
1. పరిచయం
Thank you for choosing the Makita HP457DWE 18V Cordless Hammer Drill Driver. This tool is designed for drilling in wood, metal, and plastic, as well as for hammer drilling in masonry and for screwdriving tasks. This manual provides essential information for safe operation, maintenance, and troubleshooting to ensure optimal performance and longevity of your tool.
2. సాధారణ భద్రతా సూచనలు
అగ్ని ప్రమాదాలు, విద్యుత్ షాక్ మరియు వ్యక్తిగత గాయాల ప్రమాదాన్ని తగ్గించడానికి విద్యుత్ సాధనాలను ఉపయోగిస్తున్నప్పుడు ఎల్లప్పుడూ ప్రాథమిక భద్రతా జాగ్రత్తలను అనుసరించండి.
- పని ప్రాంత భద్రత: మీ పని ప్రదేశాన్ని శుభ్రంగా మరియు బాగా వెలుతురు ఉండేలా చూసుకోండి. చిందరవందరగా లేదా చీకటిగా ఉన్న ప్రాంతాలు ప్రమాదాలను ఆహ్వానిస్తాయి. మండే ద్రవాలు, వాయువులు లేదా ధూళి వంటి పేలుడు వాతావరణాలలో విద్యుత్ ఉపకరణాలను ఆపరేట్ చేయవద్దు.
- విద్యుత్ భద్రత: పైపులు, రేడియేటర్లు, రేంజ్లు మరియు రిఫ్రిజిరేటర్లు వంటి మట్టి లేదా నేలతో కప్పబడిన ఉపరితలాలతో శరీర సంబంధాన్ని నివారించండి. వర్షం లేదా తడి పరిస్థితులకు విద్యుత్ ఉపకరణాలను బహిర్గతం చేయవద్దు.
- వ్యక్తిగత భద్రత: ఎల్లప్పుడూ కంటి రక్షణను ధరించండి. హామర్ డ్రిల్స్ను ఉపయోగించేటప్పుడు వినికిడి రక్షణను ఉపయోగించండి. సరిగ్గా దుస్తులు ధరించండి; వదులుగా ఉండే దుస్తులు లేదా ఆభరణాలను నివారించండి. పొడవాటి జుట్టును కట్టుకోండి.
- సాధన వినియోగం మరియు సంరక్షణ: పవర్ టూల్ను బలవంతంగా వాడకండి. మీ అప్లికేషన్ కోసం సరైన పవర్ టూల్ను ఉపయోగించండి. ఏవైనా సర్దుబాట్లు చేయడానికి, ఉపకరణాలను మార్చడానికి లేదా పవర్ టూల్స్ నిల్వ చేయడానికి ముందు పవర్ టూల్ నుండి బ్యాటరీ ప్యాక్ను డిస్కనెక్ట్ చేయండి.
- బ్యాటరీ సాధనం వినియోగం మరియు సంరక్షణ: తయారీదారు పేర్కొన్న ఛార్జర్తో మాత్రమే రీఛార్జ్ చేయండి. ప్రత్యేకంగా నియమించబడిన బ్యాటరీ ప్యాక్లతో మాత్రమే పవర్ టూల్స్ ఉపయోగించండి.
3. ప్యాకేజీ విషయాలు
అన్ప్యాక్ చేసిన తర్వాత అన్ని వస్తువులు ఉన్నాయని మరియు మంచి స్థితిలో ఉన్నాయని ధృవీకరించండి.
- 1 x Makita HP457DWE Cordless Hammer Drill Driver
- 2 x 18V 1.5 Ah Li-ion Batteries (BL1813G)
- 1 x DC18WA Charger
- 1 x రవాణా కేసు
- 1 x Double-ended bit (PH2 and S5 flat)
4. ఉత్పత్తి ముగిసిందిview
Familiarize yourself with the main components of your Makita HP457DWE drill driver.
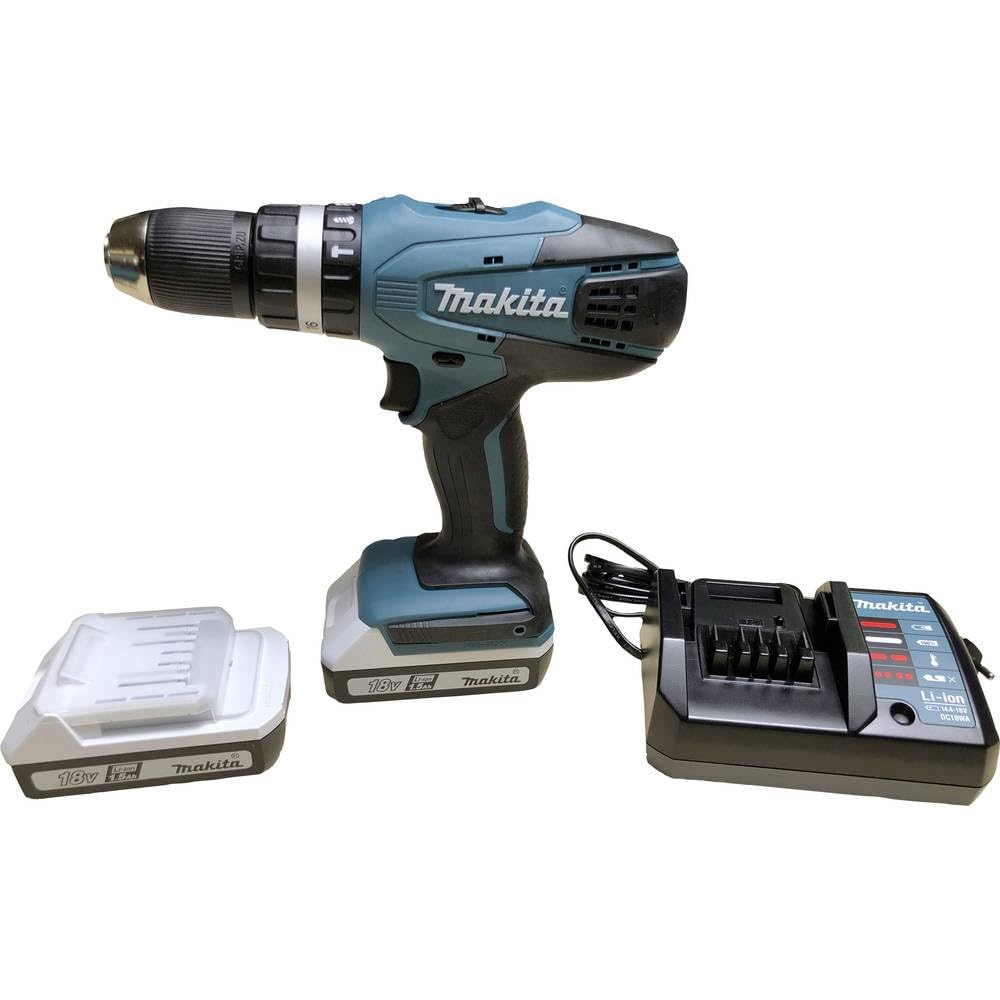
The Makita HP457DWE 18V Cordless Hammer Drill Driver, shown with its battery attached.
ముఖ్య భాగాలు:
- కీలెస్ చక్: త్వరిత మరియు సులభమైన బిట్ మార్పుల కోసం.
- టార్క్/మోడ్ సెలెక్టర్ రింగ్: Adjusts clutch settings for screwdriving or selects drilling/hammer drilling modes.
- స్పీడ్ సెలెక్టర్ స్విచ్: Allows selection between high and low-speed ranges.
- ట్రిగ్గర్ స్విచ్: సాధనాన్ని సక్రియం చేస్తుంది మరియు వేగాన్ని నియంత్రిస్తుంది.
- ఫార్వర్డ్/రివర్స్ స్విచ్: భ్రమణ దిశను మారుస్తుంది.
- బ్యాటరీ ప్యాక్: సాధనానికి శక్తిని అందిస్తుంది.

ఒక వివరణాత్మక view of the drill's keyless chuck and the adjustable torque/mode selection ring.
5. సెటప్
5.1 బ్యాటరీ ఇన్స్టాలేషన్ మరియు రిమూవల్
- ఇన్స్టాల్ చేయడానికి: Align the battery pack with the grooves in the tool's handle and slide it in until it clicks into place. Ensure it is securely latched.
- తొలగించడానికి: బ్యాటరీ ప్యాక్పై విడుదల బటన్ను నొక్కి, బ్యాటరీని సాధనం నుండి బయటకు జారండి.
5.2 బ్యాటరీ ఛార్జింగ్
Use only the specified Makita DC18WA charger for your 18V Li-ion batteries.
- ప్రామాణిక పవర్ అవుట్లెట్లో ఛార్జర్ను ప్లగ్ చేయండి.
- Insert the battery pack into the charger. The charging indicator light will show the charging status.
- A full charge typically takes approximately 60 minutes for a 1.5 Ah battery.
- ఛార్జింగ్ పూర్తయిన తర్వాత, ఛార్జర్ నుండి బ్యాటరీని తీసివేయండి.
5.3 బిట్ ఇన్స్టాలేషన్
- భద్రత కోసం సాధనం స్విచ్ ఆఫ్ చేయబడిందని మరియు బ్యాటరీ తీసివేయబడిందని నిర్ధారించుకోండి.
- దవడలు తెరవడానికి చక్ను అపసవ్య దిశలో తిప్పండి.
- డ్రిల్ బిట్ లేదా స్క్రూడ్రైవర్ బిట్ను చక్లోకి వీలైనంత వరకు చొప్పించండి.
- బిట్ చుట్టూ దవడలను గట్టిగా బిగించడానికి చక్ను సవ్యదిశలో తిప్పండి. బిట్ మధ్యలో మరియు సురక్షితంగా ఉందని నిర్ధారించుకోండి.
6. ఆపరేటింగ్ సూచనలు
6.1 ఆపరేటింగ్ మోడ్ను ఎంచుకోవడం
Rotate the torque/mode selector ring to choose the desired mode:
- Screwdriving Mode (1-16): For driving screws. Adjust the torque setting (1-16) to match the screw size and material. Lower numbers are for smaller screws or softer materials; higher numbers for larger screws or harder materials.
- Drilling Mode (Drill Symbol): సుత్తి చర్య లేకుండా కలప, లోహం లేదా ప్లాస్టిక్లోకి డ్రిల్లింగ్ చేయడానికి.
- హామర్ డ్రిల్లింగ్ మోడ్ (హామర్ సింబల్): రాతి లేదా కాంక్రీటులో డ్రిల్లింగ్ కోసం.
6.2 Selecting Speed
Use the speed selector switch located on top of the tool:
- స్థానం 1 (తక్కువ వేగం): For heavy-duty applications, large diameter drilling, or screwdriving where high torque is required.
- స్థానం 2 (హై స్పీడ్): For faster drilling in smaller diameters or lighter materials.
6.3 ముందుకు/తిరోగమనం
The forward/reverse switch is located above the trigger. Push it to the left for forward rotation (drilling/driving) and to the right for reverse rotation (removing screws or freeing jammed bits). Ensure the switch is in the center position to lock the trigger and prevent accidental startup.
6.4 సాధనాన్ని ప్రారంభించడం మరియు ఆపడం
- ప్రారంభించడానికి: Squeeze the trigger switch. The tool speed increases with increased pressure on the trigger.
- ఆపడానికి: Release the trigger switch. The electric brake will stop the chuck rotation quickly.
7. నిర్వహణ
క్రమం తప్పకుండా నిర్వహణ మీ సాధనం యొక్క దీర్ఘాయువు మరియు సురక్షితమైన ఆపరేషన్ను నిర్ధారిస్తుంది.
- శుభ్రపరచడం: వేడెక్కకుండా నిరోధించడానికి సాధనం యొక్క వెంటిలేషన్ ఓపెనింగ్లను క్రమం తప్పకుండా శుభ్రం చేయండి. మృదువైన, d ఉపయోగించండిamp బాహ్య భాగాన్ని తుడవడానికి వస్త్రం. కఠినమైన రసాయనాలు లేదా రాపిడి క్లీనర్లను ఉపయోగించవద్దు.
- చక్ నిర్వహణ: సరైన బిట్ గ్రిప్పింగ్ ఉండేలా చక్ దవడలను శుభ్రంగా మరియు శిధిలాలు లేకుండా ఉంచండి.
- బ్యాటరీ సంరక్షణ: బ్యాటరీలను చల్లని, పొడి ప్రదేశంలో ప్రత్యక్ష సూర్యకాంతికి దూరంగా నిల్వ చేయండి. పూర్తిగా డిశ్చార్జ్ చేయబడిన బ్యాటరీలను ఎక్కువసేపు నిల్వ చేయవద్దు.
- నిల్వ: When not in use, store the tool, batteries, and charger in the transport case in a secure, dry place out of reach of children.
8. ట్రబుల్షూటింగ్
సాధారణ సమస్యలు మరియు వాటి పరిష్కారాల కోసం ఈ విభాగాన్ని చూడండి.
| సమస్య | సాధ్యమైన కారణం | పరిష్కారం |
|---|---|---|
| సాధనం ప్రారంభం కాదు | Battery not charged or improperly installed; Forward/Reverse switch in center (locked) position. | Charge battery and ensure it is correctly installed; Move F/R switch to forward or reverse position. |
| తగ్గిన శక్తి లేదా పనితీరు | Low battery charge; Incorrect mode/speed/torque setting for the task. | Recharge battery; Adjust mode, speed, or torque setting appropriately. |
| బ్యాటరీ ఛార్జ్ కావడం లేదు | Charger not plugged in; Faulty battery or charger. | Check power connection; Contact Makita service for inspection. |
| చక్లో బిట్ జారిపోతుంది | Chuck not tightened sufficiently; Bit shank is dirty or damaged. | చక్ ని గట్టిగా బిగించండి; బిట్ ని శుభ్రం చేయండి లేదా మార్చండి. |
9. స్పెసిఫికేషన్లు
Technical data for the Makita HP457DWE Cordless Hammer Drill Driver.
- మోడల్ సంఖ్య: HP457DWE
- వాల్యూమ్tage: 18 వి
- బ్యాటరీ రకం: లిథియం-అయాన్
- బ్యాటరీ కెపాసిటీ: 1.5 ఆహ్
- సగటు ఛార్జింగ్ సమయం: 60 నిమిషాల
- Max. Rotation Speed: 1400 rpm
- గరిష్టంగా టార్క్: 42 Nm
- చక్ పరిమాణం: 13 మి.మీ
- స్పీడ్ల సంఖ్య: 2
- టార్క్ సెట్టింగ్లు: 16 + Drill + Hammer Drill
- డ్రిల్లింగ్ సామర్థ్యం (కలప): 36 మి.మీ
- డ్రిల్లింగ్ సామర్థ్యం (లోహం): 13 మి.మీ
- Vibration Hammer Drilling (ah): 7 మీ/సె²
- Sound Pressure (Lpa): 81 dB (A)
- Sound Power (Lwa): 92 dB (A)
- బరువు: 1.7 కిలోలు
- కొలతలు (L x W x H): 24L x 8W x 24H సెం.మీ
10. వారంటీ మరియు మద్దతు
Makita products are manufactured under strict quality control. For warranty information, service, or technical support, please refer to the official Makita website or contact your local authorized Makita service center. Keep your purchase receipt as proof of purchase for warranty claims.
మరిన్ని వివరాలకు, అధికారిక మకిటాను సందర్శించండి. webసైట్: www.makita.com