1. పరిచయం
This manual provides essential information for the safe and effective use of your CHANZON 1W Deep Red Plant Grow Light LED Chips. These high-power SMD COB emitter diodes are designed for DIY hydroponic and flower growing lamp applications, providing a deep red light spectrum (650nm-660nm) optimal for plant growth. Each pack contains 10 pieces of 1-watt LED chips.

Image 1.1: A single CHANZON 1W Deep Red LED chip, showing its compact design and the deep red light it emits.
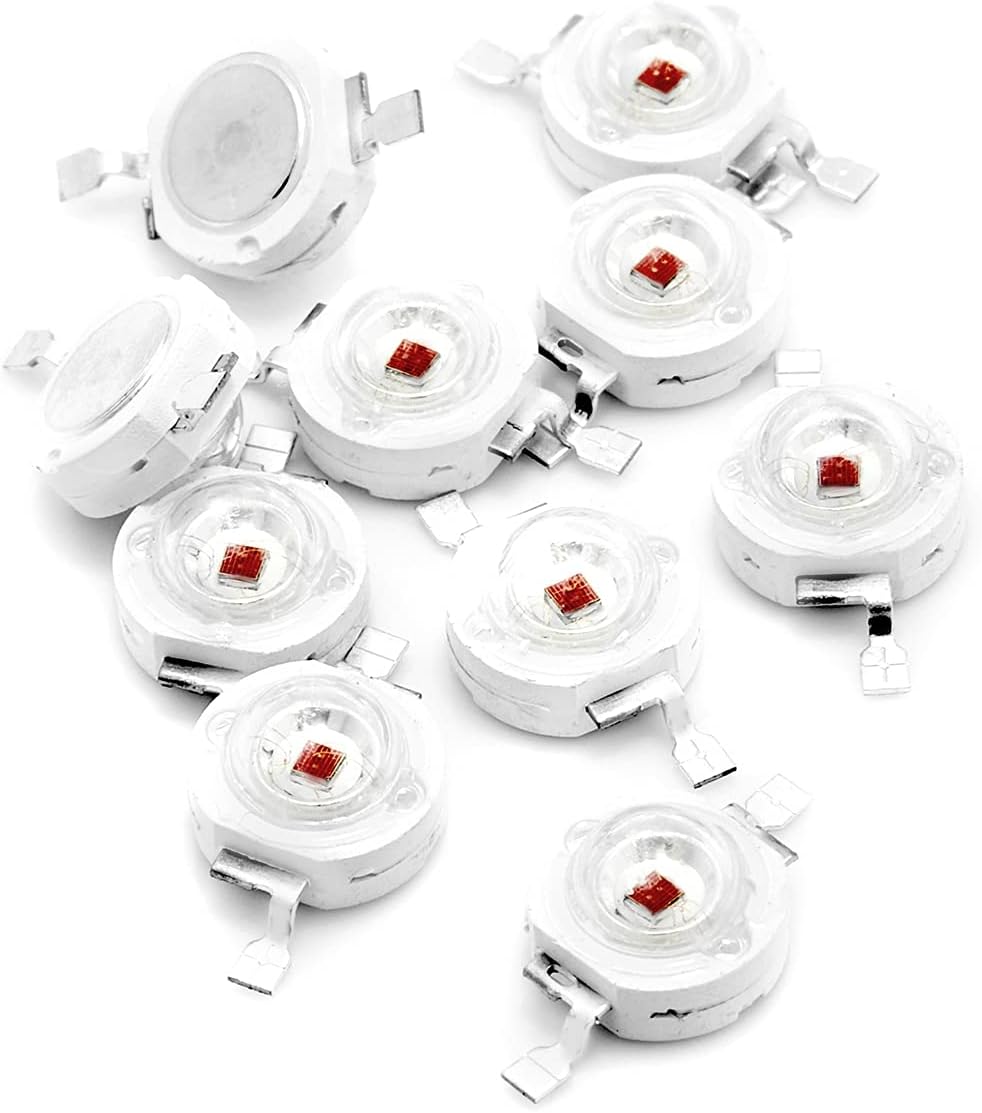
Image 1.2: A pack of 10 CHANZON 1W Deep Red LED chips, as supplied for DIY projects.
2. భద్రతా సమాచారం
Please read and understand all safety instructions before installing or operating the LED chips. Failure to follow these instructions may result in electric shock, fire, or serious injury.
- వేడి నిర్వహణ: These high-power LEDs generate heat. Ensure the working temperature remains below 60°C (140°F) by using an adequate heat sink system. Prolonged operation without proper heat dissipation will significantly reduce the lifespan of the LED and may cause failure.
- విద్యుత్ సరఫరా: Always use a constant current LED driver that matches the recommended current (300mA-350mA) and voltage (2.0V-2.2V) specifications for these 1W LEDs. Using an incorrect power supply can damage the LEDs.
- ధ్రువణత: Observe correct polarity when connecting the LEDs. The side with the "-" mark is the cathode, and the other side is the anode. Incorrect polarity will prevent the LED from lighting up and may cause damage.
- కంటి రక్షణ: The light emitted by these LEDs is very bright. Avoid looking directly into the illuminated LED chip to prevent potential eye strain or damage.
- విద్యుత్ భద్రత: Ensure all electrical connections are secure and insulated to prevent short circuits. If you are unsure about electrical wiring, consult a qualified electrician.
3. స్పెసిఫికేషన్లు
The following table details the technical specifications for the CHANZON 1W Deep Red Plant Grow Light LED Chips:
| ఫీచర్ | స్పెసిఫికేషన్ |
|---|---|
| బ్రాండ్ | చాన్జోన్ |
| మోడల్ సంఖ్య | 10DGL-DZ-1W-660 |
| ఒక్కో ప్యాక్కి పరిమాణం | 10 ముక్కలు |
| శక్తి | 1 వాట్ (గరిష్టంగా) |
| ఎమిటింగ్ కలర్ | ముదురు ఎరుపు |
| తరంగదైర్ఘ్యం | 650nm - 660nm |
| సిఫార్సు చేయబడిన కరెంట్ | 300mA - 350mA |
| ఫార్వర్డ్ వాల్యూమ్tage | డిసి 2.0 వి - 2.2 వి |
| ప్రకాశించే ఫ్లక్స్ | 70-80LM |
| Emitting Angle | 120-140 డిగ్రీలు |
| చిప్ రకం | SMD COB Emitter Diode (30mil chips) |
| అంతర్గత నిర్మాణం | Double Golden Wire (99.99%), Copper Frame |
| సగటు జీవిత కాలం | 50,000 Hours (with proper heat management) |
| మెటీరియల్ రకం | అల్యూమినియం |
| అంశం ఆకారం | వృత్తాకారము |

Image 3.1: General specification table for various 1W LED chip colors, including Deep Red.

Image 3.2: Detailed dimensions of the 1W LED chip, showing measurements in millimeters.
4. సెటప్
Proper setup is crucial for the performance and longevity of your LED chips.
4.1 Required Components (Not Included)
- Constant Current LED Driver: Essential for providing stable power. Recommended drivers (search on Amazon):
- 300mA Aluminum Case Waterproof: B01MYBFR7U
- 300mA Plastic Case: B01N25KD0R
- 300mA No Case (PCB Board only): B01MUDW3VF
- Heat Sink System: A heat sink is mandatory to dissipate heat and maintain the LED's operating temperature below 60°C. Recommended accessory (search on Amazon):
- LED Heat Sink Star Aluminum Base Plate: B06XKPNRWL
- Thermal Grease/Paste: Apply between the LED chip and the heat sink for efficient heat transfer.
- వైరింగ్: Appropriate electrical wires for connections.
4.2 సంస్థాపనా దశలు
- Prepare the Heat Sink: Ensure the heat sink surface is clean and flat.
- థర్మల్ పేస్ట్ వర్తించు: Apply a thin, even layer of thermal grease or paste to the back of the LED chip or the contact area on the heat sink.
- Mount the LED: Securely attach the LED chip to the heat sink. Ensure good contact for optimal heat transfer.
- వైరింగ్ కనెక్ట్ చేయండి: Identify the anode (+) and cathode (-) terminals on the LED chip. The cathode is marked with a "-". Connect the positive output of the constant current LED driver to the LED's anode and the negative output to the LED's cathode.
- కనెక్షన్లను ధృవీకరించండి: Double-check all connections for correct polarity and secure wiring.

Image 4.1: Illustration of the 1W LED chip's internal structure, showing the copper holder, gold wires, and polarity markings (cathode '-' and anode '+').
5. ఆపరేటింగ్ సూచనలు
Once properly installed, operating the LED chips is straightforward.
- పవర్ ఆన్: Connect the constant current LED driver to its power source. The LED chips should illuminate.
- మానిటర్ ఉష్ణోగ్రత: During operation, periodically check the temperature of the heat sink. It should not feel excessively hot to the touch. If it is too hot, the heat sink may be insufficient, or the LED driver might be supplying too much current.
- లైట్ అవుట్పుట్: The deep red light (650nm-660nm) is specifically chosen to support plant photosynthesis, particularly during the flowering and fruiting stages.

Image 5.1: The characteristic deep red light emitted by the 660nm LED chip when powered on.
6. నిర్వహణ
Minimal maintenance is required to ensure optimal performance and lifespan of your LED chips.
- శుభ్రపరచడం: Keep the surface of the LED chip and heat sink free from dust and debris. Use a soft, dry cloth for cleaning. Do not use abrasive cleaners or solvents.
- Heat Sink Inspection: Periodically inspect the heat sink for any obstructions that might impede airflow or heat dissipation.
- కనెక్షన్ తనిఖీ: అన్ని విద్యుత్ కనెక్షన్లు సురక్షితంగా మరియు తుప్పు పట్టకుండా ఉండేలా చూసుకోండి.
7. ట్రబుల్షూటింగ్
If you encounter issues with your LED chips, refer to the following troubleshooting guide:
| సమస్య | సాధ్యమైన కారణం | పరిష్కారం |
|---|---|---|
| LED వెలిగించదు | తప్పు ధ్రువణత Faulty power supply/driver వదులుగా ఉన్న కనెక్షన్ Damaged LED chip | Check and correct polarity (+ to +, - to -). Verify the constant current LED driver is functioning and providing correct output. అన్ని విద్యుత్ కనెక్షన్లను భద్రపరచండి. Replace the LED chip if damaged. |
| LED overheats rapidly | Insufficient heat sink No thermal paste Overcurrent from driver | Ensure an appropriately sized heat sink is used. Apply thermal paste between LED and heat sink. Verify the LED driver output current matches the LED's specifications (300mA-350mA). |
| LED ముందుగానే విఫలమవుతుంది | Consistent overheating వాల్యూమ్tage/current spikes Poor quality power supply | Improve heat dissipation (larger heat sink, better thermal paste). Use a stable, high-quality constant current LED driver. Ensure operating conditions are within specified limits. |
8. వారంటీ మరియు మద్దతు
Specific warranty information for this product is not provided in the available product data. For any support inquiries, technical assistance, or questions regarding warranty, please contact CHANZON directly through their official channels or the retailer from whom the product was purchased.