
1. పరిచయం
The Datavideo HRS-30 is a versatile portable recorder and integrated 10.1-inch monitor designed for professional field recording and playback applications. This device supports both HD and SD video equipment, accepting signals via HD/SD-SDI inputs. It is compatible with various video formats including 1080i, 720p, 576i, and 480i.
The HRS-30 offers flexible recording formats, including MPEG-II Long-GOP or intra-frame (i-frame) with 4:2:2 color sampling. Recorded files are stored in the MXF/OP1A format, ensuring compatibility with a wide range of Non-Linear Editing (NLE) systems and playout solutions. Storage is facilitated by a removable caddy, compatible with standard 2.5-inch HDD and SSD drives.
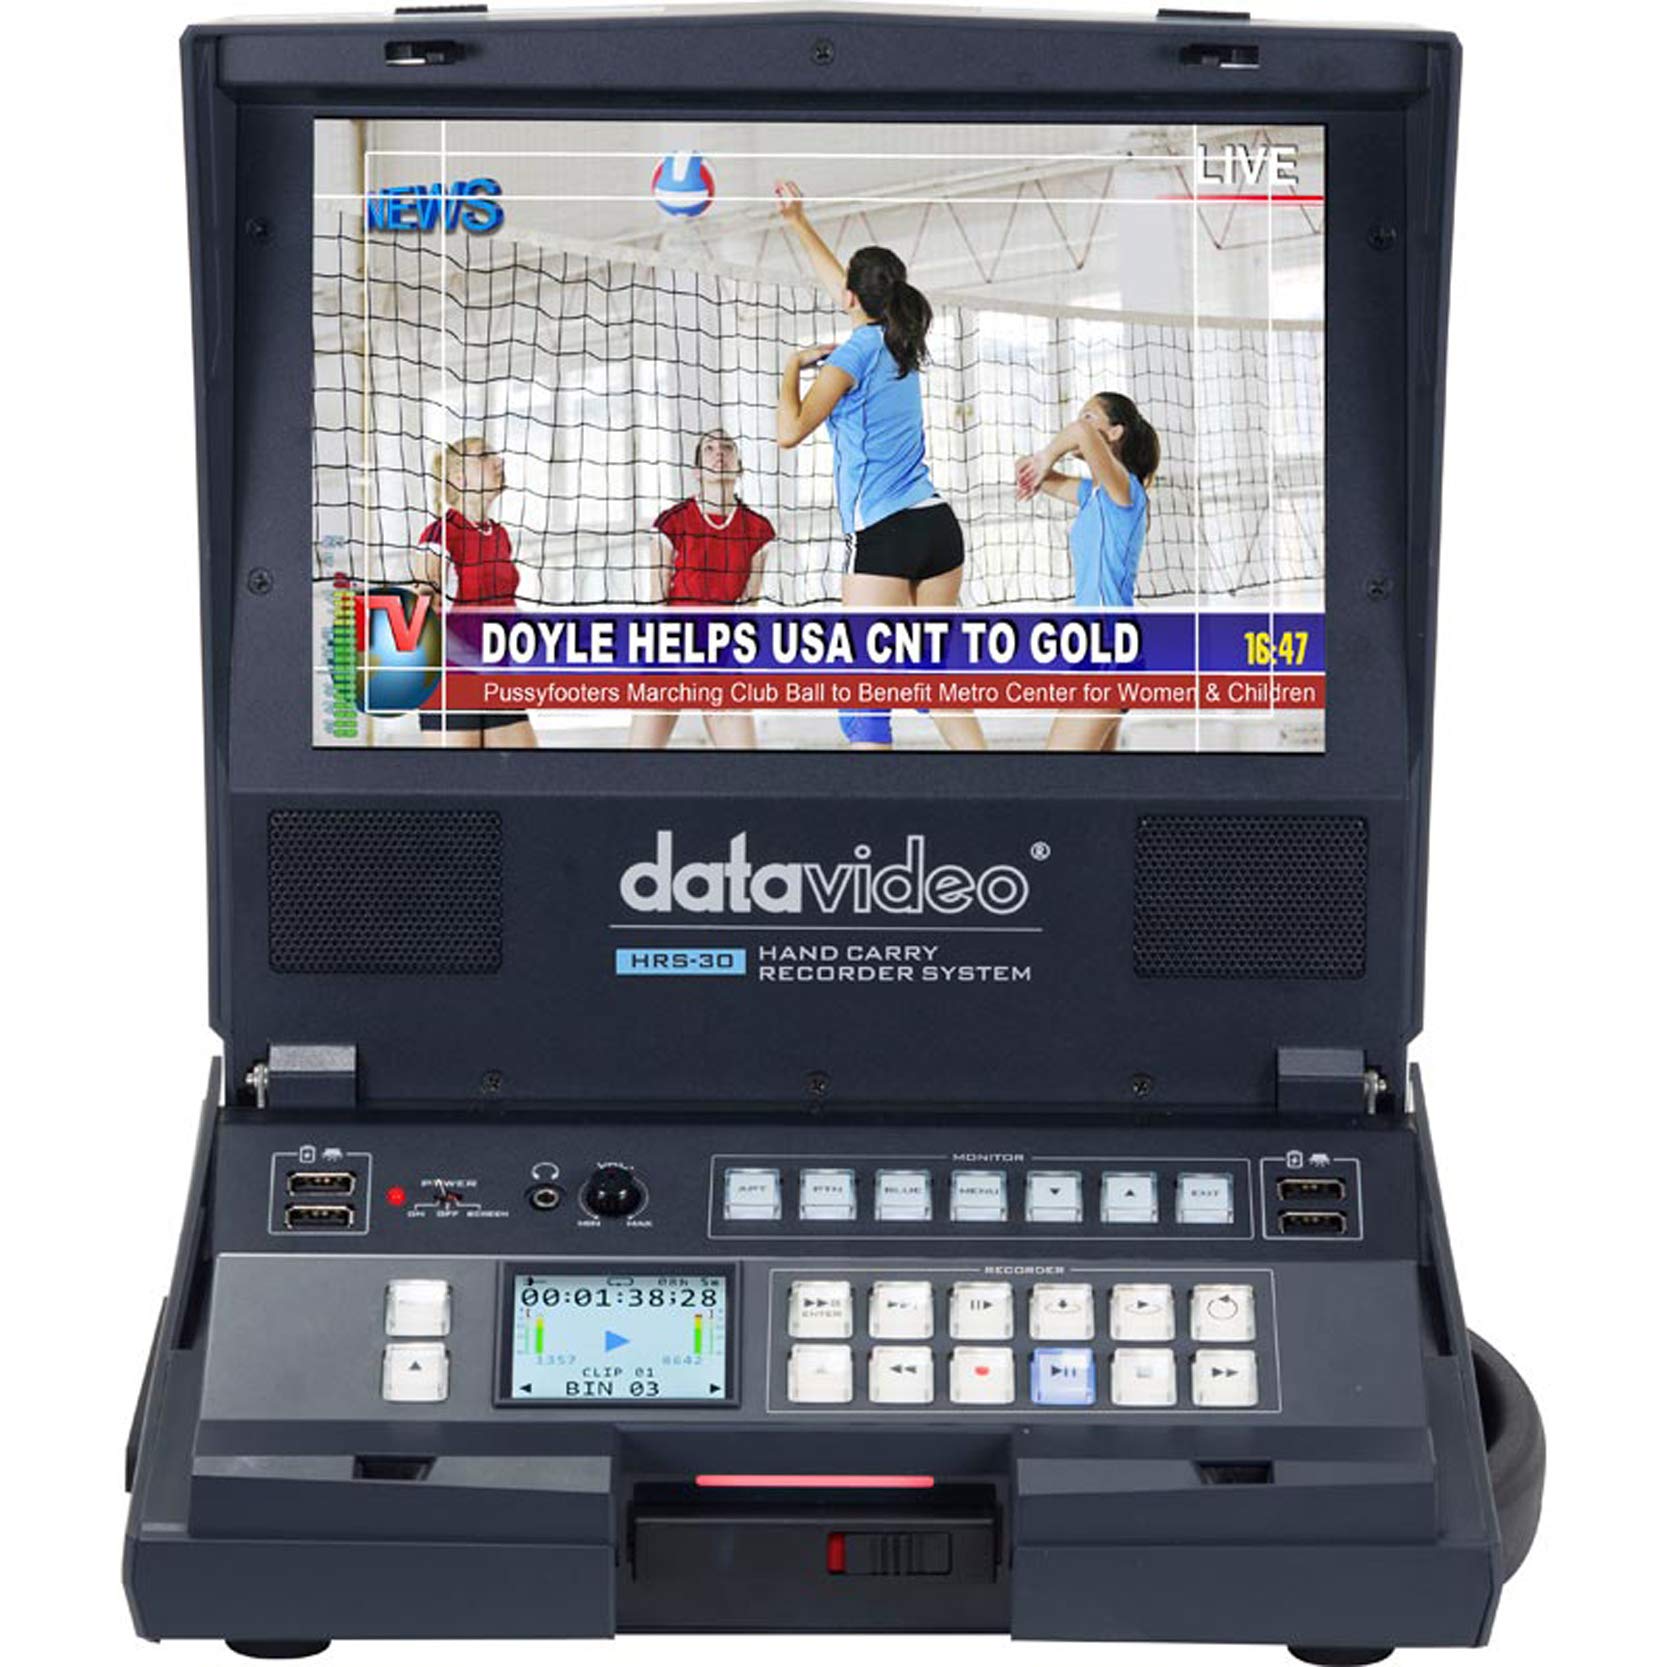
మూర్తి 1.1: ముందు view of the Datavideo HRS-30 Portable Recorder Monitor, showing the integrated screen and control interface.
2. భద్రతా సమాచారం
Please read and understand all safety instructions before operating the HRS-30. Failure to follow these instructions may result in electric shock, fire, or damage to the unit.
- శక్తి మూలం: Use only the specified power adapter and ensure the voltage యూనిట్ అవసరాలకు అనుగుణంగా ఉంటుంది.
- వెంటిలేషన్: వెంటిలేషన్ ఓపెనింగ్లను నిరోధించవద్దు. వేడెక్కకుండా నిరోధించడానికి యూనిట్ చుట్టూ తగినంత గాలి ప్రవాహాన్ని నిర్ధారించుకోండి.
- నీరు మరియు తేమ: Do not expose the unit to rain, moisture, or immerse it in water.
- సర్వీసింగ్: ఈ ఉత్పత్తిని మీరే సేవ చేయడానికి ప్రయత్నించవద్దు. అర్హత కలిగిన సేవా సిబ్బందికి అన్ని సర్వీసులను చూడండి.
- ప్లేస్మెంట్: యూనిట్ను స్థిరమైన, సమతల ఉపరితలంపై ఉంచండి. ప్రత్యక్ష సూర్యకాంతిలో లేదా ఉష్ణ వనరుల దగ్గర ఉంచకుండా ఉండండి.
3. ప్యాకేజీ విషయాలు
Verify that all items are present in the package. If any items are missing or damaged, contact your dealer immediately.
- Datavideo HRS-30 Portable Recorder Monitor Unit
- పవర్ అడాప్టర్
- Removable Caddy for 2.5" HDD/SSD
- వినియోగదారు మాన్యువల్ (ఈ పత్రం)
- Additional accessories as specified by your retailer
4. సెటప్
Follow these steps to set up your HRS-30 unit for operation.
4.1 Installing Storage Media
- Ensure the HRS-30 is powered off.
- Locate the removable caddy slot on the unit.
- Insert a compatible 2.5-inch HDD or SSD into the removable caddy.
- Slide the caddy with the installed drive into the HRS-30's caddy slot until it clicks securely into place.
4.2 కనెక్ట్ పవర్
- Connect the power adapter to the DC IN 12V port on the rear of the HRS-30.
- పవర్ అడాప్టర్ను తగిన ఎలక్ట్రికల్ అవుట్లెట్లోకి ప్లగ్ చేయండి.
- Press the POWER switch on the rear panel to turn on the unit.
4.3 వీడియో మరియు ఆడియో కనెక్షన్లు
The HRS-30 supports various input and output connections. Refer to the rear panel diagram for port locations.
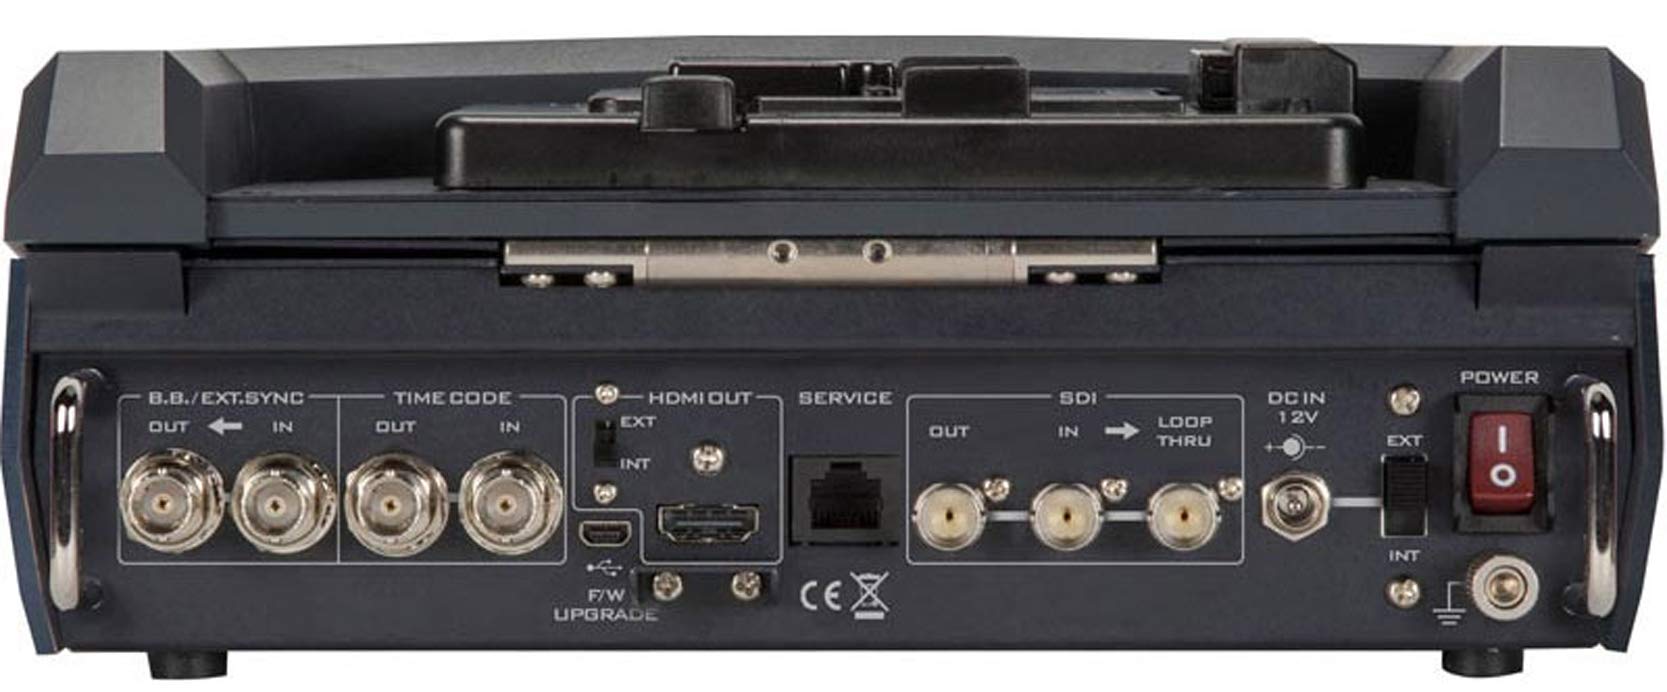
Figure 4.1: Rear panel connections of the Datavideo HRS-30, including SDI, HDMI, Timecode, and Power inputs/outputs.
- SDI ఇన్పుట్: Connect your HD/SD-SDI video source to the SDI IN port. The unit also features an SDI LOOP THRU for connecting to another device.
- HDMI అవుట్పుట్: Connect an external monitor or display to the HDMI OUT port for video monitoring.
- టైమ్కోడ్: Use the TIME CODE IN/OUT ports for external timecode synchronization.
- BB/EXT.SYNC: Connect Black Burst or external sync signals to the BB/EXT.SYNC IN/OUT ports.
- సర్వీస్ పోర్ట్: For firmware upgrades and maintenance.
5. ఆపరేటింగ్ సూచనలు
This section details the basic operation of the HRS-30 for recording and playback.
5.1 Powering On and Initial Screen
- Ensure all necessary connections are made and the storage caddy is installed.
- వెనుక ప్యానెల్లోని పవర్ స్విచ్ను 'ఆన్' స్థానానికి తిప్పండి.
- The integrated 10.1-inch monitor will display the boot-up sequence, followed by the live video input or the last recorded clip.
5.2 రికార్డింగ్ వీడియో
The HRS-30 records video from HD/SD-SDI sources in various formats.
- ఇన్పుట్ని ఎంచుకోండి: Use the control panel buttons to select the desired SDI input source.
- మానిటర్ ఇన్పుట్: Verify the incoming video signal on the integrated monitor.
- రికార్డింగ్ ప్రారంభించండి: నొక్కండి REC button on the control panel to begin recording. The recording indicator will illuminate.
- రికార్డింగ్ ఆపివేయి: నొక్కండి ఆపు button to end the recording. The recording indicator will turn off.
The HRS-30 supports recording in MPEG-II Long-GOP or intra-frame (i-frame) with 4:2:2 color sampling, producing MXF/OP1A files.
5.3 ప్లేబ్యాక్
తిరిగిview recorded content:
- Access Playback Mode: Use the navigation buttons to enter playback mode.
- క్లిప్ను ఎంచుకోండి: Browse through your recorded clips using the navigation controls.
- ప్లేబ్యాక్ ప్రారంభించండి: నొక్కండి ఆడండి button to start playback of the selected clip.
- ప్లేబ్యాక్ని నియంత్రించండి: ఉపయోగించండి పాజ్ చేయండి, FFW (ఫాస్ట్ ఫార్వర్డ్), మరియు REW (Rewind) buttons to control playback.
5.4 మెనూ నావిగేషన్
The HRS-30 features an on-screen menu system for configuring settings such as video format, recording quality, audio settings, and system preferences. Use the MENU button and directional arrows to navigate, and the ENTER button to confirm selections.
6. నిర్వహణ
Proper maintenance ensures the longevity and optimal performance of your HRS-30.
- శుభ్రపరచడం: Use a soft, dry cloth to clean the exterior of the unit. For the screen, use a specialized screen cleaning solution and a microfiber cloth. Do not use abrasive cleaners or solvents.
- నిల్వ: When not in use, store the HRS-30 in a cool, dry place, away from direct sunlight and extreme temperatures.
- ఫర్మ్వేర్ నవీకరణలు: Periodically check the Datavideo website for firmware updates to ensure your unit has the latest features and bug fixes. Follow the instructions provided with the firmware update carefully.
7. ట్రబుల్షూటింగ్
This section addresses common issues you might encounter with the HRS-30.
| సమస్య | సాధ్యమైన కారణం | పరిష్కారం |
|---|---|---|
| యూనిట్ పవర్ ఆన్ చేయదు | No power, faulty adapter, power switch off | Check power cable connection, verify power outlet, ensure power switch is ON. |
| No video on screen | Incorrect input selected, no signal from source, faulty cable | Select correct input, check video source, replace SDI/HDMI cable. |
| రికార్డ్ చేయలేరు | No storage media, full storage, media error | Ensure caddy with drive is installed, check available storage space, format or replace drive if necessary. |
| Playback issues | అవినీతిపరుడు file, incompatible format | Try playing another clip. Ensure recorded fileలు అవినీతికి గురికావు. |
8. స్పెసిఫికేషన్లు
Detailed technical specifications for the Datavideo HRS-30.
- మోడల్: హెచ్ఆర్ఎస్ -30
- కనిపించే స్క్రీన్ వికర్ణం: 10 అంగుళాలు / 26 సెం.మీ
- ఉత్పత్తి కొలతలు: 10.83 x 10.24 x 3.94 అంగుళాలు (27.5 x 26 x 10 సెం.మీ.)
- వస్తువు బరువు: 7.92 పౌండ్లు (3.6 కిలోలు)
- వీడియో ఇన్పుట్లు: HD/SD-SDI
- వీడియో అవుట్పుట్లు: HDMI, SDI Loop Thru
- మద్దతు ఉన్న వీడియో ఫార్మాట్లు: 1080i, 720p, 576i, 480i
- రికార్డింగ్ ఫార్మాట్లు: MPEG-II Long-GOP, Intra-frame (i-frame) with 4:2:2 color sampలింగ్
- File ఫార్మాట్: MXF/OP1A
- నిల్వ మీడియా: Removable caddy for 2.5" HDD & SSD drives
- తయారీదారు: డేటావీడియో
- మొదటి తేదీ అందుబాటులో ఉంది: మార్చి 23, 2016
9. వారంటీ మరియు మద్దతు
For warranty information and technical support, please refer to the official Datavideo website or contact your authorized Datavideo dealer. Keep your purchase receipt as proof of purchase for warranty claims.