
పరిచయం
The UNI-T UT151C is a high-reliability handheld digital multimeter designed for precise electrical measurements. It functions as a multimeter, LCR meter, and temperature tester, capable of measuring DC/AC voltage, DC/AC current, resistance, capacitance, and temperature. This manual provides essential information for the safe and effective operation, setup, and maintenance of your UT151C device.
భద్రతా సమాచారం
హెచ్చరిక: To avoid electric shock or personal injury, read all safety information before using this product. Use the product only as specified in this manual, or the protection provided by the product may be impaired.
- Always ensure the test leads are in good condition and properly connected.
- రేట్ చేయబడిన వాల్యూమ్ కంటే ఎక్కువ వర్తించవద్దుtagఇ, మీటర్పై, టెర్మినల్స్ మధ్య లేదా ఏదైనా టెర్మినల్ మరియు ఎర్త్ గ్రౌండ్ మధ్య గుర్తించినట్లుగా.
- వాల్యూమ్తో పని చేస్తున్నప్పుడు చాలా జాగ్రత్తగా ఉండండిtag30V AC RMS, 42V పీక్ లేదా 60V DC కంటే ఎక్కువ. ఈ వాల్యూమ్లుtagషాక్ ప్రమాదాన్ని కలిగిస్తుంది.
- Before measuring current, ensure the circuit is de-energized and the meter is connected in series.
- విధులను మార్చడానికి ముందు, పరీక్షలో ఉన్న సర్క్యూట్ నుండి టెస్ట్ లీడ్లను డిస్కనెక్ట్ చేయండి.
- Do not operate the meter with the case open or if the battery cover is not securely closed.
- ఖచ్చితమైన రీడింగ్లను నిర్ధారించడానికి తక్కువ బ్యాటరీ సూచిక కనిపించిన వెంటనే బ్యాటరీని మార్చండి.
ఉత్పత్తి ముగిసిందిview
Familiarize yourself with the components of your UNI-T UT151C Digital Multimeter.
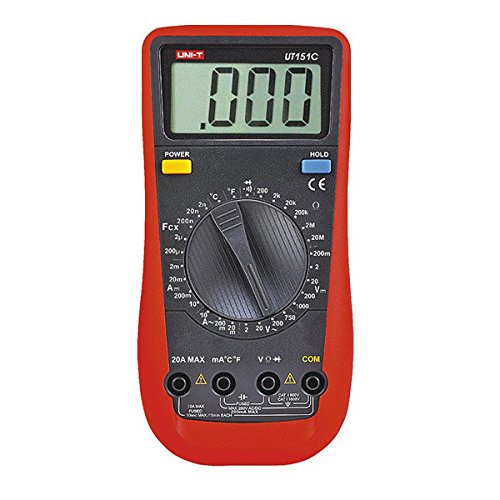
మూర్తి 1: ముందు view of the UNI-T UT151C Digital Multimeter. This image displays the LCD screen, the central rotary function switch, and the input terminals at the bottom. The 'HOLD' button is visible on the right side of the display.
- LCD డిస్ప్లే: కొలత రీడింగ్లు, యూనిట్లు మరియు ఫంక్షన్ సూచికలను చూపుతుంది.
- Function Rotary Switch: Used to select the desired measurement function (e.g., V~, V-, A~, A-, Ω, F, °C/°F, Diode, Continuity).
- ఇన్పుట్ జాక్స్: Terminals for connecting test leads. Typically include COM (common), VΩmA (voltage, resistance, small current), and 20A (high current).
- హోల్డ్ బటన్: డిస్ప్లేపై ప్రస్తుత రీడింగ్ను స్తంభింపజేస్తుంది.
- పవర్ బటన్: పరికరాన్ని ఆన్ లేదా ఆఫ్ చేస్తుంది.
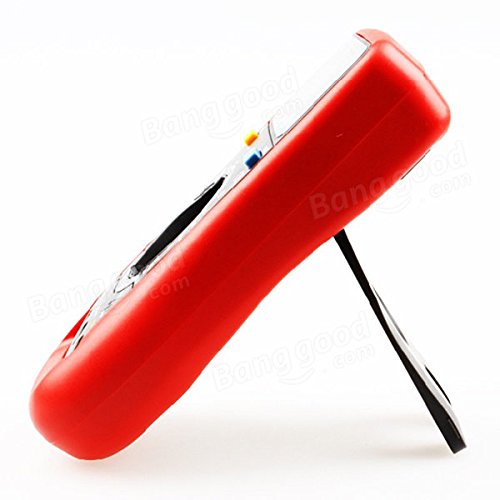
మూర్తి 2: వైపు view of the UNI-T UT151C Digital Multimeter. This image highlights the integrated kickstand, allowing the meter to be propped up for easier viewఉపయోగం సమయంలో.
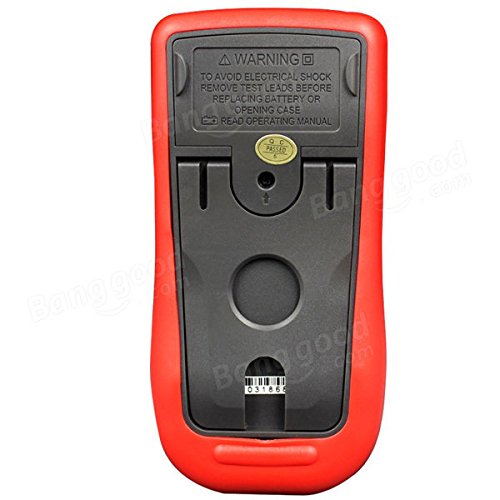
మూర్తి 3: వెనుకకు view of the UNI-T UT151C Digital Multimeter. This image shows the battery compartment cover and important safety warnings regarding electrical shock and battery replacement.
సెటప్
1. బ్యాటరీ ఇన్స్టాలేషన్
The UNI-T UT151C requires a 9V (6F22) battery for operation. The battery is not included.
- Ensure the multimeter is powered off and disconnect any test leads.
- Locate the battery compartment on the back of the meter (refer to Figure 3).
- రిటైనింగ్ స్క్రూ(లు) విప్పు మరియు బ్యాటరీ కవర్ను తీసివేయండి.
- సరైన ధ్రువణతను గమనిస్తూ, కొత్త 9V బ్యాటరీని బ్యాటరీ క్లిప్లకు కనెక్ట్ చేయండి.
- బ్యాటరీని కంపార్ట్మెంట్లో ఉంచి కవర్ను భర్తీ చేసి, దానిని స్క్రూ(లు)తో భద్రపరచండి.
గమనిక: Replace the battery immediately when the low battery indicator appears on the display to maintain measurement accuracy.
2. టెస్ట్ లీడ్లను కనెక్ట్ చేయడం
ఎల్లప్పుడూ బ్లాక్ టెస్ట్ లీడ్ను దీనికి కనెక్ట్ చేయండి COM (common) jack. Connect the red test lead to the appropriate input jack based on the measurement type:
- వాల్యూమ్ కోసంtage, resistance, capacitance, diode, continuity, and temperature measurements, connect the red lead to the VΩmA జాక్.
- For current measurements up to 200mA, connect the red lead to the VΩmA జాక్.
- For current measurements up to 20A, connect the red lead to the 20A జాక్.
జాగ్రత్త: Incorrect lead connection can damage the meter or the circuit under test.
ఆపరేటింగ్ సూచనలు
Follow these steps for various measurement functions.
1. పవర్ ఆన్/ఆఫ్
నొక్కండి శక్తి button to turn the multimeter on. The meter features an auto power-off function to conserve battery life. To turn it off manually, press the శక్తి మళ్ళీ బటన్.
2. DC వాల్యూమ్ను కొలవడంtagఇ (V-)
- బ్లాక్ లీడ్ని కనెక్ట్ చేయండి COM and the red lead to VΩmA.
- Set the rotary switch to the desired V- range (e.g., 2V, 20V, 200V, 1000V). If the voltage తెలియదు, అత్యధిక పరిధితో ప్రారంభించి, అవసరమైన విధంగా తగ్గించండి.
- కొలవవలసిన భాగం లేదా సర్క్యూట్ అంతటా పరీక్ష లీడ్లను సమాంతరంగా కనెక్ట్ చేయండి.
- సంపుటాన్ని చదవండిtagఎల్సిడి డిస్ప్లేపై ఇ విలువ.
3. AC వాల్యూమ్ను కొలవడంtagఇ (V~)
- బ్లాక్ లీడ్ని కనెక్ట్ చేయండి COM and the red lead to VΩmA.
- Set the rotary switch to the desired V~ range (e.g., 2V, 20V, 200V, 750V).
- Connect the test leads in parallel across the AC source or component.
- AC వాల్యూమ్ చదవండిtagఎల్సిడి డిస్ప్లేపై ఇ విలువ.
4. Measuring DC Current (A-)
- జాగ్రత్త: Always connect the meter in series with the circuit. Never connect it in parallel across a voltage source when measuring current.
- సర్క్యూట్కు శక్తిని డిస్కనెక్ట్ చేయండి.
- Break the circuit at the point where current is to be measured.
- For currents up to 200mA, connect the black lead to COM and the red lead to VΩmA.
- For currents up to 20A, connect the black lead to COM and the red lead to 20A.
- Set the rotary switch to the appropriate A- పరిధి.
- Connect the test leads to complete the circuit.
- Apply power to the circuit and read the DC current value.
5. Measuring AC Current (A~)
- Follow the same safety precautions and connection steps as for DC Current measurement.
- Set the rotary switch to the appropriate A~ పరిధి.
- Apply power to the circuit and read the AC current value.
6. Measuring Resistance (Ω)
- Ensure the circuit or component is completely de-energized before measuring resistance.
- బ్లాక్ లీడ్ని కనెక్ట్ చేయండి COM and the red lead to VΩmA.
- రోటరీ స్విచ్ను సెట్ చేయండి Ω తెలుగు in లో పరిధి.
- పరీక్ష లీడ్లను కాంపోనెంట్ అంతటా కనెక్ట్ చేయండి.
- ప్రదర్శనలో నిరోధక విలువను చదవండి.
7. Measuring Capacitance (F)
- Ensure the capacitor is fully discharged before measurement to prevent damage to the meter.
- బ్లాక్ లీడ్ని కనెక్ట్ చేయండి COM and the red lead to VΩmA.
- రోటరీ స్విచ్ను సెట్ చేయండి F (Capacitance) range.
- కెపాసిటర్ టెర్మినల్స్ అంతటా టెస్ట్ లీడ్లను కనెక్ట్ చేయండి.
- డిస్ప్లేలో కెపాసిటెన్స్ విలువను చదవండి.
8. Measuring Temperature (°C/°F)
- Connect the temperature probe (if included and compatible) to the COM మరియు VΩmA జాక్స్, ధ్రువణతను గమనించడం.
- రోటరీ స్విచ్ను సెట్ చేయండి °C or °F స్థానం.
- ఉష్ణోగ్రతను కొలవవలసిన వస్తువుపై లేదా సమీపంలో ఉష్ణోగ్రత ప్రోబ్ యొక్క కొనను ఉంచండి.
- డిస్ప్లేపై ఉష్ణోగ్రత విలువను చదవండి.
9. డయోడ్ టెస్ట్
- డయోడ్ సర్క్యూట్ నుండి డిస్కనెక్ట్ చేయబడిందని నిర్ధారించుకోండి.
- బ్లాక్ లీడ్ని కనెక్ట్ చేయండి COM and the red lead to VΩmA.
- రోటరీ స్విచ్ను సెట్ చేయండి డయోడ్ చిహ్నం.
- Connect the red lead to the anode and the black lead to the cathode of the diode. A forward voltage drop (e.g., 0.5V to 0.8V for silicon diodes) will be displayed.
- లీడ్లను రివర్స్ చేయండి. మంచి డయోడ్ కోసం డిస్ప్లే "OL" (ఓపెన్ లూప్) చూపించాలి.
10. కంటిన్యుటీ టెస్ట్
- సర్క్యూట్ లేదా భాగం డి-ఎనర్జైజ్ చేయబడిందని నిర్ధారించుకోండి.
- బ్లాక్ లీడ్ని కనెక్ట్ చేయండి COM and the red lead to VΩmA.
- రోటరీ స్విచ్ను సెట్ చేయండి కొనసాగింపు symbol (often shared with Diode test).
- కాంపోనెంట్ లేదా సర్క్యూట్ మార్గంలో పరీక్ష లీడ్లను కనెక్ట్ చేయండి.
- If there is continuity (low resistance), the buzzer will sound, and a low resistance value will be displayed. "OL" indicates an open circuit.
11. డేటా హోల్డ్ ఫంక్షన్
నొక్కండి పట్టుకోండి డిస్ప్లేలో ప్రస్తుత రీడింగ్ను స్తంభింపజేయడానికి బటన్ను నొక్కండి. హోల్డ్ను విడుదల చేయడానికి మరియు ప్రత్యక్ష కొలతలను తిరిగి ప్రారంభించడానికి దాన్ని మళ్ళీ నొక్కండి.
నిర్వహణ
Proper maintenance ensures the longevity and accuracy of your multimeter.
- శుభ్రపరచడం: ప్రకటనతో కేసును తుడిచివేయండిamp వస్త్రం మరియు తేలికపాటి డిటర్జెంట్. అబ్రాసివ్లు లేదా ద్రావకాలను ఉపయోగించవద్దు.
- బ్యాటరీ భర్తీ: Replace the 9V battery when the low battery indicator appears. Refer to the "Battery Installation" section for instructions.
- ఫ్యూజ్ ప్రత్యామ్నాయం: If the current measurement function fails, the fuse may need replacement. This typically requires opening the back case. Refer to the safety warnings on the back of the meter (Figure 3) and consult a qualified technician if unsure. Use only fuses of the specified type and rating.
- నిల్వ: If the meter is not used for an extended period, remove the battery to prevent leakage. Store the meter in a cool, dry place, away from direct sunlight and extreme temperatures.
ట్రబుల్షూటింగ్
If you encounter issues with your UNI-T UT151C, refer to the following common problems and solutions:
| సమస్య | సాధ్యమైన కారణం | పరిష్కారం |
|---|---|---|
| డిస్ప్లే లేదు లేదా మసక డిస్ప్లే | డెడ్ లేదా తక్కువ బ్యాటరీ | 9 వి బ్యాటరీని మార్చండి. |
| "OL" (ఓవర్లోడ్) ప్రదర్శించబడింది | కొలత ఎంచుకున్న పరిధిని లేదా ఓపెన్ సర్క్యూట్ను మించిపోయింది | Select a higher range or check for an open circuit in the component/leads. |
| సరికాని రీడింగ్లు | Incorrect function selected, poor lead connection, or low battery | Verify function selection, ensure leads are securely connected, or replace battery. |
| కరెంట్ కొలత పనిచేయడం లేదు | ఎగిరిన ఫ్యూజ్ | Replace the fuse (refer to Maintenance section). |
స్పెసిఫికేషన్లు
Technical specifications for the UNI-T UT151C Digital Multimeter.
| ఫీచర్ | స్పెసిఫికేషన్ |
|---|---|
| మోడల్ | UT151C (Internal Model: 365BG1060568) |
| DC సంtagఇ (వి) | 200mV/2V/20V/200V/1000V; ±(0.5%+1) |
| AC వాల్యూమ్tagఇ (వి) | 2V/20V/200V/750V; ±(0.8%+3) |
| DC కరెంట్ (A) | 2mA/20mA/200mA/20A; ±(0.8%+1) |
| ఎసి కరెంట్ (ఎ) | 20mA/200mA/20A; ±(1%+3) |
| ప్రతిఘటన (Ω) | 200Ω/2KΩ/20KΩ/200KΩ/2MΩ/20MΩ; ±(1%+2) |
| కెపాసిటెన్స్ (F) | 2nF/20nF/200nF/2µF/100µF; ±(4%+3) |
| ఉష్ణోగ్రత (°C) | -40°C ~ 1000°C; ±(1%+3) |
| ఉష్ణోగ్రత (°F) | -40°F ~ 1832°F; ±(1%+4) |
| డిస్ప్లే కౌంట్ | 1999 |
| మాన్యువల్ పరిధి | అవును |
| డయోడ్ టెస్ట్ | అవును |
| ఆటో పవర్ ఆఫ్ | అవును |
| కంటిన్యుటీ బజర్ | అవును |
| తక్కువ బ్యాటరీ సూచిక | అవును |
| డేటా హోల్డ్ | అవును |
| Input Impedance for DC Voltage | ≥10MΩ |
| విద్యుత్ సరఫరా | 9V (6F22) Battery (not included) |
| LCD పరిమాణం | 63 మిమీ x 29 మిమీ |
| ఉత్పత్తి రంగు | Red and Gray |
| ఉత్పత్తి నికర బరువు | 300గ్రా |
వారంటీ మరియు మద్దతు
ఉత్పత్తి వారంటీ మరియు కస్టమర్ మద్దతుకు సంబంధించిన సమాచారం సాధారణంగా మీ కొనుగోలు డాక్యుమెంటేషన్తో లేదా తయారీదారు అధికారిక website. Please refer to those resources for specific details.