
1. పరిచయం
This manual provides essential information for the installation, operation, and maintenance of the Arista Networks DCS-7050S-52-R 7050 Series Switch. This high-performance switch features 52 SFP+ ports, rear-to-front airflow, and dual 460W AC power supplies, designed for demanding network environments.
Please read this manual thoroughly before attempting to install or operate the device. Retain this manual for future reference.
భద్రతా సమాచారం
Always observe standard safety precautions when working with electrical equipment. Ensure proper grounding and ventilation. Only qualified personnel should perform installation and maintenance procedures. Disconnect power before servicing.
2. సెటప్ మరియు ఇన్స్టాలేషన్
2.1 స్విచ్ను అన్ప్యాక్ చేయడం
Carefully remove the switch and all accessories from the packaging. Verify that all components listed in the packing list are present and undamaged. Report any missing or damaged items to your supplier immediately.
2.2 భౌతిక సంస్థాపన
The DCS-7050S-52-R switch is designed for rack mounting. Ensure the rack is stable and properly grounded. This model features rear-to-front airflow, meaning cool air enters from the rear of the chassis and exits through the front. Ensure adequate clearance for airflow at both the front and rear of the switch.
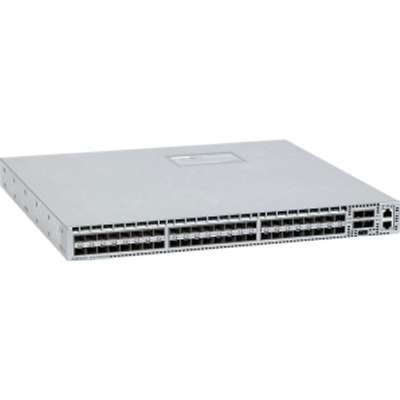
మూర్తి 1: ముందు view of the Arista Networks DCS-7050S-52-R switch, showing the SFP+ ports and status indicators. This image illustrates the port layout and general appearance of the device.
2.3 పవర్ కనెక్షన్
The switch is equipped with dual 460W AC power supplies for redundancy. Connect the provided 2XC13-C14 power cords to the AC inlets on the rear of the switch and then to separate, grounded AC power sources. It is recommended to connect to different power circuits for maximum redundancy.
- Ensure power sources match the switch's input voltagఇ అవసరాలు.
- Connect both power supplies for redundant operation.
2.4 నెట్వర్క్ కనెక్షన్లు
The DCS-7050S-52-R features 52 SFP+ పోర్ట్లు. Insert compatible SFP+ transceivers into the desired ports. Connect appropriate fiber optic or direct attach copper (DAC) cables to the transceivers. Ensure proper cable management to avoid strain on the ports.
2.5 ప్రారంభ పవర్-ఆన్
After all physical connections are made, power on the switch. Observe the system status LEDs for initial boot-up sequence. Refer to the LED indicators section for status interpretation.
3. ఆపరేటింగ్ సూచనలు
3.1 పవర్ ఆన్/ఆఫ్
To power on, ensure power cords are connected. The switch will automatically power on. To power off, disconnect both power cords from their sources. For graceful shutdown, it is recommended to use the operating system commands before disconnecting power.
3.2 Management Interface Access
The switch can be managed via a console port (RJ-45), out-of-band management (OOB) Ethernet port, or in-band management through one of the SFP+ data ports. Connect a console cable to the console port and use a terminal emulator (e.g., PuTTY, Tera Term) with settings: 9600 baud, 8 data bits, no parity, 1 stop bit, no flow control.
3.3 Arista EOS Overview
The Arista DCS-7050S-52-R runs Arista EOS (Extensible Operating System). EOS provides a command-line interface (CLI) for configuration and monitoring. For detailed configuration instructions, refer to the official Arista EOS documentation available on the Arista Networks webసైట్.
3.4 SFP+ Port Operation
The 52 SFP+ ports support 10 Gigabit Ethernet connectivity. Ensure that compatible SFP+ transceivers are used for the desired link type (e.g., SR, LR, DAC). Port status LEDs indicate link activity and speed.
4. నిర్వహణ
4.1 శుభ్రపరచడం
Periodically clean the exterior of the switch with a soft, dry, lint-free cloth. Ensure ventilation openings are free from dust and obstructions. Do not use liquid or aerosol cleaners directly on the switch.
4.2 ఫర్మ్వేర్ నవీకరణలు
Regularly check the Arista Networks support website for the latest EOS firmware updates. Follow the provided instructions for safe and effective firmware upgrades to ensure optimal performance and security.
4.3 కాంపోనెంట్ రీప్లేస్మెంట్
The DCS-7050S-52-R is designed with hot-swappable components such as fan trays and power supplies. Refer to the Arista Networks hardware guide for specific instructions on replacing these components while the switch is operational.
5. ట్రబుల్షూటింగ్
This section provides basic troubleshooting steps for common issues. For more complex problems, consult the Arista Networks support resources.
5.1 LED సూచికలు
Observe the status LEDs on the front panel for diagnostic information:
- సిస్టమ్ LED: మొత్తం వ్యవస్థ ఆరోగ్యాన్ని సూచిస్తుంది (ఉదా., సాధారణానికి ఆకుపచ్చ, హెచ్చరికకు కాషాయం, క్లిష్టమైనదానికి ఎరుపు).
- విద్యుత్ సరఫరా LED లు: Indicate the status of each power supply.
- Fan LEDs: Indicate the status of the fan trays.
- పోర్ట్ LED లు: Indicate link status and activity for each SFP+ port.
Refer to the Arista Networks documentation for a detailed explanation of all LED states.
5.2 సాధారణ సమస్యలు
- శక్తి లేదు: Verify power cord connections, power source, and power supply LEDs.
- పోర్ట్లో లింక్ లేదు: Check transceiver compatibility, cable integrity, and connection to the peer device. Verify port configuration.
- సిస్టమ్ పనిచేయకపోవడం: Check system LED. If red, consult logs via console or management interface.
5.3 Reset Procedures
A system reboot can often resolve minor issues. Use the appropriate EOS command for a graceful reboot. In cases where the system is unresponsive, a hard power cycle (disconnecting and reconnecting power) may be necessary, but this should be a last resort.
6. స్పెసిఫికేషన్లు
| ఫీచర్ | వివరణ |
|---|---|
| మోడల్ సంఖ్య | DCS-7050S-52-R |
| తయారీదారు | అరిస్టా |
| ఇంటర్ఫేస్ రకం | SFP+ |
| పోర్టుల సంఖ్య | 52 |
| గాలి ప్రవాహ దిశ | వెనుక నుండి ముందు |
| విద్యుత్ సరఫరా | Dual 460W AC |
| ఉత్పత్తి కొలతలు | 1 x 1 x 1 అంగుళాలు |
| వస్తువు బరువు | 2 పౌండ్లు |
| ఎగువ ఉష్ణోగ్రత రేటింగ్ | 40 డిగ్రీల సెల్సియస్ |
| కేస్ మెటీరియల్ | మెటల్ |
7. వారంటీ సమాచారం
This Arista Networks product is covered by a standard manufacturer's warranty. For detailed information regarding warranty terms, conditions, and duration, please refer to the warranty statement provided with your purchase or visit the official Arista Networks webవారంటీ క్లెయిమ్ల కోసం మీ కొనుగోలు రుజువును ఉంచండి.
8. సాంకేతిక మద్దతు
For technical assistance, product documentation, and software downloads, please visit the Arista Networks support portal. You can find comprehensive resources, FAQs, and contact information for their technical support team.
- అరిస్టా నెట్వర్క్స్ Webసైట్: www.arista.com
- మద్దతు పోర్టల్: Refer to the Arista website for specific support contact details and online resources.