1. పరిచయం
The MASTECH MY70 is a reliable and versatile digital multimeter designed for basic electrical measurements. It is suitable for a wide range of applications, including workshop use, hobby projects, and general electrical testing. This manual provides essential information for the safe and effective operation, maintenance, and troubleshooting of your MY70 multimeter.
2. భద్రతా సమాచారం
పరీక్షలో ఉన్న మల్టీమీటర్ లేదా పరికరాలకు వ్యక్తిగత గాయం మరియు నష్టాన్ని నివారించడానికి ఎల్లప్పుడూ క్రింది భద్రతా జాగ్రత్తలను గమనించండి.
- Read and understand all instructions in this manual before using the multimeter.
- ఏ ఫంక్షన్ కోసం గరిష్ట ఇన్పుట్ విలువలను మించకూడదు.
- వాల్యూమ్తో పని చేస్తున్నప్పుడు జాగ్రత్త వహించండిtag30V AC RMS, 42V పీక్ లేదా 60V DC కంటే ఎక్కువ. ఈ వాల్యూమ్లుtagషాక్ ప్రమాదాన్ని కలిగిస్తుంది.
- ఫంక్షన్లు లేదా పరిధులను మార్చడానికి ముందు ఎల్లప్పుడూ సర్క్యూట్ నుండి టెస్ట్ లీడ్లను డిస్కనెక్ట్ చేయండి.
- Inspect test leads for damaged insulation or exposed metal before each use. Replace if damaged.
- ఆపరేషన్ ముందు బ్యాటరీ కవర్ సురక్షితంగా మూసివేయబడిందని నిర్ధారించుకోండి.
- మల్టీమీటర్ దెబ్బతిన్నట్లు కనిపిస్తే లేదా కేస్ తెరిచి ఉంటే దాన్ని ఆపరేట్ చేయవద్దు.
- స్థానిక మరియు జాతీయ భద్రతా కోడ్లకు కట్టుబడి ఉండండి.
This device complies with IEC 61010, CE, and RoHS standards.
3. ఉత్పత్తి లక్షణాలు
The MASTECH MY70 Digital Multimeter offers a range of essential measurement capabilities:
- AC మరియు DC వాల్యూమ్tagఇ కొలత
- AC మరియు DC కరెంట్ కొలత
- ప్రతిఘటన కొలత
- డయోడ్ టెస్ట్
- Continuity Test with Buzzer
- ట్రాన్సిస్టర్ hFE పరీక్ష
- డేటా హోల్డ్ ఫంక్షన్
- ఆటో పవర్ ఆఫ్
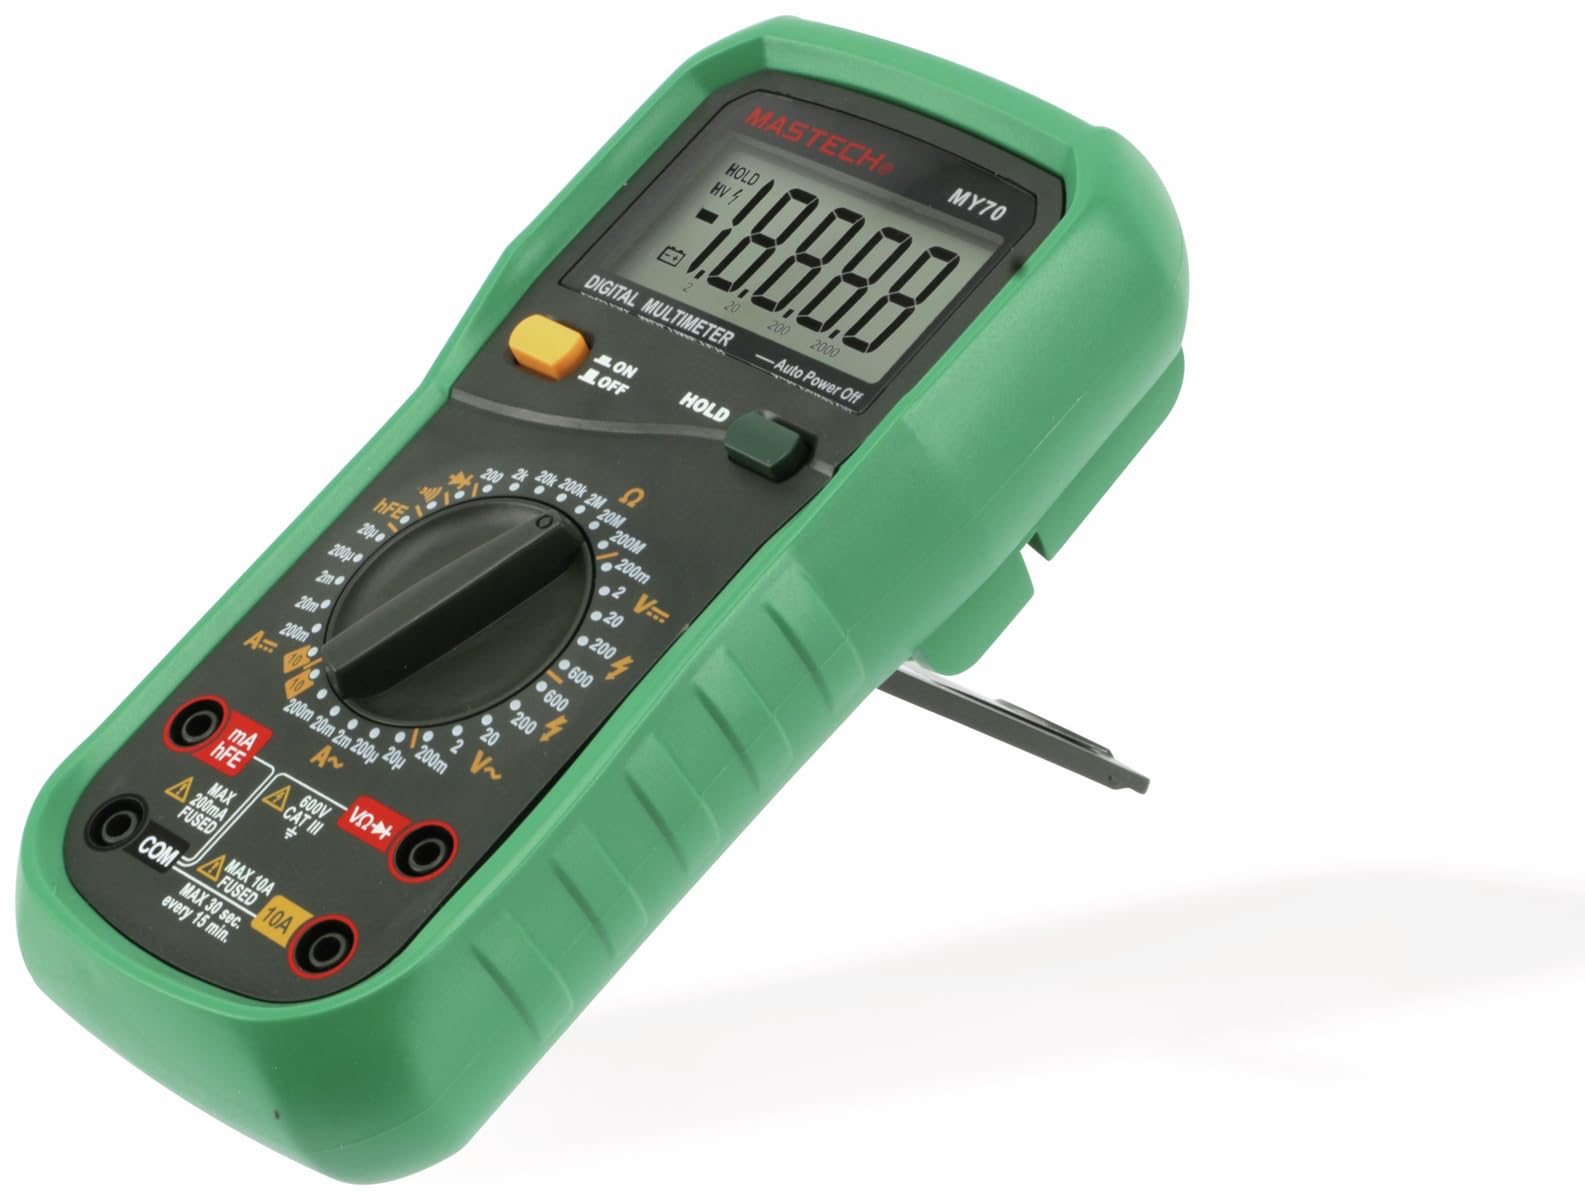
మూర్తి 3.1: ముందు view MASTECH MY70 డిజిటల్ మల్టీమీటర్ యొక్క.
4. ప్యాకేజీ విషయాలు
మీ ప్యాకేజీలో అన్ని అంశాలు ఉన్నాయని ధృవీకరించండి:
- MASTECH MY70 డిజిటల్ మల్టీమీటర్
- పరీక్ష లీడ్లు (ఒక ఎరుపు, ఒక నలుపు)
- 9V Battery (NEDA 1604 or 6F22 type)
- Transistor Test Socket (hFE adapter)
- వినియోగదారు మాన్యువల్ (ఈ పత్రం)
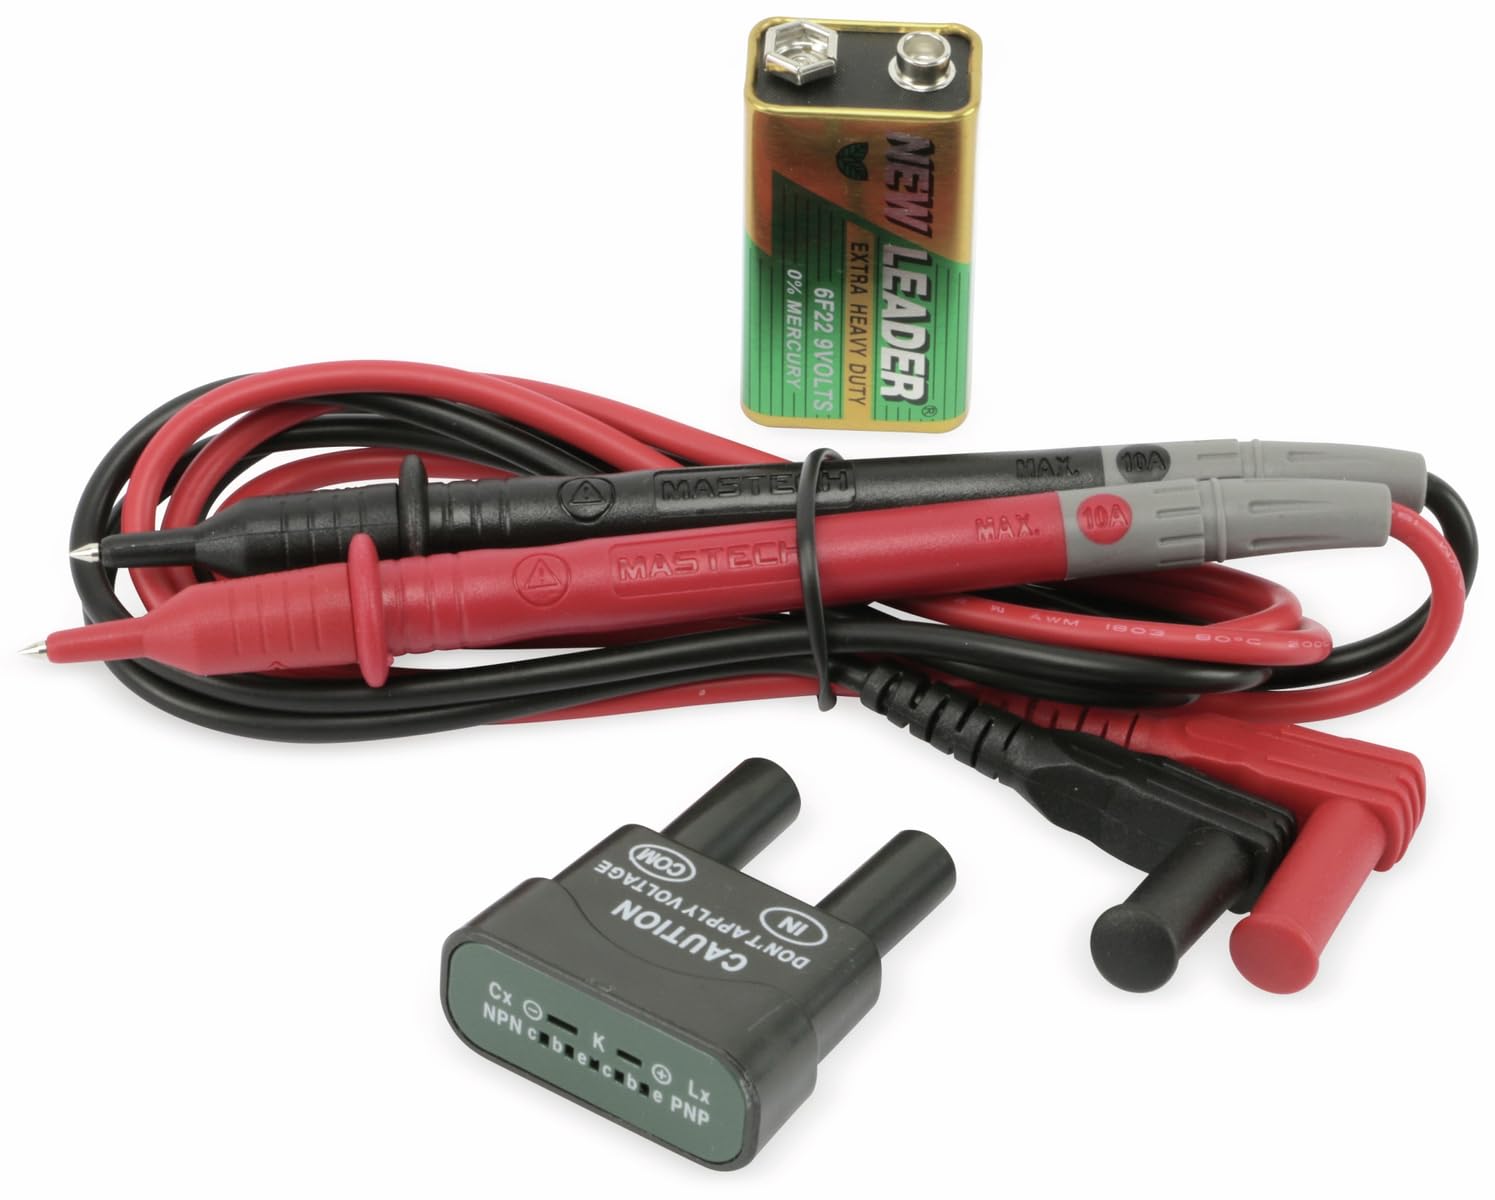
Figure 4.1: MASTECH MY70 Multimeter accessories.
5. సెటప్
5.1 బ్యాటరీ ఇన్స్టాలేషన్
- మల్టీమీటర్ ఆఫ్ చేయబడిందని నిర్ధారించుకోండి.
- యూనిట్ వెనుక భాగంలో బ్యాటరీ కంపార్ట్మెంట్ను గుర్తించండి.
- రిటైనింగ్ స్క్రూ(లు) విప్పు మరియు బ్యాటరీ కవర్ను తీసివేయండి.
- సరైన ధ్రువణతను గమనిస్తూ, 9V బ్యాటరీని బ్యాటరీ క్లిప్లకు కనెక్ట్ చేయండి.
- బ్యాటరీని కంపార్ట్మెంట్లో ఉంచి కవర్ను భర్తీ చేసి, దానిని స్క్రూ(లు)తో భద్రపరచండి.

చిత్రం 5.1: వెనుక view with battery compartment.
5.2 టెస్ట్ లీడ్లను కనెక్ట్ చేయడం
For most measurements, connect the black test lead to the "COM" (common) jack and the red test lead to the "VΩmA" jack. For high current measurements (up to 10A), connect the red lead to the "10A" jack.
6. ఆపరేటింగ్ సూచనలు
To begin, turn the rotary switch to the desired function and range. Connect the test leads to the circuit or component under test.
6.1 DC వాల్యూమ్tage కొలత (V=)
- Set the rotary switch to the desired "V=" range (e.g., 20V, 200V).
- Connect the black test lead to the "COM" jack and the red test lead to the "VΩmA" jack.
- Connect the test leads in parallel across the DC voltage source or component.
- సంపుటాన్ని చదవండిtagడిస్ప్లేలో ఇ విలువ.
6.2 AC వాల్యూమ్tage కొలత (V~)
- Set the rotary switch to the desired "V~" range (e.g., 200V, 600V).
- Connect the black test lead to the "COM" jack and the red test lead to the "VΩmA" jack.
- AC వాల్యూమ్ అంతటా పరీక్ష లీడ్లను సమాంతరంగా కనెక్ట్ చేయండి.tage source or component.
- సంపుటాన్ని చదవండిtagడిస్ప్లేలో ఇ విలువ.
6.3 DC కరెంట్ కొలత (A=)
జాగ్రత్త: కరెంట్ కొలిచేటప్పుడు ఎల్లప్పుడూ మల్టీమీటర్ను సర్క్యూట్తో సిరీస్లో కనెక్ట్ చేయండి. వాల్యూమ్ అంతటా సమాంతరంగా ఎప్పుడూ కనెక్ట్ చేయవద్దు.tagఇ మూలం.
- Set the rotary switch to the desired "A=" range (e.g., 200µA, 10A).
- For currents up to 200mA, connect the red test lead to the "VΩmA" jack. For currents up to 10A, connect the red test lead to the "10A" jack. The black lead always connects to "COM".
- కరెంట్ కొలవవలసిన సర్క్యూట్ను తెరిచి, మల్టీమీటర్ను సిరీస్లో కనెక్ట్ చేయండి.
- డిస్ప్లేలో ప్రస్తుత విలువను చదవండి.
6.4 రెసిస్టెన్స్ మెజర్మెంట్ (Ω)
జాగ్రత్త: నిరోధకతను కొలిచే ముందు సర్క్యూట్ డి-ఎనర్జైజ్ చేయబడిందని మరియు అన్ని కెపాసిటర్లు డిశ్చార్జ్ అయ్యాయని నిర్ధారించుకోండి.
- Set the rotary switch to the desired "Ω" range (e.g., 200Ω, 2MΩ).
- నలుపు పరీక్ష లీడ్ను "COM"కి మరియు ఎరుపు పరీక్ష లీడ్ను "VΩmA"కి కనెక్ట్ చేయండి.
- కొలవవలసిన నిరోధకత ఉన్న భాగం అంతటా పరీక్ష లీడ్లను కనెక్ట్ చేయండి.
- ప్రదర్శనలో నిరోధక విలువను చదవండి.
6.5 డయోడ్ పరీక్ష (→|)
- Set the rotary switch to the "→|" position.
- నలుపు పరీక్ష లీడ్ను "COM"కి మరియు ఎరుపు పరీక్ష లీడ్ను "VΩmA"కి కనెక్ట్ చేయండి.
- Connect the red lead to the anode and the black lead to the cathode of the diode. A forward voltage drop (typically 0.5V to 0.8V for silicon diodes) will be displayed.
- Reverse the leads. The display should show "OL" (Overload) for a good diode.
6.6 కంటిన్యుటీ టెస్ట్ (•))))
- Set the rotary switch to the "•)))" position.
- నలుపు పరీక్ష లీడ్ను "COM"కి మరియు ఎరుపు పరీక్ష లీడ్ను "VΩmA"కి కనెక్ట్ చేయండి.
- సర్క్యూట్ లేదా కాంపోనెంట్ అంతటా టెస్ట్ లీడ్లను కనెక్ట్ చేయండి.
- If the resistance is below approximately 50Ω, the buzzer will sound, indicating continuity.
6.7 ట్రాన్సిస్టర్ hFE పరీక్ష
- రోటరీ స్విచ్ను "hFE" స్థానానికి సెట్ చేయండి.
- Insert the transistor (NPN or PNP) into the appropriate sockets on the transistor test adapter.
- డిస్ప్లేపై hFE (DC కరెంట్ గెయిన్) విలువను చదవండి.
6.8 డేటా హోల్డ్ ఫంక్షన్
Press the "HOLD" button to freeze the current reading on the display. Press it again to release the hold function and resume live readings.
7. నిర్వహణ
7.1 శుభ్రపరచడం
ప్రకటనతో కేసును తుడిచివేయండిamp వస్త్రం మరియు తేలికపాటి డిటర్జెంట్. అబ్రాసివ్లు లేదా ద్రావకాలను ఉపయోగించవద్దు. ఉపయోగించే ముందు మల్టీమీటర్ పూర్తిగా పొడిగా ఉందని నిర్ధారించుకోండి.
7.2 బ్యాటరీ భర్తీ
When the battery symbol appears on the display, the 9V battery needs to be replaced. Refer to Section 5.1 for battery installation instructions.
7.3 ఫ్యూజ్ రీప్లేస్మెంట్
If the current measurement function fails, the fuse may need replacement. The MY70 uses two fuses: a 400mA/250V (F400mA/250V) fuse for the mA range and a 10A/250V (F10A/250V) fuse for the 10A range. To replace a fuse:
- మల్టీమీటర్ ఆఫ్ చేయబడిందని మరియు పరీక్ష లీడ్లు డిస్కనెక్ట్ చేయబడిందని నిర్ధారించుకోండి.
- బ్యాటరీ కవర్ మరియు బ్యాటరీని తీసివేయండి.
- Unscrew the additional screws holding the back case.
- Carefully separate the two halves of the case.
- Locate the blown fuse(s) and replace with fuses of the identical type and rating.
- Reassemble the case, ensuring all screws are tightened.
8. ట్రబుల్షూటింగ్
| సమస్య | సాధ్యమైన కారణం | పరిష్కారం |
|---|---|---|
| డిస్ప్లే లేదు లేదా డిమ్ డిస్ప్లే లేదు | తక్కువ బ్యాటరీ లేదా డెడ్ బ్యాటరీ | 9 వి బ్యాటరీని మార్చండి. |
| "OL" (ఓవర్లోడ్) ప్రదర్శించబడింది | Input value exceeds selected range or open circuit | అధిక పరిధిని ఎంచుకోండి లేదా ఓపెన్ సర్క్యూట్ కోసం తనిఖీ చేయండి. |
| తప్పు కరెంట్ రీడింగ్ లేదా కరెంట్ రీడింగ్ లేదు | ఎగిరిన ఫ్యూజ్ లేదా తప్పు సీసం కనెక్షన్ | Check and replace fuse if necessary. Ensure leads are connected in series and to the correct jacks. |
| Inaccurate resistance reading | Component still energized or parallel components affecting reading | Ensure circuit is de-energized. Isolate the component for accurate measurement. |
9. స్పెసిఫికేషన్లు
| పరామితి | విలువ |
|---|---|
| మోడల్ | MY70 |
| తయారీదారు | మాస్టెక్ |
| శక్తి మూలం | 9V Battery (NEDA 1604 or 6F22) |
| కొలతలు (L x W x H) | 20.5 x 12.5 x 6 సెం.మీ (సుమారుగా 8.07 x 4.92 x 2.36 అంగుళాలు) |
| బరువు | Approx. 567 grams (1.25 lbs) |
| భద్రతా ప్రమాణాలు | IEC 61010, CE, RoHS |
| గరిష్ట ఆపరేటింగ్ ఉష్ణోగ్రత | 60°C (140°F) |
| DC సంtagఇ పరిధి | 200mV, 2V, 20V, 200V, 600V |
| AC వాల్యూమ్tagఇ పరిధి | 200V, 600V |
| DC ప్రస్తుత పరిధి | 200μA, 2mA, 20mA, 200mA, 10A |
| ప్రతిఘటన పరిధి | 200Ω, 2kΩ, 20kΩ, 200kΩ, 2MΩ, 20MΩ |
10. వారంటీ మరియు మద్దతు
For warranty information and technical support, please refer to the official Mastech webసైట్ లేదా మీ స్థానిక పంపిణీదారుని సంప్రదించండి. వారంటీ క్లెయిమ్ల కోసం కొనుగోలు రుజువుగా మీ కొనుగోలు రసీదును ఉంచండి.
Manufacturer: Mastech
మోడల్ నంబర్: MY70