
పరిచయం
Thank you for choosing the Ferm TDM1025 Bench Pillar Corded Electric Drill. This manual provides essential information for the safe and efficient operation, maintenance, and troubleshooting of your new drill. Please read these instructions carefully before use and keep them for future reference.
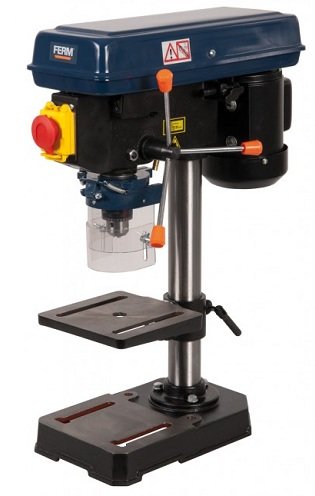
Image: Ferm TDM1025 Bench Pillar Corded Electric Drill. This image shows the complete drill press assembly, including the base, column, motor head, and work table.
భద్రతా సూచనలు
విద్యుత్ పనిముట్లను ఆపరేట్ చేసేటప్పుడు అగ్ని ప్రమాదం, విద్యుత్ షాక్ మరియు వ్యక్తిగత గాయాల ప్రమాదాన్ని తగ్గించడానికి ఎల్లప్పుడూ ప్రాథమిక భద్రతా జాగ్రత్తలను అనుసరించండి.
సాధారణ భద్రతా నియమాలు:
- పని ప్రాంత భద్రత: పని ప్రదేశం శుభ్రంగా మరియు బాగా వెలుతురుతో ఉంచండి. చిందరవందరగా లేదా చీకటిగా ఉన్న ప్రాంతాలు ప్రమాదాలను ఆహ్వానిస్తున్నాయి.
- విద్యుత్ భద్రత: వర్షం లేదా తడి పరిస్థితులకు విద్యుత్ పనిముట్లను బహిర్గతం చేయవద్దు. మట్టి లేదా నేలపై ఉన్న ఉపరితలాలతో శరీరాన్ని తాకకుండా ఉండండి.
- వ్యక్తిగత భద్రత: Stay alert, watch what you are doing, and use common sense. Do not operate tools while tired or under the influence of drugs, alcohol, or medication.
- వ్యక్తిగత రక్షణ పరికరాలు: Always wear eye protection. Use dust masks, non-skid safety shoes, hard hats, or hearing protection as appropriate for the conditions.
- సాధన వినియోగం మరియు సంరక్షణ: పవర్ టూల్ను బలవంతంగా వాడకండి. మీ అప్లికేషన్ కోసం సరైన పవర్ టూల్ను ఉపయోగించండి. ఏవైనా సర్దుబాట్లు చేయడానికి, ఉపకరణాలను మార్చడానికి లేదా పవర్ టూల్స్ నిల్వ చేయడానికి ముందు పవర్ సోర్స్ నుండి ప్లగ్ను డిస్కనెక్ట్ చేయండి.
- సురక్షిత వర్క్పీస్: ఎల్లప్పుడూ clamp or secure the workpiece to prevent movement during drilling.
- Guard Usage: Ensure the transparent guard is always in place and properly adjusted for safe working.
సెటప్
అన్ప్యాకింగ్:
Carefully remove all components from the packaging. Inspect for any damage that may have occurred during transit. Retain packaging materials for future transport or storage.
అసెంబ్లీ:
- బేస్ మరియు కాలమ్: Securely attach the column to the cast iron base using the provided fasteners. Ensure it is stable and upright.
- Drill Head: Mount the drill head assembly onto the top of the column. Tighten all securing bolts.
- పని పట్టిక: Slide the work table onto the column and secure it at a comfortable working height. Ensure the table locking mechanism functions correctly.
- చక్ ఇన్స్టాలేషన్: Insert the chuck into the spindle taper. Tap it firmly with a soft mallet to ensure a secure fit.
- Guard Attachment: Attach the transparent guard to the drill head, ensuring it can be easily adjusted and provides adequate protection.
పవర్ కనెక్షన్:
Connect the drill to a standard 230V AC power outlet. Ensure the power switch is in the "OFF" position before plugging in the tool.
ఆపరేటింగ్ సూచనలు
Installing Drill Bits:
- Ensure the drill is unplugged.
- Open the chuck jaws using the chuck key.
- డ్రిల్ బిట్ను చక్లోకి చొప్పించండి, అది కేంద్రీకృతమై పూర్తిగా కూర్చున్నట్లు నిర్ధారించుకోండి.
- Tighten the chuck jaws firmly with the chuck key. Remove the chuck key immediately after tightening.
Adjusting Work Table:
- ఎత్తు సర్దుబాటు: Loosen the table locking handle, adjust the table to the desired height, and then firmly tighten the handle.
- కోణ సర్దుబాటు: The table can be tilted from 0 to 45 degrees. Loosen the tilt locking bolt, set the desired angle, and re-tighten the bolt.
స్పీడ్ సెట్టింగ్లు:
The drill features 5 speed settings (580-2650 RPM) for optimal performance across various materials. Adjust the belt position on the pulleys inside the drill head to change the speed. Refer to the speed chart inside the pulley cover for recommended settings.
Laser Guidance:
Activate the cross laser guidance system for precise drilling alignment. The laser projects a crosshair onto the workpiece, indicating the exact drilling point.
Drilling Procedure:
- Secure the workpiece firmly to the work table using clamps.
- Adjust the table height and angle as needed.
- Select the appropriate drilling speed.
- Turn on the drill.
- Slowly lower the drill bit into the workpiece using the feed handle, applying steady, even pressure.
- Once drilling is complete, retract the drill bit from the workpiece before turning off the drill.
నిర్వహణ
క్రమం తప్పకుండా నిర్వహణ మీ డ్రిల్ యొక్క దీర్ఘాయువు మరియు సురక్షితమైన ఆపరేషన్ను నిర్ధారిస్తుంది.
- శుభ్రపరచడం: After each use, clean the drill thoroughly to remove dust, chips, and debris. Use a soft brush or compressed air. Do not use solvents that may damage plastic parts.
- సరళత: Periodically apply a light machine oil to moving parts, such as the column and spindle, to ensure smooth operation.
- త్రాడు తనిఖీ: విద్యుత్ తీగను దెబ్బతినడం, తెగిపోవడం లేదా చిరిగిపోవడం వంటి ఏవైనా సంకేతాలు ఉన్నాయా అని క్రమం తప్పకుండా తనిఖీ చేయండి. దెబ్బతిన్న తీగలను వెంటనే మార్చండి.
- చక్ నిర్వహణ: Keep the chuck jaws clean and free of debris to ensure proper grip on drill bits.
- బెల్ట్ టెన్షన్: Check the drive belt tension periodically. Adjust if necessary to prevent slippage and ensure consistent speed.
ట్రబుల్షూటింగ్
| సమస్య | సాధ్యమైన కారణం | పరిష్కారం |
|---|---|---|
| డ్రిల్ ప్రారంభం కాదు. | విద్యుత్ సరఫరా లేదు. పవర్ స్విచ్ ఆఫ్ చేయబడింది. దెబ్బతిన్న పవర్ కార్డ్. | పవర్ అవుట్లెట్ మరియు సర్క్యూట్ బ్రేకర్ను తనిఖీ చేయండి. పవర్ స్విచ్ను "ఆన్"కి మార్చండి. Inspect and replace power cord if damaged. |
| ఆపరేషన్ సమయంలో అధిక కంపనం. | Loose drill bit. Unbalanced workpiece. వదులుగా ఉండే మౌంటు బోల్ట్లు. | Ensure drill bit is securely tightened in chuck. Secure workpiece firmly. అన్ని అసెంబ్లీ బోల్ట్లను తనిఖీ చేసి బిగించండి. |
| Poor drilling performance or burning wood. | డల్ డ్రిల్ బిట్. తప్పు వేగ సెట్టింగ్. Insufficient feed pressure. | Replace or sharpen drill bit. Adjust speed according to material. Apply steady, appropriate feed pressure. |
| Laser guidance not working. | Laser switch off. Batteries (if applicable) depleted. | Ensure laser switch is on. అవసరమైతే బ్యాటరీలను తనిఖీ చేయండి మరియు భర్తీ చేయండి. |
స్పెసిఫికేషన్లు
| మోడల్ సంఖ్య | TDM1025 |
| బ్రాండ్ | ఫెర్మ్ |
| శక్తి మూలం | కార్డెడ్ ఎలక్ట్రిక్ |
| వాల్యూమ్tage | 230 వి |
| Ampఎరేజ్ | 6 Amps |
| లోడ్ వేగం లేదు | 580-2650 RPM (5 settings) |
| చక్ కెపాసిటీ | 13 మి.మీ |
| ప్రత్యేక ఫీచర్ | Variable Speed, Laser Guidance |
| Work Table Adjustment | Height adjustable, 0-45 degree angle adjustment |
వారంటీ మరియు మద్దతు
వారంటీ సమాచారం:
Ferm products are manufactured to high quality standards and are guaranteed against defects in materials and workmanship. Please refer to the warranty card included with your product for specific terms and conditions, including warranty period and coverage details. Keep your purchase receipt as proof of purchase.
కస్టమర్ మద్దతు:
For technical assistance, spare parts, or warranty claims, please contact your local Ferm dealer or authorized service center. You can also visit the official Ferm webమరింత సమాచారం మరియు మద్దతు వనరుల కోసం సైట్.
Note: Specific contact details are not provided in this manual. Please refer to your product packaging or the manufacturer's webఅత్యంత తాజా మద్దతు సమాచారం కోసం సైట్.