
పరిచయం
This manual provides detailed instructions for the installation, operation, and maintenance of the ECS Elitegroup B350AM4-M2 Micro ATX Motherboard. This motherboard is designed to support AMD AM4 socket processors, including AMD Ryzen and 7th Gen Athlon processors. It features a 4+2 phase thermal design, 100% solid capacitor design, and dual-channel DDR4 memory architecture supporting up to 64 GB across four DIMM sockets.
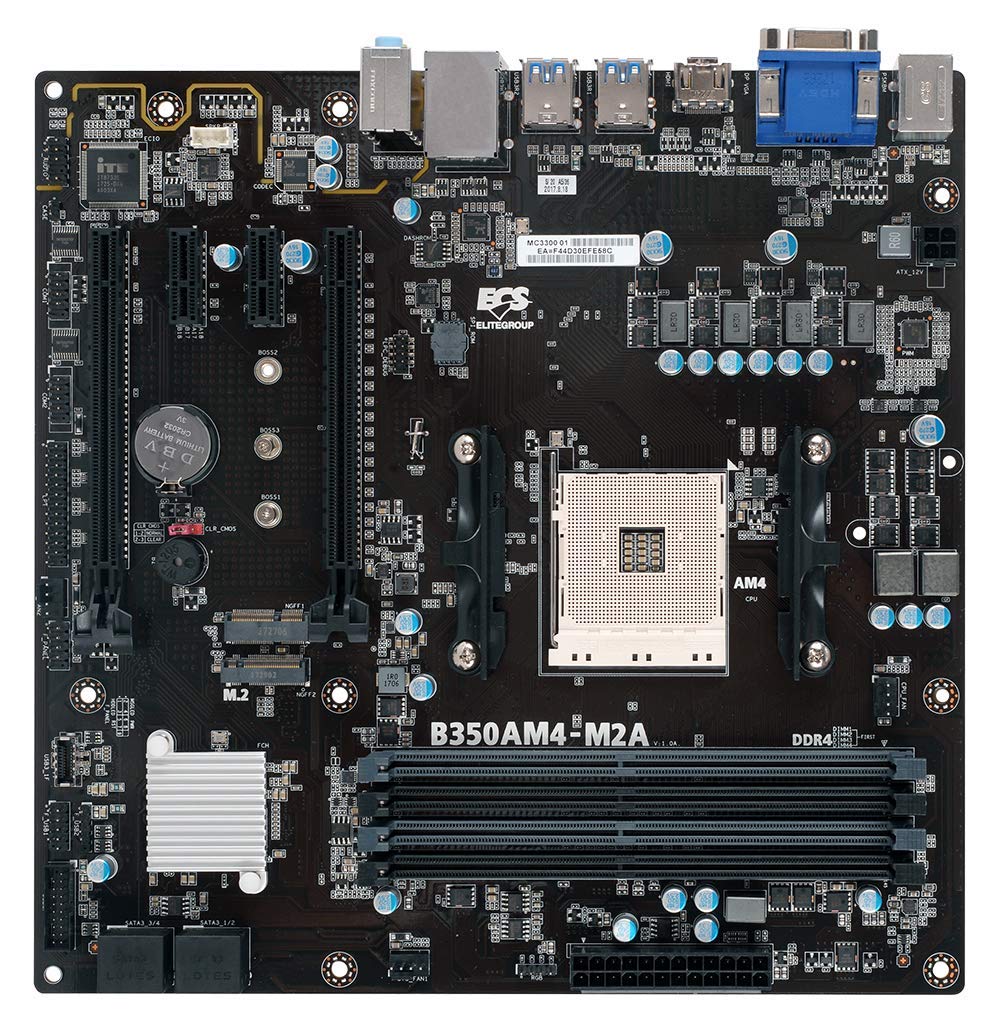
చిత్రం 1: పైగాview of the ECS B350AM4-M2 Motherboard, showing its general layout and components.
ప్యాకేజీ విషయాలు
Verify that all items listed below are present in the package. If any item is missing or damaged, contact your retailer.
- ECS B350AM4-M2 Motherboard
- డ్రైవర్ సిడి
- వినియోగదారు మాన్యువల్ (ఈ పత్రం)
- SATA కేబుల్స్
సెటప్ మరియు ఇన్స్టాలేషన్
ఇన్స్టాలేషన్ ప్రారంభించే ముందు, మీ సిస్టమ్ పవర్ ఆఫ్ చేయబడిందని మరియు పవర్ అవుట్లెట్ నుండి డిస్కనెక్ట్ చేయబడిందని నిర్ధారించుకోండి. భాగాలకు ఎలక్ట్రోస్టాటిక్ డిశ్చార్జ్ (ESD) నష్టం జరగకుండా నిరోధించడానికి యాంటీ-స్టాటిక్ రిస్ట్ స్ట్రాప్ ధరించండి.
1. CPU సంస్థాపన
- మదర్బోర్డుపై AM4 CPU సాకెట్ను గుర్తించండి.
- సాకెట్ వైపున ఉన్న లోడ్ లివర్ను ఎత్తండి.
- CPU పై ఉన్న త్రిభుజాకార గుర్తును సాకెట్ పై ఉన్న సంబంధిత గుర్తుతో జాగ్రత్తగా సమలేఖనం చేయండి.
- బలవంతంగా ఒత్తిడి చేయకుండా CPU ని సాకెట్లో సున్నితంగా ఉంచండి.
- Lower the load lever back into its locked position to secure the CPU.
- Apply thermal paste to the CPU surface and install the CPU cooler according to its manufacturer's instructions.
Figure 2: The AM4 CPU socket and surrounding area on the motherboard, where the processor is installed.
2. మెమరీ (RAM) సంస్థాపన
The B350AM4-M2 motherboard has four 288-pin DDR4 DIMM sockets. For optimal performance, install memory modules in pairs for dual-channel operation. Refer to the motherboard's silkscreen for recommended slot population order.
- Open the clips at both ends of the DIMM socket.
- Align the notch on the DDR4 memory module with the key in the DIMM socket.
- Insert the module firmly into the socket until the clips snap into place.
- Repeat for additional memory modules.
Figure 3: Location of the four DDR4 DIMM slots for memory installation.
3. Storage Device Installation (SATA & M.2)
Connect SATA storage devices (HDDs/SSDs) to the SATA 6Gb/s ports. For M.2 SSDs, locate the M.2 slot.
- For SATA devices: Connect one end of the SATA data cable to the storage device and the other end to a SATA port on the motherboard. Connect the SATA power cable from your power supply to the device.
- For M.2 SSDs: Insert the M.2 SSD into the M.2 slot at an angle. Push it down and secure it with the provided screw.
4. విస్తరణ కార్డ్ సంస్థాపన (PCIe)
Install graphics cards or other expansion cards into the appropriate PCI Express slots.
- Align the expansion card with the chosen PCIe slot.
- Press down firmly until the card is seated correctly and the retention clip (if present) locks into place.
- ఒక స్క్రూతో కార్డును ఛాసిస్కు బిగించండి.
5. విద్యుత్ కనెక్షన్లు
విద్యుత్ సరఫరా కేబుల్లను మదర్బోర్డుకు కనెక్ట్ చేయండి.
- 24-పిన్ ATX పవర్ కనెక్టర్: మీ విద్యుత్ సరఫరా నుండి ప్రధాన 24-పిన్ పవర్ కేబుల్ను మదర్బోర్డ్లోని సంబంధిత కనెక్టర్కు కనెక్ట్ చేయండి.
- 4-పిన్ CPU పవర్ కనెక్టర్: Connect the 4-pin CPU power cable (often labeled P4 or ATX12V) from your power supply to the connector near the CPU socket.
6. Front Panel and USB Connections
Connect your chassis's front panel connectors (power button, reset button, HDD LED, power LED, front USB ports, front audio) to the corresponding headers on the motherboard. Refer to the motherboard layout diagram in the full manual for exact header locations.
ఆపరేటింగ్ సూచనలు
1. BIOS/UEFI సెటప్
The BIOS (Basic Input/Output System) or UEFI (Unified Extensible Firmware Interface) is the firmware that initializes hardware during startup. To access the BIOS/UEFI setup utility:
- మీ కంప్యూటర్ను ఆన్ చేయండి.
- నొక్కండి DEL key repeatedly during the initial boot screen. The exact key may vary; consult the on-screen prompts.
Within the BIOS/UEFI, you can configure system settings such as boot order, date/time, CPU/memory frequencies, and enable/disable integrated peripherals. Save changes before exiting.
2. ఆపరేటింగ్ సిస్టమ్ ఇన్స్టాలేషన్
After assembling your system, you will need to install an operating system (e.g., Windows 10, Windows Vista, Linux).
- Insert your operating system installation media (USB drive or DVD) into the computer.
- Access the BIOS/UEFI setup and set the boot order to prioritize your installation media.
- Save changes and exit. The system will boot from the installation media.
- ఆపరేటింగ్ సిస్టమ్ను ఇన్స్టాల్ చేయడానికి ఆన్-స్క్రీన్ సూచనలను అనుసరించండి.
- After installation, install the necessary drivers from the provided driver CD or the ECS Elitegroup webసైట్.
నిర్వహణ
సరైన నిర్వహణ మీ మదర్బోర్డు యొక్క దీర్ఘాయువు మరియు స్థిరమైన ఆపరేషన్ను నిర్ధారిస్తుంది.
- దుమ్ము తొలగింపు: Regularly clean dust from inside your computer case using compressed air. Ensure fans and heatsinks are free from obstructions.
- BIOS నవీకరణలు: Periodically check the ECS Elitegroup website for updated BIOS versions. BIOS updates can improve compatibility, stability, and performance. Follow the update instructions carefully to avoid system damage.
- కేబుల్ నిర్వహణ: గాలి ప్రవాహాన్ని మెరుగుపరచడానికి మరియు జోక్యాన్ని నివారించడానికి అంతర్గత కేబుల్లు చక్కగా రూట్ చేయబడ్డాయని నిర్ధారించుకోండి.
ట్రబుల్షూటింగ్
ఈ విభాగం మీరు ఎదుర్కొనే సాధారణ సమస్యలను పరిష్కరిస్తుంది.
పవర్ లేదు / సిస్టమ్ ఆన్ అవ్వడం లేదు
- Check all power connections: 24-pin ATX, 4-pin CPU, and power cables to peripherals.
- విద్యుత్ సరఫరా స్విచ్ 'ఆన్' స్థానంలో ఉందని నిర్ధారించుకోండి.
- Verify the front panel power button connector is correctly attached to the motherboard header.
- Test the power supply with another system or a power supply tester if available.
No Display / No POST (Power-On Self-Test)
- Ensure the monitor is connected to the correct display output (motherboard integrated graphics or discrete graphics card).
- గ్రాఫిక్స్ కార్డ్ మరియు మెమరీ మాడ్యూళ్ళను తిరిగి అమర్చండి.
- Check if the CPU cooler is properly installed and connected.
- Listen for beep codes. A series of 9 short beeps often indicates a BIOS ROM error, suggesting a potential issue with the motherboard's firmware.
- Try booting with only essential components (CPU, one RAM stick, graphics card if no integrated graphics) to isolate the problem.
సిస్టమ్ అస్థిరత / క్రాష్లు
- అన్ని డ్రైవర్లు తాజాగా ఉన్నారని నిర్ధారించుకోండి.
- వేడెక్కకుండా నిరోధించడానికి CPU మరియు GPU ఉష్ణోగ్రతలను తనిఖీ చేయండి.
- తప్పు RAM కోసం తనిఖీ చేయడానికి మెమరీ డయాగ్నస్టిక్ సాధనాలను అమలు చేయండి.
- Verify that the power supply provides sufficient wattagఅన్ని భాగాలకు e.
స్పెసిఫికేషన్లు
| ఫీచర్ | వివరాలు |
|---|---|
| బ్రాండ్ | ECS Elitegroup |
| మోడల్ సంఖ్య | B350AM4-M2 |
| CPU సాకెట్ | సాకెట్ AM4 |
| అనుకూల ప్రాసెసర్లు | AMD Ryzen Processors, AMD 7th Gen Athlon Processors |
| చిప్సెట్ రకం | AMD B350 |
| RAM మెమరీ టెక్నాలజీ | DDR4 |
| మెమరీ స్లాట్లు అందుబాటులో ఉన్నాయి | 4 x 288-pin DDR4 DIMM sockets |
| RAM మెమరీ గరిష్ట పరిమాణం | 64 GB |
| మెమరీ క్లాక్ స్పీడ్ | 2667/2400 MHz (non-ECC, Un-buffered SDRAM) |
| గ్రాఫిక్స్ కార్డ్ ఇంటర్ఫేస్ | PCI ఎక్స్ప్రెస్ |
| Total Number of HDMI Ports | 1 (HDMI 1.4a) |
| డిస్ప్లేపోర్ట్ | Integrated DP with up to 2560x1600 resolution |
| USB 2.0 పోర్ట్లు | 1 (internal header, total ports may vary) |
| S/PDIF Connector Type | ఆప్టికల్ |
| సిస్టమ్ బస్ స్టాండర్డ్ మద్దతు ఉంది | SATA 3 |
| వేదిక | Windows 10, Windows Vista |
| వస్తువు బరువు | 1.15 పౌండ్లు |
వారంటీ మరియు మద్దతు
The ECS Elitegroup B350AM4-M2 Motherboard comes with a 2 సంవత్సరాల వారంటీ from the date of purchase. This warranty covers defects in materials and workmanship under normal use. For warranty claims or technical support, please contact your retailer or visit the official ECS Elitegroup webమద్దతు వనరులు మరియు సంప్రదింపు సమాచారం కోసం సైట్.
ఆన్లైన్ మద్దతు: For the latest drivers, BIOS updates, and additional support, please visit the ECS Elitegroup official webసైట్.