
1. పరిచయం మరియు ఓవర్view
This manual provides detailed instructions for the Hilitand Digital Cyclic Adjustable Delay Relay DC 12V. This versatile module is designed for precise timing control in various electronic applications, offering a wide adjustable range and multiple operating modes.
ముఖ్య లక్షణాలు:
- విస్తృత సర్దుబాటు పరిధి: Time settings from 0.1 seconds to 999 hours.
- డ్యూయల్ డిజిటల్ డిస్ప్లే: Separate displays for setting ON and OFF delay times (T1 and T2).
- బహుళ ఆపరేటింగ్ మోడ్లు: Features 6 commonly used timing modes to suit diverse application needs.
- అధిక కరెంట్ కెపాసిటీ: Capable of controlling AC/DC loads up to 5A.
- మెమరీ ఫంక్షన్: Settings are retained even after power loss.
2. భద్రతా సమాచారం
Please read and understand all safety instructions before operating this device. Failure to follow these instructions may result in electric shock, fire, or damage to the product.
- విద్యుత్ సరఫరా వాల్యూమ్ నిర్ధారించుకోండిtage matches the device's specified input (DC 12V).
- గరిష్ట లోడ్ కరెంట్ 5A మించకూడదు.
- All wiring should be performed by qualified personnel and with the power disconnected.
- Avoid exposing the device to moisture, extreme temperatures, or corrosive environments.
- పరికరాన్ని విడదీయడానికి లేదా సవరించడానికి ప్రయత్నించవద్దు.
3. ఉత్పత్తి భాగాలు మరియు రేఖాచిత్రం
Familiarize yourself with the components and connections of your delay relay module.
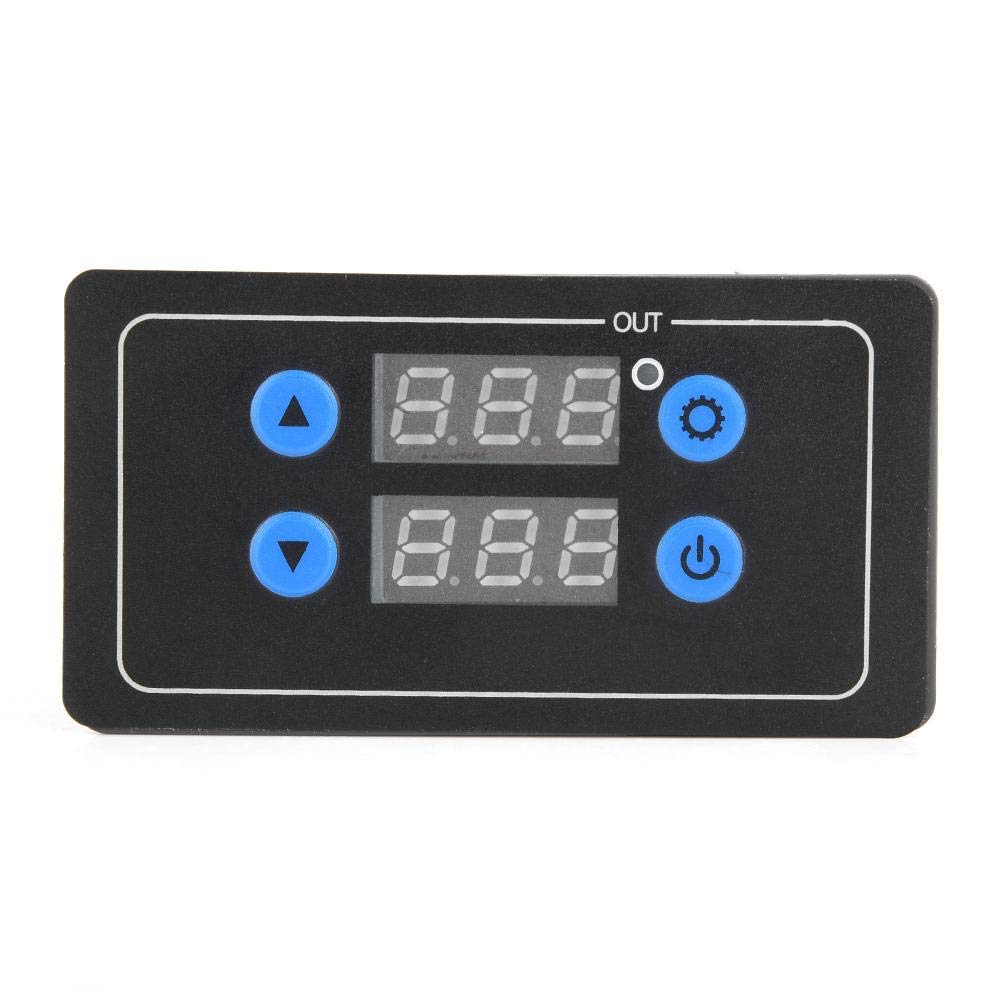
చిత్రం 3.1: ఫ్రంట్ ప్యానెల్ లేఅవుట్
This image shows the front panel of the delay relay. It features two digital displays for Delay Time T1 and Delay Time T2, an 'OUT' indicator, a Working Indicator, an Increase button (up arrow), a Decrease button (down arrow), a Setting button (gear icon), and a Confirm button (power icon).
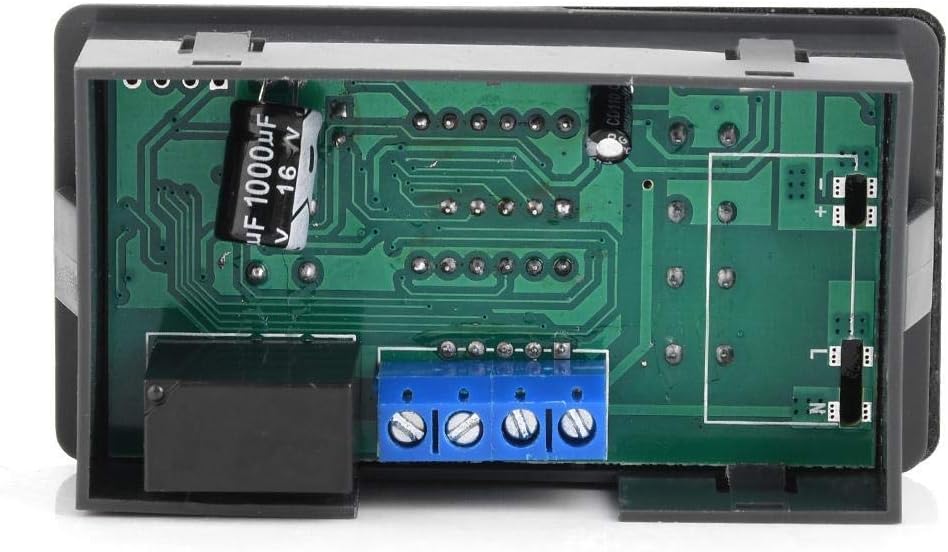
చిత్రం 3.2: వెనుక View with Circuit Board and Terminals
This image displays the rear of the module, revealing the circuit board and the blue screw terminal block for electrical connections. The relay component is visible on the left side.

మూర్తి 3.3: వైపు View of Terminal Block
This image provides a closer side view of the blue screw terminal block, highlighting the four connection points for wiring the power input and load.
టెర్మినల్ కనెక్షన్లు:
- V+: Positive DC 12V power input.
- V-: Negative DC 12V power input (Ground).
- NO: Normally Open contact of the relay.
- COM: రిలే యొక్క సాధారణ పరిచయం.
- NC: Normally Closed contact of the relay (not always present or used, refer to specific model for details).
Note: The relay output is a dry contact (potential-free). Connect your load between COM and NO for normally open operation, or COM and NC for normally closed operation.
4. సెటప్
4.1 వైరింగ్ సూచనలు
- విద్యుత్ సరఫరా కనెక్షన్: Connect your DC 12V power supply to the V+ and V- terminals. Ensure correct polarity.
- లోడ్ కనెక్షన్: Connect your device or load to the relay output terminals. For most applications, connect one side of your load to the COM terminal and the other side to the NO (Normally Open) terminal. This means the load will be activated when the relay switches ON.
- సురక్షిత కనెక్షన్లు: Ensure all wire connections are tight and secure to prevent loose contacts and potential hazards.
4.2 ప్రారంభ పవర్ ఆన్
After wiring, apply DC 12V power. The digital displays should illuminate, and the module will enter its default or last-saved operating mode.
5. ఆపరేటింగ్ సూచనలు
The module offers 6 different operating modes and allows for precise setting of two delay times, T1 (ON time) and T2 (OFF time).
5.1 ఆపరేటింగ్ మోడ్ను సెట్ చేయడం
- నొక్కండి మరియు పట్టుకోండి సెట్టింగ్ బటన్ (gear icon) for approximately 3 seconds until the display shows 'P-X' (where X is the current mode number).
- ఉపయోగించండి పెంచు బటన్ (పైకి బాణం) లేదా తగ్గించు బటన్ (down arrow) to cycle through the 6 available operating modes (P-1 to P-6).
- నొక్కండి నిర్ధారించు బటన్ (power icon) to select the desired mode and exit the mode setting interface.
5.2 Setting Delay Times (T1 and T2)
- In the normal operating state, a short press of the సెట్టింగ్ బటన్ (gear icon) will allow you to cycle through setting T1, T2, and the time unit.
- When T1 or T2 is flashing, use the పెంచు బటన్ (పైకి బాణం) లేదా తగ్గించు బటన్ (down arrow) to adjust the time value.
- To change the time unit (seconds, minutes, hours), press the సెట్టింగ్ బటన్ until the decimal point position flashes. The decimal point indicates the unit:
- No decimal point: Hours (e.g., 123 = 123 hours)
- Decimal point on the rightmost digit: Seconds (e.g., 12.3 = 12.3 seconds)
- Decimal point on the middle digit: Minutes (e.g., 1.2.3 = 12.3 minutes)
- After setting the desired time and unit, press the నిర్ధారించు బటన్ (power icon) to save the settings and return to the normal operating state.
5.3 Understanding Operating Modes (P-1 to P-6)
Each mode defines how T1 and T2 interact to control the relay output. Refer to the specific mode descriptions below:
- P-1: Delay ON (Single Trigger)
Upon trigger, the relay turns ON after T1, then turns OFF. - P-2: Delay OFF (Single Trigger)
Upon trigger, the relay turns ON immediately, then turns OFF after T1. - P-3: Cyclic ON/OFF (Continuous)
The relay cycles ON for T1, then OFF for T2, continuously. - P-4: Cyclic OFF/ON (Continuous)
The relay cycles OFF for T1, then ON for T2, continuously. - P-5: Delay ON with Trigger Reset
Upon trigger, the relay turns ON after T1. If triggered again during T1, the timer resets. - P-6: Delay OFF with Trigger Reset
Upon trigger, the relay turns ON immediately. After T1, it turns OFF. If triggered again during T1, the timer resets.
Note: Specific trigger inputs (if applicable for P-1, P-2, P-5, P-6) are typically connected to a separate input terminal, not explicitly detailed in the provided product information. For models requiring an external trigger, consult the product's specific wiring diagram.
6. నిర్వహణ
The Hilitand Digital Cyclic Adjustable Delay Relay is designed for low maintenance. Follow these guidelines to ensure optimal performance and longevity:
- పరికరాన్ని శుభ్రంగా మరియు దుమ్ము మరియు చెత్త లేకుండా ఉంచండి. శుభ్రం చేయడానికి మృదువైన, పొడి వస్త్రాన్ని ఉపయోగించండి.
- మాడ్యూల్ వేడెక్కకుండా నిరోధించడానికి చుట్టూ సరైన వెంటిలేషన్ ఉండేలా చూసుకోండి.
- Regularly check wiring connections for tightness, especially in environments with vibration.
- Store the device in a dry, cool environment when not in use.
7. ట్రబుల్షూటింగ్
If you encounter issues with your delay relay, refer to the following common problems and solutions:
| సమస్య | సాధ్యమైన కారణం | పరిష్కారం |
|---|---|---|
| పరికరం పవర్ ఆన్ చేయదు. | విద్యుత్ సరఫరా లేదు; తప్పు వాల్యూమ్tage; incorrect wiring polarity. | Check DC 12V power supply connection. Verify V+ and V- are correctly wired. |
| Relay does not activate/deactivate. | Incorrect load wiring; incorrect mode setting; time values set to zero. | Verify load is connected between COM and NO. Check selected operating mode and ensure T1/T2 are set to non-zero values. |
| Timing is inaccurate. | Incorrect time unit selected (seconds, minutes, hours). | Re-enter time setting mode and verify the decimal point position corresponds to the desired time unit. |
| Settings are not saved. | Settings not confirmed. | మీరు నొక్కినట్లు నిర్ధారించుకోండి నిర్ధారించు బటన్ (power icon) after making changes to save them. |
ఈ పరిష్కారాలను ప్రయత్నించిన తర్వాత కూడా సమస్య కొనసాగితే, దయచేసి కస్టమర్ మద్దతును సంప్రదించండి.
8. స్పెసిఫికేషన్లు
| ఫీచర్ | స్పెసిఫికేషన్ |
|---|---|
| బ్రాండ్ | హిలిటాండ్ |
| మోడల్ | B07QHVS7HD |
| ఇన్పుట్ వాల్యూమ్tage | DC 12V |
| సమయ పరిధి | 0.1 సెకన్ల నుండి 999 గంటలు |
| అవుట్పుట్ కరెంట్ | Max 5A (AC/DC load) |
| ఆపరేటింగ్ మోడ్ల సంఖ్య | 6 |
| ప్రదర్శన రకం | డ్యూయల్ డిజిటల్ డిస్ప్లే |
| రంగు | నలుపు |
| మెటీరియల్ | Material (as per product data) |
| మూలం దేశం | చైనా |
9. వారంటీ మరియు మద్దతు
9.1 వారంటీ సమాచారం
This Hilitand product is covered by a standard manufacturer's warranty against defects in materials and workmanship. The warranty period typically begins from the date of purchase. Please retain your proof of purchase for warranty claims. For specific warranty terms and conditions, refer to the documentation provided with your purchase or contact your retailer.
9.2 కస్టమర్ మద్దతు
If you require technical assistance, have questions about product operation, or need to report a defect, please contact the retailer from whom you purchased the product. They will be able to provide support or guide you to the appropriate service channels.