
పరిచయం
This user manual provides comprehensive instructions for the Andoer HDV-201LM 1080P FHD Digital Video Camera. It covers setup, operation, maintenance, and troubleshooting to help you get the most out of your device. The Andoer HDV-201LM is a portable digital video camera designed for capturing high-quality photos and videos, making it ideal for preserving memories.
ప్యాకేజీ విషయాలు
ప్యాకేజీని తెరిచినప్పుడు, దయచేసి కింది అంశాలన్నీ చేర్చబడ్డాయో లేదో తనిఖీ చేయండి:
- 1 x Digital Video Camera
- 1 x కెమెరా బ్యాగ్
- 2 x Rechargeable Batteries (one already in camera)
- 1 x USB కేబుల్
- 1 x AV కేబుల్
- 1 x రిమోట్ కంట్రోల్
- 1 x యూజర్ మాన్యువల్ (ఇంగ్లీష్)

Image: All items included in the Andoer HDV-201LM package, including the camera, batteries, cables, remote, and bag.
సెటప్
1. బ్యాటరీ ఇన్స్టాలేషన్
The camera comes with two 3.7V 1500mAh rechargeable batteries. One battery is typically pre-installed. Before first use, ensure you remove any insulating film from the battery terminals.
- Open the battery compartment cover, usually located at the bottom or side of the camera.
- Insert the battery, ensuring the correct polarity as indicated inside the compartment.
- బ్యాటరీ కంపార్ట్మెంట్ కవర్ను సురక్షితంగా మూసివేయండి.
- Charge the battery fully before initial use using the provided USB cable.

Image: The Andoer HDV-201LM camera, two rechargeable batteries, and the remote control, illustrating the main components.
2. మెమరీ కార్డ్ సంస్థాపన
The camera requires an SD card (not included) for storing photos and videos. A Class 10 or higher SD card is highly recommended for optimal performance and smooth recording.
- సాధారణంగా బ్యాటరీ కంపార్ట్మెంట్ దగ్గర SD కార్డ్ స్లాట్ను గుర్తించండి.
- Insert the SD card with the metal contacts facing the correct direction until it clicks into place.
- తీసివేయడానికి, కార్డు బయటకు వచ్చే వరకు సున్నితంగా లోపలికి నెట్టండి.
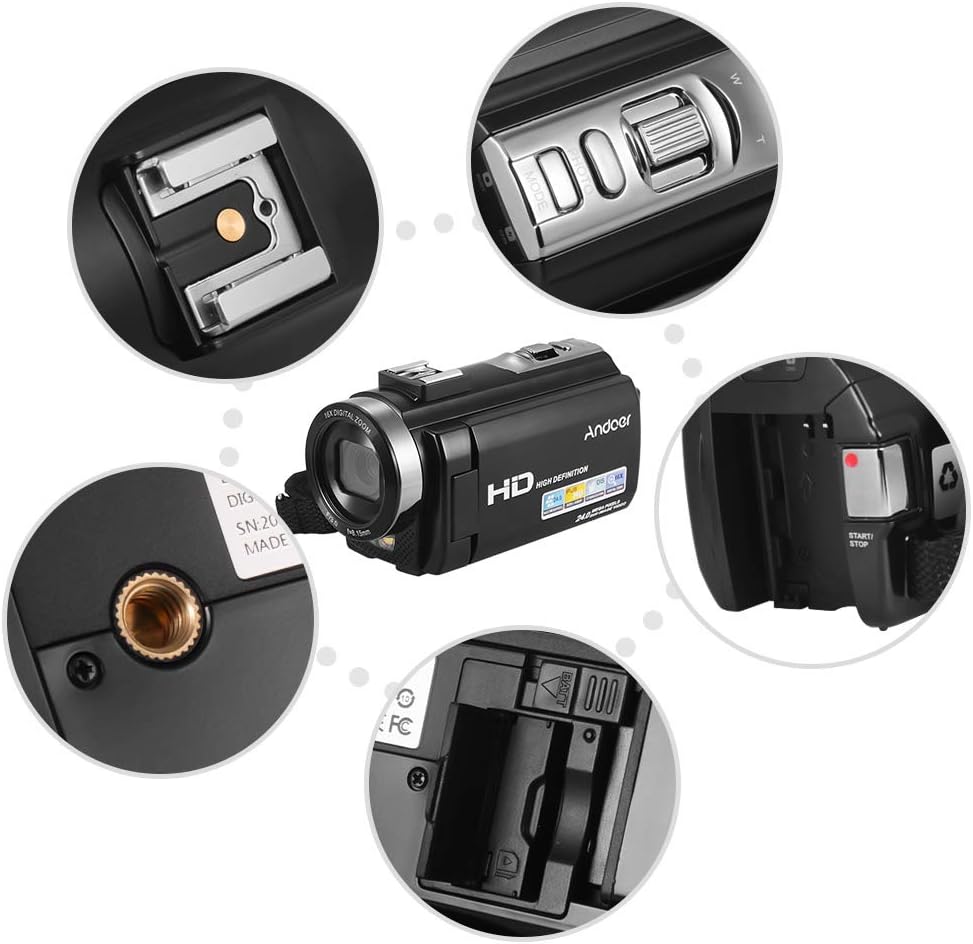
చిత్రం: క్లోజప్ views of various camera components, including the SD card slot, hot shoe mount, and control buttons.
3. బాహ్య ఉపకరణాలను అటాచ్ చేయడం
The camera features a hot shoe mount for connecting external accessories such as microphones or LED video lights (sold separately).
- Slide the accessory onto the hot shoe mount located on top of the camera.
- Secure the accessory if it has a locking mechanism.
- For external microphones, connect the audio cable to the camera's microphone input port.

Image: Illustration of the hot shoe mount on the Andoer HDV-201LM camera, showing how external microphones and LED lights can be attached.
ఆపరేటింగ్ సూచనలు
1. పవర్ ఆన్/ఆఫ్
- To power on, open the LCD screen or press the శక్తి బటన్.
- To power off, close the LCD screen or press and hold the శక్తి బటన్.
2. వీడియోలను రికార్డ్ చేయడం
The camera supports 1080P FULL HD video recording.
- కెమెరాను ఆన్ చేయండి.
- Ensure the camera is in video recording mode (usually indicated by a video camera icon on the screen). If not, press the మోడ్ మారడానికి బటన్.
- నొక్కండి START/STOP button to begin recording. The recording indicator will light up.
- నొక్కండి START/STOP రికార్డింగ్ ఆపివేయడానికి మళ్లీ బటన్.
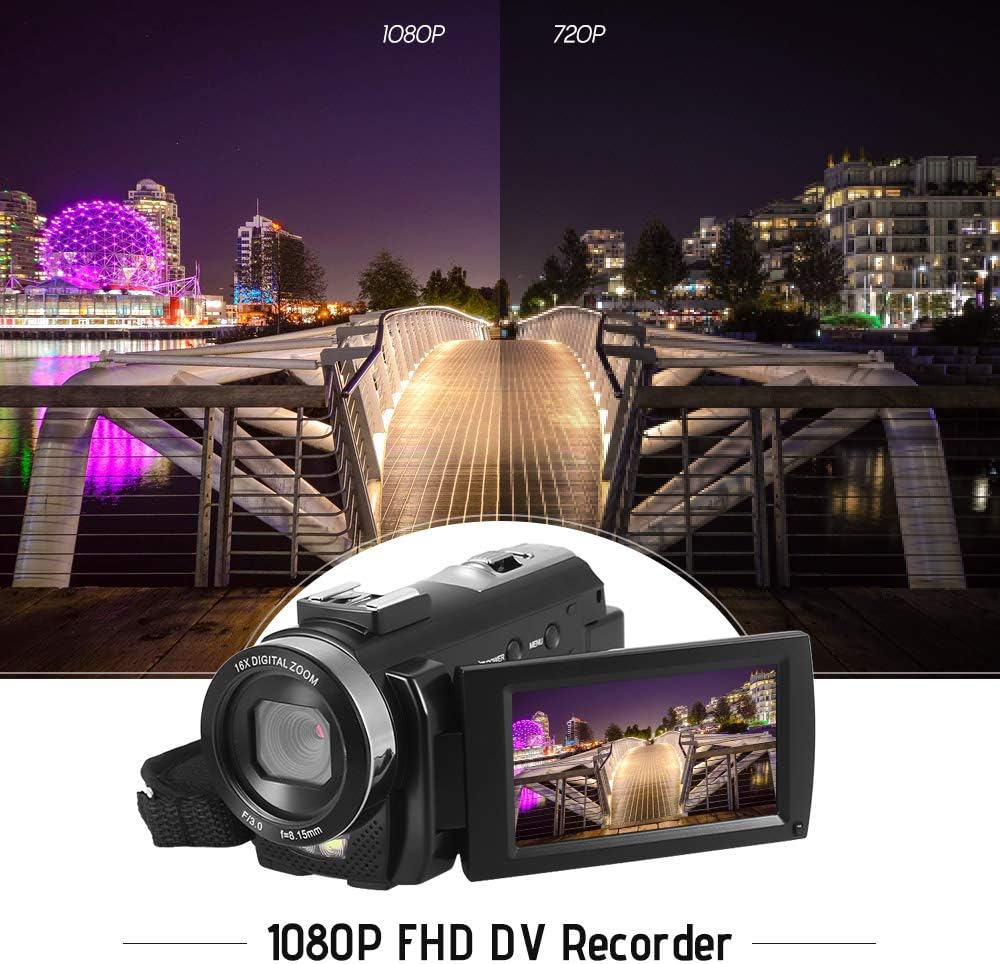
Image: Comparison of 1080P and 720P video quality, highlighting the 1080P FHD capability of the Andoer HDV-201LM camcorder.
3. ఫోటోలు తీయడం
The camera can capture still images up to 24MP (interpolation).
- కెమెరాను ఆన్ చేయండి.
- నొక్కండి మోడ్ button to switch to photo mode (indicated by a camera icon).
- LCD స్క్రీన్ ఉపయోగించి మీ షాట్ను ఫ్రేమ్ చేయండి.
- నొక్కండి ఫోటో button (shutter button) to take a picture.
4. Using the LCD Screen
The 3.0-inch TFT-LCD screen offers 270° rotation for flexible viewing కోణాలు.
- Rotate the screen to face forward for self-recording or to various angles for comfortable viewing.
- The screen displays recording status, battery level, mode, and other settings.

Image: The Andoer HDV-201LM camera with its rotatable LCD screen open, showing the camera's compact design.
5. డిజిటల్ జూమ్
The camera features 16X digital zoom.
- ఉపయోగించండి W (వెడల్పు) మరియు టి (టెలిఫోటో) buttons, typically located near the top of the camera, to zoom in or out.
- Note: Digital zoom may reduce image quality compared to optical zoom.

Image: Demonstrates the 16X digital zoom capability of the Andoer HDV-201LM, showing a zoomed-in view of a subject.
6. మెనూ సెట్టింగులు
Access the menu to adjust various camera settings:
- నొక్కండి మెనూ సెట్టింగుల మెనుని నమోదు చేయడానికి బటన్.
- ఎంపికలను ఎంచుకోవడానికి నావిగేషన్ బటన్లను (పైకి/క్రిందికి/ఎడమ/కుడి) ఉపయోగించండి.
- నొక్కండి OK ఎంపికను నిర్ధారించడానికి బటన్.
- నొక్కండి మెనూ మళ్ళీ నిష్క్రమించడానికి.
కీలక సెట్టింగ్లలో ఇవి ఉన్నాయి:
- వైట్ బ్యాలెన్స్: Auto, Daylight, Cloudy, Fluorescent, Tungsten.
- మోడ్: Auto, Night, Portrait, Landscape, Backlight, Sport, Party, Beach, High Sensitivity.
- బహిరంగపరచడం: Adjust brightness from ±3.0EV.
- నేనే-టైమర్: Off, 2s, 5s, 10s.
- ఆటో పవర్ ఆఫ్: OFF, 1min, 3min, 5min.
- ఇతర విధులు: Face detection, smile capture, beauty face, anti-shake.

Image: A user holding and operating the Andoer HDV-201LM camera, demonstrating its portability and ease of use.
7. కంప్యూటర్ (USB) కి కనెక్ట్ చేయడం
You can connect the camera to a computer to transfer files.
- కెమెరా పవర్ ఆన్ చేయబడిందని నిర్ధారించుకోండి.
- అందించిన USB కేబుల్ని ఉపయోగించి కెమెరాను మీ కంప్యూటర్కి కనెక్ట్ చేయండి.
- The camera will appear as a removable disk drive on your computer.
- You can now access and transfer your photos and videos.
Supported Operating Systems: Windows XP/Vista/7/8/10.

చిత్రం: క్లోజప్ view of the USB and TV output ports on the Andoer HDV-201LM camera, indicating connectivity options.
8. Connecting to a TV (AV Output)
View your recordings directly on a television using the AV cable.
- Connect one end of the AV cable to the camera's AV output port.
- Connect the other end to the AV input ports on your television (yellow for video, white/red for audio).
- Select the correct AV input source on your TV.
TV Output Standards: NTSC/PAL.
9. రిమోట్ కంట్రోల్ ఉపయోగించడం
చేర్చబడిన రిమోట్ కంట్రోల్ దూరం నుండి సౌకర్యవంతమైన ఆపరేషన్ కోసం అనుమతిస్తుంది.
- Ensure the remote control battery (1 x 3V CR2025) is installed correctly.
- Point the remote control towards the camera's IR receiver.
- Use the buttons on the remote to control recording, playback, zoom, and menu navigation.
నిర్వహణ
1. కెమెరాను శుభ్రపరచడం
- కెమెరా బాడీని శుభ్రం చేయడానికి మృదువైన, పొడి వస్త్రాన్ని ఉపయోగించండి.
- లెన్స్ మరియు LCD స్క్రీన్ కోసం, ప్రత్యేకమైన లెన్స్ క్లీనింగ్ క్లాత్ మరియు ద్రావణాన్ని ఉపయోగించండి. రాపిడి పదార్థాలను నివారించండి.
- బలమైన డిటర్జెంట్లు లేదా ద్రావకాలను ఉపయోగించవద్దు.
2. బ్యాటరీ సంరక్షణ
- ఉపయోగంలో లేనప్పుడు బ్యాటరీలను చల్లని, పొడి ప్రదేశంలో నిల్వ చేయండి.
- బ్యాటరీల జీవితకాలం పొడిగించడానికి తరచుగా పూర్తిగా డిశ్చార్జ్ చేయడాన్ని నివారించండి.
- కెమెరాను ఎక్కువ కాలం ఉపయోగించకపోతే, బ్యాటరీని తీసివేయండి.
3. నిల్వ
- Store the camera in its camera bag to protect it from dust and scratches.
- Keep the camera away from extreme temperatures, humidity, and direct sunlight.
ట్రబుల్షూటింగ్
| సమస్య | సాధ్యమైన కారణం | పరిష్కారం |
|---|---|---|
| కెమెరా పవర్ ఆన్ అవ్వదు. | Battery is dead or not inserted correctly. Insulating film on battery. | Charge the battery. Reinsert the battery correctly. Remove insulating film. |
| వీడియో రికార్డ్ చేయలేరు/ఫోటోలు తీయలేరు. | No SD card or SD card full/corrupted. Incorrect mode. | Insert a valid SD card. Delete files or format SD card. Switch to correct mode. |
| చిత్రం/వీడియో నాణ్యత బాగాలేదు. | Lens is dirty. Low light conditions. Digital zoom used excessively. | Clean the lens. Use LED fill light. Avoid excessive digital zoom. |
| రిమోట్ కంట్రోల్ పనిచేయడం లేదు. | Battery dead or incorrectly inserted. Obstruction between remote and camera. | Replace/reinsert remote battery. Ensure clear line of sight to IR receiver. |
| కెమెరా స్తంభించిపోతుంది లేదా స్పందించడం మానేస్తుంది. | సాఫ్ట్వేర్ లోపం. | కెమెరాను రీసెట్ చేయడానికి బ్యాటరీని తీసివేసి తిరిగి చొప్పించండి. |
స్పెసిఫికేషన్లు
| ఫీచర్ | వివరాలు |
|---|---|
| బ్రాండ్ | అండోయర్ |
| మోడల్ సంఖ్య | HDV-201LM |
| సెన్సార్ | 8MP CMOS Sensor, max. 24MP (interpolation) |
| బాహ్య మెమరీ | SD Card, max. 32G (Not included, Class 10+ recommended) |
| కెమెరా లెన్స్ | Ff (F/3.0 f=8.15mm) |
| స్క్రీన్ | 3.0 Inch TFT-LCD (16:9), 270° rotation |
| Video Format & Resolution | AVI, 1920*1080P FULL HD/30fps, 1280*720 HD/30fps, VGA 640*480/30fps, QVGA 320*240/30fps |
| Image Format & Resolution | JPG, 5600*4200 (24MP Interpolation) / 5200*3900 (20MP Interpolation) / 4608*3456 (16MP Interpolation) / 4000*3000 (12MP Interpolation) / 3648*2736 (10MP Interpolation) / 3648*2048 HD (7M-Wide Interpolation) / 2592*1944 (5MP) / 2048*1536 (3MP) / 1920*1080 HD (2M-Wide) / 640*480 VGA |
| వైట్ బ్యాలెన్స్ | Auto/ Daylight/ Cloudy/ Fluorescent/ Tungsten |
| మోడ్ | Auto/Night/Portrait/Landscape/Backlight/Sport/Party/Beach/High Sensitivity |
| బహిరంగపరచడం | E 3.0EV |
| సెల్ఫ్ టైమర్ | ఆఫ్, 2సె, 5సె, 10సె |
| ఆటో పవర్ ఆఫ్ | OFF/1min/ 3min/ 5min |
| USB పోర్ట్ | USB2.0 |
| టీవీ అవుట్పుట్ | NTSC/ PAL |
| ఆపరేటింగ్ సిస్టమ్ మద్దతు | Windows XP/Vista/7/8/10 |
| కెమెరా పవర్ సప్లై | 1 * Battery 3.7V 1500mAh (included) |
| రిమోట్ కంట్రోల్ బ్యాటరీ | 1 * 3V CR2025 Battery |
| కెమెరా పరిమాణం | 13.5 * 5.5 * 6.5cm / 5.3 * 2.2 * 2.6in |
| కెమెరా బరువు | 273g / 9.6oz (With battery) |
వారంటీ మరియు మద్దతు
This product comes with standard manufacturer support. For extended coverage, consider the following options:
- 1 Year Extended Warranty Plan
- 2 Years Extended Warranty Plan
For technical support or warranty claims, please refer to the contact information provided with your purchase documentation or visit the official Andoer webసైట్.