
1. ఉత్పత్తి ముగిసిందిview
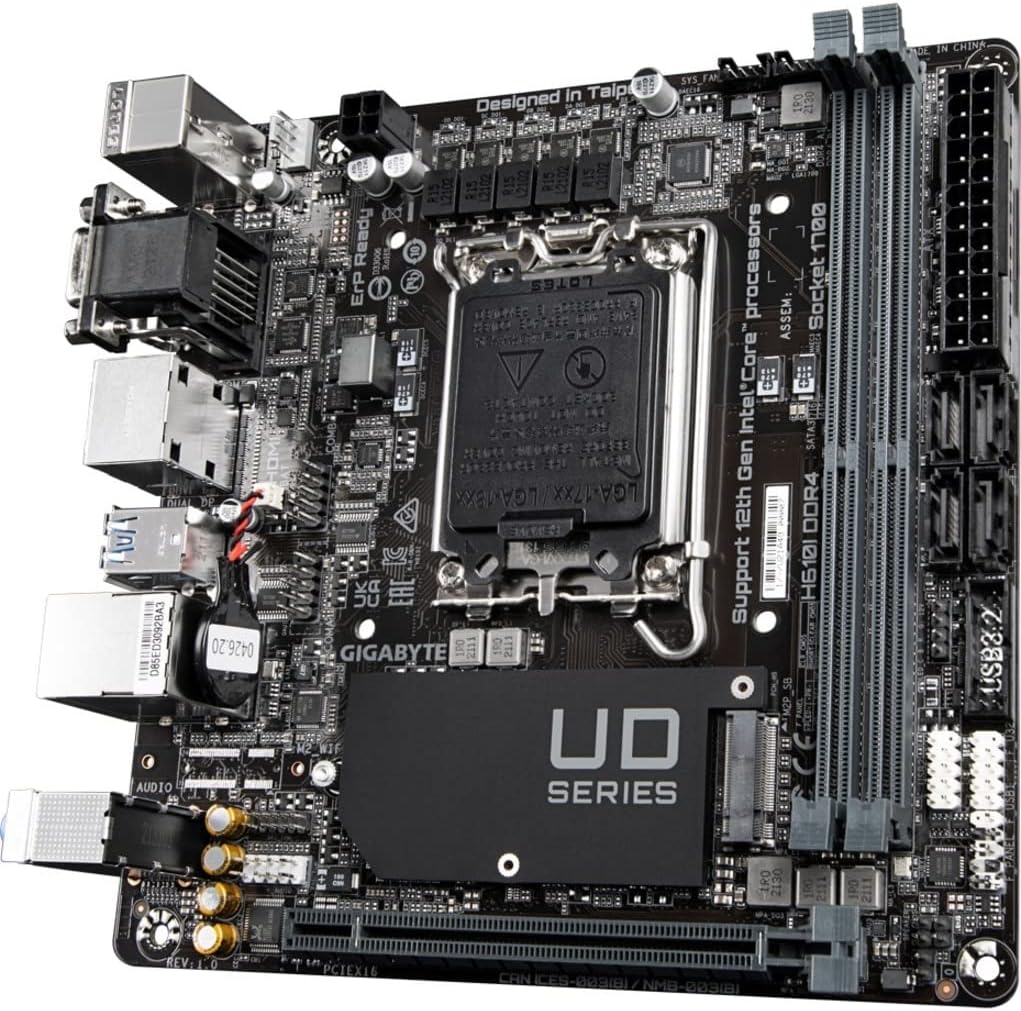
The GIGABYTE H610I DDR4 is a Mini-ITX motherboard designed to support 12th Generation Intel Core Series Processors. It offers a robust platform for building compact yet powerful systems, suitable for various applications from gaming to everyday computing. This motherboard integrates essential features for reliable performance and connectivity.
ముఖ్య లక్షణాలు:
- ఇంటెల్ LGA 1700 సాకెట్: Supports 12th Gen Intel Core Series Processors.
- DDR4 అనుకూలమైనది: Features Dual Channel Non-ECC Unbuffered DDR4 memory support with 2 DIMM slots.
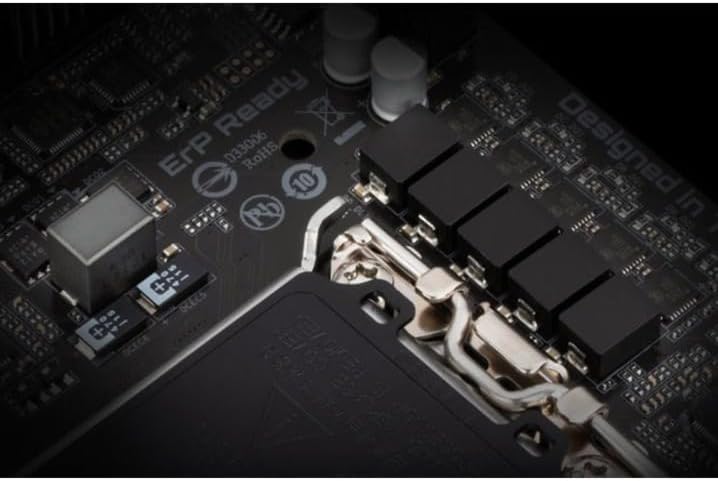
- కమాండింగ్ పవర్ డిజైన్: Equipped with a 4+1+1 Hybrid Digital VRM Design for stable power delivery.
- అధునాతన కనెక్టివిటీ: Includes PCIe 4.0 support, a Single NVMe PCIe 3.0 x4 M.2 slot, and USB 3.2 Gen1 ports.
- వేగవంతమైన నెట్వర్కింగ్: Integrated Intel GbE LAN Chip for reliable wired network connections.
- డైనమిక్ ఆడియో: Features High Quality Audio Capacitors and Audio Noise Guard for enhanced sound experience.


2. సెటప్ మరియు ఇన్స్టాలేషన్
Follow these steps for proper installation of your GIGABYTE H610I DDR4 motherboard and its components.
2.1 CPU ని ఇన్స్టాల్ చేస్తోంది
- మదర్బోర్డుపై LGA 1700 CPU సాకెట్ను గుర్తించండి.
- CPU సాకెట్ లివర్ను తెరిచి, రక్షణ కవర్ను తీసివేయండి.
- Carefully align your 12th Gen Intel Core processor with the socket, ensuring the notches on the CPU match the keys on the socket.
- Gently place the CPU into the socket without applying force.
- ప్రాసెసర్ను భద్రపరచడానికి CPU సాకెట్ లివర్ను మూసివేయండి.

2.2 DDR4 మెమరీని ఇన్స్టాల్ చేయడం
- మదర్బోర్డుపై రెండు DDR4 DIMM స్లాట్లను గుర్తించండి.
- DIMM స్లాట్ యొక్క రెండు చివర్లలో క్లిప్లను తెరవండి.
- DIMM స్లాట్లోని కీతో DDR4 మెమరీ మాడ్యూల్లోని నాచ్ను సమలేఖనం చేయండి.
- క్లిప్లు సరిగ్గా అమర్చబడే వరకు మెమరీ మాడ్యూల్ను స్లాట్లోకి గట్టిగా చొప్పించండి.
2.3 Installing NVMe M.2 SSD
- Locate the single NVMe PCIe 3.0 x4 M.2 slot.
- మదర్బోర్డ్ నుండి M.2 స్క్రూ మరియు స్టాండ్ఆఫ్ను తీసివేయండి.
- స్లాట్లోకి M.2 SSDని కోణంలో చొప్పించండి.
- Gently push down the M.2 SSD and secure it with the screw and standoff.
2.4 పవర్ కనెక్షన్లు
- మీ విద్యుత్ సరఫరా నుండి 24-పిన్ ATX ప్రధాన విద్యుత్ కనెక్టర్ను మదర్బోర్డ్లోని సంబంధిత హెడర్కు కనెక్ట్ చేయండి.
- Connect the 8-pin CPU power connector (or 4-pin if applicable) to the CPU power header.
2.5 ఫ్రంట్ ప్యానెల్ మరియు పెరిఫెరల్ కనెక్షన్లు
Connect your case's front panel headers (power button, reset button, USB, audio) to the corresponding pins on the motherboard. Refer to your case manual for specific pin layouts. Connect peripherals such as USB devices, display cables, and network cables to the rear I/O ports.
3. ఆపరేటింగ్ సూచనలు
3.1 Initial Boot-up and BIOS/UEFI Setup
- అన్ని భాగాలను అసెంబుల్ చేసిన తర్వాత, మీ మానిటర్, కీబోర్డ్ మరియు మౌస్ను కనెక్ట్ చేయండి.
- మీ సిస్టమ్ను ఆన్ చేయండి. బూట్ ప్రాసెస్ సమయంలో, DEL BIOS/UEFI సెటప్ యుటిలిటీలోకి ప్రవేశించడానికి పదే పదే కీని నొక్కండి.
- In the BIOS/UEFI, you can configure boot order, system time, and other advanced settings. Save changes and exit to continue booting into your operating system installer.
3.2 డ్రైవర్ ఇన్స్టాలేషన్
After installing your operating system, install the necessary drivers for the motherboard components. These typically include chipset drivers, LAN drivers, audio drivers, and any other peripheral drivers. Drivers can usually be found on the GIGABYTE official webమీ మదర్బోర్డ్ మోడల్ కోసం సైట్.
4. నిర్వహణ
4.1 శుభ్రపరచడం
Regularly clean your computer's interior to prevent dust buildup, which can lead to overheating and reduced performance. Use compressed air to remove dust from fans, heatsinks, and other components. Ensure the system is powered off and unplugged before cleaning.
4.2 BIOS/UEFI నవీకరణలు
GIGABYTE ని కాలానుగుణంగా తనిఖీ చేయండి website for BIOS/UEFI updates. Updates can improve system stability, add support for new hardware, or fix bugs. Follow the instructions provided by GIGABYTE carefully when performing a BIOS/UEFI update to avoid system damage.
5. ట్రబుల్షూటింగ్
ఈ విభాగం మీ మదర్బోర్డుతో మీరు ఎదుర్కొనే సాధారణ సమస్యలను పరిష్కరిస్తుంది.
5.1 డిస్ప్లే అవుట్పుట్ లేదు
- మానిటర్ కనెక్షన్ను తనిఖీ చేయండి: Ensure your monitor is correctly connected to the graphics card or motherboard's integrated graphics port and is powered on.
- Verify RAM Installation: Reseat the DDR4 memory modules firmly in their slots. Incorrectly seated RAM is a common cause of no display.
- CPU పవర్: Confirm the 8-pin (or 4-pin) CPU power connector is securely plugged into the motherboard.
- గ్రాఫిక్స్ కార్డ్: If using a dedicated graphics card, ensure it is properly seated in the PCIe slot and has all necessary power cables connected.
- బెంట్ CPU పిన్స్: Carefully inspect the CPU socket for any bent pins. If found, contact GIGABYTE support.
5.2 System Unresponsive / Does Not Boot
- విద్యుత్ సరఫరా: Ensure the power supply is connected to the motherboard (24-pin ATX and CPU power) and is switched on.
- CMOS క్లియర్ చేయండి: Try clearing the CMOS (Complementary Metal-Oxide-Semiconductor) settings. This can usually be done by removing the CMOS battery for a few minutes or using a dedicated jumper on the motherboard.
- Minimal Boot Configuration: Disconnect all non-essential peripherals and components (e.g., extra storage drives, expansion cards) and attempt to boot with only the CPU, one RAM stick, and the graphics card (if no integrated graphics).
5.3 RAM Slot Malfunction
- If one of the two DDR4 RAM slots is not functioning, try testing each RAM stick individually in each slot to isolate the faulty component (RAM stick or motherboard slot).
- Ensure the RAM is compatible with the motherboard's specifications (DDR4, Non-ECC Unbuffered).
6. సాంకేతిక లక్షణాలు
| ఫీచర్ | స్పెసిఫికేషన్ |
|---|---|
| బ్రాండ్ | గిగాబైట్ |
| మోడల్ పేరు | H610I DDR4 |
| CPU సాకెట్ | LGA 1700 |
| అనుకూల ప్రాసెసర్లు | 12th Gen Intel Core Series Processors |
| చిప్సెట్ రకం | ఇంటెల్ H610 |
| RAM మెమరీ టెక్నాలజీ | DDR4 (Dual Channel Non-ECC Unbuffered) |
| మెమరీ స్లాట్లు | 2 DIMMలు |
| మెమరీ క్లాక్ స్పీడ్ | 3200 MHz వరకు |
| PCIe స్లాట్లు | PCIe 4.0 |
| M.2 స్లాట్లు | 1 x NVMe PCIe 3.0 x4 M.2 |
| USB పోర్ట్లు | USB 3.2 Gen1, USB 2.0 |
| LAN | Intel GbE LAN Chip |
| ఆడియో | High Quality Audio Capacitors and Audio Noise Guard |
| ఫారమ్ ఫ్యాక్టర్ | మినీ-ITX |
| ఉత్పత్తి కొలతలు | 8.74 x 7.09 x 2.56 అంగుళాలు |
| వస్తువు బరువు | 1.3 పౌండ్లు |
7. ఉత్పత్తి వీడియోలు
7.1 ఉత్పత్తి ప్రదర్శన వీడియో
This video provides a brief demonstration of the GIGABYTE H610I DDR4 Mini-ITX Motherboard, showcasing its physical features and design. (Duration: 0:35)
7.2 ఉత్పత్తి ముగిసిందిview వీడియో
ఒక అధికారిview video detailing the features and benefits of the GIGABYTE H610I DDR4 Mini-ITX Motherboard. (Duration: 0:52)
8. వారంటీ మరియు మద్దతు
8.1 వారంటీ సమాచారం
GIGABYTE products are covered by a limited warranty. The specific terms and duration of the warranty may vary by region and product type. Please refer to the warranty card included with your product or visit the official GIGABYTE webవివరణాత్మక వారంటీ సమాచారం కోసం సైట్.
8.2 సాంకేతిక మద్దతు
For technical assistance, driver downloads, or further product information, please visit the official GIGABYTE support webసైట్. మీరు తరచుగా అడిగే ప్రశ్నలు, ట్రబుల్షూటింగ్ మార్గదర్శకాలు మరియు కస్టమర్ సేవ కోసం సంప్రదింపు సమాచారాన్ని కనుగొనవచ్చు.
GIGABYTE అధికారికం Webసైట్: www.gigabyte.com