
Sorand AC 230V Floor Heating Thermostat
Sorand AC 230V Digital Programmable Floor Heating Thermostat User Manual
Model: AC 230V Floor Heating Thermostat
పరిచయం
This manual provides comprehensive instructions for the installation, operation, and maintenance of your Sorand AC 230V Digital Programmable Floor Heating Thermostat. Please read this manual carefully before installation and use to ensure proper function and safety.
The thermostat is designed for electronic floor heating systems and other electrical heating elements. It features a large LCD with backlight, programmable temperature settings, and internal/external temperature sensing capabilities.
భద్రతా సమాచారం
- ఇన్స్టాలేషన్ తప్పనిసరిగా అర్హత కలిగిన ఎలక్ట్రీషియన్ చేత నిర్వహించబడాలి.
- సంస్థాపన లేదా నిర్వహణకు ముందు విద్యుత్తు డిస్కనెక్ట్ చేయబడిందని నిర్ధారించుకోండి.
- థర్మోస్టాట్ను నీటికి లేదా అధిక తేమకు గురిచేయవద్దు.
- పేర్కొన్న వాల్యూమ్లో పని చేయండిtagఇ మరియు ప్రస్తుత పరిమితులు.
ప్యాకేజీ విషయాలు
ప్యాకేజీలో అన్ని అంశాలు ఉన్నాయని నిర్ధారించుకోండి:
- 1 x Sorand AC 230V Digital Programmable Floor Heating Thermostat
- 1 x External Temperature Sensor Cable (approx. 3 meters)
- 2 x మౌంటు స్క్రూలు
- 1 x యూజర్ మాన్యువల్ (ఈ పత్రం)

Image: Contents of the Sorand thermostat package, showing the main unit, external sensor cable, mounting screws, and the instruction manual.
సెటప్ మరియు ఇన్స్టాలేషన్
ముఖ్యమైన: Installation should only be carried out by a qualified electrician. Ensure the main power supply is turned off before commencing any wiring work.
వైరింగ్ రేఖాచిత్రం
Refer to the wiring diagram on the back of the thermostat unit for correct connections. The terminals are typically labeled as follows:
- L1, N1: Power input (AC 230V)
- LOAD (1, 2): Connection to the heating element
- NTC (5, 6): Connection for the external floor temperature sensor

చిత్రం: వెనుక view of the Sorand thermostat, displaying the wiring terminals and a simplified diagram for electrical connections.
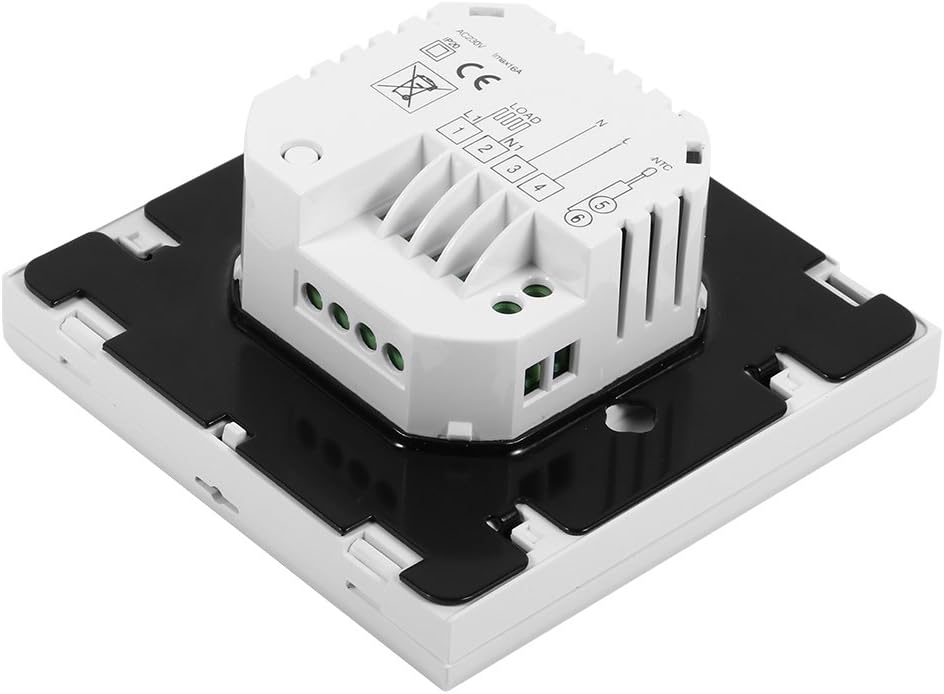
చిత్రం: వైపు view of the Sorand thermostat, illustrating the internal components and ports for wiring connections.
మౌంటు
- Prepare a standard electrical wall box (86x86mm recommended).
- Connect the power supply, heating load, and external sensor wires according to the wiring diagram.
- Carefully push the wired thermostat into the wall box.
- Secure the thermostat to the wall box using the provided screws.
- Attach the front panel of the thermostat.
ఆపరేటింగ్ సూచనలు
The thermostat features a large LCD and touch-sensitive buttons for easy operation.
బటన్ విధులు
- ⏻ ⏻ తెలుగు (శక్తి): Turns the thermostat ON/OFF.
- ↻ లు (Mode/Cycle): Switches between manual mode and programmable mode.
- ⏱ ⏱ తెలుగు (Clock/Time): Sets the time and enters programming mode.
- ▲ ▲ తెలుగు (పైకి బాణం): Increases temperature setting or adjusts values.
- ▼ (క్రింది బాణం): Decreases temperature setting or adjusts values.

చిత్రం: ముందు భాగం view of the Sorand thermostat, highlighting the LCD screen and the five touch-sensitive control buttons below it.
సమయం మరియు రోజు సెట్టింగ్
- నొక్కండి మరియు పట్టుకోండి ⏱ ⏱ తెలుగు టైమ్ సెట్టింగ్ మోడ్లోకి ప్రవేశించడానికి 3 సెకన్ల పాటు బటన్.
- ఉపయోగించండి ▲ ▲ తెలుగు మరియు ▼ గంటను సర్దుబాటు చేయడానికి బటన్లను నొక్కి, ఆపై నొక్కండి ⏱ ⏱ తెలుగు to confirm and move to minutes, then day of the week.
- నొక్కండి ⏱ ⏱ తెలుగు again to exit, or wait for 10 seconds for automatic exit.
మాన్యువల్ మోడ్ ఆపరేషన్
In manual mode, the thermostat maintains a constant temperature set by the user.
- నొక్కండి ↻ లు button to switch to manual mode (indicated by a hand icon or similar on the display).
- ఉపయోగించండి ▲ ▲ తెలుగు మరియు ▼ మీకు కావలసిన ఉష్ణోగ్రతను సెట్ చేయడానికి బటన్లు.
- The thermostat will now maintain this temperature.
Programmable Mode Operation (6 Periods)
The thermostat allows for 6 programmable periods per day, enabling different temperature settings at different times.
- నొక్కండి ↻ లు button to switch to programmable mode (indicated by a clock icon or similar).
- నొక్కండి మరియు పట్టుకోండి ⏱ ⏱ తెలుగు button for 3 seconds to enter programming mode.
- The display will show the first period (e.g., "Period 1"). Use ▲ ▲ తెలుగు మరియు ▼ to set the start time and desired temperature for this period.
- నొక్కండి ⏱ ⏱ తెలుగు to move to the next period and repeat the process for all 6 periods.
- After setting all periods, press ⏱ ⏱ తెలుగు again or wait for automatic exit to save settings.
The thermostat will automatically follow the programmed schedule.
Sensor Selection (Internal/External)
The thermostat can use its internal sensor or the external floor sensor. The selection method is typically found in advanced settings or by a specific button combination. Refer to the on-screen indicators for the active sensor.
నిర్వహణ
- థర్మోస్టాట్ డిస్ప్లేను శుభ్రం చేసి, సిasinమృదువైన, పొడి గుడ్డతో జి. రాపిడి క్లీనర్లు లేదా ద్రావకాలను ఉపయోగించవద్దు.
- Ensure the thermostat is free from dust and debris to maintain optimal performance.
- No user-serviceable parts inside. Do not attempt to open or repair the unit.
ట్రబుల్షూటింగ్
| సమస్య | సాధ్యమైన కారణం | పరిష్కారం |
|---|---|---|
| థర్మోస్టాట్ ఆన్ కావడం లేదు. | విద్యుత్ సరఫరా లేదు; వైరింగ్ తప్పు. | సర్క్యూట్ బ్రేకర్ను తనిఖీ చేయండి. వైరింగ్ కనెక్షన్లను ధృవీకరించండి (అర్హత కలిగిన ఎలక్ట్రీషియన్ను సంప్రదించండి). |
| తాపన ఆన్/ఆఫ్ చేయడం లేదు. | Incorrect temperature setting; thermostat in OFF mode; wiring issue. | Adjust set temperature. Ensure thermostat is ON. Check heating element wiring. |
| సరికాని ఉష్ణోగ్రత పఠనం. | Sensor malfunction; incorrect sensor selected. | Verify sensor connection. Check if internal or external sensor is active. |
| డిస్ప్లే ఖాళీగా లేదా మినుకుమినుకుమంటోంది. | విద్యుత్తులో హెచ్చుతగ్గులు; అంతర్గత లోపం. | Reset power to the thermostat. If issue persists, contact support. |
స్పెసిఫికేషన్లు
| ఫీచర్ | వివరాలు |
|---|---|
| బ్రాండ్ | Sorand |
| మోడల్ | AC 230V Floor Heating Thermostat |
| వర్కింగ్ వాల్యూమ్tage | AC 230V, 50/60Hz |
| కరెంట్ లోడ్ చేయండి | 12/16A (Electric Heating) |
| ఖచ్చితత్వం | ±0.5℃ |
| Set-point Temperature Range | 5℃ - 35℃ |
| Limit Temperature Range | 5℃ - 99℃ |
| విద్యుత్ వినియోగం | <0.3W |
| ఉష్ణోగ్రత సెన్సార్ | NTC (Internal and External) |
| Surface Size | సుమారుగా 86 x 86 x 40మి.మీ (3.4 x 3.4 x 1.6 అంగుళాలు) |
| External Sensor Cable Length | సుమారు 3 మీటర్లు (9.8 అడుగులు) |
| మెటీరియల్ | PC+ABS |
| ప్రదర్శన రకం | బ్యాక్లైట్తో డిజిటల్ LCD |
| నియంత్రణ పద్ధతి | టచ్ప్యాడ్ నియంత్రణ |
వారంటీ మరియు మద్దతు
This product is covered by the manufacturer's standard warranty. Please refer to the product packaging or your point of purchase for specific warranty terms and conditions.
సాంకేతిక మద్దతు, ట్రబుల్షూటింగ్ సహాయం లేదా వారంటీ క్లెయిమ్ల కోసం, దయచేసి మీ రిటైలర్ లేదా తయారీదారుని నేరుగా సంప్రదించండి. కొనుగోలు రుజువుగా మీ కొనుగోలు రసీదును ఉంచండి.
Ask a question about this manual
Ask about setup, troubleshooting, compatibility, parts, safety, or missing instructions. Manuals+ will review the question and use this page’s manual context to help answer it.