
1. పరిచయం
This manual provides essential instructions for the safe and efficient use of your Ulefone Armor X7 Pro Dual SIM smartphone. The Armor X7 Pro is designed for durability, featuring IP68/69K water, dust, and drop resistance, making it suitable for challenging environments. Please read this manual thoroughly before operating your device.

Figure 1: Ulefone Armor X7 Pro, showing the front display and the textured back panel with camera module.
2. ఉత్పత్తి ముగిసిందిview
2.1 పరికర భాగాలు
Familiarize yourself with the key components of your Ulefone Armor X7 Pro.

మూర్తి 2: ముందు view of the Ulefone Armor X7 Pro, highlighting the display, front camera, and earpiece.
- ముందు కెమెరా: సెల్ఫీలు మరియు వీడియో కాల్స్ కోసం.
- ఇయర్పీస్: For audio during calls.
- ప్రదర్శన: 5-inch screen for interaction.
- మైక్రోఫోన్: వాయిస్ ఇన్పుట్ కోసం.

మూర్తి 3: వెనుకకు view of the Ulefone Armor X7 Pro, showing the main camera, flash, and fingerprint sensor.
- ప్రధాన కెమెరా: ఫోటోలు మరియు వీడియోలను సంగ్రహించడానికి.
- LED ఫ్లాష్: Provides illumination for photos and can serve as a flashlight.
- వేలిముద్ర సెన్సార్: For secure device unlocking and authentication.
- స్పీకర్: ఆడియో అవుట్పుట్ కోసం.
2.2 Rugged Design
The Armor X7 Pro features a robust construction designed to withstand harsh conditions. Its reinforced corners and durable casing provide protection against drops, dust, and water ingress.
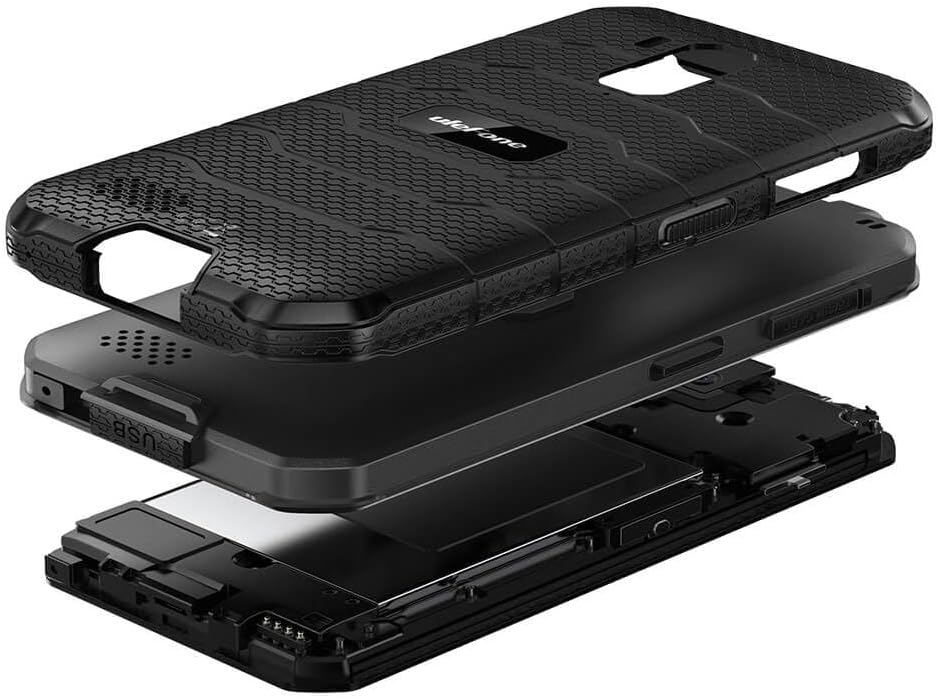
మూర్తి 4: పేలింది view illustrating the multi-layered rugged construction of the Ulefone Armor X7 Pro.
3. సెటప్
3.1 SIM కార్డ్ మరియు మైక్రో SD కార్డ్ ఇన్స్టాలేషన్
- పరికరం వైపున SIM కార్డ్ ట్రేని గుర్తించండి.
- ట్రేని తెరవడానికి అందించిన SIM ఎజెక్టర్ సాధనాన్ని ఉపయోగించండి.
- Carefully place your Nano-SIM cards and/or a MicroSD card into the designated slots. Ensure the gold contacts face downwards.
- Gently push the tray back into the device until it clicks into place. Ensure the tray is fully sealed to maintain water and dust resistance.
3.2 పరికరాన్ని ఛార్జ్ చేస్తోంది
Before first use, fully charge your Ulefone Armor X7 Pro.
- మీ ఫోన్లోని ఛార్జింగ్ పోర్ట్కి USB కేబుల్ను కనెక్ట్ చేయండి.
- Connect the other end of the USB cable to a power adapter, then plug the adapter into a power outlet.
- ఛార్జింగ్ సూచిక తెరపై కనిపిస్తుంది.
3.3 పవర్ చేయడం ఆన్/ఆఫ్
- పవర్ ఆన్ చేయడానికి: Ulefone లోగో కనిపించే వరకు పవర్ బటన్ను నొక్కి పట్టుకోండి.
- పవర్ ఆఫ్ చేయడానికి: Press and hold the Power button until the power options appear on the screen, then select 'Power off'.
4. ఆపరేటింగ్ సూచనలు
4.1 ప్రాథమిక నావిగేషన్
Use touch gestures such as tap, swipe, pinch, and spread to navigate the interface.
4.2 కాల్స్ చేయడం మరియు సందేశాలు పంపడం
- కాల్లు: Open the 'Phone' app, enter the number, and tap the call icon.
- సందేశాలు: Open the 'Messages' app, tap 'Start chat', enter the recipient and your message.
4.3 కెమెరాను ఉపయోగించడం
Open the 'Camera' app. Tap the shutter button to take a photo or the video icon to record a video. Swipe left or right to switch between modes.
4.4 ఫింగర్ప్రింట్ అన్లాక్
వేలిముద్ర అన్లాక్ను సెటప్ చేయడానికి:
- Go to 'Settings' > 'Security & location' > 'Fingerprint'.
- మీ వేలిముద్రను నమోదు చేయడానికి ఆన్-స్క్రీన్ సూచనలను అనుసరించండి.
- Once registered, you can unlock your device by placing your finger on the sensor.
4.5 నెట్వర్క్ కనెక్టివిటీ
- Wi-Fi: Go to 'Settings' > 'Network & internet' > 'Wi-Fi'. Turn Wi-Fi on and select a network to connect.
- మొబైల్ డేటా: Go to 'Settings' > 'Network & internet' > 'Mobile network'. Ensure 'Mobile data' is enabled.
5. నిర్వహణ
5.1 మీ పరికరాన్ని శుభ్రపరచడం
ఫోన్ స్క్రీన్ మరియు బాడీని శుభ్రం చేయడానికి మృదువైన, మెత్తటి బట్టను ఉపయోగించండి. కఠినమైన రసాయనాలు లేదా రాపిడి పదార్థాలను ఉపయోగించకుండా ఉండండి.
5.2 Water and Dust Resistance (IP68/IP69K)
The Ulefone Armor X7 Pro is rated IP68/IP69K, meaning it is resistant to dust and can withstand water immersion up to 1.5 meters for 30 minutes. It can also handle high-pressure, high-temperature water jets. To maintain this resistance:
- Ensure all port covers (USB, SIM tray) are securely closed.
- Do not expose the device to water if any port covers are open or damaged.
- If the device gets wet, dry it thoroughly before charging or opening any ports.
- Avoid exposing the device to saltwater or other liquids that may corrode components.
5.3 బ్యాటరీ సంరక్షణ
- బ్యాటరీ జీవితకాలం క్షీణించే తీవ్రమైన ఉష్ణోగ్రతలను నివారించండి.
- Use only Ulefone-approved chargers and cables.
- బ్యాటరీని పంక్చర్ చేయవద్దు లేదా పాడు చేయవద్దు.
6. ట్రబుల్షూటింగ్
మీ పరికరంతో మీకు సమస్యలు ఎదురైతే, ఈ క్రింది పరిష్కారాలను ప్రయత్నించండి:
| సమస్య | పరిష్కారం |
|---|---|
| పరికరం ఆన్ చేయబడలేదు | బ్యాటరీ ఛార్జ్ అయ్యిందని నిర్ధారించుకోండి. రీస్టార్ట్ చేయమని బలవంతం చేయడానికి పవర్ బటన్ను కనీసం 10 సెకన్ల పాటు నొక్కి ఉంచండి. |
| పేలవమైన నెట్వర్క్ సిగ్నల్ | Check SIM card installation. Move to an area with better network coverage. Restart the device. |
| బ్యాటరీ త్వరగా అయిపోతుంది | Close unused apps. Reduce screen brightness. Disable Wi-Fi/Bluetooth when not in use. |
| యాప్లు క్రాష్ అవుతున్నాయి లేదా స్తంభించిపోతున్నాయి | Clear app cache/data in Settings. Update apps. If persistent, consider a factory reset (back up data first). |
If problems persist, contact Ulefone customer support.
7. స్పెసిఫికేషన్లు
Key technical specifications for the Ulefone Armor X7 Pro:
- మోడల్: UF-AX7P/BK
- కొలతలు: 0.57 x 3.11 x 5.91 అంగుళాలు
- బరువు: 8.3 ఔన్సులు (234 గ్రాములు)
- స్క్రీన్ పరిమాణం: 5 అంగుళాలు
- RAM: 4 GB
- మెమరీ స్టోరేజ్ కెపాసిటీ: 32 GB
- సెల్యులార్ టెక్నాలజీ: 4G
- వైర్లెస్ నెట్వర్క్ టెక్నాలజీ: GSM
- SIM Card Slot Count: డ్యూయల్ సిమ్
- Biometric Security Feature: వేలిముద్ర గుర్తింపు
- నీరు/ధూళి నిరోధకత: IP68/69K
- తయారీదారు: ఉలేఫోన్
8. వారంటీ మరియు మద్దతు
8.1 వారంటీ సమాచారం
Your Ulefone Armor X7 Pro comes with a two-year warranty against factory defects. This warranty covers manufacturing faults and material defects under normal use. It does not cover damage caused by misuse, accidents, unauthorized modifications, or normal wear and tear.
8.2 కస్టమర్ మద్దతు
For technical assistance, warranty claims, or further inquiries, please visit the official Ulefone webసైట్ లేదా వారి కస్టమర్ సర్వీస్ విభాగాన్ని సంప్రదించండి. నిర్దిష్ట సంప్రదింపు వివరాల కోసం మీ కొనుగోలు డాక్యుమెంటేషన్ను చూడండి.