
1. పరిచయం
Thank you for choosing the Tornado TCM-14512ES Espresso Machine. This manual provides essential information for the safe and efficient operation, maintenance, and troubleshooting of your new appliance. Please read these instructions thoroughly before first use and retain them for future reference.
This espresso machine is designed to prepare high-quality espresso and froth milk for various coffee beverages. It features a 15-bar pump pressure system and a 1.2-liter water tank capacity.
2. భద్రతా సూచనలు
- ఉపకరణం ఎల్లప్పుడూ సరైన వాల్యూమ్తో గ్రౌండెడ్ పవర్ అవుట్లెట్కి కనెక్ట్ చేయబడిందని నిర్ధారించుకోండిtagఇ (220-240V).
- పరికరం, పవర్ కార్డ్ లేదా ప్లగ్ నీటిలో లేదా మరేదైనా ద్రవంలో ముంచవద్దు.
- Keep hands and cords away from hot surfaces and steam. The steam wand and portafilter can become very hot during operation.
- శుభ్రపరచడం, నిర్వహణ లేదా ఉపయోగంలో లేనప్పుడు యంత్రాన్ని పవర్ అవుట్లెట్ నుండి అన్ప్లగ్ చేయండి.
- డ్యామేజ్ అయిన త్రాడు లేదా ప్లగ్తో ఉపకరణాన్ని ఆపరేట్ చేయవద్దు, లేదా అది పనిచేయకపోయినా లేదా ఏదైనా పద్ధతిలో దెబ్బతిన్నట్లయితే.
- ఈ ఉపకరణం గృహ వినియోగం కోసం మాత్రమే. ఆరుబయట ఉపయోగించవద్దు.
- Ensure the water tank is filled with clean, cold water before operation. Do not operate without water.
- పిల్లలు ఉపకరణంతో ఆడకుండా ఉండేలా వారిని పర్యవేక్షించాలి.
3. ఉత్పత్తి ముగిసిందిview
Familiarize yourself with the components of your Tornado TCM-14512ES Espresso Machine:
- వాటర్ ట్యాంక్ (1.2 లీటర్ల సామర్థ్యం)
- Control Knob (Power, Espresso, Steam)
- పవర్ ఇండికేటర్ లైట్
- రెడీ ఇండికేటర్ లైట్
- పోర్టాఫిల్టర్ హ్యాండిల్
- ఫిల్టర్ బాస్కెట్ (గ్రౌండ్ కాఫీ కోసం)
- Steam Wand / Milk Frother
- డ్రిప్ ట్రే మరియు తొలగించగల గ్రిడ్
- కాఫీ అవుట్లెట్
- Tamper/Measuring Spoon (often included)

మూర్తి 3.1: ముందు view of the Tornado TCM-14512ES Espresso Machine, showing the control knob, portafilter, steam wand, and drip tray.
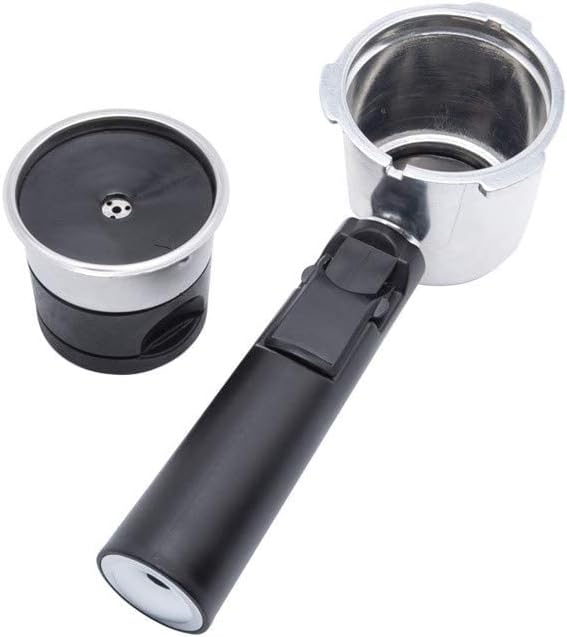
మూర్తి 3.2: Detached portafilter with a single filter basket, ready for coffee grounds.

మూర్తి 3.3: Filter basket with its lid open, illustrating the internal structure for holding coffee grounds.
4. సెటప్
4.1 అన్ప్యాకింగ్
- యంత్రం నుండి అన్ని ప్యాకేజింగ్ సామగ్రిని జాగ్రత్తగా తొలగించండి.
- యంత్రాన్ని నీటి వనరులకు దూరంగా, స్థిరమైన, చదునైన, వేడి-నిరోధక ఉపరితలంపై ఉంచండి.
- Ensure all accessories are present: portafilter, filter basket(s), measuring spoon/tamper.
4.2 ప్రారంభ శుభ్రపరచడం
- Wash the water tank, portafilter, filter basket(s), and drip tray with warm, soapy water. Rinse thoroughly and dry.
- యాడ్తో మెషిన్ వెలుపలి భాగాన్ని తుడవండిamp గుడ్డ.
4.3 వాటర్ ట్యాంక్ నింపడం
- యంత్రం వెనుక నుండి నీటి ట్యాంక్ తొలగించండి.
- Fill the tank with fresh, cold water up to the MAX level indicator.
- వాటర్ ట్యాంక్ను తిరిగి సురక్షితంగా దాని స్థానంలో ఉంచండి.
4.4 యంత్రాన్ని ప్రైమింగ్ చేయడం (మొదటి ఉపయోగం)
- నీటి ట్యాంక్ నిండినట్లు నిర్ధారించుకోండి.
- Plug the machine into a power outlet. Turn the control knob to the "Power" position (usually indicated by an 'I' or a power symbol). The power indicator light will illuminate.
- కాఫీ అవుట్లెట్ కింద ఒక కప్పు ఉంచండి.
- Turn the control knob to the "Espresso" position (coffee cup symbol). Water will start to flow through the coffee outlet. Let approximately 100ml of water run through.
- Turn the control knob back to the "Power" position to stop the flow.
- Next, turn the control knob to the "Steam" position (steam symbol). Allow steam to release from the steam wand for a few seconds to clear any air. Turn the knob back to "Power".
- యంత్రం ఇప్పుడు ప్రైమ్ చేయబడింది మరియు ఉపయోగం కోసం సిద్ధంగా ఉంది.
5. ఆపరేటింగ్ సూచనలు
5.1 ఎస్ప్రెస్సోను తయారు చేయడం
- యంత్రాన్ని సిద్ధం చేయండి: Ensure the water tank is filled. Plug in the machine and turn the control knob to "Power". Wait for the "Ready" indicator light to illuminate, indicating the machine has reached the optimal brewing temperature.
- పోర్టాఫిల్టర్ సిద్ధం చేయండి: Insert the desired filter basket into the portafilter. For a single shot, use the smaller basket; for a double shot, use the larger one.
- కాఫీ గ్రౌండ్స్ జోడించండి: Fill the filter basket with finely ground espresso coffee. Use the measuring spoon to add the correct amount (approx. 7g for a single shot, 14g for a double shot).
- Tamp కాఫీ: టి ఉపయోగించండిamper to press the coffee grounds firmly and evenly. Wipe any excess grounds from the rim of the portafilter.
- పోర్టాఫిల్టర్ను అటాచ్ చేయండి: Align the portafilter with the group head (coffee outlet) on the machine. Insert it and twist firmly to the right until it is securely locked in place.
- ప్లేస్ కప్: Position one or two espresso cups under the coffee outlet.
- బ్రూ ఎస్ప్రెస్సో: Once the "Ready" light is on, turn the control knob to the "Espresso" position. Espresso will begin to flow into your cup(s).
- కాయడం ఆపండి: When the desired amount of espresso is reached (typically 25-30ml per shot), turn the control knob back to the "Power" position to stop the flow.
- పోర్టాఫిల్టర్ను తీసివేయండి: Carefully twist the portafilter to the left to unlock and remove it. Be cautious as it will be hot. Discard the used coffee grounds.
5.2 నురుగు పాలు
- ఆవిరి కోసం సిద్ధం: Ensure the machine is plugged in and turned on. Turn the control knob to the "Steam" position. Wait for the "Ready" indicator light to illuminate, indicating the machine has reached steaming temperature.
- ఆవిరి దండాన్ని శుభ్రపరచండి: Before frothing, place an empty cup under the steam wand and briefly open the steam valve (if applicable, or turn the control knob slightly to release a burst of steam) to clear any condensed water. Close the valve/knob.
- పాలు సిద్ధం చేసుకోండి: స్టెయిన్లెస్ స్టీల్ నురుగు పుట్టించే పాత్రలో చల్లని పాలు (పాలు లేదా పాలు లేనివి) చిమ్ము కిందకు నింపండి.
- నురుగు పాలు: Immerse the tip of the steam wand just below the surface of the milk. Open the steam valve fully (or turn the control knob to the "Steam" position). Hold the pitcher at an angle, moving it slightly up and down to incorporate air and create foam.
- వేడి పాలు: Once desired foam is achieved, lower the pitcher to immerse the steam wand deeper into the milk to heat it without adding more air. Continue until the pitcher is hot to the touch (approx. 60-70°C).
- స్టీమింగ్ ఆపండి: Close the steam valve (or turn the control knob back to "Power"). Remove the pitcher.
- శుభ్రమైన ఆవిరి దండం: వెంటనే ప్రకటనతో స్టీమ్ వాండ్ను తుడవండి.amp పాలు అవశేషాలు ఎండిపోకుండా నిరోధించడానికి వస్త్రాన్ని ఉపయోగించండి. మంత్రదండం లోపల నుండి పాలు తొలగించడానికి ఆవిరి వాల్వ్ను మళ్ళీ క్లుప్తంగా తెరవండి.
6. శుభ్రపరచడం మరియు నిర్వహణ
క్రమం తప్పకుండా శుభ్రపరచడం వల్ల మీ ఎస్ప్రెస్సో యంత్రం యొక్క పనితీరు ఉత్తమంగా ఉంటుంది మరియు దాని జీవితకాలం పెరుగుతుంది.
6.1 రోజువారీ శుభ్రపరచడం
- పోర్టాఫిల్టర్ మరియు ఫిల్టర్ బాస్కెట్: ప్రతి ఉపయోగం తర్వాత, పోర్టాఫిల్టర్ను తీసివేసి, కాఫీ గ్రౌండ్లను విస్మరించండి మరియు పోర్టాఫిల్టర్ మరియు ఫిల్టర్ బుట్టను నడుస్తున్న నీటిలో శుభ్రం చేసుకోండి.
- బిందు ట్రే: Empty and clean the drip tray and grid daily. Wash with warm, soapy water and rinse.
- ఆవిరి దండం: As mentioned in the operating instructions, wipe the steam wand immediately after frothing milk and purge it to prevent blockages.
- బాహ్య: యంత్రం యొక్క బాహ్య భాగాన్ని మృదువైన, డితో తుడవండిamp గుడ్డ. రాపిడి క్లీనర్లు లేదా స్కౌరింగ్ ప్యాడ్లను ఉపయోగించవద్దు.
6.2 వాటర్ ట్యాంక్ క్లీనింగ్
- Clean the water tank weekly with warm, soapy water. Rinse thoroughly to remove any soap residue.
6.3 డెస్కలింగ్
Mineral deposits from water can build up inside the machine over time, affecting performance. Descale your machine every 2-3 months, or more frequently if you have hard water or use it often.
- తయారీదారు సూచనలను అనుసరించి, ఎస్ప్రెస్సో యంత్రాల కోసం ప్రత్యేకంగా రూపొందించిన వాణిజ్య డెస్కేలింగ్ పరిష్కారాన్ని ఉపయోగించండి.
- ప్రత్యామ్నాయంగా, తెల్ల వెనిగర్ మరియు నీటి (1:1 నిష్పత్తి) ద్రావణాన్ని ఉపయోగించవచ్చు.
- Run the descaling solution through the machine as if brewing coffee, and also through the steam wand.
- After descaling, run several cycles of clean water through the machine to rinse thoroughly and remove any descaling solution residue.
7. ట్రబుల్షూటింగ్
కస్టమర్ సపోర్ట్ను సంప్రదించే ముందు, దయచేసి ఈ క్రింది సాధారణ సమస్యలను మరియు వాటి పరిష్కారాలను చూడండి:
| సమస్య | సాధ్యమైన కారణం | పరిష్కారం |
|---|---|---|
| No water flow / Machine not pumping water. | Water tank empty, airlock in pump, clogged filter. | Fill water tank. Prime the machine (Section 4.4). Clean filter basket. |
| ఎస్ప్రెస్సో చాలా నెమ్మదిగా ప్రవహిస్తుంది లేదా అస్సలు ప్రవహించదు. | Coffee ground too fine, coffee tamped too hard, clogged filter basket. | Use coarser grind. Tamp less firmly. Clean filter basket. Descale machine. |
| Espresso flows too quickly / Weak coffee. | Coffee ground too coarse, not enough coffee, coffee tampచాలా తేలికగా ఎడ్. | Use finer grind. Increase coffee amount. Tamp మరింత దృఢంగా. |
| స్టీమ్ వాండ్ నుండి ఆవిరి లేదు. | Steam wand clogged, machine not heated to steam temperature. | Clean steam wand thoroughly. Wait for "Ready" light in steam mode. Descale machine. |
| యంత్రం నీటిని లీక్ చేస్తుంది. | Water tank not seated correctly, portafilter not locked properly, seals worn. | Ensure water tank is secure. Lock portafilter firmly. Contact support if seals are worn. |
8. సాంకేతిక లక్షణాలు
| ఫీచర్ | స్పెసిఫికేషన్ |
|---|---|
| బ్రాండ్ | సుడిగాలి |
| మోడల్ సంఖ్య | TCM-14512ES |
| వాల్యూమ్tage | 220-240 వోల్ట్లు |
| పవర్ / వాట్tage | 1050 వాట్స్ |
| నీటి ట్యాంక్ సామర్థ్యం | 1.2 లీటర్లు |
| పంప్ ఒత్తిడి | 15 బార్ |
| మెటీరియల్ | మెటల్ |
| రంగు | నలుపు & వెండి |
| ప్రత్యేక లక్షణాలు | Milk Frother, Permanent Filter, Thermal, Timer, Water Filter |
| వస్తువు బరువు | 4.06 కిలోలు |
| ప్యాకేజీ కొలతలు | 36.5 x 35.5 x 23.5 సెం.మీ |
9. వారంటీ మరియు మద్దతు
Your Tornado TCM-14512ES Espresso Machine comes with a manufacturer's warranty. Please refer to the warranty card included with your purchase for specific terms and conditions, including the warranty period and coverage details.
For technical assistance, spare parts, or warranty claims, please contact the retailer where you purchased the product or the authorized Tornado service center in your region. Keep your proof of purchase for warranty validation.