
పరిచయం
This manual provides detailed instructions for the installation, operation, and maintenance of your Integy 2 Output LED On/Off RC Board, Model C29429. This device is designed to provide simple on/off control for LED lighting systems in your RC vehicle via the receiver's third channel.
భద్రతా సమాచారం
- భాగాలను ఇన్స్టాల్ చేసే లేదా తొలగించే ముందు ఎల్లప్పుడూ పవర్ను డిస్కనెక్ట్ చేయండి.
- Ensure correct polarity when connecting wires to prevent damage to the board or LEDs.
- Keep the board away from water, moisture, and extreme temperatures.
- This product is intended for adult use or under adult supervision.
- Do not attempt to modify the board, as this may void the warranty and cause malfunction.
ప్యాకేజీ విషయాలు
The package for the Integy 2 Output LED On/Off RC Board (C29429) typically includes:
- 1x Integy 2 Output LED On/Off RC Board (Model C29429)
- Additional components as shown in the product packaging.
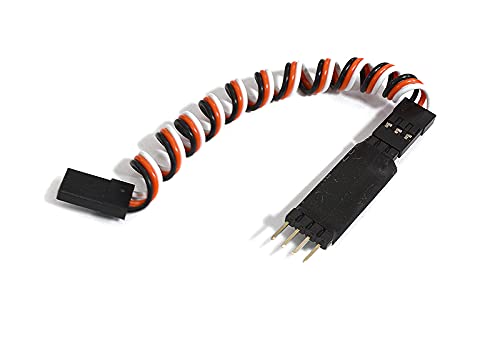
చిత్రం: ముందు భాగం view of the Integy 2 Output LED On/Off RC Board, Model C29429.
స్పెసిఫికేషన్లు
| ఫీచర్ | వివరాలు |
|---|---|
| మోడల్ సంఖ్య | C29429 |
| బ్రాండ్ | Integy |
| అవుట్పుట్లు | 2 (for LED lights) |
| నియంత్రణ ఛానెల్ | Receiver 3rd Channel |
| మెటీరియల్ రకం | మెటల్ |
| వస్తువు బరువు | 4.54 గ్రా |
| అంశం కొలతలు | 1 x 1 x 1 అంగుళాలు (సుమారుగా) |
| అసెంబ్లీ అవసరం | అవును |
| తయారీదారు కనీస వయస్సు | 180 నెలలు (15 సంవత్సరాలు) |
సెటప్ మరియు ఇన్స్టాలేషన్
Follow these steps to properly install your Integy 2 Output LED On/Off RC Board:
- Prepare your RC Vehicle: Ensure your RC vehicle's power is off and the battery is disconnected before beginning installation.
- Locate the 3rd Channel: Identify the available 3rd channel port on your RC receiver. This port is typically labeled "CH3" or similar.
- Connect the RC Board: Plug the servo connector from the Integy LED board into the 3rd channel port of your receiver. Ensure the connector is oriented correctly (signal, positive, negative).
- Connect LEDs: Connect your LED light sets to the two output ports on the Integy board. Observe correct polarity for your LEDs. Most RC LEDs are designed to plug directly into these types of outputs.
- బోర్డును భద్రపరచండి: Mount the Integy board securely within your RC vehicle using double-sided tape or a suitable mounting method, ensuring it is protected from vibrations and moisture.
- ప్రారంభ పరీక్ష: Reconnect your RC vehicle's battery and power on your transmitter and receiver.
Image: The Integy RC board showing connection points for receiver and LED outputs.

చిత్రం: వైపు view of the Integy RC board, highlighting its compact design.
ఆపరేటింగ్ సూచనలు
Once installed, operating the LED lights with your Integy RC Board is straightforward:
- పవర్ ఆన్: Turn on your RC transmitter, then your RC vehicle's receiver.
- Control via 3rd Channel: Use the switch or button assigned to the 3rd channel on your RC transmitter to toggle the connected LED lights on or off. The exact control mechanism depends on your specific transmitter model.
- కార్యాచరణను ధృవీకరించండి: Confirm that your LED lights illuminate when the 3rd channel is activated and turn off when deactivated.
నిర్వహణ
To ensure the longevity and optimal performance of your Integy 2 Output LED On/Off RC Board, follow these maintenance guidelines:
- శుభ్రపరచడం: Periodically inspect the board for dust or debris. Use a soft, dry brush or compressed air to gently clean the surface. Avoid using liquids or solvents.
- నిల్వ: When not in use, store the board in a dry, cool environment, away from direct sunlight and extreme temperatures.
- కనెక్షన్ తనిఖీ: Regularly check all connections to ensure they are secure and free from corrosion.
ట్రబుల్షూటింగ్
If you encounter issues with your Integy 2 Output LED On/Off RC Board, refer to the following common problems and solutions:
| సమస్య | సాధ్యమైన కారణం | పరిష్కారం |
|---|---|---|
| LEDs do not turn on. |
|
|
| LEDs flicker or are dim. |
|
|
| Board gets excessively hot. |
|
|
వారంటీ మరియు మద్దతు
వారంటీ: This Integy product is covered by a 30-day warranty against manufacturer defects from the date of purchase. This warranty does not cover damage caused by misuse, improper installation, unauthorized modification, or normal wear and tear.
కస్టమర్ మద్దతు: For technical assistance, troubleshooting beyond this manual, or warranty claims, please contact Integy customer support through their official website or the retailer where the product was purchased. Please have your model number (C29429) and proof of purchase ready.