
1. ముఖ్యమైన భద్రతా సూచనలు
ఎలక్ట్రికల్ ఉపకరణాలను ఉపయోగిస్తున్నప్పుడు, కింది వాటితో సహా అగ్ని, విద్యుత్ షాక్ మరియు వ్యక్తులకు గాయాలయ్యే ప్రమాదాన్ని తగ్గించడానికి ప్రాథమిక భద్రతా జాగ్రత్తలు ఎల్లప్పుడూ అనుసరించాలి:
- ఈ పరికరాన్ని ఆపరేట్ చేయడానికి ముందు అన్ని సూచనలను చదవండి.
- వేడి ఉపరితలాలను తాకవద్దు. హ్యాండిల్స్ లేదా నాబ్లను ఉపయోగించండి.
- విద్యుత్ షాక్ నుండి రక్షించడానికి, త్రాడు, ప్లగ్లు లేదా ఉపకరణాన్ని నీటిలో లేదా ఇతర ద్రవంలో ముంచవద్దు.
- ఏదైనా ఉపకరణాన్ని పిల్లలు లేదా సమీపంలో ఉపయోగించినప్పుడు నిశిత పర్యవేక్షణ అవసరం.
- ఉపయోగంలో లేనప్పుడు మరియు శుభ్రపరిచే ముందు అవుట్లెట్ నుండి అన్ప్లగ్ చేయండి. భాగాలను ఉంచడానికి లేదా తీయడానికి ముందు చల్లబరచడానికి అనుమతించండి.
- దెబ్బతిన్న త్రాడు లేదా ప్లగ్తో లేదా ఉపకరణం పనిచేయకపోవడం లేదా ఏ పద్ధతిలో పాడైపోయిన తర్వాత ఏదైనా ఉపకరణాన్ని ఆపరేట్ చేయవద్దు.
- ఉపకరణాల తయారీదారు సిఫార్సు చేయని అనుబంధ జోడింపులను ఉపయోగించడం వల్ల గాయాలు సంభవించవచ్చు.
- ఆరుబయట ఉపయోగించవద్దు.
- టేబుల్ లేదా కౌంటర్ అంచుపై త్రాడు వేలాడదీయవద్దు లేదా వేడి ఉపరితలాలను తాకవద్దు.
- వేడి గ్యాస్ లేదా ఎలక్ట్రిక్ బర్నర్ లేదా వేడిచేసిన ఓవెన్లో ఉంచవద్దు.
- వేడి నూనె లేదా ఇతర వేడి ద్రవాలు ఉన్న ఉపకరణాన్ని తరలించేటప్పుడు చాలా జాగ్రత్తగా ఉండాలి.
- ఎల్లప్పుడూ ముందుగా ఉపకరణానికి ప్లగ్ని అటాచ్ చేయండి, ఆపై వాల్ అవుట్లెట్లోకి త్రాడును ప్లగ్ చేయండి. డిస్కనెక్ట్ చేయడానికి, ఏదైనా నియంత్రణను "ఆఫ్"కి మార్చండి, ఆపై వాల్ అవుట్లెట్ నుండి ప్లగ్ని తీసివేయండి.
- ఉపకరణాన్ని ఉద్దేశించిన వినియోగానికి కాకుండా ఇతర వాటికి ఉపయోగించవద్దు.
- పరికరం స్థిరమైన, వేడి-నిరోధక ఉపరితలంపై ఉంచబడిందని నిర్ధారించుకోండి.
- ఏ వెంటిలేషన్ ఓపెనింగ్లను నిరోధించవద్దు.

Image: Safety certification logos (INMETRO and SGS OCP 0040) indicating compliance with safety standards.
2. ఉత్పత్తి ముగిసిందిview
The Oster Digital Fryer 3.2L is designed for healthy cooking with minimal oil. Familiarize yourself with its components before use.
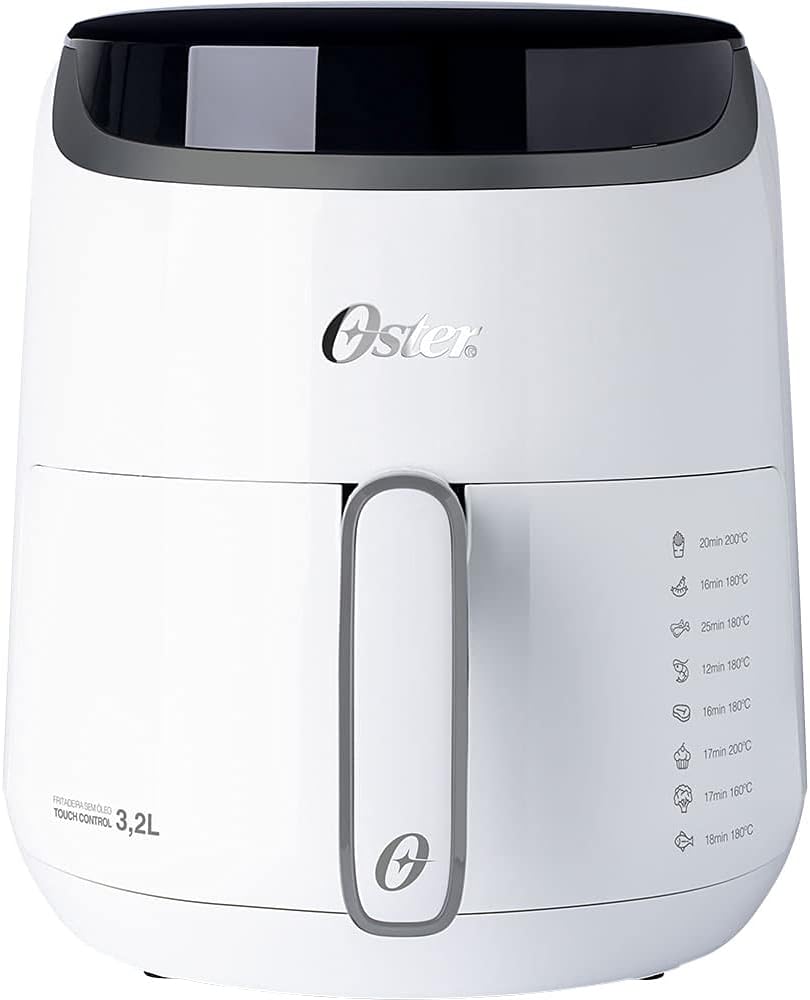
చిత్రం: ముందు భాగం view of the Oster Digital Fryer 3.2L, showcasing the sleek design and touch control panel.
భాగాలు:
- ప్రధాన యూనిట్: హీటింగ్ ఎలిమెంట్ మరియు ఫ్యాన్ను ఉంచుతుంది.
- టచ్ కంట్రోల్ ప్యానెల్: Digital display for setting time, temperature, and selecting pre-set programs.
- ఫ్రైయింగ్ బాస్కెట్: వంట చేసేటప్పుడు ఆహారాన్ని పట్టుకోవడానికి తొలగించగల బుట్ట.
- బాస్కెట్ హ్యాండిల్: వేయించే బుట్టను సురక్షితంగా బయటకు తీసి చొప్పించడానికి.
- గాలి ప్రవేశద్వారం: యూనిట్ పైభాగంలో ఉంది.
- ఎయిర్ అవుట్లెట్: యూనిట్ వెనుక భాగంలో ఉంది.

Image: The Oster Digital Fryer 3.2L with its frying basket pulled out, showing food inside, illustrating how food is placed for cooking.
3. సెటప్ మరియు మొదటి ఉపయోగం
మొదటి ఉపయోగం ముందు:
- ఉపకరణం నుండి అన్ని ప్యాకేజింగ్ పదార్థాలు, స్టిక్కర్లు మరియు లేబుల్లను తీసివేయండి.
- Clean the frying basket and pan thoroughly with hot water, dish soap, and a non-abrasive sponge.
- ప్రకటనతో ఉపకరణం లోపల మరియు వెలుపల తుడవండిamp గుడ్డ.
- ఉపయోగం ముందు అన్ని భాగాలు పూర్తిగా పొడిగా ఉన్నాయని నిర్ధారించుకోండి.
ప్లేస్మెంట్:
- పరికరాన్ని స్థిరమైన, సమాంతర మరియు వేడి-నిరోధక ఉపరితలంపై ఉంచండి.
- సరైన గాలి ప్రసరణ కోసం ఉపకరణం వెనుక మరియు వైపులా కనీసం 10 సెం.మీ (4 అంగుళాలు) ఖాళీ స్థలం మరియు ఉపకరణం పైన 10 సెం.మీ (4 అంగుళాలు) ఉండేలా చూసుకోండి.
- ఉపకరణాన్ని గోడ లేదా ఇతర ఉపకరణాలకు వ్యతిరేకంగా ఉంచవద్దు.
4. ఆపరేటింగ్ సూచనలు
సాధారణ ఆపరేషన్:
- Plug the power cord into a grounded wall outlet (220V). The appliance will beep, and the display will light up briefly.
- ఎయిర్ ఫ్రైయర్ నుండి వేయించడానికి బుట్టను జాగ్రత్తగా బయటకు తీయండి.
- Place the ingredients into the frying basket. Do not exceed the MAX fill line.
- ఫ్రైయింగ్ బాస్కెట్ను తిరిగి ఎయిర్ ఫ్రైయర్లోకి జారండి. అది క్లిక్ అయ్యేలా చూసుకోండి.
- ప్రదర్శనను ప్రారంభించడానికి పవర్ బటన్ నొక్కండి.
- మాన్యువల్ సెట్టింగ్: Use the temperature and time control buttons to set your desired cooking parameters. The temperature range is typically 80°C to 200°C, and the timer can be set up to 60 minutes.
- ప్రీ-సెట్ ప్రోగ్రామ్లు: Alternatively, select one of the pre-set cooking programs (see section 5).
- వంట ప్రారంభించడానికి స్టార్ట్/పాజ్ బటన్ నొక్కండి. ఫ్యాన్ మరియు హీటింగ్ ఎలిమెంట్ యాక్టివేట్ అవుతాయి.
- During cooking, you may pull out the basket to shake or turn ingredients for even cooking. The appliance will pause automatically and resume when the basket is reinserted.
- When the set cooking time has elapsed, the appliance will beep, and the heating element will turn off.
- Carefully pull out the basket and transfer the cooked food to a plate. Use tongs to avoid touching hot surfaces.
- ఉపయోగించిన తర్వాత ఉపకరణాన్ని అన్ప్లగ్ చేయండి.
ముందుగా వేడి చేయడం:
For best results, especially with certain foods, preheating the air fryer for 3-5 minutes at the desired temperature is recommended. Simply set the temperature and time, then let it run empty before adding food.
5. Pre-set Cooking Programs
The Oster Digital Fryer 3.2L features several convenient pre-set programs for common dishes. These programs automatically set the optimal time and temperature. You can adjust these settings manually if needed.
| ఆహార వస్తువు | సమయం | ఉష్ణోగ్రత |
|---|---|---|
| ఫ్రైస్ | 20 నిమిషాల | 200°C |
| చికెన్ | 16 నిమిషాల | 180°C |
| రొయ్యలు | 12 నిమిషాల | 180°C |
| కేక్ | 16 నిమిషాల | 180°C |
| స్టీక్ | 17 నిమిషాల | 200°C |
| చేప | 17 నిమిషాల | 160°C |
| పక్కటెముకలు | 18 నిమిషాల | 180°C |
గమనిక: వంట సమయాలు మరియు ఉష్ణోగ్రతలు సుమారుగా ఉంటాయి మరియు ఆహార పరిమాణం, పరిమాణం మరియు కావలసిన కరకరలాడే గుణాన్ని బట్టి మారవచ్చు. ఎల్లప్పుడూ ఆహారం పూర్తిగా ఉడికిందని నిర్ధారించుకోండి.
6. శుభ్రపరచడం మరియు నిర్వహణ
మీ ఎయిర్ ఫ్రైయర్ను క్రమం తప్పకుండా శుభ్రపరచడం వల్ల సరైన పనితీరు లభిస్తుంది మరియు దాని జీవితకాలం పొడిగించబడుతుంది.
శుభ్రపరిచే దశలు:
- ఉపకరణాన్ని ఎల్లప్పుడూ అన్ప్లగ్ చేసి, శుభ్రం చేసే ముందు పూర్తిగా చల్లబరచడానికి అనుమతించండి.
- ప్రకటనతో ఉపకరణం యొక్క బాహ్య భాగాన్ని తుడవండిamp గుడ్డ. రాపిడి క్లీనర్లను ఉపయోగించవద్దు.
- Remove the frying basket. Clean the basket and pan with hot water, dish soap, and a non-abrasive sponge. For stubborn food residues, soak the basket in hot water with dish soap for about 10 minutes.
- The frying basket is generally dishwasher-safe, but hand washing is recommended to prolong its lifespan.
- ప్రకటనతో ఉపకరణం లోపలి భాగాన్ని శుభ్రం చేయండిamp వస్త్రం. ప్రధాన యూనిట్ను నీటిలో ముంచవద్దు.
- ఏదైనా ఆహార అవశేషాలను తొలగించడానికి హీటింగ్ ఎలిమెంట్ను శుభ్రపరిచే బ్రష్తో శుభ్రం చేయండి.
- నిల్వ చేయడానికి లేదా మళ్ళీ ఉపయోగించే ముందు అన్ని భాగాలు పూర్తిగా పొడిగా ఉన్నాయని నిర్ధారించుకోండి.
నిల్వ:
Store the appliance in a cool, dry place, away from direct sunlight and out of reach of children.
7. ట్రబుల్షూటింగ్
| సమస్య | సాధ్యమైన కారణం | పరిష్కారం |
|---|---|---|
| ఎయిర్ ఫ్రైయర్ ఆన్ చేయదు. | ఉపకరణం ప్లగిన్ చేయబడలేదు. | పవర్ కార్డ్ గ్రౌండెడ్ అవుట్లెట్లోకి సురక్షితంగా ప్లగ్ చేయబడిందని నిర్ధారించుకోండి. |
| ఆహారం సమానంగా వండరు. | బుట్టలో చాలా ఆహారం ఉంది; ఆహారాన్ని కదిలించలేదు/తిప్పి చూడలేదు. | చిన్న చిన్న భాగాలుగా ఉడికించాలి. వంట మధ్యలోకి ఆహారాన్ని షేక్ చేయండి లేదా తిప్పండి. |
| ఉపకరణం నుండి తెల్లటి పొగ వస్తుంది. | Grease from previous use; fatty ingredients. | Clean the basket and pan thoroughly. For fatty foods, absorb excess oil before cooking. |
| ఆహారం క్రిస్పీగా ఉండదు. | తగినంత నూనె లేదు; ఉష్ణోగ్రత చాలా తక్కువగా ఉంది; వంట సమయం చాలా తక్కువ. | ఆహారాన్ని తేలికగా నూనెతో రుద్దండి. ఉష్ణోగ్రత లేదా వంట సమయాన్ని పెంచండి. |
8. స్పెసిఫికేషన్లు
- మోడల్: Digital Fryer 3.2L
- బ్రాండ్: ఆస్టర్
- సామర్థ్యం: 3.2 లీటర్లు
- పవర్ అవుట్పుట్: 1500 వాట్స్
- వాల్యూమ్tage: 220V (as per product description)
- నియంత్రణ పద్ధతి: టచ్ ప్యానెల్
- మెటీరియల్: Stainless Steel (internal and external)
- ఉష్ణోగ్రత నియంత్రణ: అవును
- నాన్-స్టిక్ పూత: No (as per specifications)
9. వారంటీ మరియు మద్దతు
This Oster appliance comes with a manufacturer's warranty. Please refer to the warranty card included with your product for specific terms and conditions, including the warranty period and coverage details.
For technical support, service, or to inquire about replacement parts, please contact Oster customer service. Contact information can typically be found on the official Oster webసైట్ లేదా మీ కొనుగోలుతో అందించిన డాక్యుమెంటేషన్లో.
వారంటీ క్లెయిమ్ల కోసం కొనుగోలు రుజువుగా మీ కొనుగోలు రసీదును ఉంచండి.