
Cabletech URZ0336B
Cabletech URZ0336B DVB-T2 H.265 HEVC Digital Tuner
వినియోగదారు సూచనల మాన్యువల్
1. పరిచయం
This manual provides comprehensive instructions for the installation, operation, and maintenance of your Cabletech URZ0336B DVB-T2 H.265 HEVC Digital Tuner. Please read this manual thoroughly before using the device to ensure proper functionality and to prevent damage.
2. భద్రతా సమాచారం
Always observe the following safety precautions to avoid electric shock, fire, or damage to the device:
- పరికరం వర్షం లేదా తేమను బహిర్గతం చేయవద్దు.
- సి ని తెరవవద్దుasing. అన్ని సర్వీసింగ్లను అర్హత కలిగిన సిబ్బందికి సూచించండి.
- Ensure proper ventilation around the device. Do not block ventilation openings.
- పరికరంతో సరఫరా చేయబడిన పవర్ అడాప్టర్ను మాత్రమే ఉపయోగించండి.
- పరికరాన్ని వేడి మూలాలు మరియు ప్రత్యక్ష సూర్యకాంతి నుండి దూరంగా ఉంచండి.
- పరికరం ఎక్కువ కాలం ఉపయోగించబడకపోతే, గోడ అవుట్లెట్ నుండి పవర్ ప్లగ్ను డిస్కనెక్ట్ చేయండి.
3. ప్యాకేజీ విషయాలు
దయచేసి ఈ క్రింది అంశాల కోసం ప్యాకేజీని తనిఖీ చేయండి:
- Cabletech URZ0336B DVB-T2 H.265 HEVC Digital Tuner
- రిమోట్ కంట్రోల్
- AAA బ్యాటరీలు (2x)
- పవర్ అడాప్టర్
- వినియోగదారు మాన్యువల్ (ఈ పత్రం)
4. ఉత్పత్తి ముగిసిందిview
Familiarize yourself with the main components and connections of your Cabletech URZ0336B tuner.
4.1. పరికరం మరియు రిమోట్ కంట్రోల్
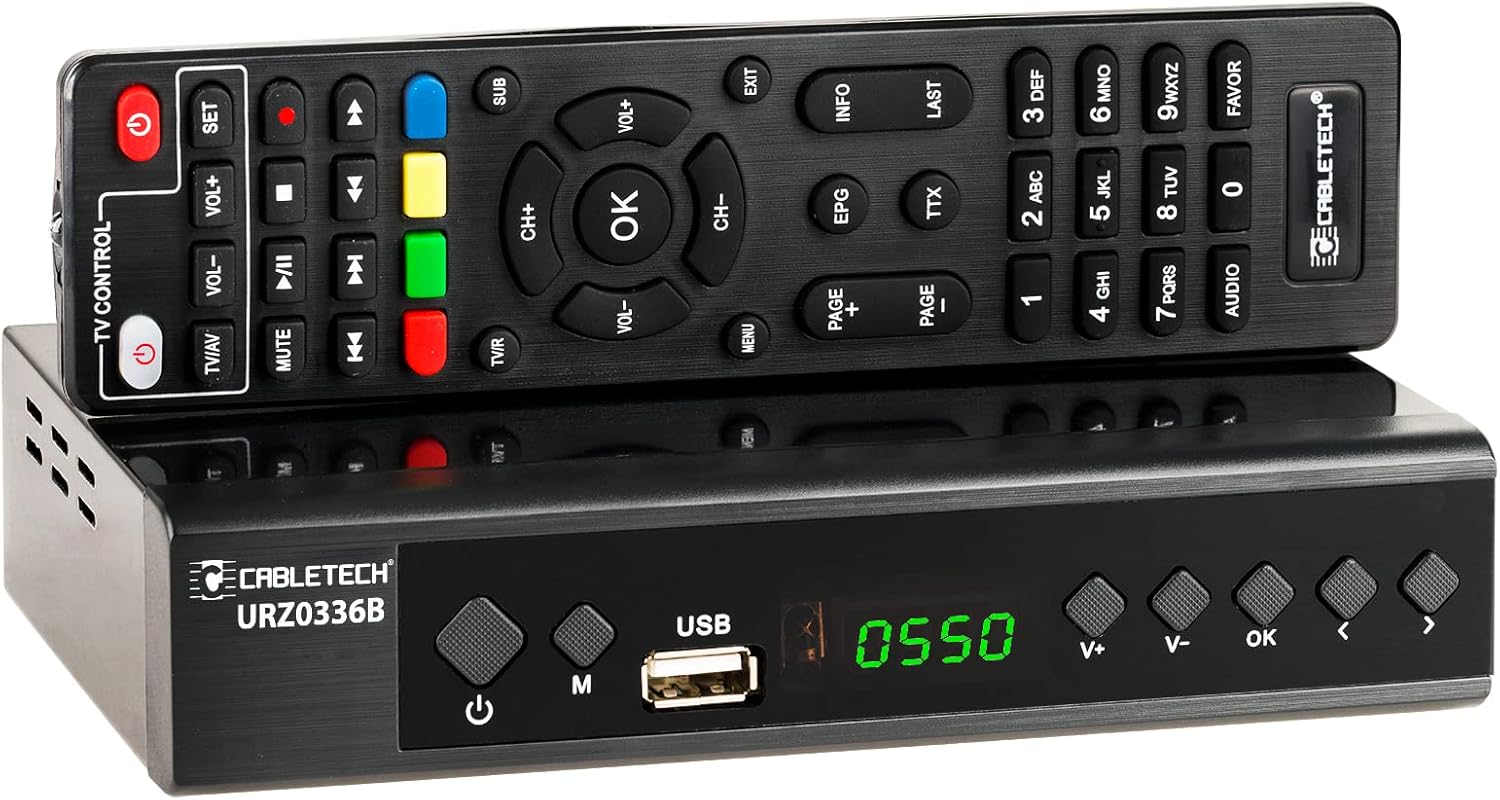
Image: The Cabletech URZ0336B DVB-T2 H.265 HEVC Digital Tuner shown with its accompanying remote control. The tuner is a compact black box, and the remote is also black with various control buttons.
4.2. ఫ్రంట్ ప్యానెల్
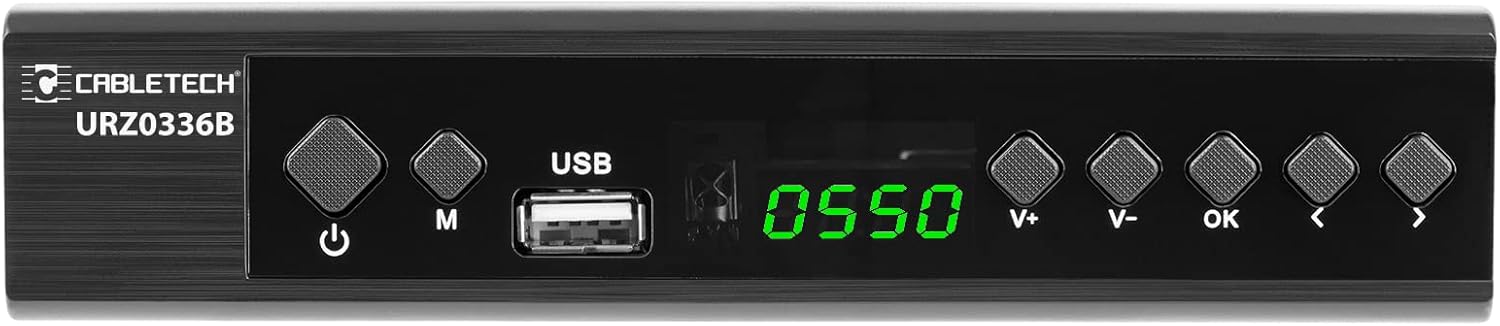
Image: Close-up of the Cabletech URZ0336B front panel, featuring a power button, menu button (M), USB 2.0 port, LED display showing "0550", and navigation/volume buttons (V+, V-, OK, <, >).
- పవర్ బటన్: Turns the device on/off or to standby.
- M (మెనూ) బటన్: ప్రధాన మెనూని యాక్సెస్ చేస్తుంది.
- USB 2.0 పోర్ట్: For software updates, PVR recording, and media playback.
- LED డిస్ప్లే: ఛానెల్ నంబర్ లేదా సమయాన్ని చూపుతుంది.
- V+/V- Buttons: వాల్యూమ్ సర్దుబాటు చేస్తుంది.
- సరే బటన్: ఎంపికలను నిర్ధారిస్తుంది.
- </> Buttons: Navigates through menus or changes channels.
4.3. వెనుక ప్యానెల్ కనెక్షన్లు

Image: The rear panel of the Cabletech URZ0336B, showing various input and output ports: ANT IN (IEC socket), COAXIAL, USB, HD OUT (HDMI), SCART, and the power input (110-240V~ 50/60Hz).
- ఆంట్ ఇన్: Connects to your DVB-T/T2 antenna.
- కోక్సియల్: డిజిటల్ ఆడియో అవుట్పుట్.
- USB: Additional USB 2.0 port for external devices.
- HD అవుట్ (HDMI): హై-డెఫినిషన్ వీడియో మరియు ఆడియో కోసం మీ టీవీకి కనెక్ట్ అవుతుంది.
- స్కార్ట్: Connects to older TVs or VCRs.
- పవర్ ఇన్పుట్: పవర్ అడాప్టర్కు కనెక్ట్ చేస్తుంది.
4.4. Remote Control Layout

చిత్రం: వివరణాత్మకం view of the Cabletech URZ0336B remote control, showing buttons for power, TV/AV, volume, channel, mute, playback controls, EPG, TTX, INFO, numeric keypad, and special function buttons.
The remote control provides full functionality for operating your tuner. Insert 2x AAA batteries into the battery compartment before first use.
5. సెటప్
5.1. Connecting the Tuner
- యాంటెన్నాను కనెక్ట్ చేయండి: Connect your DVB-T/T2 antenna cable to the యాంట్ ఇన్ port on the rear panel of the tuner.
- టీవీకి కనెక్ట్ అవ్వండి:
- For HD TVs: Connect an HDMI cable from the HD OUT (HDMI) port on the tuner to an HDMI input on your TV.
- For older TVs: Connect a SCART cable from the SCART port on the tuner to the SCART input on your TV.
- పవర్ కనెక్ట్ చేయండి: Connect the power adapter to the tuner's power input and then plug it into a wall outlet.
- బ్యాటరీలను చొప్పించండి: Open the battery compartment on the remote control and insert 2x AAA batteries, observing polarity.
5.2. First-Time Installation and Channel Scan
- Turn on your TV and select the correct HDMI or SCART input source that the tuner is connected to.
- Power on the Cabletech URZ0336B tuner using the power button on the front panel or remote control.
- The first-time installation wizard should appear on your TV screen. Follow the on-screen prompts.
- Select your preferred language and country.
- Initiate an స్వయంచాలక శోధన for channels. The tuner will scan for all available DVB-T/T2 channels in your area. This process may take several minutes.
- Once the scan is complete, the tuner will save the found channels and display the first channel.
Note: If you experience poor signal quality, adjust your antenna position or consider using a signal ampజీవితకాలం.
6. ఆపరేటింగ్ సూచనలు
6.1. ప్రాథమిక విధులు
- పవర్ ఆన్/ఆఫ్: నొక్కండి శక్తి రిమోట్ కంట్రోల్లో బటన్.
- ఛానెల్ మార్పు: ఉపయోగించండి CH + / CH- buttons or the numeric keypad to enter a channel number.
- వాల్యూమ్ నియంత్రణ: ఉపయోగించండి VOL + / VOL- బటన్లు.
- మ్యూట్: నొక్కండి మ్యూట్ ఆడియోను తాత్కాలికంగా నిశ్శబ్దం చేయడానికి బటన్.
- మెను: నొక్కండి మెనూ button to access the main menu for settings and features.
- అలాగే: Confirms selections in menus or displays the channel list.
- బయటకి దారి: ప్రస్తుత మెను లేదా స్క్రీన్ నుండి నిష్క్రమిస్తుంది.
6.2. ఎలక్ట్రానిక్ ప్రోగ్రామ్ గైడ్ (EPG)
The 7-day EPG provides a schedule of current and upcoming programs.
- నొక్కండి EPG రిమోట్ కంట్రోల్లో బటన్.
- Navigate through channels and program times using the arrow buttons.
- నొక్కండి OK కు view details about a selected program.
6.3. PVR (Program Recording) and Timeshift
Connect a USB storage device (e.g., USB flash drive or external hard drive) to one of the USB 2.0 ports to use PVR and Timeshift functions.
- PVR Recording:
- నొక్కండి REC button (red circle) on the remote to start immediate recording of the current program. Press ఆపు (square) to end recording.
- Schedule recordings via the EPG: Select a program in the EPG and press OK, then choose the record option.
- కాలమార్పు:
- ఒక కార్యక్రమాన్ని చూస్తున్నప్పుడు, పాజ్ చేయండి button. The tuner will begin recording the live broadcast to the USB device.
- అప్పుడు మీరు చెయ్యగలరు ఆడండి, ఫాస్ట్ ఫార్వర్డ్, లేదా రివైండ్ within the buffered content.
- నొక్కండి ఆపు to exit Timeshift and return to live TV.
6.4. మీడియా ప్లేబ్యాక్
The tuner supports playback of various media fileకనెక్ట్ చేయబడిన USB నిల్వ పరికరం నుండి.
- Connect your USB device to a USB port on the tuner.
- Go to the main menu and select "Media" or "USB".
- కావలసిన దానికి నావిగేట్ చేయండి file type (MP3, WMA, JPEG, BMP, AVI) and select the file ఆడటానికి.
6.5. Supported Applications
The tuner supports various online applications when connected to the internet via an external MT7601 Wi-Fi adapter (not included).
- వాతావరణం: View local weather forecasts.
- ఐపీటీవీ: Access Internet Protocol Television streams.
- YouTube: Watch videos from YouTube.
- RSS: Read RSS news feeds.
Note: An external MT7601 Wi-Fi adapter is required for internet connectivity and access to these applications.
6.6. Parental Control
Set up parental control to restrict access to certain channels or programs based on age ratings.
- Access the "Parental Control" section in the main menu.
- Enter your PIN (default is usually 0000 or 1234, check your device for specifics).
- Configure age restrictions or lock specific channels.
6.7. టైమర్ ఫంక్షన్
The timer function allows you to schedule the tuner to turn on/off at specific times or to switch to a particular channel.
- Navigate to the "Timer" section in the main menu.
- Set the event type (e.g., Power On, Power Off, Record), time, and duration.
7. నిర్వహణ
7.1. శుభ్రపరచడం
To clean the device, disconnect it from the power supply and wipe the exterior with a soft, dry cloth. Do not use liquid or aerosol cleaners.
7.2. సాఫ్ట్వేర్ నవీకరణ
Software updates can improve performance and add new features. Updates are performed via the USB port.
- తాజా ఫర్మ్వేర్ను డౌన్లోడ్ చేయండి file from the official Cabletech support webసైట్ (అందుబాటులో ఉంటే).
- ఫర్మ్వేర్ను కాపీ చేయండి file to the root directory of a USB flash drive.
- Connect the USB flash drive to the tuner's USB port.
- Go to the "System" or "Tools" menu, then select "Software Update" or "Upgrade by USB".
- Follow the on-screen instructions to complete the update. Do not power off the device during the update process.
8. ట్రబుల్షూటింగ్
If you encounter issues with your tuner, refer to the following common problems and solutions:
| సమస్య | సాధ్యమైన కారణం | పరిష్కారం |
|---|---|---|
| చిత్రం లేదా ధ్వని లేదు | Incorrect TV input selected; Loose cable connections; Tuner not powered on. | Select correct TV input (HDMI/SCART); Check all cable connections; Ensure tuner is powered on. |
| "సిగ్నల్ లేదు" సందేశం | Antenna not connected; Poor antenna signal; No channels scanned. | Connect antenna properly; Adjust antenna position; Perform an automatic channel scan. |
| రిమోట్ కంట్రోల్ పనిచేయడం లేదు | Batteries are dead or inserted incorrectly; Obstruction between remote and tuner. | Replace batteries; Check battery polarity; Remove any obstructions; Point remote directly at the tuner. |
| USB కి రికార్డ్ చేయడం సాధ్యం కాదు | USB device not connected or formatted incorrectly; Insufficient storage space. | Ensure USB device is connected; Format USB device to FAT32 or NTFS; Free up space on USB device. |
| No internet access for apps | No MT7601 Wi-Fi adapter connected; Network configuration issues. | Connect a compatible MT7601 Wi-Fi adapter; Check network settings in the tuner's menu. |
9. స్పెసిఫికేషన్లు
| ఫీచర్ | వివరాలు |
|---|---|
| మోడల్ సంఖ్య | URZ0336B |
| CPU | GX6702S5 |
| అంతర్గత మెమరీ | 32 MB |
| RAM | 512 MB DDR2 |
| ANT కనెక్టర్ | IEC సాకెట్ |
| ఫ్రీక్వెన్సీ రేంజ్ | VHF: 170–230 MHz, UHF: 470–862 MHz |
| డీమోడ్యులేషన్ | QPSK, 16QAM, 64QAM, 256QAM |
| బ్యాండ్విడ్త్ | 7 MHz, 8 MHz |
| డీకోడింగ్ | MPEG-1, MPEG-2, MPEG-4, H.264, H.265, AAC, HE-AAC, AC-3, DD+ |
| ఇన్పుట్లు/అవుట్పుట్లు | 2x USB 2.0, HDMI, SCART, COAXIAL |
| కారక నిష్పత్తి | Auto, 16:9 WS, 16:9 PB, 16:9 PS; 4:3 LB, 4:3 PS, 4:3 Full |
| మద్దతు ఉన్న ఫార్మాట్లు | MP3, WMA, JPEG, BMP, AVI |
| స్క్రీన్ రిజల్యూషన్ | 480i, 480p, 576i, 576p, 720p, 1080i, 1080p |
| వీడియో రిజల్యూషన్ | 1920 x 1080 పిక్సెల్లు |
| ఆడియో డీకోడింగ్ | MPEG-1 LayerI/II, Dolby-Downmix 2-Channel (License), AAC LC, HE-AAC v1/V2, PCM-Downmix, IEC958 SPDIF |
| File వ్యవస్థ | FAT32, NTFS |
| అనుకూలత | Fully compatible with DVB-T2/DVB-T |
| రిమోట్ కంట్రోల్ | Requires 2x AAA batteries |
| విద్యుత్ వినియోగం | Max. 6 W (Operating), Max. 50/60 Hz (Standby) |
| కొలతలు (W x H) | 168 మిమీ x 36 మిమీ |
| Wi-Fi మద్దతు | Requires external MT7601 chip adapter |
| Tuner Bit Depth | 10 బిట్ |
10. వారంటీ మరియు మద్దతు
This product comes with a standard manufacturer's warranty. For specific warranty terms and conditions, please refer to the documentation included with your purchase or contact Cabletech customer support.
For technical assistance, troubleshooting beyond this manual, or warranty claims, please contact your retailer or the official Cabletech support channels.
Ask a question about this manual
Ask about setup, troubleshooting, compatibility, parts, safety, or missing instructions. Manuals+ will review the question and use this page’s manual context to help answer it.