1. పరిచయం
Thank you for choosing the PRIXTON Cinema Mini Projector. This compact and versatile projector is designed to provide an immersive viewing experience for movies, games, and presentations. Its multiple connectivity options and portable design make it ideal for various environments. Please read this manual carefully before using the projector to ensure proper operation and to maximize its lifespan.
2. భద్రతా సమాచారం
- విద్యుత్ సరఫరా: పేర్కొన్న పవర్ అడాప్టర్ను మాత్రమే ఉపయోగించండి. వాల్యూమ్ను నిర్ధారించుకోండిtage మీ ప్రాంతానికి అనుకూలంగా ఉంటుంది.
- వెంటిలేషన్: వెంటిలేషన్ ఓపెనింగ్లను బ్లాక్ చేయవద్దు. వేడెక్కకుండా నిరోధించడానికి సరైన గాలి ప్రవాహం కోసం ప్రొజెక్టర్ చుట్టూ తగినంత స్థలం ఉండేలా చూసుకోండి.
- కంటి భద్రత: l ఉన్నప్పుడు ప్రొజెక్టర్ లెన్స్లోకి నేరుగా చూడకండిamp ఆన్లో ఉంది. ప్రకాశవంతమైన కాంతి కంటికి హాని కలిగించవచ్చు.
- నీరు మరియు తేమ: Keep the projector away from water, rain, and excessive humidity. Do not operate with wet hands.
- శుభ్రపరచడం: శుభ్రపరిచే ముందు విద్యుత్తును డిస్కనెక్ట్ చేయండి. మృదువైన, పొడి వస్త్రాన్ని ఉపయోగించండి. ద్రవ క్లీనర్లను నివారించండి.
- ప్లేస్మెంట్: Place the projector on a stable, flat surface. Avoid placing it in direct sunlight or near heat sources.
- పిల్లలు: ప్రొజెక్టర్ మరియు దాని ఉపకరణాలను పిల్లలకు అందుబాటులో లేకుండా ఉంచండి.
3. ప్యాకేజీ విషయాలు
దయచేసి మీ ప్యాకేజీలో అన్ని వస్తువులు ఉన్నాయో లేదో తనిఖీ చేయండి:
- PRIXTON సినిమా మినీ ప్రొజెక్టర్
- రిమోట్ కంట్రోల్
- పవర్ అడాప్టర్
- వినియోగదారు మాన్యువల్
4. ఉత్పత్తి ముగిసిందిview
Familiarize yourself with the various parts of your PRIXTON Cinema Mini Projector.
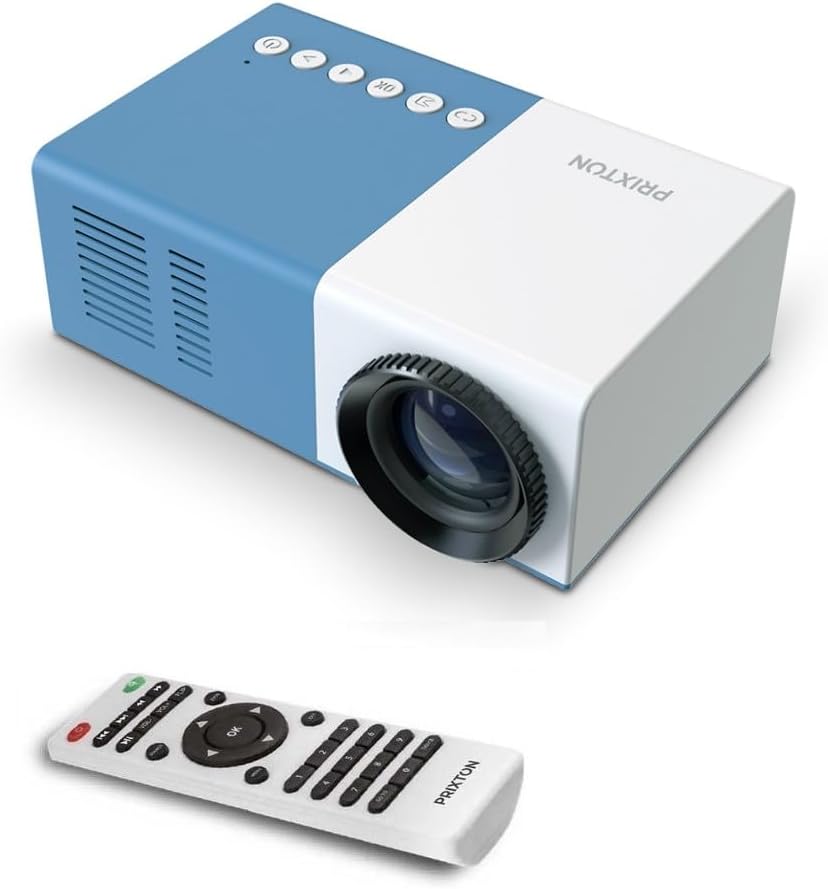
మూర్తి 4.1: ముందు మరియు ఎగువ View of the PRIXTON Cinema Mini Projector with its remote control. The projector is blue and white, showing the lens, control buttons, and the included remote.
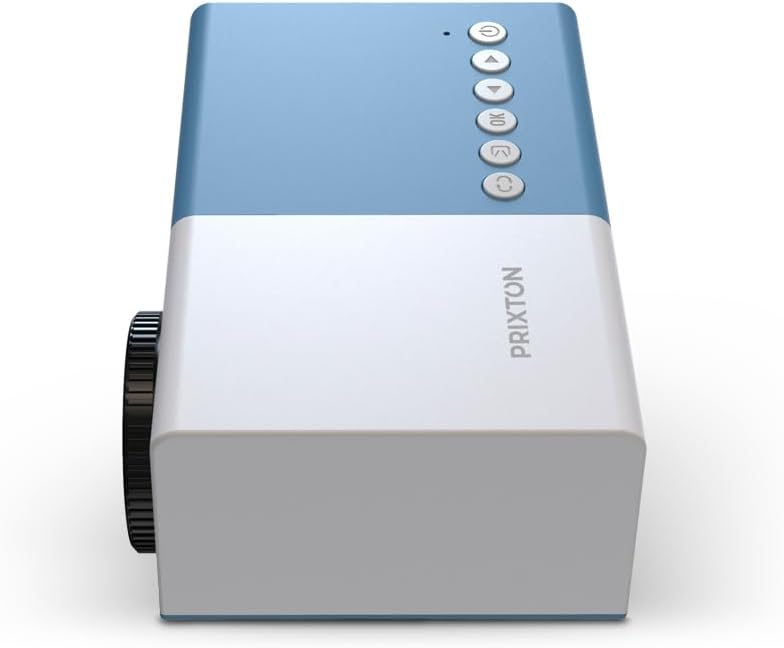
మూర్తి 4.2: టాప్ view of the projector, highlighting the control buttons (Power, Menu, OK, Navigation) and the focus wheel on the side.
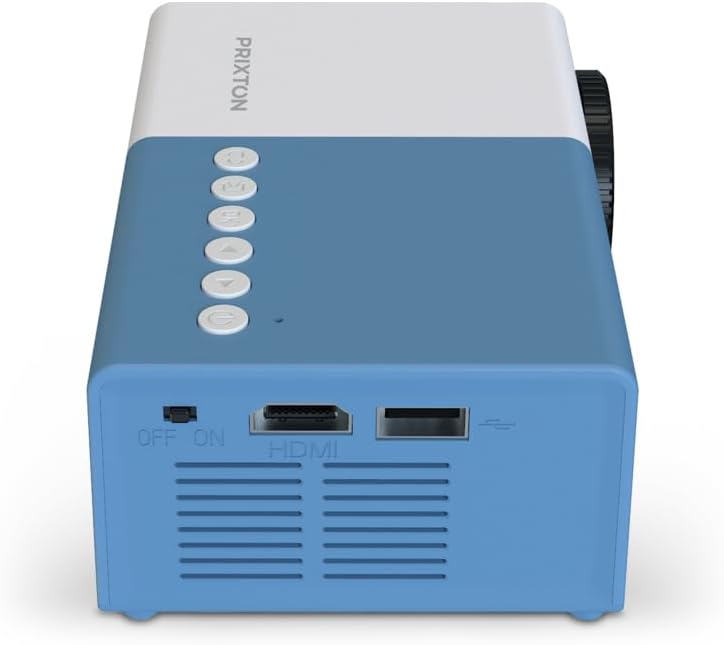
మూర్తి 4.3: వెనుక view of the projector, showing the power switch, HDMI port, USB port, and ventilation grilles.

మూర్తి 4.4: వైపు view of the projector, displaying the MicroSD card slot, AV In port, and additional ventilation.
భాగాలు:
- లెన్స్: చిత్రాన్ని తెరపైకి ప్రొజెక్ట్ చేస్తుంది.
- ఫోకస్ వీల్: చిత్ర స్పష్టతను సర్దుబాటు చేస్తుంది.
- నియంత్రణ బటన్లు: Power, Menu, OK, and navigation buttons for on-device control.
- పవర్ స్విచ్: ప్రొజెక్టర్ను ఆన్ లేదా ఆఫ్ చేస్తుంది.
- HDMI పోర్ట్: Connects to devices like laptops, streaming sticks, and game consoles.
- USB పోర్ట్: USB డ్రైవ్ల నుండి మీడియా ప్లేబ్యాక్ కోసం.
- మైక్రో SD స్లాట్: For media playback from MicroSD cards.
- AV ఇన్: Connects to older devices using an AV cable.
- ఇంటిగ్రేటెడ్ స్పీకర్: ఆడియో అవుట్పుట్ని అందిస్తుంది.
5. సెటప్
5.1 పవర్ కనెక్షన్
- పవర్ అడాప్టర్ను ప్రొజెక్టర్ పవర్ ఇన్పుట్ పోర్ట్కు కనెక్ట్ చేయండి.
- పవర్ అడాప్టర్ను వాల్ అవుట్లెట్లోకి ప్లగ్ చేయండి.
- Flip the power switch on the projector to the 'ON' position. The power indicator light should illuminate.
5.2 ప్లేస్మెంట్ మరియు ప్రొజెక్షన్
Place the projector on a stable surface, ensuring the lens is facing the projection surface (wall or screen).

మూర్తి 5.1: Illustration of projection distance and screen size. The projector can project images between 24 and 60 inches, with a maximum distance of 2 meters from the surface.
- For optimal image quality, ensure the room is dark.
- The projector can display images from 24 inches to 60 inches.
- The optimal projection distance is up to 2 meters (approximately 6.5 feet). Adjust the distance to achieve your desired screen size.
6. ఆపరేటింగ్
6.1 పవర్ ఆన్/ఆఫ్
- పవర్ ఆన్ చేయడానికి: After connecting power, press the Power button on the projector or the remote control.
- పవర్ ఆఫ్ చేయడానికి: Press the Power button again. Confirm shutdown if prompted.
6.2 ఫోకస్ సర్దుబాటు
After powering on, the image may appear blurry. Use the focus wheel located on the side of the projector to sharpen the image until it is clear.
6.3 మూలం ఎంపిక
To select an input source (HDMI, USB, MicroSD, AV):
- Press the 'Source' or 'Input' button on the remote control or the projector.
- Use the navigation buttons to highlight your desired input source.
- Press 'OK' to confirm your selection.
7 కనెక్టివిటీ
The PRIXTON Cinema Mini Projector offers multiple ways to connect your devices.
7.1 HDMI కనెక్షన్
Connect devices such as laptops, streaming sticks (e.g., Chromecast, Fire TV Stick), game consoles, or Blu-ray players using an HDMI cable.
- Connect one end of the HDMI cable to your device and the other end to the HDMI port on the projector.
- Select 'HDMI' as the input source (refer to Section 6.3).
7.2 USB and MicroSD Playback
The projector supports direct media playback from USB drives and MicroSD cards.
- Insert your USB drive into the USB port or your MicroSD card into the MicroSD slot.
- Select 'USB' or 'MicroSD' as the input source.
- ద్వారా నావిగేట్ చేయండి files using the remote control and select the media you wish to play.
7.3 AV In Connection
For older devices that use composite video and stereo audio (RCA), connect them via the AV In port.
- Connect the AV cable from your device to the AV In port on the projector.
- Select 'AV' as the input source.
8. ఆడియో అవుట్పుట్
The projector features an integrated stereo speaker, providing audio for your content. Volume can be adjusted using the remote control.

మూర్తి 8.1: The PRIXTON Cinema Mini Projector in use, projecting content in a living room environment, demonstrating its portability and ease of setup for home entertainment.
9. నిర్వహణ
9.1 లెన్స్ శుభ్రపరచడం
Use a soft, lint-free cloth specifically designed for optical lenses. Do not use abrasive cleaners or excessive force, as this can scratch the lens.
9.2 ప్రొజెక్టర్ బాడీని శుభ్రపరచడం
Wipe the exterior of the projector with a soft, dry cloth. Avoid using chemical cleaners that may damage the finish.
9.3 వెంటిలేషన్
Regularly check that the ventilation grilles are free from dust and debris to ensure proper heat dissipation and prevent overheating.
9.4 నిల్వ
When not in use, store the projector in a cool, dry place, away from direct sunlight and extreme temperatures. If possible, use the original packaging or a protective case.
10. ట్రబుల్షూటింగ్
మీ ప్రొజెక్టర్తో మీకు సమస్యలు ఎదురైతే, ఈ క్రింది సాధారణ సమస్యలు మరియు పరిష్కారాలను చూడండి.
| సమస్య | సాధ్యమైన కారణం | పరిష్కారం |
|---|---|---|
| తెరపై చిత్రం లేదు | No power; Incorrect input source; Cable not connected. | Check power connection and switch; Select correct input source; Ensure HDMI/AV/USB cable is securely connected. |
| చిత్రం అస్పష్టంగా ఉంది | ఫోకస్ సర్దుబాటు కాలేదు; ప్రొజెక్టర్ చాలా దగ్గరగా/దూరంగా ఉంది. | Adjust the focus wheel; Adjust projection distance. |
| శబ్దం లేదు | Volume too low; Muted; Source device audio issue. | Increase volume; Unmute projector; Check audio settings on source device. |
| రిమోట్ కంట్రోల్ పనిచేయడం లేదు | Batteries low/dead; Obstruction; Remote not aimed at sensor. | Replace batteries; Remove obstructions; Aim remote directly at the projector's IR sensor. |
| ప్రొజెక్టర్ వేడెక్కి ఆగిపోతుంది | వెంటిలేషన్ నిరోధించబడింది; దీర్ఘకాలిక ఉపయోగం. | వెంట్ లు స్పష్టంగా ఉన్నాయని నిర్ధారించుకోండి; ప్రొజెక్టర్ చల్లబరచడానికి అనుమతించండి; బాగా వెంటిలేషన్ ఉన్న ప్రదేశంలో పనిచేయండి. |
11. స్పెసిఫికేషన్లు
Technical specifications for the PRIXTON Cinema Mini Projector.
| ఫీచర్ | స్పెసిఫికేషన్ |
|---|---|
| బ్రాండ్ | ప్రిక్స్టన్ |
| మోడల్ సంఖ్య | Cinema Mini |
| రంగు | నీలం |
| ప్రొజెక్షన్ టెక్నాలజీ | LED |
| స్థానిక రిజల్యూషన్ | QVGA 320 x 240 |
| మద్దతు ఉన్న రిజల్యూషన్ | Up to Full HD (1920 x 1080) |
| ప్రకాశం | 900 ల్యూమెన్స్ (15 ANSI ల్యూమెన్స్) |
| ప్రొజెక్షన్ పరిమాణం | 24" - 60" |
| ప్రొజెక్షన్ దూరం | 2 మీటర్ వరకు |
| కనెక్టివిటీ | HDMI, USB, MicroSD, AV In |
| ఆడియో అవుట్పుట్ | ఇంటిగ్రేటెడ్ స్టీరియో స్పీకర్ |
| ప్రత్యేక లక్షణాలు | తేలికైనది, పోర్టబుల్ |
| చేర్చబడిన భాగాలు | రిమోట్ కంట్రోల్ |
12. వారంటీ మరియు మద్దతు
For warranty information, please refer to the documentation provided at the time of purchase or contact your retailer. Information regarding spare parts availability and software updates is not available in this manual. For further assistance or technical support, please visit the official PRIXTON webసైట్ లేదా వారి కస్టమర్ సేవను సంప్రదించండి.