
1. పరిచయం
This manual provides detailed instructions for the installation, operation, and maintenance of your Geek Smart Fingerprint Door Lock, Model L-B201. Please read this manual thoroughly before installation and use to ensure proper function and longevity of the product. Keep this manual for future reference.
2. ఉత్పత్తి లక్షణాలు
- వేలిముద్ర గుర్తింపు: Stores up to 20 unique fingerprints for quick and secure access. Unlocks in approximately 0.1 seconds.
- ద్వంద్వ ఆపరేటింగ్ మోడ్లు: Easily switch between Normal mode (auto-lock after 5 seconds) and Passage mode (remains unlocked for free passage).
- సుదీర్ఘ బ్యాటరీ జీవితం: Powered by 4 AAA batteries (not included), providing approximately 8-12 months of operation.
- అత్యవసర శక్తి: Equipped with a USB port for emergency charging if batteries deplete.
- సాధారణ సంస్థాపన: Designed for easy DIY installation with minimal tools required. Voice assistant guides programming.
- యూనివర్సల్ అనుకూలత: Suitable for both left and right-handed doors. Fits standard door thicknesses from 1-3/8'' to 2-1/8'' (35 to 55mm). Adjustable latch for 2-3/8'' (60mm) or 2-3/4'' (70mm) backsets.
- Backup Access: Includes physical keys for manual override.
3. ప్యాకేజీ విషయాలు
ఇన్స్టాలేషన్ ప్రారంభించే ముందు అన్ని భాగాలు ఉన్నాయని నిర్ధారించుకోండి:
- ఫ్రంట్ హ్యాండిల్ అసెంబ్లీ
- వెనుక హ్యాండిల్ అసెంబ్లీ
- గొళ్ళెం
- స్ట్రైక్ ప్లేట్
- కీలు (2)
- Keyhole Cover Pin
- మౌంటు స్క్రూలు (4)
- రబ్బరు రబ్బరు పట్టీ
- సూచనల మాన్యువల్ (ఈ పత్రం)
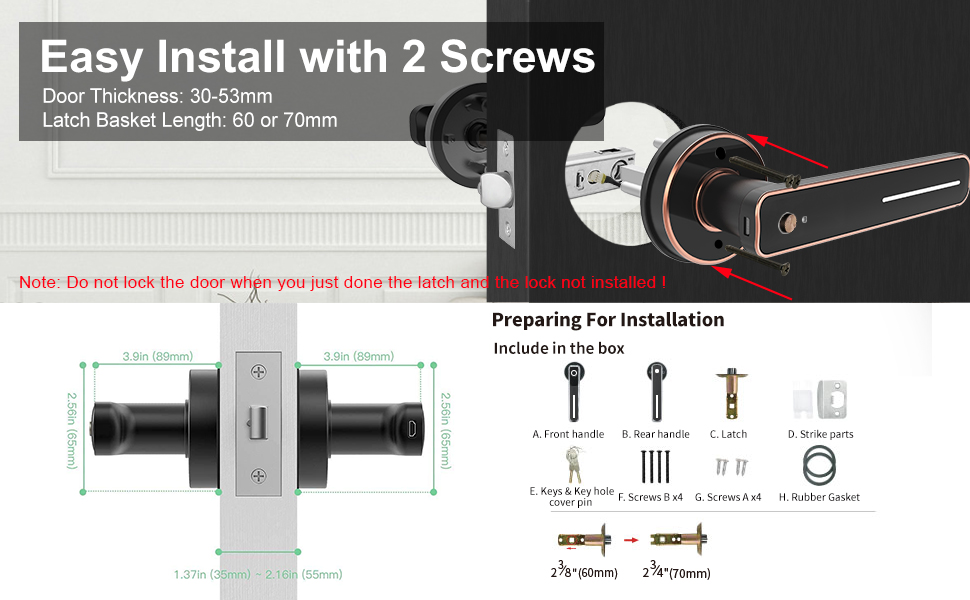
Image: Included components for installation, featuring front and rear handles, latch, strike plate, keys, screws, and gasket.
4. ఇన్స్టాలేషన్ గైడ్
Installation typically requires only a screwdriver. Follow these steps carefully:
- తలుపును సిద్ధం చేయండి: Ensure your door meets the thickness requirements (1-3/8'' to 2-1/8'' or 35-55mm) and that the latch backset is set correctly (60mm or 70mm).
- గొళ్ళెం ఇన్స్టాల్ చేయండి: Insert the latch into the door edge. Ensure the bevel of the latch bolt faces the door frame. Secure with screws.
- Install the Front Handle: Position the front handle assembly on the exterior side of the door, aligning the spindle with the latch mechanism.
- Install the Rear Handle: Place the rubber gasket on the interior side of the door. Connect the rear handle assembly to the front handle, ensuring wires are not pinched.
- తాళాన్ని భద్రపరచండి: Use the provided screws to firmly attach both handle assemblies to the door.
- స్ట్రైక్ ప్లేట్ ఇన్స్టాల్ చేయండి: Mount the strike plate on the door frame, aligning it with the latch bolt.
- బ్యాటరీలను చొప్పించండి: Open the battery compartment on the rear handle and insert 4 AAA batteries (not included), observing polarity.

Image: Visual guide for installing the smart lock using two screws, highlighting door thickness and latch basket length.
Note: Do not lock the door when you have just installed the latch and the lock is not fully assembled.
5. ఆపరేషన్
5.1 Initial Setup and Fingerprint Enrollment
- After battery installation, the lock will prompt you with voice instructions.
- To add the first administrator fingerprint, follow the voice prompts. You will typically need to place your finger on the sensor multiple times from different angles.
- Once the administrator fingerprint is registered, you can add additional user fingerprints (up to 20 total) by following similar voice prompts.

Image: The fingerprint sensor in action, showing a quick 0.1-second read speed and capacity for 20 fingerprints.
5.2 తలుపును అన్లాక్ చేస్తోంది
- వేలిముద్ర: Place a registered finger on the sensor. The lock will unlock if the fingerprint is recognized.
- కీ: In case of emergency or battery depletion, use the provided physical key to unlock the door.
5.3 Mode Switching (Passage Mode / Normal Mode)
The lock features a mode switching button, typically located on the interior handle. Press this button to toggle between modes.
- సాధారణ మోడ్: The lock will automatically engage (auto-lock) approximately 5 seconds after being unlocked. This is the standard secure mode.
- పాసేజ్ మోడ్: The lock will remain unlocked, allowing free entry and exit without requiring a fingerprint or key. This mode is suitable for periods of high traffic.
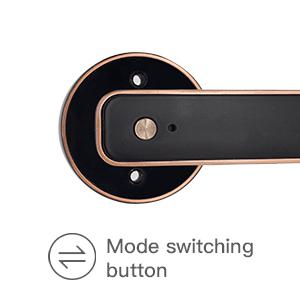
Image: Detail of the mode switching button on the lock's interior handle.

Image: The lock set to Passage Mode, allowing unrestricted entry and exit.
5.4 అత్యవసర ఛార్జింగ్
If the batteries run out, the lock can be temporarily powered using a standard USB power bank connected to the emergency USB port on the exterior handle. This allows you to unlock the door with a registered fingerprint or key.

Image: The USB port for emergency power, located on the exterior handle.

Image: A physical backup key provided for manual access.
6. నిర్వహణ
- శుభ్రపరచడం: Wipe the lock surface with a soft, dry cloth. Avoid abrasive cleaners or solvents that could damage the finish or electronic components.
- బ్యాటరీ భర్తీ: Replace all 4 AAA batteries when the low battery indicator or voice prompt is activated. Do not mix old and new batteries.
- వేలిముద్ర సెన్సార్ సంరక్షణ: ఉత్తమ పనితీరు కోసం వేలిముద్ర సెన్సార్ను శుభ్రంగా మరియు పొడిగా ఉంచండి.
7. ట్రబుల్షూటింగ్
| సమస్య | సాధ్యమైన కారణం | పరిష్కారం |
|---|---|---|
| లాక్ స్పందించదు. | డెడ్ బ్యాటరీలు. | Replace batteries or use emergency USB power. |
| వేలిముద్ర గుర్తించబడలేదు. | Finger is wet/dirty, sensor is dirty, or fingerprint not properly registered. | Clean finger and sensor. Re-enroll fingerprint if necessary. Try a different registered finger. |
| లాక్ స్వయంచాలకంగా లాక్ అవ్వదు. | Lock is in Passage Mode. | Press the mode switching button to return to Normal Mode. |
| Voice prompts are unclear or absent. | Low battery or internal error. | బ్యాటరీలను మార్చండి. సమస్య కొనసాగితే, కస్టమర్ సపోర్ట్ను సంప్రదించండి. |
8. స్పెసిఫికేషన్లు
| ఫీచర్ | వివరాలు |
|---|---|
| మోడల్ | ఎల్-బి 201 |
| బ్రాండ్ | గీక్ స్మార్ట్ |
| లాక్ రకం | Biometric Fingerprint Handle Lock |
| మెటీరియల్ | అల్యూమినియం |
| రంగు | నలుపు |
| వేలిముద్ర కెపాసిటీ | 20 వరకు |
| అన్లాక్ స్పీడ్ | సుమారు 0.1 సెకన్లు |
| శక్తి మూలం | 4 x AAA బ్యాటరీలు (చేర్చబడలేదు) |
| అత్యవసర శక్తి | USB పోర్ట్ |
| బ్యాటరీ లైఫ్ | 8-12 months (approx.) |
| తలుపు మందం | 1-3/8'' to 2-1/8'' (35-55mm) |
| సర్దుబాటు గొళ్ళెం | 2-3/8'' (60mm) or 2-3/4'' (70mm) |
| కొలతలు (L x W x H) | 6.03 x 2.55 x 2.82 అంగుళాలు |
| వస్తువు బరువు | 2.72 పౌండ్లు |
| కనెక్టివిటీ | No Bluetooth or Wi-Fi Connectivity |
9. వారంటీ మరియు మద్దతు
For warranty information and customer support, please refer to the official Geek Smart webమీరు ఉత్పత్తిని కొనుగోలు చేసిన రిటైలర్ను సైట్లో లేదా సంప్రదించండి. కొనుగోలు రుజువుగా మీ కొనుగోలు రసీదును ఉంచండి.