
1. పరిచయం
This manual provides detailed instructions for the installation, operation, and maintenance of your NUTOMO Fingerprint Entry Door Handle Lock. Please read this manual thoroughly before installation and use to ensure proper function and safety.
The NUTOMO smart lock offers multiple access methods including fingerprint, user passcode, IC card, and traditional physical keys, providing enhanced security and convenience for your home, hotel, or office.
2. భద్రతా సమాచారం
- Do not attempt to disassemble or repair the lock yourself. Contact customer support for assistance.
- Use only specified batteries (4 AA batteries). Do not mix old and new batteries or different types of batteries.
- Keep physical keys in a secure location outside the property.
- Avoid exposing the lock to direct sunlight or extreme temperatures for prolonged periods.
- Ensure the door frame and door are properly aligned and free of obstructions for smooth operation.
3. ప్యాకేజీ విషయాలు
ఇన్స్టాలేషన్ ప్రారంభించే ముందు అన్ని భాగాలు ఉన్నాయని నిర్ధారించుకోండి:
- Front Panel Assembly (with keypad and fingerprint sensor)
- Back Panel Assembly (with battery compartment)
- గొళ్ళెం మెకానిజం
- స్ట్రైక్ ప్లేట్
- మౌంటు స్క్రూలు మరియు హార్డ్వేర్
- Physical Keys (2)
- IC కార్డులు (2)
- వినియోగదారు మాన్యువల్
- సంస్థాపన మూస
Note: 4 AA batteries are required but not included.
4. సెటప్ మరియు ఇన్స్టాలేషన్
4.1 డోర్ తయారీ
మీ తలుపు కింది స్పెసిఫికేషన్లకు అనుగుణంగా ఉందని నిర్ధారించుకోండి:
- Door thickness: 1.49-2.36 inches (38-60 mm)
- Backset: 2-3/8 inches or 2-3/4 inches (60mm or 70mm)
If replacing an existing lock, ensure the door holes are compatible. If the door has two holes, you may need to seal one or use a deadbolt in conjunction with this lock if the holes are too close.
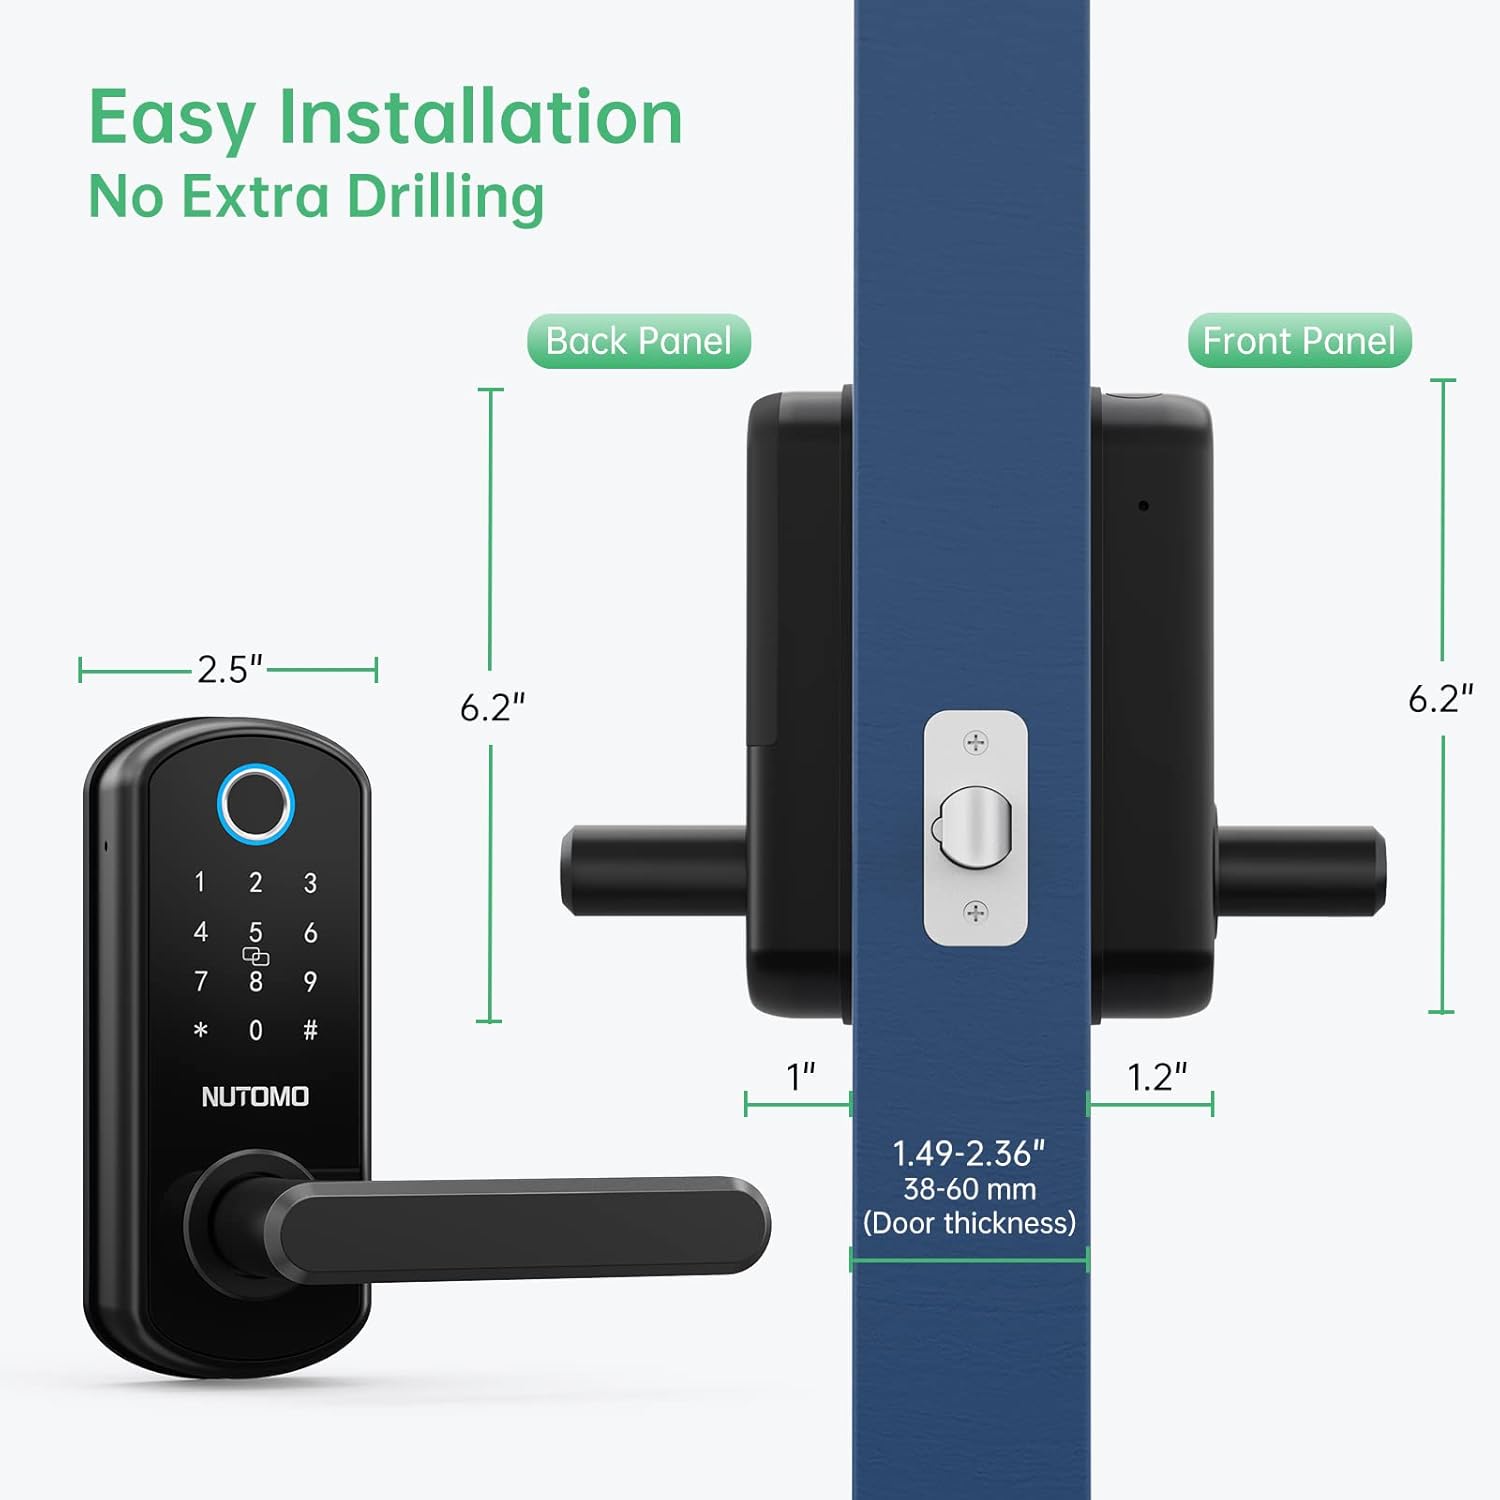
4.2 Latch Installation
Adjust the latch length if necessary and install it into the door edge. Secure with screws.
4.3 Handle Direction Adjustment
The handle direction can be adjusted for left-hand or right-hand doors. Turn the front handle to the Left and the back handle to the Right for a left-hand door. For a right-hand door, turn the front handle to the Right and the back handle to the Left.

4.4 Front Panel and Mounting Plate Installation
Install the front panel, routing the IC wire under the latch. Then, install the mounting plate and connect the IC wire.
4.5 బ్యాటరీ ఇన్స్టాలేషన్
Insert 4 AA batteries into the battery compartment on the back panel. Ensure correct polarity. Close the battery cover securely.

5. ఆపరేటింగ్ సూచనలు
5.1 అన్లాకింగ్ పద్ధతులు
- వేలిముద్ర అన్లాక్: మీ నమోదిత వేలిని సెన్సార్పై ఉంచండి.
- పాస్కోడ్ అన్లాక్: Enter your registered passcode followed by '#'.
- IC కార్డ్ అన్లాక్: Tap your registered IC card on the keypad.
- భౌతిక కీ అన్లాక్: Use the provided physical key for manual override.

5.2 ఆటో-లాక్ ఫీచర్
The lock is equipped with an auto-lock feature that engages after a short period (typically 5 seconds) once the door is closed. This ensures your door is always secured.

5.3 Anti-Peeping Virtual Code
To enhance security, you can enter random digits before or after your actual passcode. This prevents others from guessing your code by observing your finger movements.

5.4 Emergency Power and Key Access
In case of battery depletion, the lock features a USB charging port for emergency power. Additionally, physical keys are provided for manual access.

5.5 డోర్బెల్ ఫంక్షన్
After waking up the keypad, press '#', and the doorbell will sound three times.
6. Programming and Management
6.1 Setting the Management Passcode
To enter the menu, input "*#". Then, press '1' for Management Setting, and '1' again to set the management passcode. Input your desired code twice, ending with '#'.
6.2 Adding Fingerprints and IC Cards
After setting the management passcode, you can add fingerprints and IC cards. Enter the management menu, select the appropriate option, and follow the voice prompts. For fingerprints, input your finger 5 times. For IC cards, tap the card once.
6.3 Sharing Passcodes
The lock supports up to 300 sets of passwords, allowing you to share access with multiple users.

6.4 లాక్ని రీసెట్ చేయడం
To reset the lock to factory settings, remove the battery cover while the lock is powered on. Press and hold the reset button for approximately 5 seconds until you hear "Initializing". Release the button, and the lock will reset.
7. నిర్వహణ
- బ్యాటరీ భర్తీ: Replace all 4 AA batteries when the low battery alarm sounds.
- శుభ్రపరచడం: Wipe the keypad and fingerprint sensor with a soft, dry cloth. Avoid abrasive cleaners or solvents.
- పర్యావరణ పరిస్థితులు: The lock is designed to withstand temperatures from -13°F to 149°F and has an IP63 rating for dust and water resistance.

8. ట్రబుల్షూటింగ్
- లాక్ స్పందించడం లేదు: Check battery levels. Use emergency USB power or physical key.
- వేలిముద్ర గుర్తించబడలేదు: Ensure your finger is clean and dry. Try re-registering your fingerprint. Cold weather can sometimes affect fingerprint reader performance; use a passcode or key fob as an alternative.
- పాస్కోడ్ పనిచేయడం లేదు: Ensure you are entering the correct passcode followed by '#'. Try resetting the lock if issues persist.
- ఆటో-లాక్ పనిచేయడం లేదు: Verify the door is fully closed and aligned.
9. స్పెసిఫికేషన్లు
| ఫీచర్ | వివరాలు |
|---|---|
| బ్రాండ్ | నుటోమో |
| మోడల్ సంఖ్య | B0B7S2DMPM |
| లాక్ రకం | బయోమెట్రిక్, కీప్యాడ్ |
| ప్రత్యేక లక్షణాలు | Fingerprint, Smart Lock |
| మెటీరియల్ | అల్యూమినియం |
| రంగు | నలుపు |
| అంశం కొలతలు (L x W x H) | 2.5 x 1.2 x 6.2 అంగుళాలు |
| వస్తువు బరువు | 3.56 పౌండ్లు |
| నియంత్రణ పద్ధతి | టచ్ |
| కనెక్టివిటీ ప్రోటోకాల్ | Wi-Fi |
| సిఫార్సు చేసిన ఉపయోగాలు | గృహ భద్రత |
| బ్యాటరీలు చేర్చబడ్డాయా? | No (Requires 4 AA batteries) |
10. వారంటీ మరియు మద్దతు
For warranty information, technical support, or any inquiries regarding your NUTOMO Fingerprint Entry Door Handle Lock, please refer to the product packaging or visit the official NUTOMO website. Contact details for customer service are typically provided with your purchase.