
1. పరిచయం
Thank you for choosing the GEEKOM MiniAir 11 Mini PC. This compact and powerful device is designed for various computing tasks, from everyday browsing to 4K media playback. This manual provides essential information for setting up, operating, maintaining, and troubleshooting your Mini PC.
2. పెట్టెలో ఏముంది
Carefully unpack your GEEKOM MiniAir 11 and ensure all items are present:
- GEEKOM MiniAir 11 మినీ PC
- పవర్ అడాప్టర్
- పవర్ కేబుల్
- HDMI కేబుల్
- HDMI అడాప్టర్కి మినీ డిస్ప్లేపోర్ట్
- VESA మౌంట్ మరియు స్క్రూలు
- నిల్వ బ్యాగ్
- వినియోగదారు మాన్యువల్ (ఈ పత్రం)
- Mascot Figurine (Special Edition)
- GEEKOM Mouse Pad (Special Edition)

Figure 2.1: Contents of the GEEKOM MiniAir 11 Special Edition box.
3. ఉత్పత్తి ముగిసిందిview
The GEEKOM MiniAir 11 features a compact design with various ports for connectivity and expansion.
3.1 ఫ్రంట్ ప్యానెల్

Figure 3.1: Front panel ports.
- USB Type-C (SS 10): డేటా బదిలీ మాత్రమే.
- USB 3.2 Gen1 (SS 5): హై-స్పీడ్ డేటా బదిలీ.
- హెడ్ఫోన్ జాక్: ఆడియో అవుట్పుట్ కోసం.
- పవర్ బటన్: పరికరాన్ని ఆన్/ఆఫ్ చేయడానికి.
3.2 వెనుక ప్యానెల్

Figure 3.2: Rear panel ports.
- Power Socket (19V DC): పవర్ అడాప్టర్ను ఇక్కడ కనెక్ట్ చేయండి.
- Mini DisplayPort (DP): వీడియో అవుట్పుట్ కోసం.
- Gigabit LAN: వైర్డు నెట్వర్క్ కనెక్షన్ కోసం.
- 2x USB 3.2 Gen1 (SS 5): హై-స్పీడ్ డేటా బదిలీ.
- USB Type-C (SS 10): డేటా బదిలీ మాత్రమే.
- HDMI: For video output (supports 4K UHD).
3.3 సైడ్ ప్యానెల్లు

Figure 3.3: Side panel with SD card slot.
- SD కార్డ్ స్లాట్: SD కార్డ్తో నిల్వను విస్తరించడానికి.
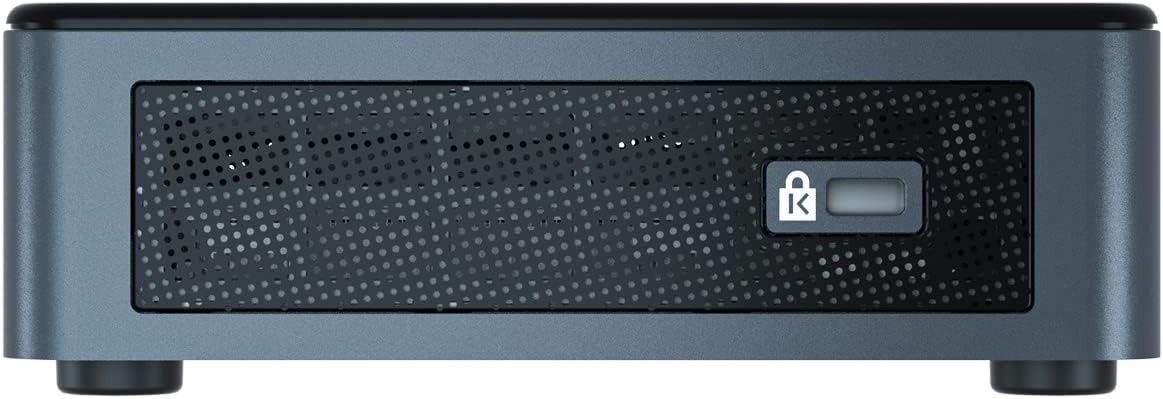
Figure 3.4: Side panel with Kensington lock slot.
- కెన్సింగ్టన్ లాక్ స్లాట్: భౌతిక భద్రత కోసం.
4. సెటప్
Follow these steps to set up your GEEKOM MiniAir 11:
- డిస్ప్లేకి కనెక్ట్ చేయండి: Connect your monitor or TV to the Mini PC using the HDMI cable or Mini DisplayPort to HDMI adapter.
- పెరిఫెరల్స్ కనెక్ట్ చేయండి: మీ కీబోర్డ్, మౌస్ మరియు ఏవైనా ఇతర USB పరికరాలను అందుబాటులో ఉన్న USB పోర్ట్లలోకి ప్లగ్ చేయండి.
- నెట్వర్క్కు కనెక్ట్ చేయండి: For a wired connection, plug an Ethernet cable into the Gigabit LAN port. For Wi-Fi, the device will prompt you during initial Windows setup.
- పవర్ కనెక్ట్ చేయండి: Connect the power adapter to the Mini PC's power socket, then plug the power cable into an electrical outlet.
- పవర్ ఆన్: Press the power button on the front panel. The device will boot up, and you will be guided through the Windows 11 Pro setup process.
5 ఆపరేటింగ్ సిస్టమ్
The GEEKOM MiniAir 11 comes pre-installed with Windows 11 ప్రో, offering a full desktop experience. Ensure your operating system is regularly updated for optimal performance and security.
6. నిర్వహణ
To ensure the longevity and optimal performance of your Mini PC, consider the following maintenance tips:
- శుభ్రపరచడం: Regularly clean the exterior with a soft, dry cloth. Use compressed air to clear dust from vents to maintain proper airflow and cooling.
- సాఫ్ట్వేర్ అప్డేట్లు: Keep Windows 11 Pro and all drivers updated. This can be done through Windows Update in the Settings menu.
- నిల్వ నిర్వహణ: కాలానుగుణంగా అనవసరమైన వాటిని క్లియర్ చేయండి fileనిల్వ స్థలాన్ని ఖాళీ చేయడానికి లు మరియు అప్లికేషన్లను ఉపయోగించండి.
- పర్యావరణం: Operate the Mini PC in a well-ventilated area, away from direct sunlight, heat sources, and excessive moisture.
7. భాగాలు అప్గ్రేడ్ చేయడం
The GEEKOM MiniAir 11 offers upgrade options for RAM and storage:
- RAM: The device features two DDR4 RAM slots. It comes with 8GB DDR4 RAM (one slot occupied) and is upgradable to a maximum of 32GB (16GB per slot).
- SSD: The Mini PC includes a 256GB M.2 NVMe SSD. This can be upgraded to a 1TB M.2 NVMe SSD. Note that upgrading the SSD will require reinstalling the operating system.
For detailed instructions on how to access and upgrade these components, please refer to the official GEEKOM support resources or consult a qualified technician.
8. ట్రబుల్షూటింగ్
If you encounter issues with your GEEKOM MiniAir 11, try the following basic troubleshooting steps:
- శక్తి లేదు: పవర్ అడాప్టర్ మినీ PC మరియు పనిచేసే ఎలక్ట్రికల్ అవుట్లెట్ రెండింటికీ సురక్షితంగా కనెక్ట్ చేయబడిందని నిర్ధారించుకోండి. వేరే అవుట్లెట్ను ప్రయత్నించండి.
- ప్రదర్శన లేదు: Verify that the HDMI or Mini DisplayPort cable is correctly connected to both the Mini PC and your display. Ensure the display is set to the correct input source.
- నెమ్మదిగా పనితీరు: Check for background applications consuming resources. Ensure Windows and drivers are updated. Consider upgrading RAM or SSD if performance issues persist.
- నెట్వర్క్ సమస్యలు: For wired connections, check the Ethernet cable and router. For Wi-Fi, ensure the device is connected to the correct network and the signal is strong. Restart your router if necessary.
- పరిధీయ గుర్తించబడలేదు: పరిధీయ పరికరాన్ని వేరే USB పోర్ట్కు కనెక్ట్ చేయడానికి ప్రయత్నించండి. పరిధీయ పరికరానికి డ్రైవర్లు ఇన్స్టాల్ చేయబడ్డాయని నిర్ధారించుకోండి.
For more advanced troubleshooting, visit the GEEKOM support webసైట్.
9. స్పెసిఫికేషన్లు
| ఫీచర్ | స్పెసిఫికేషన్ |
|---|---|
| బ్రాండ్ | GEEKOM |
| మోడల్ పేరు | GEEKOM MiniAir 11 |
| మోడల్ సంఖ్య | GMA11N5095S |
| ఆపరేటింగ్ సిస్టమ్ | Windows 11 ప్రో |
| CPU మోడల్ | Intel Celeron N5095 (11th Gen Quad-Core) |
| CPU వేగం | 2.9 GHz వరకు |
| GPU | ఇంటెల్ UHD గ్రాఫిక్స్ 605 (ఇంటిగ్రేటెడ్) |
| RAM | 8GB DDR4 (Upgradable to 32GB Max) |
| నిల్వ | 256GB M.2 NVMe SSD (Upgradable to 1TB Max) |
| వైర్లెస్ కనెక్టివిటీ | Wi-Fi (5GHz AC), Bluetooth 4.0 |
| వైర్డు కనెక్టివిటీ | గిగాబిట్ LAN |
| వీడియో అవుట్పుట్ | HDMI, Mini DisplayPort (Supports 4K UHD) |
| USB పోర్ట్లు | 3x USB 3.2 Gen1, 2x USB Type-C (Data Only) |
| ఇతర పోర్టులు | Headphone Jack, SD Card Slot, Kensington Lock Slot |
| కొలతలు | 4.61 x 4.41 x 1.34 అంగుళాలు |
| శీతలీకరణ పద్ధతి | గాలి |
10. వారంటీ మరియు మద్దతు
GEEKOM products are designed for reliability and performance. For warranty information, product registration, and technical support, please visit the official GEEKOM webసైట్ లేదా వారి కస్టమర్ సర్వీస్ను సంప్రదించండి. వారంటీ క్లెయిమ్ల కోసం మీ కొనుగోలు రసీదును ఉంచండి.
GEEKOM Official Webసైట్: www.geekompc.com