
1. పరిచయం
This manual provides comprehensive instructions for the assembly, operation, maintenance, and troubleshooting of your KIMISS 6-DOF Robotic Arm Kit. This robotic manipulator is designed for a wide range of applications, including university education and industrial prototyping. Please read this manual carefully before beginning assembly or operation to ensure proper use and longevity of the product.
2. ఉత్పత్తి ముగిసిందిview
2.1 ముఖ్య లక్షణాలు
- 6-Degrees of Freedom (6-DOF): Equipped with 6 servo motors, enabling demonstrations of forward and backward, up and down, and left and right gripping movements.
- మన్నికైన నిర్మాణం: All support fittings are made from 2mm thick aluminum plate, enhancing the robot's stability.
- Enhanced Articulation: Imported cup bearings are used at the steering joints, providing more flexible steering and ensuring the steering gear remains centered.
- Flexible Base: The chassis features a disc-shaped design, allowing the manipulator to rotate left and right with greater flexibility and smoothness.
2.2 చేర్చబడిన భాగాలు
The KIMISS 6-DOF Robotic Arm Kit includes the following components:
- 6 x MG996 Analog Steering Gear
- 1 x కేబుల్ టై
- 5 packs of Screw Nut Fittings
- 3 x పొడిగింపు కేబుల్స్
- 1 x Flange Bar
- 3 x Flange Bearings
- 6 x Metal Flywheels
- 1 x Mechanical Arm Structure
- 1 x బ్రేస్
- 1 x U-shaped Bracket
- 2 x L-shaped Brackets
- 2 x Long U-shaped Brackets
- 4 x Multi-function Brackets
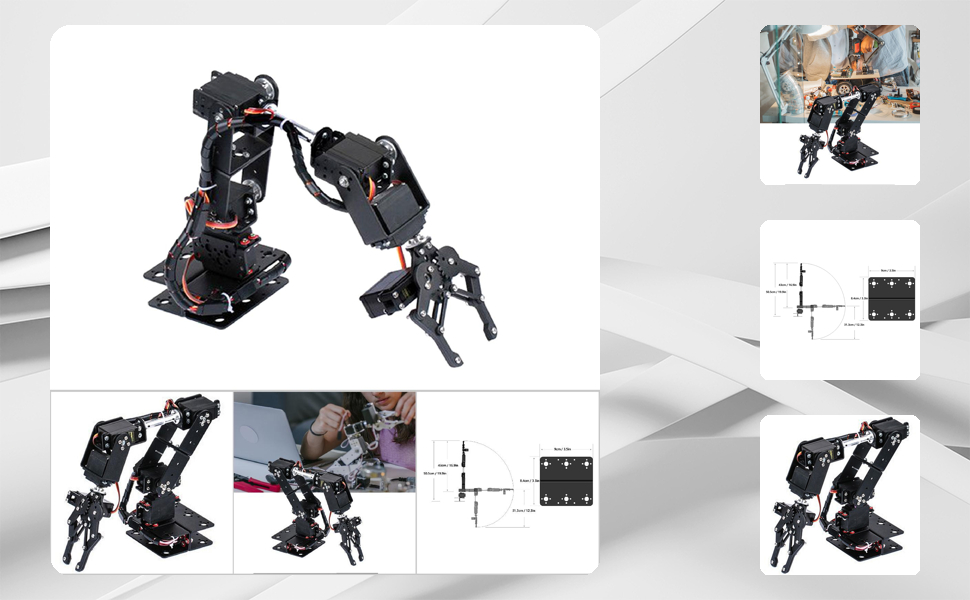
చిత్రం 1: పైగాview of the KIMISS 6-DOF Robotic Arm Kit.

Figure 2: Assortment of parts and accessories included in the kit, such as brackets, servos, and fasteners.
వీడియో 1: ఒక ఓవర్view of the KIMISS 6-DOF Robotic Arm Kit, showing its components and initial movements.
3. సెటప్ మరియు అసెంబ్లీ
The KIMISS 6-DOF Robotic Arm Kit requires assembly. Follow the steps below carefully. It is recommended to refer to the assembly video for visual guidance.
3.1 అసెంబ్లీ దశలు
- భాగాలను సిద్ధం చేయండి: అన్ని భాగాలను అన్ప్యాక్ చేసి, చేర్చబడిన భాగాల జాబితాతో సరిచూసుకోండి.
- బేస్ అసెంబ్లీ: Assemble the base structure using the U-shaped brackets and multi-function brackets. Secure with appropriate screws and nuts.
- సర్వో ఇన్స్టాలేషన్: Mount the MG996 analog steering gears into their designated positions within the brackets. Ensure correct orientation for each joint.
- Arm Linkage: Connect the arm segments using the L-shaped brackets, long U-shaped brackets, flange bar, and flange bearings. Pay attention to the mechanical structure for proper articulation.
- Gripper Assembly: Assemble the gripper mechanism and attach it to the end of the arm.
- వైరింగ్: Connect the servo motors to your control board (e.g., Arduino, not included) using the extension cables. Ensure all connections are secure and correctly polarized.
- చివరి తనిఖీలు: Before powering on, double-check all screw connections for tightness and ensure no wires are pinched.

Figure 3: Diagram illustrating the simplified forearm mechanical structure, designed for easier installation and flexible control.
Video 2: An animated exploded view demonstrating the step-by-step assembly process of the robotic arm components.
4. ఆపరేటింగ్ సూచనలు
The KIMISS 6-DOF Robotic Arm operates manually and requires an external power source (battery, not included) and a control system (e.g., Arduino, not included) to function. This section outlines general operating principles.
4.1 Powering the Robotic Arm
- Connect a compatible battery (4.8V-7.2V) to your control board, which in turn powers the servo motors.
- Ensure the power supply can deliver sufficient current (100mA no-load current per servo, higher under load) for all 6 servos.
4.2 Control and Movement
- The arm is controlled via signals sent to the individual servo motors from your chosen microcontroller (e.g., Arduino).
- Each servo has a limit angle of 180°, allowing for precise positioning of each joint.
- Program your microcontroller to send appropriate pulse-width modulation (PWM) signals to each servo to achieve desired movements, such as gripping, lifting, and rotating.
- Experiment with different servo angles to understand the full range of motion and capabilities of the 6-DOF arm.

Figure 4: The robotic arm demonstrating its gripping capability by picking up a small wooden block.
Video 3: A demonstration of the robotic arm's mechanical movements, including picking up and manipulating objects.
5. నిర్వహణ
Regular maintenance ensures the optimal performance and longevity of your robotic arm kit.
- శుభ్రముగా ఉంచు: Periodically clean the arm components to prevent dust and debris buildup, which can affect joint movement.
- కనెక్షన్లను తనిఖీ చేయండి: Regularly inspect all electrical connections and mechanical fasteners (screws, nuts) to ensure they are secure. Loose connections can lead to erratic behavior or damage.
- సరళత: While not typically required for servo motors, ensure that any moving metal-on-metal parts (if applicable) are free from excessive friction.
- ఓవర్లోడింగ్ను నివారించండి: Do not attempt to lift objects heavier than the arm's rated capacity (refer to servo torque specifications).
- నిల్వ: When not in use, store the robotic arm in a dry, dust-free environment.
6. ట్రబుల్షూటింగ్
If you encounter issues with your robotic arm, refer to the following troubleshooting tips:
- Arm Not Moving:
- Check power supply: Ensure the battery is charged and correctly connected, providing the specified voltagఇ (4.8V-7.2V).
- Verify wiring: Confirm all servo motor wires are correctly connected to the control board.
- Review code: Ensure your microcontroller code is correctly sending signals to the servos. Test individual servos if possible.
- అనియత ఉద్యమం:
- Check for loose connections: Tighten any loose screws or electrical connections.
- Interference: Ensure no physical obstructions are impeding the arm's movement.
- Power fluctuations: An unstable power supply can cause erratic behavior. Ensure a consistent power source.
- Servo Buzzing/Overheating:
- Overload: The servo might be trying to hold a position against too much force. Reduce the load or adjust the arm's position.
- Incorrect angle: Ensure the servo is not commanded to an angle beyond its 180° limit.
- Continuous power: Servos can overheat if continuously powered at maximum torque. Consider programming brief rest periods or reducing holding torque.
7. స్పెసిఫికేషన్లు
| ఫీచర్ | స్పెసిఫికేషన్ |
|---|---|
| బ్రాండ్ | KIMISS |
| మోడల్ సంఖ్య | KIMISSt40f5qbh27 |
| టైప్ చేయండి | Mechanical Robotic Arm Kit |
| రంగు | నలుపు |
| మెటీరియల్ | మెటల్, అల్యూమినియం |
| Degrees of Freedom (DOF) | 6 |
| Servo Model | MG996R Analog Steering Gear |
| ఆపరేటింగ్ వాల్యూమ్tage | 4.8వి - 7.2వి |
| నో-లోడ్ కరెంట్ | 100mA (per servo) |
| Machine Torsion | 10 కి.గ్రా.సెం.మీ. |
| Limit Angle | 180° |
| వైర్ పొడవు | 30 సెం.మీ |
| Transmission Material | మెటల్ గేర్లు |
| డెడ్ టైమ్ | 5 యుఎస్ |
| కొలతలు (L x W x H) | 30 x 20 x 7 cm (approximate assembled) |
| అసెంబ్లీ అవసరం | అవును |
| శక్తి మూలం | బ్యాటరీ (చేర్చబడలేదు) |
| సిఫార్సు ఉపయోగం | University education, industrial prototyping |

Figure 5: Technical drawing illustrating key dimensions and components of the robotic arm.
8. వారంటీ మరియు మద్దతు
For warranty information and technical support, please refer to the seller's policies on the platform where the product was purchased. Keep your proof of purchase for any warranty claims.
If you require further assistance with assembly, operation, or troubleshooting, please contact the seller directly through the platform's messaging system. Provide your order number and a detailed description of the issue for prompt support.