
1. పరిచయం
This manual provides detailed instructions for the installation, operation, and maintenance of your Hilitand MPPT Solar Controller. This intelligent regulator is designed to optimize power generation from solar panels and efficiently charge various battery types in 12V or 24V automatic systems. Please read this manual thoroughly before use to ensure proper function and longevity of the device.
ఉత్పత్తి లక్షణాలు:
- Maximum Power Point Tracking (MPPT): Detects real-time power generation of solar panels and tracks the highest voltage current value (V1) for maximum power charging.
- బహుముఖ బ్యాటరీ అనుకూలత: Supports colloidal, sealed, open, and lithium batteries.
- సమగ్ర రక్షణ: Includes high input terminal voltage, short circuit, overpower, backcharge, TVS thunder, and overtemperature protection.
- సమర్థవంతమైన ఉష్ణ వెదజల్లడం: Features a dual fan system to manage charging power and ensure stable operation.
- యూజర్ ఫ్రెండ్లీ LCD డిస్ప్లే: Shows operating status, parameters, and control settings for easy monitoring and modification.
- డ్యూయల్ USB పోర్ట్: Provides 5V 3A output for charging external devices.
2. భద్రతా సమాచారం
Always observe the following safety precautions to prevent personal injury and damage to the controller or other components:
- Ensure all wiring is correctly connected before powering on the system. Incorrect wiring can cause damage.
- కంట్రోలర్ను మీరే విడదీయడానికి లేదా మరమ్మతు చేయడానికి ప్రయత్నించవద్దు. సేవ కోసం అర్హత కలిగిన సిబ్బందిని చూడండి.
- మండే పదార్థాలు మరియు ప్రత్యక్ష సూర్యకాంతికి దూరంగా, బాగా వెంటిలేషన్ ఉన్న ప్రదేశంలో కంట్రోలర్ను ఇన్స్టాల్ చేయండి.
- విద్యుత్ వ్యవస్థలతో పనిచేసేటప్పుడు తగిన వ్యక్తిగత రక్షణ పరికరాలు (PPE) ధరించండి.
- బ్యాటరీ వాల్యూమ్ని నిర్ధారించుకోండిtagఇ సిస్టమ్ వాల్యూమ్తో సరిపోలుతుందిtage (12V or 24V) before connection.
3. ఉత్పత్తి ముగిసిందిview మరియు భాగాలు
The Hilitand MPPT Solar Controller is designed for robust performance in off-grid photovoltaic systems. Below is an overview of its physical characteristics and included components.

మూర్తి 3.1: ముందు view of the Hilitand MPPT Solar Controller, showing the LCD screen and control buttons.

Figure 3.2: Dimensions of the Hilitand MPPT Solar Controller, measuring approximately 135 x 135 x 54mm.
ప్యాకేజీ విషయాలు:
- 1 x MPPT సోలార్ కంట్రోలర్
- 4 x Installation Screws
- 4 x వాల్ ప్లగ్స్
- 1 x యూజర్ మాన్యువల్ (ఈ పత్రం)
4. సెటప్ మరియు ఇన్స్టాలేషన్
Follow these steps for proper installation of your MPPT Solar Controller.
4.1 కంట్రోలర్ను మౌంట్ చేయడం
Mount the controller in a dry, well-ventilated indoor location. Ensure there is sufficient space around the unit for heat dissipation. The controller features mounting holes for secure wall installation.

చిత్రం 4.1: ఉదాample of controller installation, highlighting the dual USB interface.
4.2 వైరింగ్ కనెక్షన్లు
నష్టాన్ని నివారించడానికి భాగాలను ఈ క్రింది క్రమంలో కనెక్ట్ చేయండి:
- బ్యాటరీని కనెక్ట్ చేయండి: Connect the battery to the controller's battery terminals. Ensure correct polarity (+ to + and - to -). The LCD display should light up.
- సోలార్ ప్యానెల్ను కనెక్ట్ చేయండి: Connect the solar panel to the controller's solar panel terminals. Ensure correct polarity. The controller will begin charging the battery.
- లోడ్ను కనెక్ట్ చేయండి (ఐచ్ఛికం): Connect your DC load to the controller's load terminals. Ensure correct polarity.
ముఖ్యమైన: ఎల్లప్పుడూ ముందుగా బ్యాటరీని, తర్వాత సోలార్ ప్యానెల్ను, చివరకు లోడ్ను కనెక్ట్ చేయండి. రివర్స్ ఆర్డర్లో డిస్కనెక్ట్ చేయండి: లోడ్, తర్వాత సోలార్ ప్యానెల్, తర్వాత బ్యాటరీ.

Figure 4.2: System connection diagram illustrating the wiring order for solar panel, battery, and DC load.

Figure 4.3: Comprehensive system diagram showing the MPPT solar charging controller integrated into a larger solar power system with AC output.
5. ఆపరేటింగ్ సూచనలు
The controller features an LCD display and control buttons for easy operation and monitoring.
5.1 LCD డిస్ప్లే మరియు బటన్లు
The LCD screen displays real-time system status, including battery voltage, charging current, load current, and various parameters. The buttons (SET, UP, DOWN, ESC) allow you to navigate menus and adjust settings.
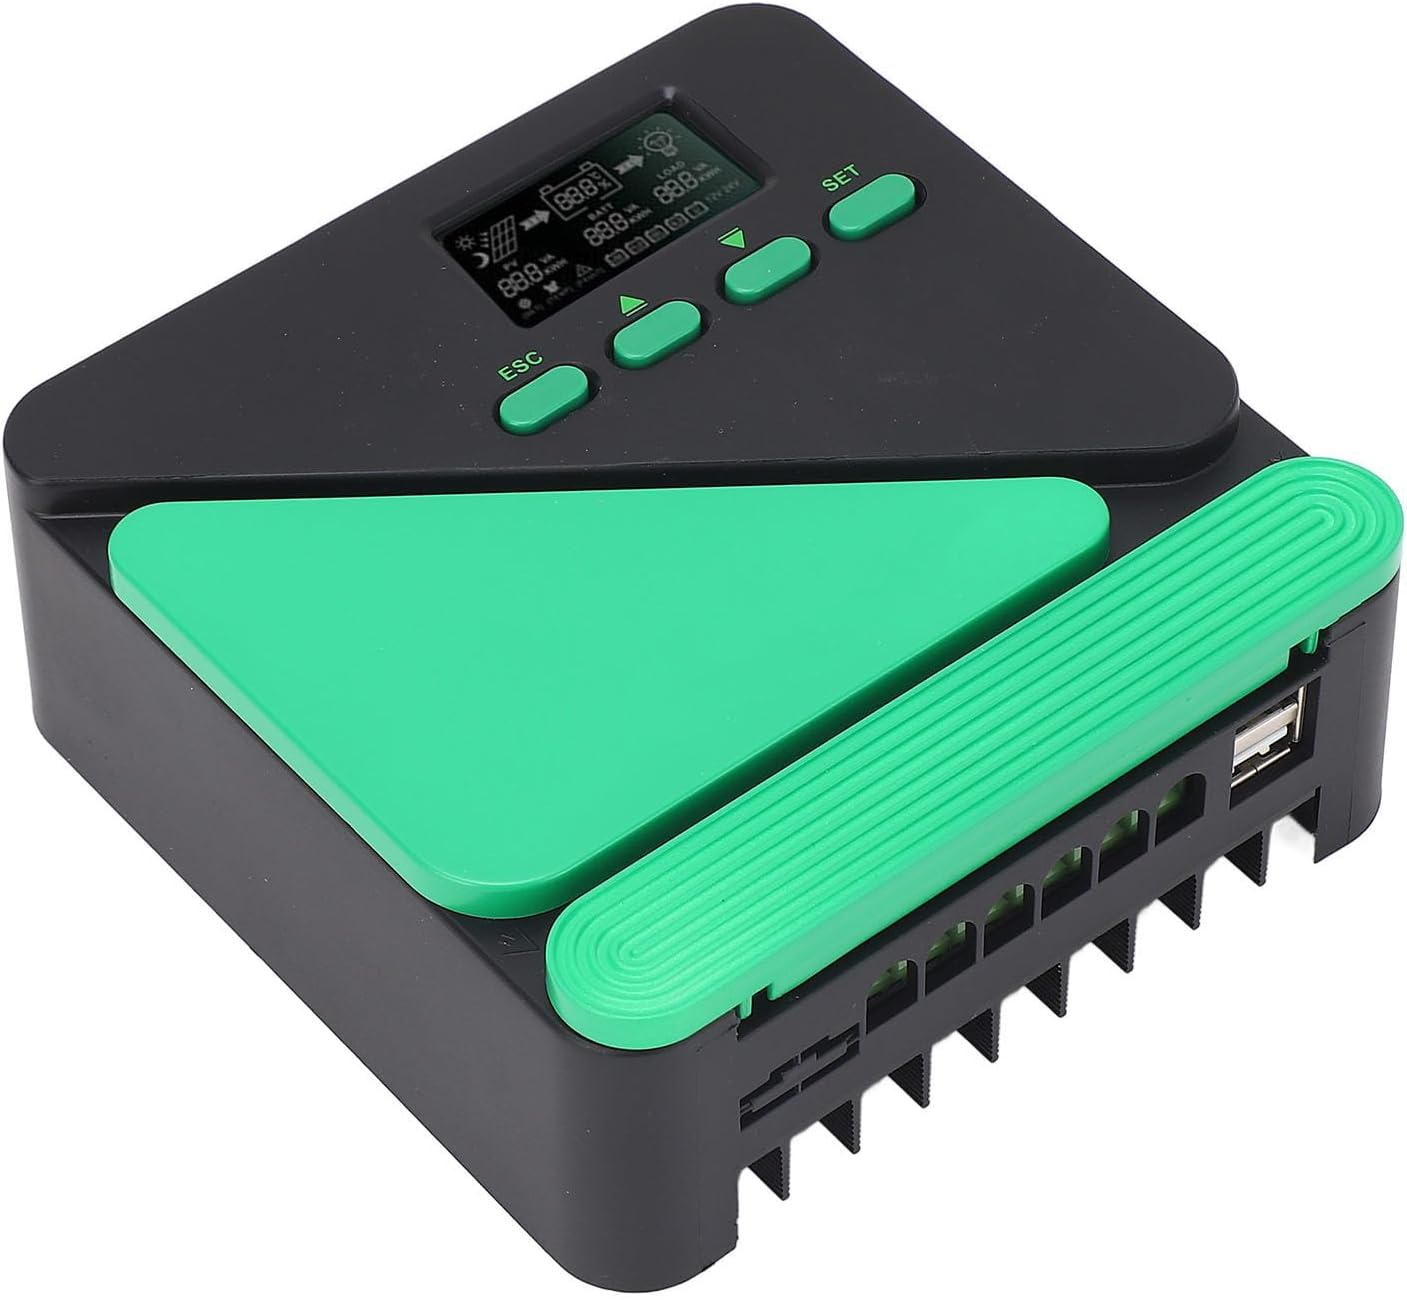
Figure 5.1: Close-up of the LCD display and control buttons (SET, UP, DOWN, ESC).
5.2 పారామీటర్ సెట్టింగ్లు
నొక్కండి సెట్ పరామితి సెట్టింగ్ మెనులోకి ప్రవేశించడానికి బటన్. UP మరియు డౌన్ buttons to navigate through different parameters (e.g., battery type, load control mode). Press సెట్ again to confirm a selection or enter edit mode. Use UP/డౌన్ to change values, then సెట్ కాపాడడానికి. నొక్కండి ESC to exit the menu without saving changes.
5.3 USB అవుట్పుట్
The controller is equipped with dual 5V 3A USB ports. These ports can be used to charge compatible electronic devices directly from the controller.
6. నిర్వహణ
Regular maintenance ensures optimal performance and extends the lifespan of your solar controller.
6.1 శుభ్రపరచడం
Periodically clean the controller's exterior with a dry cloth. Do not use liquid cleaners or solvents. Ensure ventilation openings are free from dust and debris.
6.2 వేడి వెదజల్లడం
The controller features a dual fan system for efficient heat dissipation. Ensure that the fans are not obstructed and operate correctly. If the controller consistently runs hot, verify proper ventilation and ensure the solar panel power does not exceed the controller's rated current for extended periods.

Figure 6.1: The controller's dual fan system for enhanced heat dissipation.

చిత్రం 6.2: దిగువ view of the controller, revealing the heat sink fins for cooling.
6.3 కనెక్షన్ తనిఖీలు
Periodically inspect all wiring connections for tightness and corrosion. Loose or corroded connections can lead to power loss or system malfunction.
7. ట్రబుల్షూటింగ్
ఈ విభాగం సాధారణ సమస్యలను మరియు వాటి సంభావ్య పరిష్కారాలను వివరిస్తుంది.
7.1 రక్షణ విధులు
The controller incorporates several protection mechanisms to safeguard the system:
- Input Power Limit Protection: Prevents damage if solar panel power exceeds the controller's rated capacity.
- High Photovoltaic Input Terminal Voltagఇ రక్షణ: అధిక వాల్యూమ్ నుండి రక్షిస్తుందిtagఇ సౌర ఫలకాల నుండి.
- షార్ట్ సర్క్యూట్ రక్షణ: Automatically disconnects in case of a short circuit in the photovoltaic input or load.
- Photovoltaic Input Reverse Protection: Prevents damage from incorrect solar panel polarity.
- Load Overpower Protection: Disconnects the load if its power consumption exceeds the controller's limit.
- లోడ్ షార్ట్ సర్క్యూట్ రక్షణ: Disconnects the load in case of a short circuit.
- Night Prevent Backcharge Protection: రాత్రిపూట సౌర ఫలకాలలోకి బ్యాటరీ తిరిగి విడుదల కాకుండా నిరోధిస్తుంది.
- TVS Thunder Protection: Provides protection against lightning surges.
- అధిక ఉష్ణోగ్రత రక్షణ: Reduces charging power or shuts down if the internal temperature becomes too high.

చిత్రం 7.1: పైగాview of the controller's comprehensive protection functions.
7.2 సాధారణ సమస్యలు
| సమస్య | సాధ్యమైన కారణం | పరిష్కారం |
|---|---|---|
| LCD డిస్ప్లే ఆఫ్లో ఉంది | బ్యాటరీ కనెక్ట్ కాలేదు లేదా తక్కువ వాల్యూమ్ ఉందిtage | బ్యాటరీ కనెక్షన్లు మరియు వాల్యూమ్ను తనిఖీ చేయండిtage. Ensure battery is charged. |
| బ్యాటరీ ఛార్జ్ కావడం లేదు | Solar panel not connected, insufficient sunlight, or reverse polarity | Check solar panel connections and polarity. Ensure adequate sunlight. |
| లోడ్ పనిచేయడం లేదు | Load not connected, overload protection active, or short circuit | Check load connections. Reduce load. Check for short circuits. |
| Controller is hot | Poor ventilation or excessive solar input | Ensure proper airflow around the controller. Verify solar panel wattagఇ పరిమితుల్లో ఉంది. |
8. స్పెసిఫికేషన్లు
| పరామితి | విలువ |
|---|---|
| సిస్టమ్ వాల్యూమ్tage | 12V / 24V AUTO |
| No Load Loss | ≤0.4W |
| గరిష్ట సోలార్ ఇన్పుట్ వాల్యూమ్tage | 50V VOC |
| బ్యాటరీ వాల్యూమ్tagఇ పరిధి | 9~32V |
| గరిష్ట పవర్ పాయింట్ వాల్యూమ్tagఇ పరిధి | బ్యాటరీ వాల్యూమ్tage +2V నుండి 50V |
| USB అవుట్పుట్ | 5V 3A (Dual Port) |
| మార్పిడి సామర్థ్యం | ≤98% |
| MPPT ట్రాకింగ్ సామర్థ్యం | >99% |
| ఉష్ణోగ్రత పరిహారం గుణకం | -2mv/℃/2V (default) |
| ఆపరేటింగ్ ఉష్ణోగ్రత | -10℃ నుండి +65℃ |
| రక్షణ స్థాయి | IP21 |
| విద్యుదయస్కాంత అనుకూలత | EN61000, EN55022, EN55024 |
| ఎత్తు | ≤3000 మీటర్లు |
| కొలతలు (LxWxH) | సుమారుగా 135 x 135 x 54మిమీ / 5.31 x 5.31 x 2.13అంగుళాలు |
| మోడల్ సంఖ్య | Hilitandt1sged9y2q-12 |
9. వారంటీ మరియు మద్దతు
9.1 తయారీదారు వారంటీ
This Hilitand MPPT Solar Controller comes with a manufacturer warranty for 90 days from the date of purchase. This warranty covers defects in materials and workmanship under normal use. It does not cover damage caused by improper installation, misuse, accidents, or unauthorized modifications.
9.2 సాంకేతిక మద్దతు
For technical assistance, troubleshooting beyond this manual, or warranty claims, please contact your retailer or visit the official Hilitand webమద్దతు సమాచారం కోసం సైట్.