1. భద్రతా సమాచారం
ఈ ఉత్పత్తిని ఉపయోగించే ముందు దయచేసి అన్ని భద్రతా సూచనలను జాగ్రత్తగా చదవండి. ఈ సూచనలను పాటించడంలో విఫలమైతే విద్యుత్ షాక్, అగ్ని ప్రమాదం లేదా ఇతర ప్రమాదాలు సంభవించవచ్చు.
- అగ్ని లేదా విద్యుత్ షాక్ను నివారించడానికి ప్రొజెక్టర్ను వర్షం లేదా తేమకు బహిర్గతం చేయవద్దు.
- ప్రొజెక్టర్ తెరవవద్దు casing. లోపల వినియోగదారు-సేవ చేయగల భాగాలు లేవు. అన్ని సర్వీసింగ్లను అర్హత కలిగిన సేవా సిబ్బందికి సూచించండి.
- సరైన వెంటిలేషన్ ఉండేలా చూసుకోండి. వెంటిలేషన్ ఓపెనింగ్లను బ్లాక్ చేయవద్దు.
- ప్రొజెక్టర్తో సరఫరా చేయబడిన పవర్ అడాప్టర్ను మాత్రమే ఉపయోగించండి.
- l ఉన్నప్పుడు ప్రొజెక్టర్ లెన్స్కు నేరుగా కళ్ళు గురికాకుండా ఉండండిamp ఆన్లో ఉంది.
- ప్రొజెక్టర్ను వేడి వనరుల నుండి మరియు ప్రత్యక్ష సూర్యకాంతి నుండి దూరంగా ఉంచండి.
2. ప్యాకేజీ విషయాలు
క్రింద జాబితా చేయబడిన అన్ని వస్తువులు మీ ప్యాకేజీలో చేర్చబడ్డాయని ధృవీకరించండి:
- 1 x Jectse Mini LED Projector
- 1 x Remote Control (2 AAA batteries not included)
- 1 x AV Line (3-in-1 RCA cable)
- 1 x ఇన్స్ట్రక్షన్ మాన్యువల్
- 1 x పవర్ అడాప్టర్

Figure 2.1: Contents of the Jectse Mini LED Projector package.
3. ఉత్పత్తి ముగిసిందిview
The Jectse Mini LED Projector is a compact and portable device designed for various multimedia applications. It features a 1080P resolution, LED light source, and multiple connectivity options.

Figure 3.1: Front and top view of the Jectse Mini LED Projector.
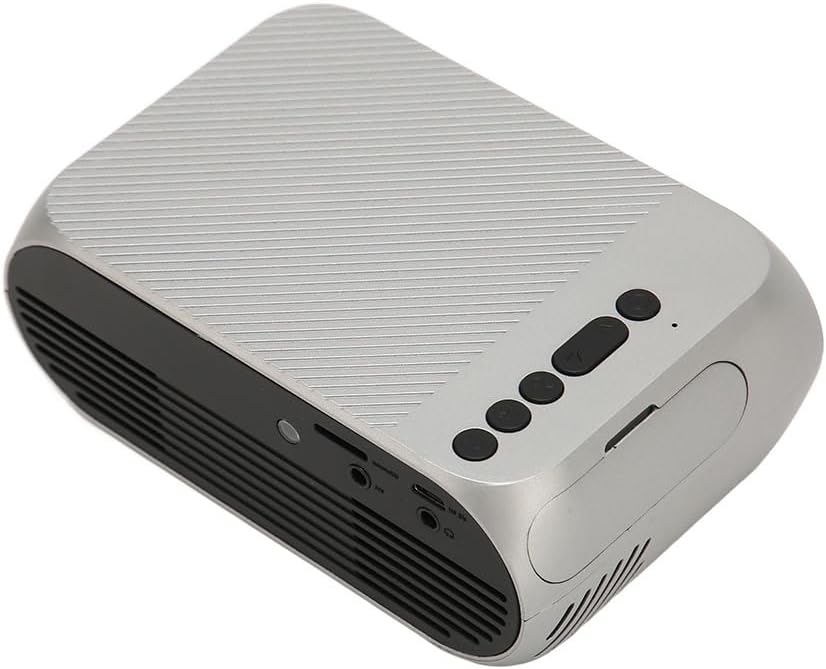
3.1 ప్రొజెక్టర్ భాగాలు

Figure 3.2: Top panel controls of the Jectse Mini LED Projector.
- లెన్స్: చిత్రాన్ని తెరపైకి ప్రొజెక్ట్ చేస్తుంది.
- వెంటిలేషన్ గ్రిల్: చల్లబరచడానికి సరైన గాలి ప్రవాహాన్ని నిర్ధారిస్తుంది.
- నియంత్రణ బటన్లు: (Refer to Figure 3.2) For basic navigation and power control.
- ఫోకస్ వీల్: చిత్ర స్పష్టతను సర్దుబాటు చేస్తుంది.
చిత్రం 3.3: వెనుక మరియు వైపు view ఇన్పుట్/అవుట్పుట్ పోర్టులతో.
3.2 ఇన్పుట్/అవుట్పుట్ పోర్ట్లు
- HD మల్టీమీడియా ఇంటర్ఫేస్ (HDMI): For connecting devices like laptops, gaming consoles, and media players.
- AV పోర్ట్: చేర్చబడిన AV కేబుల్ ఉపయోగించి పాత పరికరాలను కనెక్ట్ చేయడానికి.
- USB పోర్ట్: మీడియాను ప్లే చేయడానికి USB డ్రైవ్లను కనెక్ట్ చేయడానికి fileనేరుగా లు.
- పవర్ ఇన్పుట్: పవర్ అడాప్టర్ను కనెక్ట్ చేయడానికి.
- ఆడియో అవుట్పుట్ (3.5mm జాక్): బాహ్య స్పీకర్లు లేదా హెడ్ఫోన్లను కనెక్ట్ చేయడానికి.
4. సెటప్
4.1 ప్లేస్మెంట్
Place the projector on a stable, flat surface. Ensure there is adequate space around the projector for ventilation. The ideal projection distance is between 1.5 to 2 meters for optimal image size and clarity.

Figure 4.1: Recommended projection distance and screen sizes.
4.2 పవర్ కనెక్షన్
- పవర్ అడాప్టర్ను ప్రొజెక్టర్ పవర్ ఇన్పుట్ పోర్ట్కు కనెక్ట్ చేయండి.
- Plug the power adapter into a suitable electrical outlet (100-240V).
4.3 ఇన్పుట్ సోర్స్లను కనెక్ట్ చేయడం
The projector supports HD Multimedia Interface, AV, and USB inputs.

Figure 4.2: Projector compatibility with various devices.
- HD Multimedia Interface: Connect an HD Multimedia Interface cable from your source device (e.g., laptop, game console) to the projector's HD Multimedia Interface port.
- యొక్క: Connect the included AV cable to the projector's AV port and the corresponding audio/video output ports on your source device.
- USB: Insert a USB flash drive into the projector's USB port.
4.4 ఫోకస్ సర్దుబాటు
After powering on the projector, rotate the focus wheel (usually located near the lens) until the projected image appears clear and sharp.
5. ఆపరేటింగ్ సూచనలు
5.1 పవర్ చేయడం ఆన్/ఆఫ్
- పవర్ ఆన్ చేయడానికి: Press the Power Switch button on the projector or the power button on the remote control.
- పవర్ ఆఫ్ చేయడానికి: Press the Power Switch button again. The projector will shut down.
5.2 మూలం ఎంపిక
After powering on, use the "Signal Source Button" on the projector or the "Source" button on the remote control to cycle through available input sources (HD Multimedia Interface, AV, USB).
5.3 మెనూ నావిగేషన్
Use the Direction Buttons and Confirm Button on the projector or the arrow keys and OK button on the remote control to navigate through the projector's on-screen menu for settings adjustments (e.g., picture mode, aspect ratio, sound settings).
5.4 రిమోట్ కంట్రోల్ వినియోగం
Insert two AAA batteries (not included) into the remote control. Point the remote control towards the projector's IR receiver to operate functions such as power, source selection, volume, and menu navigation.
6. నిర్వహణ
6.1 లెన్స్ శుభ్రపరచడం
ప్రొజెక్టర్ లెన్స్ను సున్నితంగా తుడవడానికి ఆప్టికల్ లెన్స్ల కోసం ప్రత్యేకంగా రూపొందించిన మృదువైన, లింట్-ఫ్రీ వస్త్రాన్ని ఉపయోగించండి. రాపిడి క్లీనర్లను లేదా అధిక శక్తిని ఉపయోగించవద్దు, ఎందుకంటే ఇది లెన్స్ను గీతలు పడే అవకాశం ఉంది.
6.2 సాధారణ శుభ్రపరచడం
Wipe the exterior of the projector with a soft, dry cloth. Do not use liquid cleaners or solvents. Ensure the ventilation grilles are free from dust and debris to maintain optimal cooling.
7. ట్రబుల్షూటింగ్
| సమస్య | సాధ్యమైన కారణం | పరిష్కారం |
|---|---|---|
| చిత్రం ఏదీ ప్రొజెక్ట్ చేయబడలేదు |
|
|
| చిత్రం అస్పష్టంగా ఉంది |
|
|
| శబ్దం లేదు |
|
|
| రిమోట్ కంట్రోల్ పనిచేయడం లేదు |
|
|
8. స్పెసిఫికేషన్లు
| ఫీచర్ | వివరాలు |
|---|---|
| బ్రాండ్ | జెక్ట్సే |
| మోడల్ సంఖ్య | Jectse3giz17bkpy |
| రిజల్యూషన్ | 1920*1080p |
| కాంతి మూలం | LED |
| LED లైఫ్ | 3000 గంటలు |
| ప్రొజెక్షన్ దూరం | 1.5-2మీ |
| ప్రొజెక్షన్ నిష్పత్తి | 1.6:1 |
| కారక నిష్పత్తి | 16:9 |
| పవర్ ఇన్పుట్ | 100-240V |
| ఉత్పత్తి పరిమాణం | 13 x 8.5 x 5 సెం.మీ (సుమారుగా 5.1 x 3.3 x 2 అంగుళాలు) |
| వస్తువు బరువు | 1.1 పౌండ్లు |
| కనెక్టివిటీ టెక్నాలజీ | HD Multimedia Interface, AV, USB |
| ప్రత్యేక లక్షణాలు | Adjustable, Portable Design |
9. వారంటీ మరియు మద్దతు
For warranty information or technical support, please refer to the contact details provided with your purchase or visit the official Jectse webవారంటీ క్లెయిమ్ల కోసం మీ కొనుగోలు రుజువును ఉంచండి.