
1. పరిచయం
This manual provides essential information for the safe and efficient operation of your WLLKIY Hybrid Solar Inverter. This device is a multi-functional inverter/charger that integrates an inverter, solar charger, and battery charger to provide uninterruptible power support in a compact design. Please read this manual thoroughly before installation and use, and retain it for future reference.
2. భద్రతా సూచనలు
Please observe the following safety precautions during installation, operation, and maintenance of the inverter. Failure to comply with these instructions may result in electric shock, fire, or severe injury.
- అన్ని వైరింగ్లు అర్హత కలిగిన సిబ్బందిచే నిర్వహించబడుతున్నాయని నిర్ధారించుకోండి.
- Do not attempt to disassemble or repair the inverter yourself. Refer to authorized service personnel.
- ఇన్పుట్ వాల్యూమ్ అని ధృవీకరించండిtage and current ratings match the specifications of your solar panels and battery bank.
- మండే పదార్థాలు మరియు తేమకు దూరంగా, బాగా వెంటిలేషన్ ఉన్న ప్రదేశంలో ఇన్వర్టర్ను ఇన్స్టాల్ చేయండి.
- Always disconnect all power sources (AC, PV, Battery) before performing any maintenance or wiring.
- ఇన్వర్టర్ యొక్క సరైన గ్రౌండింగ్ నిర్ధారించుకోండి.
3. ఉత్పత్తి లక్షణాలు
- సున్నితమైన ఎలక్ట్రానిక్స్ కోసం ప్యూర్ సైన్ వేవ్ అవుట్పుట్.
- కాన్ఫిగర్ చేయగల ఇన్పుట్ వాల్యూమ్tage range for various applications (home appliances, personal computers).
- User-configurable battery charging current via LCD settings.
- Configurable AC/Solar charger priority via LCD settings.
- Compatibility with mains voltagఇ లేదా జనరేటర్ శక్తి.
- Automatic restart upon AC recovery.
- Integrated protection against overload, over-temperature, and short circuits.
- Smart charger design for optimized battery performance.
- కోల్డ్ స్టార్ట్ ఫంక్షన్.
- Optional WIFI/GPRS module for remote monitoring.
- Supports connection to lithium batteries.
4. ఉత్పత్తి ముగిసిందిview
Familiarize yourself with the components and connections of your WLLKIY Hybrid Solar Inverter.

మూర్తి 4.1: ముందు view of the WLLKIY Hybrid Solar Inverter, showing the main casing and front display panel.
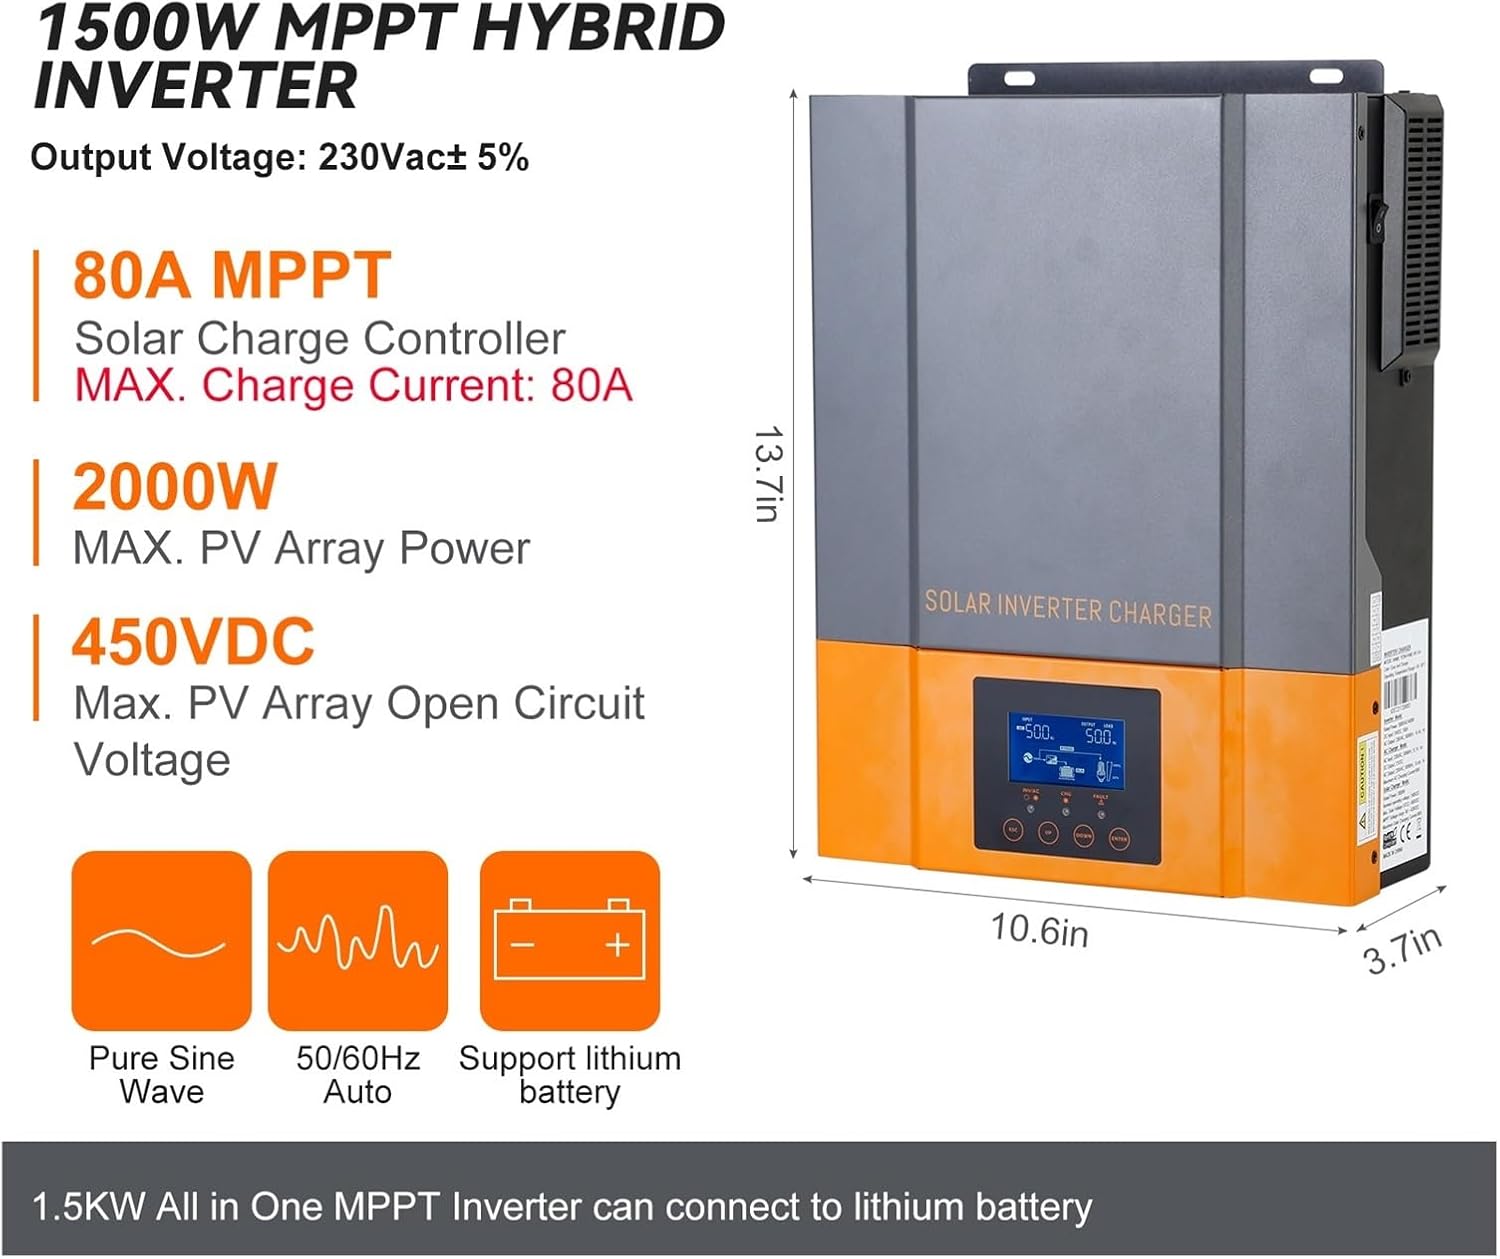
Figure 4.2: Inverter dimensions (13.7in H x 10.6in W x 3.7in D) and key electrical specifications including 230Vac output, 80A MPPT solar charge controller, 2000W max PV array power, and 450VDC max PV open circuit voltage. It supports pure sine wave output, 50/60Hz auto frequency, and lithium batteries.

మూర్తి 4.3: వివరంగా view of the LCD display, LED indicators (AC/INV, CHG, FAULT), and function keys (ESC, UP, DOWN, ENTER) on the front panel. The power ON/OFF switch is located on the side of the unit.
LED సూచిక సందేశాలు
| LED సూచిక | రాష్ట్రం | సందేశాలు |
|---|---|---|
| AC / INV | Solid On (Green) | అవుట్పుట్ లైన్ మోడ్లోని యుటిలిటీ ద్వారా శక్తిని పొందుతుంది. |
| ఫ్లాషింగ్ (ఆకుపచ్చ) | అవుట్పుట్ బ్యాటరీ మోడ్లో బ్యాటరీ లేదా PV ద్వారా అందించబడుతుంది. | |
| సిహెచ్జి | Solid On (Green) | బ్యాటరీ పూర్తిగా ఛార్జ్ చేయబడింది. |
| ఫ్లాషింగ్ (ఆకుపచ్చ) | బ్యాటరీ ఛార్జ్ అవుతోంది. | |
| తప్పు | Solid On (Red) | ఇన్వర్టర్లో లోపం ఏర్పడుతుంది. |
| ఫ్లాషింగ్ (ఎరుపు) | ఇన్వర్టర్లో హెచ్చరిక పరిస్థితి ఏర్పడుతుంది. |
Function Key Descriptions
| ఫంక్షన్ కీ | వివరణ |
|---|---|
| ESC | సెట్టింగ్ మోడ్ నుండి నిష్క్రమించడానికి |
| UP | మునుపటి ఎంపికకు వెళ్లడానికి |
| డౌన్ | తదుపరి ఎంపికకు వెళ్లడానికి |
| నమోదు చేయండి | సెట్టింగ్ మోడ్లో ఎంపికను నిర్ధారించడానికి లేదా సెట్టింగ్ మోడ్లోకి ప్రవేశించండి |
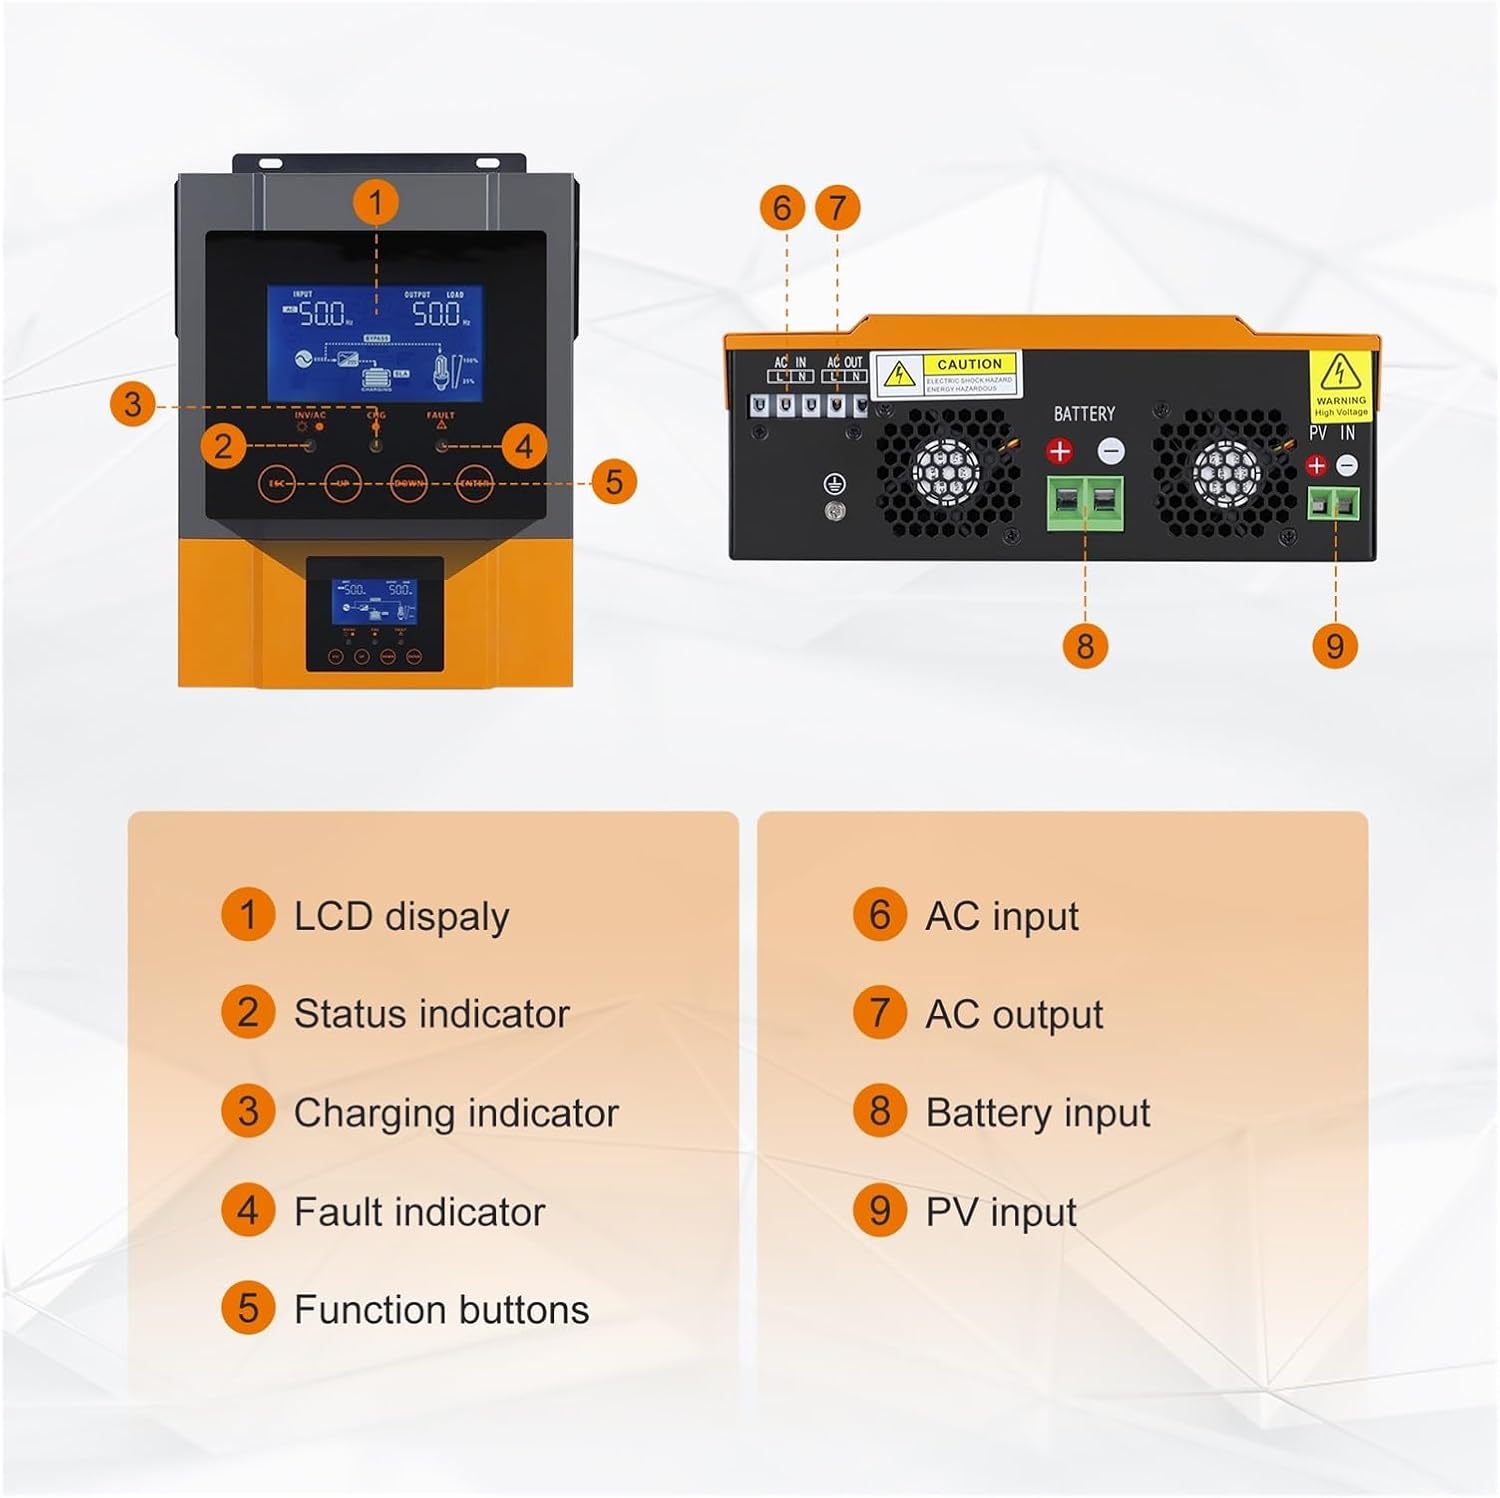
Figure 4.4: Key components and connection points. 1: LCD display, 2: Status indicator, 3: Charging indicator, 4: Fault indicator, 5: Function buttons, 6: AC input, 7: AC output, 8: Battery input, 9: PV input.

Figure 4.5: The inverter supports optional WIFI monitoring, allowing real-time performance viewing and parameter changes via a mobile application. The WIFI module is not included in the standard package.
5. సెటప్ మరియు ఇన్స్టాలేషన్
This section outlines the steps for installing your hybrid solar inverter. Ensure all safety instructions are followed.
5.1 ఇన్వర్టర్ను మౌంట్ చేయడం
- Choose a suitable location: The inverter should be mounted indoors, in a dry, well-ventilated area, protected from direct sunlight, high temperatures, and moisture.
- Ensure adequate clearance: Allow at least 20 cm (8 inches) of clearance around the unit for proper heat dissipation.
- Secure mounting: Use appropriate screws and anchors to securely mount the inverter to a solid wall surface.
5.2 వైరింగ్ కనెక్షన్లు
Refer to Figure 4.4 for connection port locations. All wiring must comply with local electrical codes.
- బ్యాటరీ కనెక్షన్: Connect the battery cables to the Battery Input terminals (8). Ensure correct polarity (positive to positive, negative to negative).
- PV అర్రే కనెక్షన్: Connect the solar panel cables to the PV Input terminals (9). Observe correct polarity and ensure the PV array voltage is within the inverter's specified range.
- AC ఇన్పుట్ కనెక్షన్: Connect the utility grid or generator AC power to the AC Input terminals (6).
- AC అవుట్పుట్ కనెక్షన్: Connect your loads to the AC Output terminals (7).
- గ్రౌండింగ్: ఇన్వర్టర్ యొక్క గ్రౌండ్ టెర్మినల్ను నమ్మకమైన ఎర్త్ గ్రౌండ్కు కనెక్ట్ చేయండి.
5.3 ప్రారంభ పవర్-అప్
- After all connections are secure, switch on the battery breaker.
- Switch on the PV array breaker.
- Switch on the AC input breaker (if connected).
- Turn on the inverter's power switch (refer to Figure 4.3).
- Observe the LCD display and LED indicators for normal operation.
6. ఆపరేటింగ్ సూచనలు
The inverter features an LCD display and function buttons for monitoring and configuration.
6.1 LCD Display and Button Operation
The LCD displays real-time system status, including input/output voltage, battery status, and charging information. Use the function keys (ESC, UP, DOWN, ENTER) to navigate through menus and adjust settings as described in Figure 4.3.
6.2 LED సూచికలు
The LED indicators provide a quick visual status of the inverter's operation. Refer to the table in Figure 4.3 for detailed descriptions of each indicator's state and corresponding message.
6.3 Configuring Settings
The inverter allows configuration of various parameters to optimize performance for your specific setup. These include:
- Battery charging current.
- AC/Solar charger priority.
- ఇన్పుట్ వాల్యూమ్tagఇ పరిధి.
- Output frequency (50Hz/60Hz).
To access and modify settings, press the ENTER button to enter the setting mode, use UP/DOWN to navigate, and ENTER to confirm selections. Press ESC to exit.
7. నిర్వహణ
క్రమం తప్పకుండా నిర్వహణ మీ ఇన్వర్టర్ యొక్క దీర్ఘాయువు మరియు సరైన పనితీరును నిర్ధారిస్తుంది.
- శుభ్రపరచడం: Periodically clean the inverter's exterior with a dry cloth. Ensure ventilation openings are free from dust and debris.
- కనెక్షన్లు: Annually check all electrical connections for tightness and signs of corrosion.
- పర్యావరణం: ఇన్స్టాలేషన్ వాతావరణం పేర్కొన్న ఉష్ణోగ్రత మరియు తేమ పరిధిలో ఉండేలా చూసుకోండి.
- బ్యాటరీ ఆరోగ్యం: మానిటర్ బ్యాటరీ వాల్యూమ్tage and performance regularly, especially for lead-acid batteries.
8. ట్రబుల్షూటింగ్
ఈ విభాగం మీరు ఎదుర్కొనే సాధారణ సమస్యలకు పరిష్కారాలను అందిస్తుంది.
| సమస్య | సాధ్యమైన కారణం | పరిష్కారం |
|---|---|---|
| ఇన్వర్టర్ ఆన్ కావడం లేదు | బ్యాటరీ కనెక్షన్ లేదు లేదా తక్కువ బ్యాటరీ వాల్యూమ్tage. Power switch off. | బ్యాటరీ కనెక్షన్లు మరియు వాల్యూమ్ను తనిఖీ చేయండిtage. Ensure power switch is ON. |
| AC అవుట్పుట్ లేదు | Overload. Short circuit. Inverter fault. | Reduce load. Check for short circuits. Refer to FAULT LED. |
| బ్యాటరీ ఛార్జ్ కావడం లేదు | PV input too low. AC input not present. Charger settings incorrect. | Check PV array and AC input. Verify charger settings on LCD. |
| FAULT LED is solid red | అంతర్గత లోపం. | Disconnect all power sources, wait 5 minutes, then reconnect. If fault persists, contact support. |
9. స్పెసిఫికేషన్లు
Detailed technical specifications for the WLLKIY Hybrid Solar Inverter models.
| ఫీచర్ | 1.5 kW 12V Model | 2.4 kW 24V Model | 3.2 KVA / 3 KW 24V Model |
|---|---|---|---|
| రేట్ అవుట్పుట్ పవర్ | 1.5 kW | 2.4 kW | 3200 VA / 3000 W |
| అవుట్పుట్ వాల్యూమ్tagఇ తరంగ రూపం | స్వచ్ఛమైన సైన్ వేవ్ | ||
| అవుట్పుట్ వాల్యూమ్tagఇ రెగ్యులేషన్ | 230 వాక్ ± 5% | ||
| ఛార్జింగ్ అల్గోరిథం | 3-సెtage | ||
| గరిష్ట AC ఛార్జింగ్ కరెంట్ | 60 Amp | ||
| బల్క్ ఛార్జింగ్ వాల్యూమ్tagఇ (ఫ్లడెడ్ బ్యాటరీ) | 14.6 వి | 29.2 వి | |
| బల్క్ ఛార్జింగ్ వాల్యూమ్tage (AGM/Gel Battery) | 14.1 వి | 28.2 వి | |
| ఫ్లోటింగ్ ఛార్జింగ్ వాల్యూమ్tage | 13.5 VDC | 27.0 VDC | |
| గరిష్ట PV అర్రే పవర్ | 2000 W | 3000 W | |
| నామమాత్రపు PV వాల్యూమ్tage | 240 VDC | ||
| MPPT వాల్యూమ్tage Range (PV Array) | 90 ~ 430 విడిసి | ||
| గరిష్ట PV ఓపెన్ సర్క్యూట్ వాల్యూమ్tage | 450 VDC | ||
| Max Charging Current (AC + Solar) | 80 Amp | ||
| ఆపరేటింగ్ ఉష్ణోగ్రత పరిధి | -10°C నుండి 50°C | ||
| నిల్వ ఉష్ణోగ్రత పరిధి | -15°C నుండి 60°C | ||
| తేమ | 5% నుండి 95% సాపేక్ష ఆర్ద్రత (కన్డెన్సింగ్) | ||
10. వారంటీ మరియు మద్దతు
For warranty information and technical support, please refer to the documentation provided with your purchase or contact your vendor. Keep your purchase receipt as proof of purchase.