Mastech YQ-MAS830L
MGL MASTECH MAS830L Digital Multimeter User Manual
Model: MAS830L (YQ-MAS830L)
1. పరిచయం
This user manual provides comprehensive instructions for the safe and effective operation of the MGL MASTECH MAS830L Digital Multimeter. This device is designed for measuring various electrical parameters, offering reliability and precision for both domestic and electronics applications.

మూర్తి 1: ముందు view of the MGL MASTECH MAS830L Digital Multimeter, displaying its clear LCD screen and rotary dial.
2. భద్రతా సమాచారం
Always adhere to the following safety precautions to prevent personal injury or damage to the multimeter:
- Do not exceed the maximum input limits for any measurement range.
- వాల్యూమ్తో పని చేస్తున్నప్పుడు చాలా జాగ్రత్తగా ఉండండిtag30V AC RMS, 42V పీక్ లేదా 60V DC కంటే ఎక్కువ. ఈ వాల్యూమ్లుtagషాక్ ప్రమాదాన్ని కలిగిస్తుంది.
- విధులను మార్చడానికి ముందు, పరీక్షలో ఉన్న సర్క్యూట్ నుండి టెస్ట్ లీడ్లను డిస్కనెక్ట్ చేయండి.
- Do not operate the multimeter if it appears damaged or if the test leads are damaged.
- ఆపరేషన్ ముందు బ్యాటరీ కవర్ సురక్షితంగా మూసివేయబడిందని నిర్ధారించుకోండి.
- Replace the battery when the low battery indicator appears to ensure accurate readings.
- అన్ని స్థానిక మరియు జాతీయ భద్రతా కోడ్లను గమనించండి.
Warning: Incorrect use of this meter can cause damage, shock, or injury.
3. ఉత్పత్తి లక్షణాలు
The MGL MASTECH MAS830L Digital Multimeter offers a range of features for versatile electrical measurements:
- ప్రదర్శన: 2000 counts for precise readings.
- డయోడ్ పరీక్ష: ఓపెన్ వాల్యూమ్tagఇ 3.0V.
- డేటా హోల్డ్: సౌలభ్యం కోసం ప్రదర్శించబడిన పఠనాన్ని స్తంభింపజేస్తుంది.
- తక్కువ బ్యాటరీ డిస్ప్లే: Indicates when battery replacement is needed.
- కంటిన్యుటీ బజర్: Audible alert for continuity testing (less than 70 ±30Ω).
- బ్యాక్లైట్ని ప్రదర్శించు: తక్కువ కాంతి పరిస్థితుల్లో మెరుగైన దృశ్యమానత కోసం.
- వర్తింపు: CE, RoHS, UL certified.
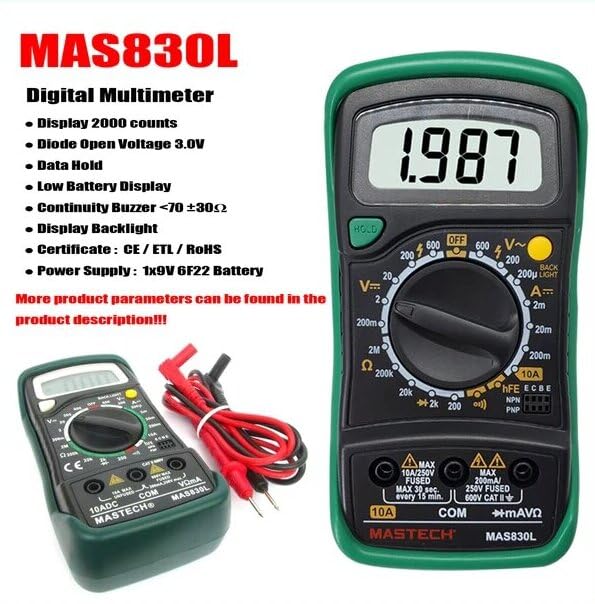
Figure 2: The MAS830L Multimeter highlighting its key features and included test leads.

మూర్తి 3: వివరంగా view of the multimeter's high-definition LCD screen, designed for clear and easy data reading.
4. సెటప్
4.1. అన్ప్యాకింగ్ మరియు తనిఖీ
Carefully unpack the multimeter and check for any signs of damage. Verify that all components listed below are present:
- MGL MASTECH MAS830L Digital Multimeter
- పరీక్ష లీడ్లు (ఎరుపు మరియు నలుపు)
- 1x 9V 6F22 Battery (pre-installed or included)
- Calibration Certificate (if included)
- త్వరిత ప్రారంభ మార్గదర్శి (చేర్చబడి ఉంటే)

Figure 4: Illustration of the MAS830L package contents and typical applications.
4.2. బ్యాటరీ ఇన్స్టాలేషన్ / రీప్లేస్మెంట్
The MAS830L uses one 9V 6F22 battery. If the low battery indicator appears on the display, or if the unit does not power on, replace the battery:
- మల్టీమీటర్ ఆఫ్ చేయబడిందని నిర్ధారించుకోండి మరియు అన్ని పరీక్ష లీడ్లను డిస్కనెక్ట్ చేయండి.
- యూనిట్ వెనుక భాగంలో బ్యాటరీ కంపార్ట్మెంట్ కవర్ను గుర్తించండి.
- రిటైనింగ్ స్క్రూ(లు) విప్పు మరియు కవర్ తొలగించండి.
- Carefully remove the old battery (if present) and disconnect it from the battery clip.
- Connect the new 9V 6F22 battery to the battery clip, observing correct polarity.
- Place the new battery into the compartment and replace the cover, securing it with the screw(s).
5. ఆపరేటింగ్ సూచనలు
5.1. సాధారణ ఆపరేషన్
- Connect the black test lead to the "COM" input jack.
- Connect the red test lead to the appropriate input jack for the desired measurement:
- "VΩmA" for voltage, నిరోధకత మరియు చిన్న కరెంట్ కొలతలు.
- "10A" for high current measurements (up to 10A).
- Turn the rotary switch to the desired function and range.
- పరీక్ష లీడ్లను పరీక్షించబడుతున్న సర్క్యూట్ లేదా కాంపోనెంట్కు కనెక్ట్ చేయండి.
- LCD డిస్ప్లేలో కొలత విలువను చదవండి.
5.2. కొలత విధులు
DC సంtage Measurement (V–):
- రోటరీ స్విచ్ను కావలసిన DC వాల్యూమ్కు సెట్ చేయండిtage range (e.g., 200mV, 2V, 20V, 200V, 600V).
- Connect the red lead to the positive side and the black lead to the negative side of the DC source.
AC వాల్యూమ్tage Measurement (V∼):
- రోటరీ స్విచ్ను కావలసిన AC వాల్యూమ్కు సెట్ చేయండిtage పరిధి (ఉదా., 200V, 600V).
- Connect the test leads across the AC source.
DC Current Measurement (A–):
- Set the rotary switch to the desired DC Current range (e.g., 2mA, 20mA, 200mA, 10A).
- ముఖ్యమైన: For 10A measurements, move the red lead to the "10A" input jack.
- Connect the multimeter in series with the circuit.
Resistance Measurement (Ω):
- Set the rotary switch to the desired Resistance range (e.g., 200Ω, 2kΩ, 20kΩ, 200kΩ, 2MΩ).
- నిరోధకతను కొలిచే ముందు సర్క్యూట్ డీ-ఎనర్జైజ్ చేయబడిందని నిర్ధారించుకోండి.
- పరీక్ష లీడ్లను కాంపోనెంట్ అంతటా కనెక్ట్ చేయండి.
Diode Test (▶):
- రోటరీ స్విచ్ను డయోడ్ టెస్ట్ స్థానానికి సెట్ చేయండి.
- ఎర్రటి సీసాన్ని ఆనోడ్ కు మరియు నల్లటి సీసాన్ని డయోడ్ యొక్క కాథోడ్ కు అనుసంధానించండి. డిస్ప్లే ఫార్వర్డ్ వాల్యూమ్ ను చూపుతుంది.tagఓపెన్ సర్క్యూట్ కోసం తనిఖీ చేయడానికి లీడ్లను రివర్స్ చేయండి.
Continuity Test (♫):
- రోటరీ స్విచ్ను కంటిన్యుటీ టెస్ట్ స్థానానికి సెట్ చేయండి.
- Connect the test leads across the circuit or component. An audible buzzer will sound if continuity exists (resistance less than 70 ±30Ω).
డేటా హోల్డ్:
- డిస్ప్లేపై ప్రస్తుత రీడింగ్ను స్తంభింపజేయడానికి "హోల్డ్" బటన్ను నొక్కండి. విడుదల చేయడానికి మళ్ళీ నొక్కండి.
6. నిర్వహణ
6.1. శుభ్రపరచడం
మల్టీమీటర్ శుభ్రం చేయడానికి, మృదువైన, damp cloth and a mild detergent. Do not use abrasives or solvents. Ensure the unit is completely dry before use.
6.2. ఫ్యూజ్ ప్రత్యామ్నాయం
The MAS830L is equipped with internal fuses to protect against overcurrent. If the current measurement function fails, the fuse may need replacement. Refer to the specifications for fuse ratings.
- మల్టీమీటర్ ఆఫ్ చేయబడిందని నిర్ధారించుకోండి మరియు అన్ని పరీక్ష లీడ్లను డిస్కనెక్ట్ చేయండి.
- విభాగం 4.2లో వివరించిన విధంగా బ్యాటరీ కంపార్ట్మెంట్ కవర్ను తెరవండి.
- కంపార్ట్మెంట్ లోపల ఫ్యూజ్(లు)ని గుర్తించండి.
- Carefully remove the blown fuse and replace it with a fuse of the identical type and rating.
- బ్యాటరీ కంపార్ట్మెంట్ కవర్ను మార్చండి మరియు దాన్ని భద్రపరచండి.
Caution: Always use fuses with the specified voltage and current ratings to prevent fire or damage to the meter.
7. ట్రబుల్షూటింగ్
| సమస్య | సాధ్యమైన కారణం | పరిష్కారం |
|---|---|---|
| పవర్ ఆన్ చేసినప్పుడు డిస్ప్లే లేదు. | డెడ్ లేదా తప్పుగా ఇన్స్టాల్ చేయబడిన బ్యాటరీ. | Check battery polarity, replace battery. |
| "OL" or "1" displayed. | Overload or out of range measurement. | Select a higher range or check circuit. |
| సరికాని రీడింగ్లు. | Low battery, dirty test leads, or incorrect range. | Replace battery, clean leads, select appropriate range. |
| కరెంట్ కొలత పనిచేయడం లేదు. | ఎగిరిన ఫ్యూజ్. | ఫ్యూజ్ని మార్చండి (విభాగం 6.2 చూడండి). |
8. స్పెసిఫికేషన్లు
The following table outlines the general and electrical specifications for the MGL MASTECH MAS830L Digital Multimeter:
| పరామితి | స్పెసిఫికేషన్ |
|---|---|
| ప్రదర్శించు | 2000 గణనలు |
| DC సంtagఇ (వి–) | 600 వి (గరిష్టంగా) |
| AC వాల్యూమ్tagఇ (వి ∼) | 600 వి (గరిష్టంగా) |
| DC Current (A–) | 10A (గరిష్టంగా) |
| ప్రతిఘటన (Ω) | 2MΩ (Max) |
| డయోడ్ ఓపెన్ వాల్యూమ్tage | 3.0V |
| కంటిన్యుటీ బజర్ | <70 ±30Ω |
| శక్తి మూలం | 1x 9V 6F22 బ్యాటరీ |
| కొలతలు (L x W x H) | 20 x 15 x 25 సెం.మీ (సుమారుగా) |
| బరువు | 1 Kilogram (approx.) |
| భద్రతా రేటింగ్ | క్యాట్ III 600 వి |
| ధృవపత్రాలు | CE, RoHS, UL |
| ఆపరేటింగ్ ఉష్ణోగ్రత | 50°C వరకు |

Figure 5: Comparative specifications for various Mastech digital multimeters, including the MAS830L.
9. వారంటీ మరియు మద్దతు
The MGL MASTECH MAS830L Digital Multimeter comes with a standard warranty. Please refer to your purchase documentation for specific warranty terms and conditions.
- విడిభాగాల లభ్యత: 1 Year (as per manufacturer information).
- For technical support or warranty claims, please contact your retailer or the official Mastech customer service.
Ask a question about this manual
Ask about setup, troubleshooting, compatibility, parts, safety, or missing instructions. Manuals+ will review the question and use this page’s manual context to help answer it.