మాస్టెక్ MS2101
Mastech MS2101 AC/DC Digital Clamp మీటర్ యూజర్ మాన్యువల్
మోడల్: MS2101 | బ్రాండ్: మాస్టెక్
1. ముఖ్యమైన భద్రతా సమాచారం
Please read and understand all safety information and operating instructions before using this instrument. Improper use may result in electric shock or damage to the meter. Always adhere to local and national safety codes.
- ప్రతి ఫంక్షన్ కోసం పేర్కొన్న గరిష్ట ఇన్పుట్ విలువలను మించకూడదు.
- Ensure the test leads are properly connected and in good condition before making any measurements.
- మీటర్ దెబ్బతిన్నట్లు కనిపిస్తే లేదా టెస్ట్ లీడ్స్పై ఇన్సులేషన్ దెబ్బతిన్నట్లయితే దాన్ని ఉపయోగించవద్దు.
- వాల్యూమ్తో పని చేస్తున్నప్పుడు చాలా జాగ్రత్తగా ఉండండిtag30V AC RMS, 42V పీక్ లేదా 60V DC కంటే ఎక్కువ. ఈ వాల్యూమ్లుtagషాక్ ప్రమాదాన్ని కలిగిస్తుంది.
- ఎల్లప్పుడూ సర్క్యూట్ పవర్ను డిస్కనెక్ట్ చేసి, అధిక-వాల్యూమ్ విద్యుత్తును విడుదల చేయండి.tage capacitors before measuring resistance, continuity, diodes, or capacitance.
- ఖచ్చితమైన రీడింగ్లను నిర్ధారించడానికి తక్కువ బ్యాటరీ సూచిక కనిపించిన వెంటనే బ్యాటరీలను మార్చండి.
- This device is rated for CAT III 600V and CAT II 1000V. Adhere to these safety categories.
2. ఉత్పత్తి ముగిసిందిview
The Mastech MS2101 is a versatile AC/DC digital clamp meter designed for accurate measurement of current, voltage, resistance, capacitance, frequency, and temperature. It features auto-ranging capabilities and a clear digital display, making it suitable for both domestic and industrial electrical testing.
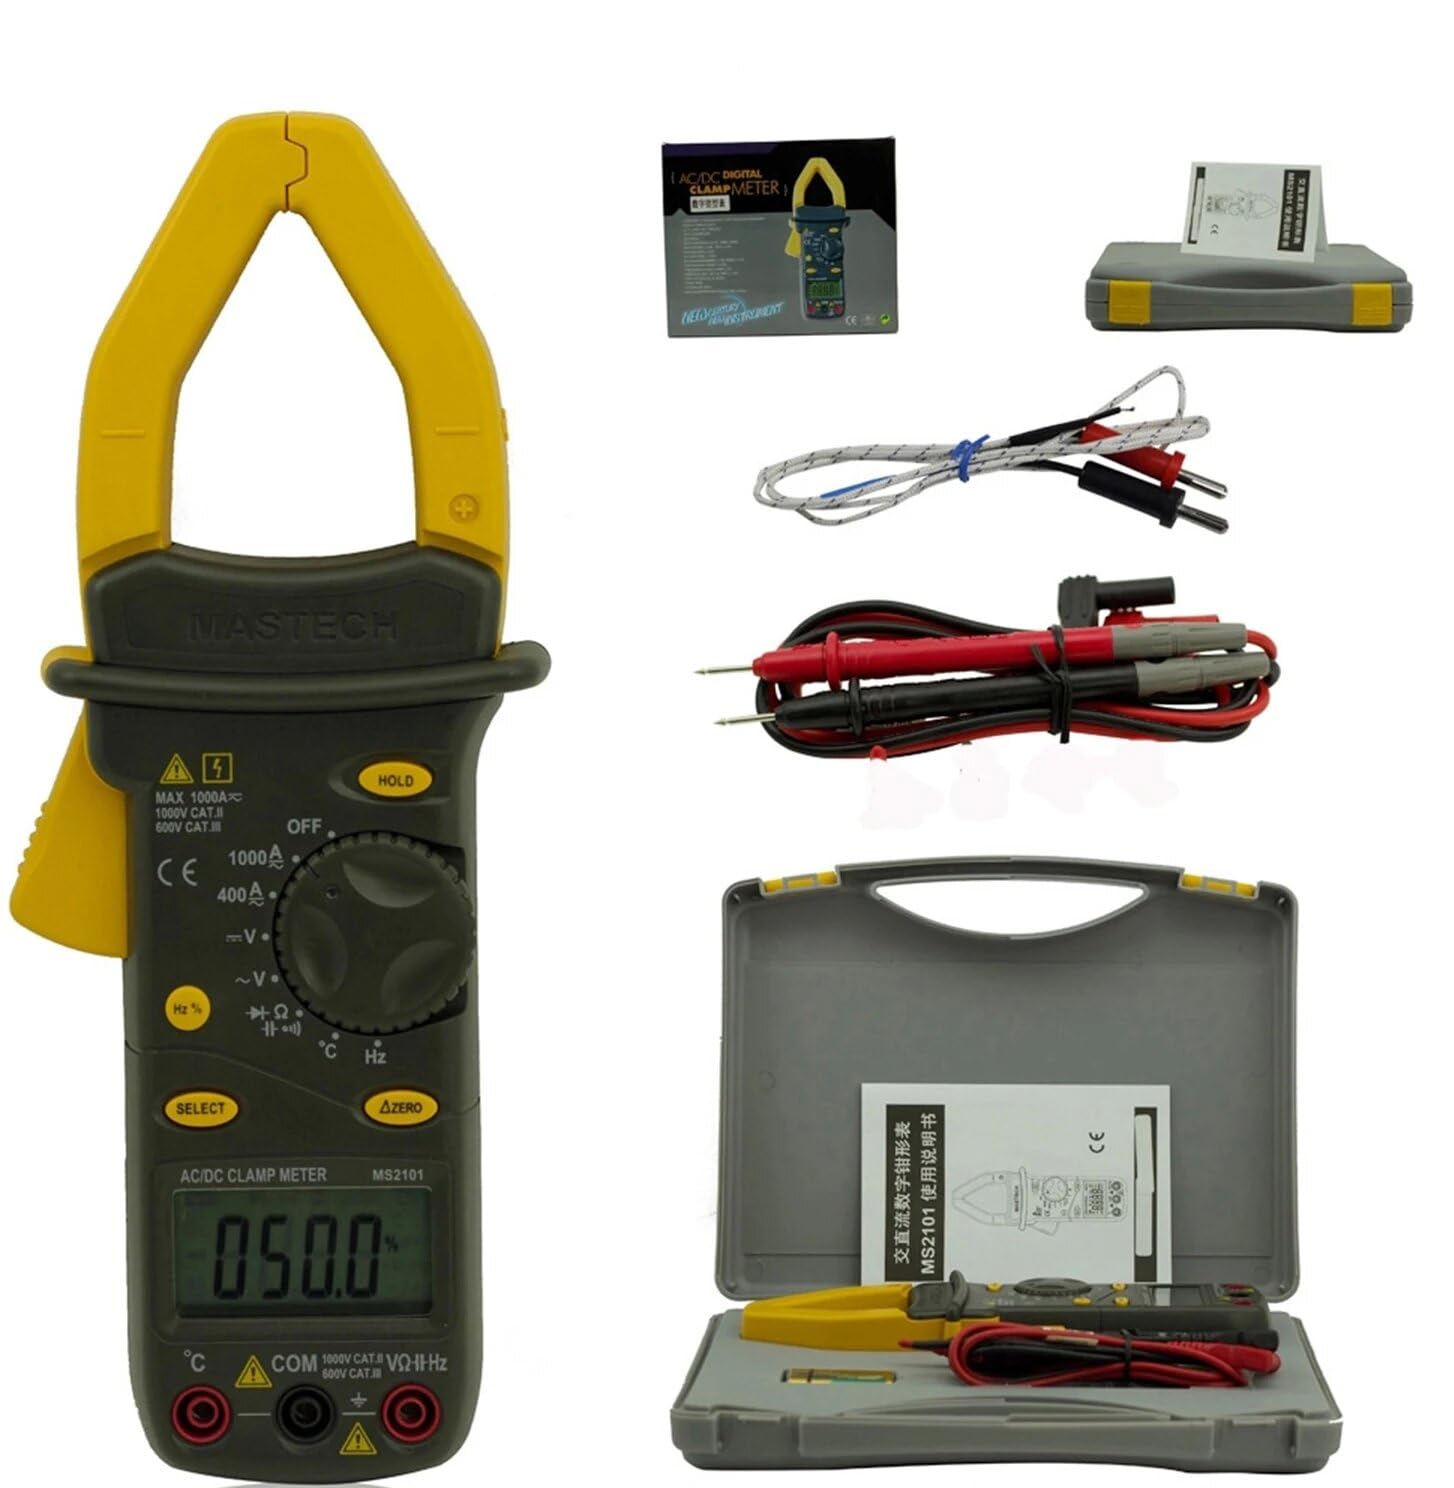
Image: Mastech MS2101 clamp meter with included test leads, temperature probe, and carrying case.
2.1 ముఖ్య లక్షణాలు
- ప్రదర్శన: 4000 గణనలు
- Jaw Opening: Φ42mm / 1.7 inches
- ఆటో మరియు మాన్యువల్ రేంజింగ్
- ఆటో పవర్ ఆఫ్ ఫంక్షన్
- డయోడ్ ఓపెన్ వాల్యూమ్tagఇ: 2.2 వి
- Continuity Buzzer: Activates at <50±20Ω
- డేటా హోల్డ్ ఫంక్షన్
- Low Battery Display indicator
3. ప్యాకేజీ విషయాలు
ప్యాకేజీని తెరిచిన తర్వాత, క్రింద జాబితా చేయబడిన అన్ని వస్తువులు ఉన్నాయని మరియు మంచి స్థితిలో ఉన్నాయని ధృవీకరించండి.

Image: Contents of the Mastech MS2101 package, including the meter, test leads, and documentation.
- Mastech MS2101 AC/DC Digital Clamp మీటర్
- Test Leads (one pair)
- K-Type Thermocouple (for temperature measurement)
- క్యారీయింగ్ బ్యాగ్
- కాలిబ్రేషన్ సర్టిఫికేట్
- త్వరిత ప్రారంభ గైడ్
- Batteries (2 x LR44, included)
4. పరికర లేఅవుట్ మరియు నియంత్రణలు
Familiarize yourself with the various parts and controls of your MS2101 clamp మీటర్.

చిత్రం: ముందు భాగం view of the Mastech MS2101, highlighting the display, rotary switch, and function buttons.
- ప్రస్తుత Clamp దవడ: స్పర్శరహిత AC/DC కరెంట్ కొలతకు ఉపయోగించబడుతుంది.
- దవడ ట్రిగ్గర్: Squeeze to open the current clamp దవడ.
- రోటరీ స్విచ్: Selects the desired measurement function (OFF, V, A, Ω, Capacitance, Hz, Diode, Continuity, Temperature).
- LCD డిస్ప్లే: కొలత రీడింగ్లు, యూనిట్లు మరియు ఫంక్షన్ సూచికలను చూపుతుంది.
- హోల్డ్ బటన్: డిస్ప్లేపై ప్రస్తుత రీడింగ్ను స్తంభింపజేస్తుంది.
- ఎంపిక బటన్: Toggles between AC/DC modes or different functions within a rotary switch position (e.g., Diode/Continuity, AC/DC Voltagమరియు).
- ΔZERO Button: Used to zero out DC current readings or relative measurements.
- COM ఇన్పుట్ జాక్: Common (negative) input for test leads.
- VΩHz Input Jack: వాల్యూమ్ కోసం పాజిటివ్ ఇన్పుట్tage, నిరోధకత, పౌనఃపున్యం, కెపాసిటెన్స్, డయోడ్ మరియు కొనసాగింపు కొలతలు.
- Temperature Input Jack: Specific input for the K-type thermocouple.
5. ప్రారంభ సెటప్
5.1 బ్యాటరీ ఇన్స్టాలేషన్
The Mastech MS2101 requires two LR44 batteries for operation. These are typically included in the package.

చిత్రం: వెనుకకు view of the Mastech MS2101, indicating the location of the battery compartment screws.
- మీటర్ ఆఫ్ చేయబడిందని నిర్ధారించుకోండి.
- మీటర్ వెనుక భాగంలో బ్యాటరీ కంపార్ట్మెంట్ను గుర్తించండి.
- Use a screwdriver to remove the screws securing the battery cover.
- బ్యాటరీ కవర్ని జాగ్రత్తగా తొలగించండి.
- Insert two LR44 batteries, observing the correct polarity (+ and -) as indicated inside the compartment.
- బ్యాటరీ కవర్ను మార్చి స్క్రూలతో భద్రపరచండి.
6. ఆపరేటింగ్ సూచనలు
6.1 పవర్ ఆన్/ఆఫ్
To power on the meter, rotate the rotary switch from the 'OFF' position to any desired measurement function. To power off, rotate the switch back to 'OFF'.
6.2 ఫంక్షన్ ఎంపిక
Turn the rotary switch to the desired measurement function. For functions with multiple modes (e.g., AC/DC Voltage, Diode/Continuity), press the 'SELECT' button to toggle between them.
6.3 AC/DC కరెంట్ను కొలవడం
- Rotate the switch to the 'A' (Current) position.
- Press 'SELECT' to choose between AC or DC current measurement.
- cl తెరవడానికి దవడ ట్రిగ్గర్ను నొక్కండిamp దవడ.
- cl లోపల సర్క్యూట్ యొక్క ఒక కండక్టర్ను మాత్రమే మూసివేయండి.amp దవడ పూర్తిగా మూసివేయబడిందని నిర్ధారించుకోండి.
- LCD డిస్ప్లేలో ప్రస్తుత విలువను చదవండి.
- For DC current, use the 'ΔZERO' button to zero the display before measurement if necessary.
6.4 కొలిచే AC/DC వాల్యూమ్tage
- Rotate the switch to the 'V' (Voltagఇ) స్థానం.
- Press 'SELECT' to choose between AC or DC voltagఇ కొలత.
- Insert the red test lead into the 'VΩHz' jack and the black test lead into the 'COM' jack.
- మీరు కొలవాలనుకుంటున్న సర్క్యూట్ లేదా కాంపోనెంట్కు సమాంతరంగా పరీక్ష ప్రోబ్లను కనెక్ట్ చేయండి.
- సంపుటాన్ని చదవండిtagఎల్సిడి డిస్ప్లేపై ఇ విలువ.
6.5 కొలిచే ప్రతిఘటన
- Rotate the switch to the 'Ω' (Resistance) position.
- Insert the red test lead into the 'VΩHz' jack and the black test lead into the 'COM' jack.
- Ensure the circuit or component is de-energized before connecting the test probes across it.
- LCD డిస్ప్లేలో నిరోధక విలువను చదవండి.
6.6 కొలిచే కెపాసిటెన్స్
- Rotate the switch to the 'Capacitance' position.
- Insert the red test lead into the 'VΩHz' jack and the black test lead into the 'COM' jack.
- Ensure the capacitor is fully discharged before connecting the test probes across it.
- LCD డిస్ప్లేలో కెపాసిటెన్స్ విలువను చదవండి.
6.7 Measuring Frequency/Duty Cycle
- Rotate the switch to the 'Hz' (Frequency) position.
- Insert the red test lead into the 'VΩHz' jack and the black test lead into the 'COM' jack.
- Connect the test probes across the signal source.
- Read the frequency or duty cycle value on the LCD display. Press 'SELECT' to toggle between frequency and duty cycle.
6.8 డయోడ్ టెస్ట్
- Rotate the switch to the Diode/Continuity position. Press 'SELECT' until the diode symbol appears.
- Insert the red test lead into the 'VΩHz' jack and the black test lead into the 'COM' jack.
- Connect the red probe to the anode and the black probe to the cathode of the diode.
- ఫార్వర్డ్ వాల్యూమ్ చదవండిtage drop on the display. Reverse the probes to check for open circuit (OL) in reverse bias.
6.9 కొనసాగింపు పరీక్ష
- Rotate the switch to the Diode/Continuity position. Press 'SELECT' until the continuity buzzer symbol appears.
- Insert the red test lead into the 'VΩHz' jack and the black test lead into the 'COM' jack.
- సర్క్యూట్ లేదా కాంపోనెంట్ అంతటా పరీక్ష ప్రోబ్లను కనెక్ట్ చేయండి.
- If the resistance is below approximately 50Ω, the buzzer will sound, indicating continuity.
6.10 ఉష్ణోగ్రత కొలత
- Rotate the switch to the '°C/°F' (Temperature) position.
- Insert the K-type thermocouple into the dedicated temperature input jacks, observing polarity.
- Place the thermocouple tip on or near the object whose temperature you wish to measure.
- Read the temperature on the LCD display. Press 'SELECT' to toggle between Celsius and Fahrenheit.
6.11 డేటా హోల్డ్ ఫంక్షన్
Press the 'HOLD' button to freeze the current reading on the display. Press it again to release the hold and resume live measurements.
6.12 Zeroing (ΔZERO) Function
In DC current mode, press the 'ΔZERO' button to zero the display before making a measurement. This compensates for any residual magnetic fields or offsets, ensuring more accurate DC current readings.
6.13 ఆటో పవర్ ఆఫ్
The meter will automatically power off after approximately 15 minutes of inactivity to conserve battery life. To reactivate, turn the rotary switch to 'OFF' and then back to the desired function.
7. నిర్వహణ
7.1 శుభ్రపరచడం
మీటర్ యొక్క సి తుడవండిasinప్రకటనతో గ్రాamp వస్త్రం మరియు తేలికపాటి డిటర్జెంట్. అబ్రాసివ్లు లేదా ద్రావకాలను ఉపయోగించవద్దు. ఉపయోగించే ముందు మీటర్ పూర్తిగా పొడిగా ఉందని నిర్ధారించుకోండి.
7.2 బ్యాటరీ భర్తీ
When the low battery indicator appears on the display, replace the batteries as described in Section 5.1. Always use two new LR44 batteries.
7.3 నిల్వ
మీటర్ను ఎక్కువ కాలం ఉపయోగించకపోతే, లీకేజీ మరియు నష్టాన్ని నివారించడానికి బ్యాటరీలను తీసివేయండి. మీటర్ను చల్లని, పొడి ప్రదేశంలో, ప్రత్యక్ష సూర్యకాంతి మరియు తీవ్రమైన ఉష్ణోగ్రతలకు దూరంగా నిల్వ చేయండి.
8. ట్రబుల్షూటింగ్
- మీటర్ పవర్ ఆన్ చేయదు: బ్యాటరీ ఇన్స్టాలేషన్ను తనిఖీ చేయండి మరియు బ్యాటరీలు అయిపోకుండా చూసుకోండి.
- పఠనం లేదా 'OL' ప్రదర్శించబడలేదు: Ensure test leads are properly connected and making good contact. For current measurements, ensure only one conductor is within the clamp jaw. For resistance/continuity, ensure the circuit is de-energized. 'OL' (Overload) indicates the measured value is beyond the meter's range.
- సరికాని రీడింగ్లు: Check battery level. Ensure the correct function is selected. For DC current, use the 'ΔZERO' function.
- Buzzer not sounding in continuity mode: The resistance may be too high (above 50Ω), or the circuit is open.
9. సాంకేతిక లక్షణాలు
Detailed specifications for the Mastech MS2101 clamp meter are provided below.

Image: Table detailing the measurement ranges, resolutions, and accuracies of the Mastech MS2101.
| కొలత | పరిధి | రిజల్యూషన్ | ఖచ్చితత్వం |
|---|---|---|---|
| DC సంtage | 400mV/4V/40V/400V 1000V | 0.1mV/1mV/10mV/0.1V 1V | ±(0.7%+1) ±(0.8%+3) |
| AC వాల్యూమ్tage | 4V/40V/400V 750V | 1mV/10mV/0.1V 1V | ±(0.8%+5) ±(1.0%+10) |
| DC కరెంట్ | 400A/1000A | 0.1A/1A | ±(3.0%+3) |
| ఎసి కరెంట్ | 400A/1000A | 0.1A/1A | ±(3.0%+3) |
| ప్రతిఘటన | 400Ω/4kΩ/40kΩ/400kΩ/4MΩ 40MΩ | 0.1Ω/1Ω/10Ω/100Ω/1kΩ 10 కే | ±(1.2%+1) ±(2.0%+3) |
| కెపాసిటెన్స్ | 4nF/40nF/400nF 4µF/40µF/100µF | 1pF/10pF/0.1nF 1nF/10nF/100nF | ±(4.0%+10) ±(4.0%+10) |
| ఫ్రీక్వెన్సీ | 40Hz/400Hz/4kHz/40kHz/100kHz | 0.01Hz/0.1Hz/1Hz/10Hz/0.1kHz | ±(2.0%+1) |
| డ్యూటీ సైకిల్ | 0.1% ~ 99.9% | 0.10% | ±(2.0%+2) |
| ఉష్ణోగ్రత | -40°C ~ 0°C 1°C ~ 400°C 401°C ~ 750°C | 1°C 1°C 1°C | ±(1.0%+6) ±(1.0%+3) ±(1.0%+5) |
| ప్రదర్శించు | 4000 గణనలు | ||
| దవడ తెరవడం | 42 మిమీ / 1.7 అంగుళాలు | ||
| కంటిన్యుటీ బజర్ | <50±20Ω | ||
| డయోడ్ ఓపెన్ వాల్యూమ్tage | 2.2V | ||
| శక్తి మూలం | 2 x LR44 batteries | ||
| కొలతలు (L x W x H) | 7.87 x 5.91 x 9.84 అంగుళాలు | ||
| బరువు | 1 కిలోగ్రాము (2.2 పౌండ్లు) | ||
10. వారంటీ మరియు మద్దతు
The Mastech MS2101 Digital Clamp Meter comes with a 1-year warranty from the date of purchase, covering manufacturing defects. Please retain your proof of purchase for warranty claims.
For technical support, product information, or warranty inquiries, please visit the official Mastech webసైట్ లేదా వారి కస్టమర్ సేవను సంప్రదించండి:
- Official Mastech Webసైట్: www.mastech-group.com
- మద్దతు పేజీ: http://www.mastech-group.com/support.php?n=0
Ask a question about this manual
Ask about setup, troubleshooting, compatibility, parts, safety, or missing instructions. Manuals+ will review the question and use this page’s manual context to help answer it.