SecuFirst CWL401S
SecuFirst 2K Outdoor Surveillance Camera Kit with Indoor Monitor User Manual
Model: CWL401S
1. పరిచయం
This manual provides detailed instructions for the installation, operation, and maintenance of your SecuFirst 2K Outdoor Surveillance Camera Kit. This system includes a 7-inch touchscreen monitor and an outdoor camera, designed for reliable security monitoring without requiring an internet connection for basic functions. It can also be used as a baby monitor, pet camera, or for elderly care.
2. భద్రతా సమాచారం
- అన్ని విద్యుత్ కనెక్షన్లు సురక్షితంగా ఉన్నాయని మరియు పేర్కొన్న వాల్యూమ్కు అనుగుణంగా ఉన్నాయని నిర్ధారించుకోండి.tagఇ (12 వోల్ట్లు).
- Do not place the camera near metal objects as this may reduce wireless range.
- మానిటర్ను విపరీతమైన ఉష్ణోగ్రతలు లేదా ప్రత్యక్ష సూర్యకాంతికి బహిర్గతం చేయకుండా ఉండండి.
- The outdoor camera is IP66 waterproof, but avoid submerging it in water.
- ఉత్పత్తిని పిల్లలకు అందుబాటులో లేకుండా ఉంచండి.
- Only use the provided power adapters.
3. ప్యాకేజీ విషయాలు
దయచేసి ప్యాకేజీలోని విషయాలను జాగ్రత్తగా తనిఖీ చేయండి. ఏవైనా వస్తువులు తప్పిపోయినా లేదా దెబ్బతిన్నా, కస్టమర్ మద్దతును సంప్రదించండి.
- 1x 7-inch Touchscreen Monitor
- 1x Outdoor Camera with Multi-position Mounts
- 2x AC Power Adapters (1.8m cable)
- 1x Power Extension Cable (1.8m)
- 1x 64GB MicroSD Card (pre-installed in monitor)

Image: SecuFirst 2K Outdoor Surveillance Camera Kit showing the monitor and camera.
4. ఉత్పత్తి ముగిసిందిview
4.1. 7-inch Touchscreen Monitor

Image: Diagram of the 7-inch touchscreen monitor, highlighting its components and ports.
- టచ్స్క్రీన్ డిస్ప్లే: 7-inch interface for live view, ప్లేబ్యాక్ మరియు సెట్టింగ్లు.
- పవర్ బటన్: పవర్ ఆన్/ఆఫ్ చేయడానికి 3 సెకన్ల పాటు నొక్కి పట్టుకోండి.
- యాంటెన్నా పోర్ట్: For connecting the monitor's antenna to ensure stable wireless connection.
- USB పోర్ట్: For connecting external storage (up to 2TB HDD/USB drive).
- స్పీకర్: ఆడియో అవుట్పుట్ కోసం.
- SD కార్డ్ స్లాట్: For the included 64GB MicroSD card (supports up to 128GB).
- పవర్ పోర్ట్: For connecting the monitor's power adapter.
- ఈథర్నెట్ పోర్ట్: For optional wired internet connection.
- రీసెట్ బటన్: For factory reset (use a pin).
- రికార్డింగ్ సూచిక: Lights up when recording.
- శక్తి సూచిక: శక్తి స్థితిని చూపుతుంది.
- మైక్రోఫోన్: రెండు-మార్గాల ఆడియో కమ్యూనికేషన్ కోసం.
4.2. అవుట్డోర్ కెమెరా

Image: Diagram of the outdoor camera, showing its features and connection points.
- యాంటెన్నా: For wireless signal transmission to the monitor.
- Adjustable Camera Mount: Allows for flexible positioning.
- AC పవర్ కేబుల్: For connecting the camera to power.
- శక్తి స్థితి సూచిక: Shows camera's operational status.
- లైట్ సెన్సార్: ఆటోమేటిక్ నైట్ విజన్ యాక్టివేషన్ కోసం యాంబియంట్ లైట్ను గుర్తిస్తుంది.
- IR LED లు: Infrared lights for clear night vision up to 300 meters.
- పిఐఆర్ మోషన్ సెన్సార్: Passive Infrared sensor for accurate thermal motion detection.
- ఆడియో స్పీకర్: రెండు-మార్గాల ఆడియో కమ్యూనికేషన్ కోసం.
- మైక్రోఫోన్: Located behind the camera's swivel support for audio input.
- యాంటెన్నా కనెక్టర్: For attaching the camera's antenna.
5. సెటప్
5.1. Initial Power-Up and Pairing
- Connect Power to Monitor: Plug one AC power adapter into the monitor's power port and then into a power outlet.
- Connect Power to Camera: Plug the second AC power adapter into the camera's power cable and then into a power outlet. If needed, use the included power extension cable.
- స్వయంచాలక జత చేయడం: The camera and monitor are pre-paired at the factory. Once both are powered on, the live video feed from the camera should appear on the monitor within a few seconds.
- స్థానం: Place the monitor in a convenient indoor location. Mount the camera outdoors using the provided mounts. Ensure the camera is not near large metal objects to maintain optimal wireless range (up to 200 meters in open space, reduced by walls/windows).

Image: Illustrates the wireless, internet-free operation of the system, showing a user viewing the monitor and the camera mounted outdoors.
5.2. Expanding the System (Optional)
The system supports up to 4 cameras. Additional cameras can be purchased separately and easily paired with your existing monitor.

Image: Depicts how the system can be expanded to include up to four cameras, showing different monitor views with multiple camera feeds.
6. ఆపరేటింగ్ సూచనలు
6.1. లైవ్ View and Basic Functions
Once powered on, the monitor will display the live feed from the connected camera(s). Use the touchscreen to navigate the interface.
- మారుతోంది Views: If multiple cameras are connected, tap the channel numbers (CH1, CH2, etc.) at the top of the screen to switch between individual camera views or a multi-camera view.
- రెండు-మార్గం ఆడియో: Tap the microphone icon on the screen to speak through the camera's speaker. Tap again to end.
- రికార్డింగ్: The system automatically records motion-triggered events to the installed 64GB MicroSD card. The REC indicator light on the monitor will illuminate during recording.
- రాత్రి దృష్టి: The camera automatically switches to night vision mode in low-light conditions, providing clear black and white images.
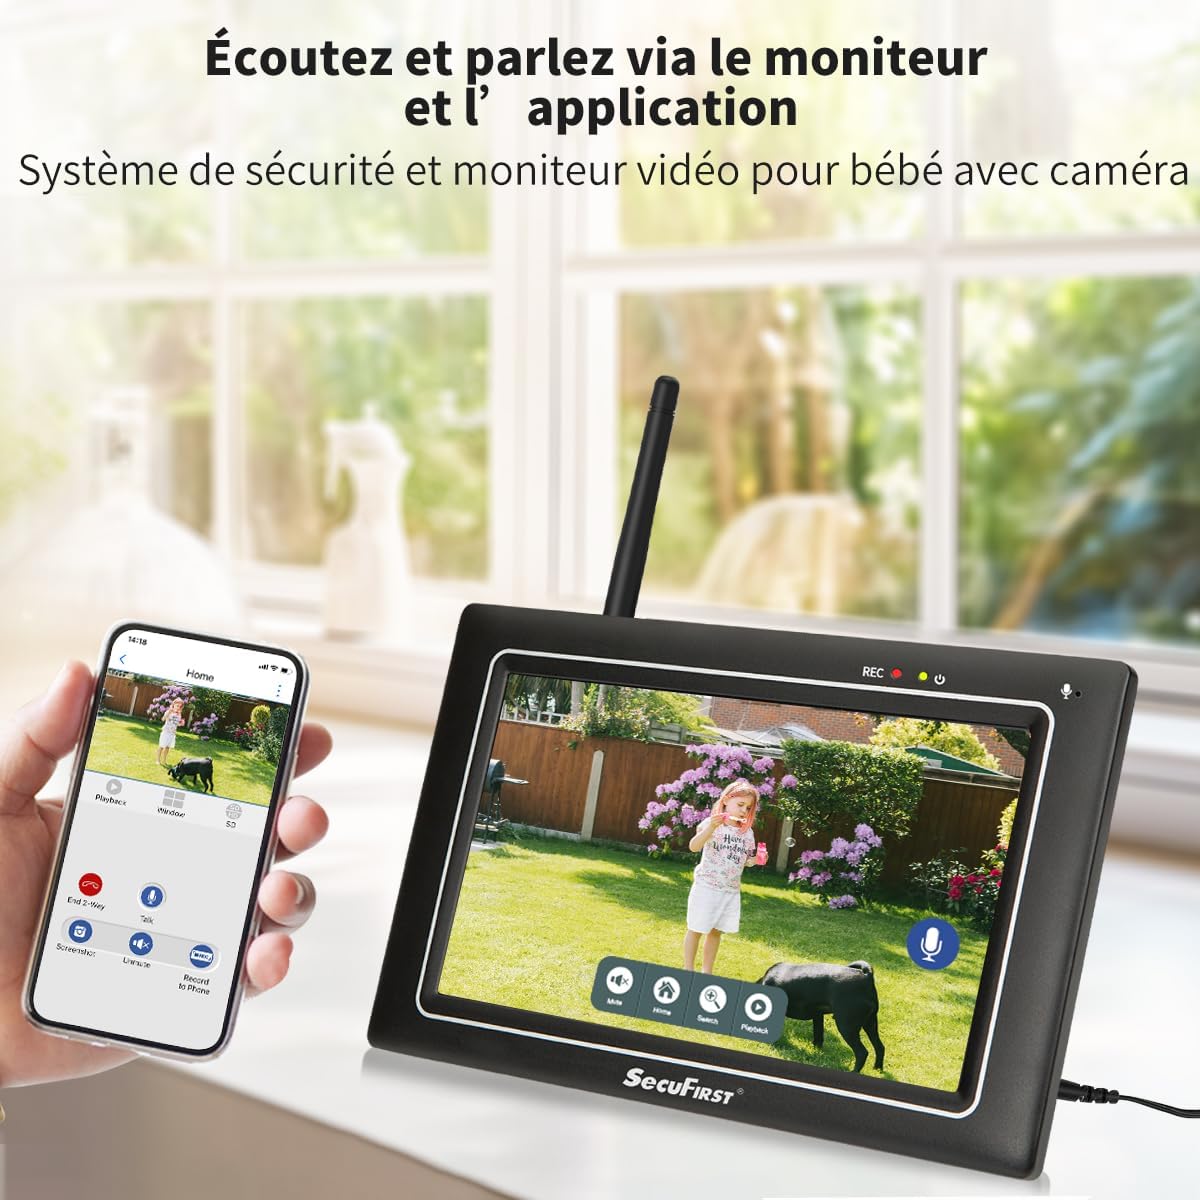
Image: Shows the monitor displaying a live feed, with icons for two-way audio and other functions.
6.2. ప్లేబ్యాక్ రికార్డ్ చేయబడిన ఫూtage
తిరిగిview recorded events:
- ప్రత్యక్ష ప్రసారం నుండి view, tap the playback icon (usually a play symbol or calendar icon) on the monitor's touchscreen.
- Select the desired date and time from the interface.
- The monitor will display a list of recorded events. Tap on an event to play it back.
- Use the on-screen controls (play, pause, fast forward, rewind) to navigate the footage.

Image: The monitor's interface showing recorded events and playback controls.
6.3. Advanced Settings (via Monitor)
The monitor allows for various personal settings adjustments:
- మోషన్ డిటెక్షన్ జోన్లు: కెమెరాలోని నిర్దిష్ట ప్రాంతాలను నిర్వచించండి view మోషన్ డిటెక్షన్ యాక్టివ్గా ఉండాల్సిన చోట.
- గోప్యతా మాస్కింగ్: Block out specific areas in the camera's view for privacy.
- అలారం వాల్యూమ్: Adjust the volume of alarms triggered by motion.
- స్లీప్ మోడ్: Activate "sleep mode" to save energy, turning the screen into a digital clock.
- నిల్వ నిర్వహణ: The included 64GB MicroSD card can be replaced with up to a 128GB MicroSD card, or an external HDD/USB drive up to 2TB can be connected via the USB port for extended storage.
6.4. Smartphone App Connectivity (Optional)
For remote access and advanced features, connect the monitor to the internet via Ethernet cable or Wi-Fi. Then download the "Observer HD+" app.
- Connect Monitor to Internet: Plug an Ethernet cable into the monitor's Ethernet port or configure Wi-Fi settings on the monitor.
- అనువర్తనాన్ని డౌన్లోడ్ చేయండి: కోసం వెతకండి "Observer HD+" in your smartphone's app store and install it.
- జత పరికరం: Follow the in-app instructions to add your SecuFirst system. This typically involves scanning a QR code displayed on the monitor.
- రిమోట్ యాక్సెస్: జత చేసిన తర్వాత, మీరు చేయవచ్చు view live video, listen and speak through the camera, and play back recordings from your smartphone or tablet anywhere.

Image: Shows the monitor and a smartphone displaying the "Observer HD+" app interface for remote viewing మరియు నియంత్రణ.
7. నిర్వహణ
- శుభ్రపరచడం: Use a soft, dry cloth to clean the monitor screen and camera lens. Do not use liquid cleaners or aerosols directly on the devices.
- ఫర్మ్వేర్ నవీకరణలు: Check the SecuFirst webసరైన పనితీరు మరియు భద్రతను నిర్ధారించడానికి ఫర్మ్వేర్ అప్డేట్ల కోసం కాలానుగుణంగా సైట్ లేదా యాప్ను తనిఖీ చేయండి.
- నిల్వ నిర్వహణ: Regularly back up important recordings from the MicroSD card or external storage to prevent data loss. The system will overwrite the oldest recordings when storage is full.
- కేబుల్ తనిఖీ: Periodically inspect all power cables for any signs of wear or damage. Replace immediately if damage is found.
8. ట్రబుల్షూటింగ్
| సమస్య | సాధ్యమైన కారణం | పరిష్కారం |
|---|---|---|
| మానిటర్ పై చిత్రం లేదు. | Monitor or camera not powered on; camera out of range; pairing lost. | Ensure both monitor and camera are plugged in and powered. Move camera closer to monitor. If still no image, try re-pairing the camera (refer to advanced settings in monitor menu). |
| Poor image quality or signal interference. | Obstructions (walls, metal objects); too far from monitor; interference from other wireless devices. | Relocate camera or monitor to minimize obstructions. Ensure antennas are properly attached. Reduce interference by moving other wireless devices away. |
| మోషన్ డిటెక్షన్ పనిచేయడం లేదు లేదా చాలా సున్నితంగా ఉంది. | Incorrect sensitivity settings; detection zone not configured; environmental factors (e.g., swaying trees). | Adjust motion detection sensitivity and configure detection zones via the monitor settings. Ensure camera lens is clean. |
| Cannot connect to smartphone app. | Monitor not connected to internet; incorrect app settings; network issues. | Ensure monitor is connected to Wi-Fi or Ethernet. Verify app settings and device pairing. Check your internet connection. |
| రెండు-మార్గాల ఆడియో అస్పష్టంగా ఉంది లేదా పనిచేయడం లేదు. | Microphone/speaker blocked; volume too low; signal interference. | Ensure nothing is obstructing the microphone or speaker on both devices. Adjust volume settings on the monitor. Check for signal interference. |
9. స్పెసిఫికేషన్లు
| ఫీచర్ | వివరాలు |
|---|---|
| మోడల్ సంఖ్య | CWL401S |
| వీడియో రికార్డింగ్ రిజల్యూషన్ | 2K (3MP) |
| స్క్రీన్ పరిమాణాన్ని పర్యవేక్షించండి | 7 inches (Touchscreen) |
| వైర్లెస్ కమ్యూనికేషన్ టెక్నాలజీ | Wi-Fi (for optional app connectivity) |
| Wireless Range (Open Space) | 200 మీటర్ వరకు |
| నైట్ విజన్ రేంజ్ | 300 మీటర్ వరకు |
| కెమెరా మెటీరియల్ | మెటల్ సిasing |
| మానిటర్ మెటీరియల్ | Matte Black Plastic Casing |
| Waterproof Rating (Camera) | IP66 |
| పవర్ ఇన్పుట్ | 12 వోల్ట్లు |
| విద్యుత్ వినియోగం | 12 వాట్స్ |
| కొలతలు (L x W x H) | 20 x 14.2 x 7.8 సెం.మీ |
| బరువు | 1.58 కిలోగ్రాములు |
| నిల్వ చేర్చబడింది | 64GB మైక్రో SD కార్డ్ |
| Max. Storage Capacity | 128GB MicroSD / 2TB External HDD/USB |
| ప్రత్యేక లక్షణాలు | Local Recording, Night Vision, App Control, Motion Detector (AI + PIR), Plug and Play, Pre-paired, Two-way Audio |
10. వారంటీ మరియు మద్దతు
SecuFirst products are designed for reliability and performance. For warranty information and technical support, please refer to the contact details provided with your purchase or visit the official SecuFirst webసైట్.
తయారీదారు: ALC ఎలక్ట్రానిక్స్ BV
For further assistance, please contact SecuFirst customer service.
Ask a question about this manual
Ask about setup, troubleshooting, compatibility, parts, safety, or missing instructions. Manuals+ will review the question and use this page’s manual context to help answer it.