
Beuiouer 500452209
Beuiouer 10CH Wireless NVR Recorder User Manual
మోడల్: 500452209
పరిచయం
This manual provides comprehensive instructions for the setup, operation, and maintenance of your Beuiouer 10CH Wireless NVR Recorder. This device is designed for use with Eseecloud WiFi CCTV cameras and the IPPRO/Eseecloud application, offering a reliable solution for your surveillance needs. Please read this manual thoroughly before using the product to ensure proper functionality and longevity.
ఉత్పత్తి ముగిసిందిview
The Beuiouer 10CH Wireless NVR Recorder is a compact and efficient digital video recorder. It supports up to 10 channels for wireless camera connectivity, making it suitable for various surveillance setups. Its design emphasizes ease of use and integration with the Eseecloud ecosystem. The NVR is constructed from durable plastic and features a sleek black finish.

మూర్తి 1: ముందు view of the Beuiouer 10CH Wireless NVR Recorder. The front panel features a "Digital Video Recorder" label, power button, and status indicators.
సెటప్ సూచనలు
Follow these steps for the initial setup of your NVR recorder:
- Unpack the NVR: Carefully remove the NVR from its packaging. The package includes one wireless NVR recorder.
- యాంటెన్నాలను కనెక్ట్ చేయండి: Screw the two wireless antennas firmly into the antenna interfaces located at the back of the NVR. Ensure they are upright for optimal signal reception.
- డిస్ప్లేకి కనెక్ట్ చేయండి:

చిత్రం 2: వెనుక view of the NVR showing various ports including Audio Out, VGA, HDMI, WAN (Ethernet), USB, and DC 12V power input.
Connect the NVR to a monitor or TV using either the HDMI అవుట్పుట్ or VGA అవుట్పుట్ port. Use a compatible cable (not included) for your display type.
- మౌస్ను కనెక్ట్ చేయండి: Plug the USB mouse (not included) into one of the USB పోర్ట్లు on the rear panel. This will allow you to navigate the NVR's interface.
- నెట్వర్క్ కనెక్షన్ (ఐచ్ఛికం కానీ సిఫార్సు చేయబడింది): రిమోట్ కోసం viewing and firmware updates, connect an Ethernet cable from your router to the ఈథర్నెట్ పోర్ట్ (WAN) on the NVR.
- పవర్ ఆన్: అందించిన పవర్ అడాప్టర్ను దీనికి కనెక్ట్ చేయండి DC 12V పవర్ ఇన్పుట్ పోర్ట్ on the NVR, then plug the adapter into a power outlet. The NVR will power on automatically.
- కెమెరా పెయిరింగ్: The NVR is designed for auto-pairing with Eseecloud WiFi CCTV cameras. Ensure your cameras are powered on and within range. The system should automatically detect and connect to compatible cameras.

Figure 3: Illustration of the auto-pairing process between the NVR and a wireless camera, highlighting the plug-and-play system.
- ప్రారంభ కాన్ఫిగరేషన్: Follow the on-screen prompts to complete the initial setup, including setting a password, time zone, and storage preferences.
ఆపరేటింగ్ సూచనలు
Once set up, you can operate your NVR using the connected mouse and display, or via the mobile application.
Using the NVR Interface:
- ప్రత్యక్షం View: After startup, the NVR will display the live feeds from connected cameras. You can switch between single-camera view మరియు బహుళ-కెమెరా గ్రిడ్ view.
- ప్లేబ్యాక్: తిరిగిview రికార్డ్ చేసిన footage, click the "Playback" icon on the main interface. Select the date, time, and camera channel to view రికార్డింగ్లు.
- రికార్డింగ్ సెట్టింగ్లు: Access the "Record" menu to configure recording schedules, motion detection settings, and storage management.
- సిస్టమ్ సెట్టింగ్లు: The "System" menu allows you to manage user accounts, network settings, system logs, and perform firmware updates.
Using the Mobile Application (IPPRO/Eseecloud):
- అనువర్తనాన్ని డౌన్లోడ్ చేయండి: Download the "IPPRO" or "Eseecloud" app from your device's app store.
- ఖాతా నమోదు: ఖాతాను సృష్టించండి మరియు లాగిన్ చేయండి.
- పరికరాన్ని జోడించండి: Scan the QR code displayed on the NVR's monitor (usually found in System Settings > Network) or manually enter the device ID to add your NVR to the app.
- రిమోట్ Viewing: జోడించిన తర్వాత, మీరు view ప్రత్యక్ష ఫీడ్లను ప్రసారం చేయండి, రికార్డింగ్లను ప్లే బ్యాక్ చేయండి మరియు మీ మొబైల్ పరికరంలో నేరుగా హెచ్చరికలను స్వీకరించండి.
నిర్వహణ
Regular maintenance ensures the optimal performance and longevity of your NVR:
- శుభ్రపరచడం: Use a soft, dry cloth to clean the exterior of the NVR. Do not use liquid cleaners or aerosols.
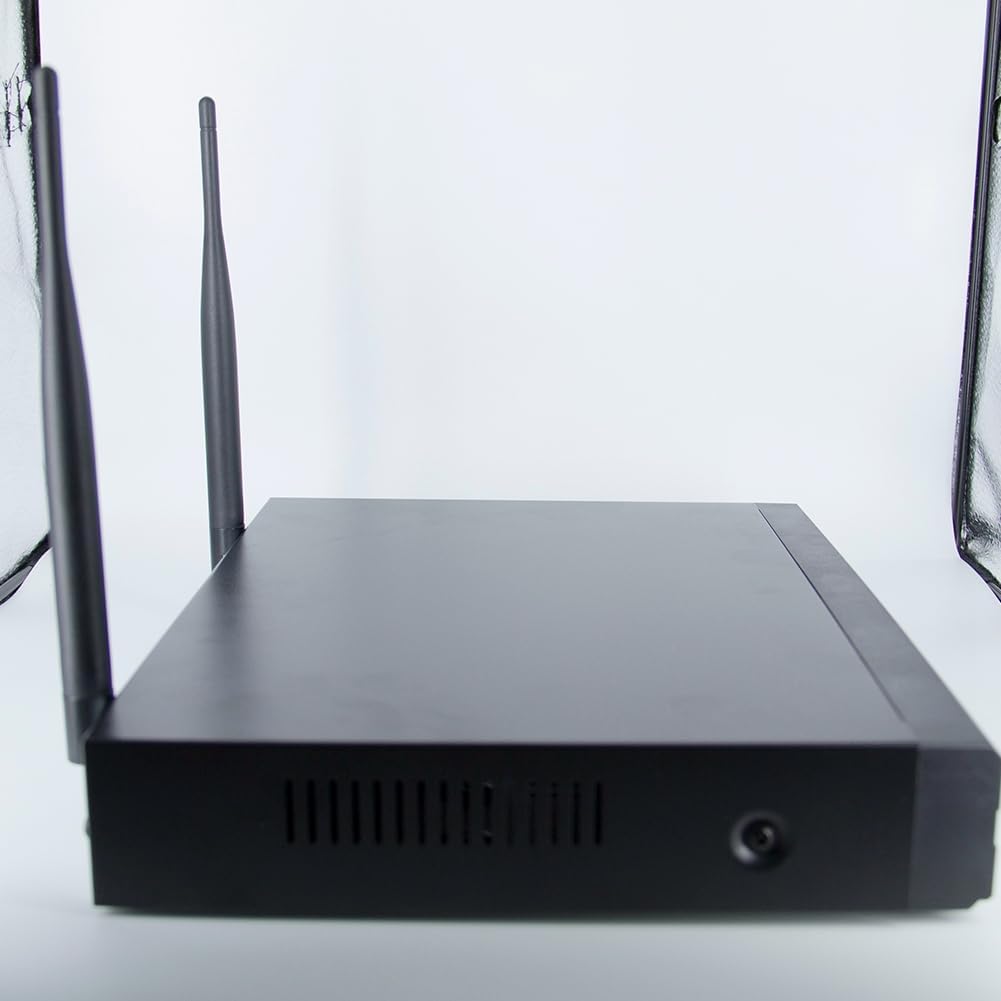
మూర్తి 4: వైపు view of the NVR, highlighting the side vents for proper airflow.
- వెంటిలేషన్: Ensure the NVR is placed in a well-ventilated area. Do not block the ventilation openings on the sides and back of the unit to prevent overheating.
- ఫర్మ్వేర్ నవీకరణలు: Periodically check for firmware updates through the NVR's system settings or the mobile app. Keeping the firmware updated can improve performance and security.
- డేటా బ్యాకప్: Regularly back up important recordings to an external storage device (e.g., USB drive) if needed.
- పవర్ సైకిల్: If the NVR experiences minor issues, try power cycling it by unplugging the power adapter for 10 seconds and then plugging it back in.
ట్రబుల్షూటింగ్
మీరు ఎదుర్కొనే సాధారణ సమస్యలకు పరిష్కారాలు ఇక్కడ ఉన్నాయి:
- మానిటర్లో డిస్ప్లే లేదు:
- Check if the NVR is powered on.
- Verify that the HDMI or VGA cable is securely connected to both the NVR and the monitor.
- Ensure the monitor is set to the correct input source (HDMI/VGA).
- Cameras Not Connecting/Showing Live View:
- కెమెరాలు ఆన్ చేయబడి, NVR పరిధిలో ఉన్నాయని నిర్ధారించుకోండి.
- Check if the camera's Wi-Fi signal is strong enough.
- If cameras were previously connected, try restarting both the NVR and the cameras.
- Refer to your camera's manual for specific pairing instructions if auto-pairing fails.
- రికార్డింగ్ లేదు:
- Verify that a compatible hard drive (not included) is installed and properly initialized in the NVR.
- Check recording schedules and motion detection settings in the NVR's interface.
- హార్డ్ డ్రైవ్లో తగినంత నిల్వ స్థలం ఉందని నిర్ధారించుకోండి.
- Mobile App Connection Issues:
- Ensure the NVR is connected to the internet via the Ethernet port.
- మీ మొబైల్ పరికరం యొక్క ఇంటర్నెట్ కనెక్షన్ను తనిఖీ చేయండి.
- Verify that the correct device ID or QR code was used to add the NVR to the app.
- Restart the NVR and try connecting again.
స్పెసిఫికేషన్లు
| ఫీచర్ | వివరాలు |
|---|---|
| మోడల్ సంఖ్య | 500452209 |
| బ్రాండ్ | బ్యూయుయర్ |
| ఛానెల్ల సంఖ్య | 10 |
| కనెక్టివిటీ టెక్నాలజీ | Wi-Fi |
| మీడియా ఫార్మాట్ డిజిటల్ వీడియో | SD Card (Note: NVR typically uses HDD for primary storage; SD card might be for specific features or models) |
| ఉత్పత్తి కొలతలు | 13.78 x 10.63 x 3.15 అంగుళాలు |
| వస్తువు బరువు | 2.08 పౌండ్లు (945 గ్రాములు) |
| తయారీదారు | బ్యూయుయర్ |
గమనిక: ముందస్తు నోటీసు లేకుండా స్పెసిఫికేషన్లు మారవచ్చు.
వారంటీ మరియు మద్దతు
This product is manufactured by Beuiouer. For warranty information and technical support, please refer to the documentation included with your purchase or contact the seller directly. Ensure you have your model number (500452209) and purchase details ready when seeking support.
సంప్రదింపు సమాచారం: Please refer to your purchase receipt or the seller's information on the platform where you purchased the product for specific contact details.
Ask a question about this manual
Ask about setup, troubleshooting, compatibility, parts, safety, or missing instructions. Manuals+ will review the question and use this page’s manual context to help answer it.