
1. పరిచయం
This manual provides detailed instructions for the operation and maintenance of your Docooler Digital Voice Recorder. Please read this manual thoroughly before using the device to ensure proper function and to maximize its capabilities. This device is designed for recording audio in various settings, including lectures, meetings, and interviews, featuring noise reduction and voice-activated recording.
2. ఉత్పత్తి ముగిసిందిview
The Docooler Digital Voice Recorder is a compact and portable audio recording device. It features a clear digital display, intuitive controls, and a robust design for reliable performance. Key features include intelligent noise cancellation, voice-activated recording, and a choice of 8GB or 32GB storage capacity.

మూర్తి 2.1: ముందు view of the Docooler Digital Voice Recorder, showing the display and control buttons.

Figure 2.2: The compact size of the Docooler Digital Voice Recorder, shown held in a hand.

Figure 2.3: Illustration of the voice-activated recording feature, automatically starting when sound reaches a detectable level.
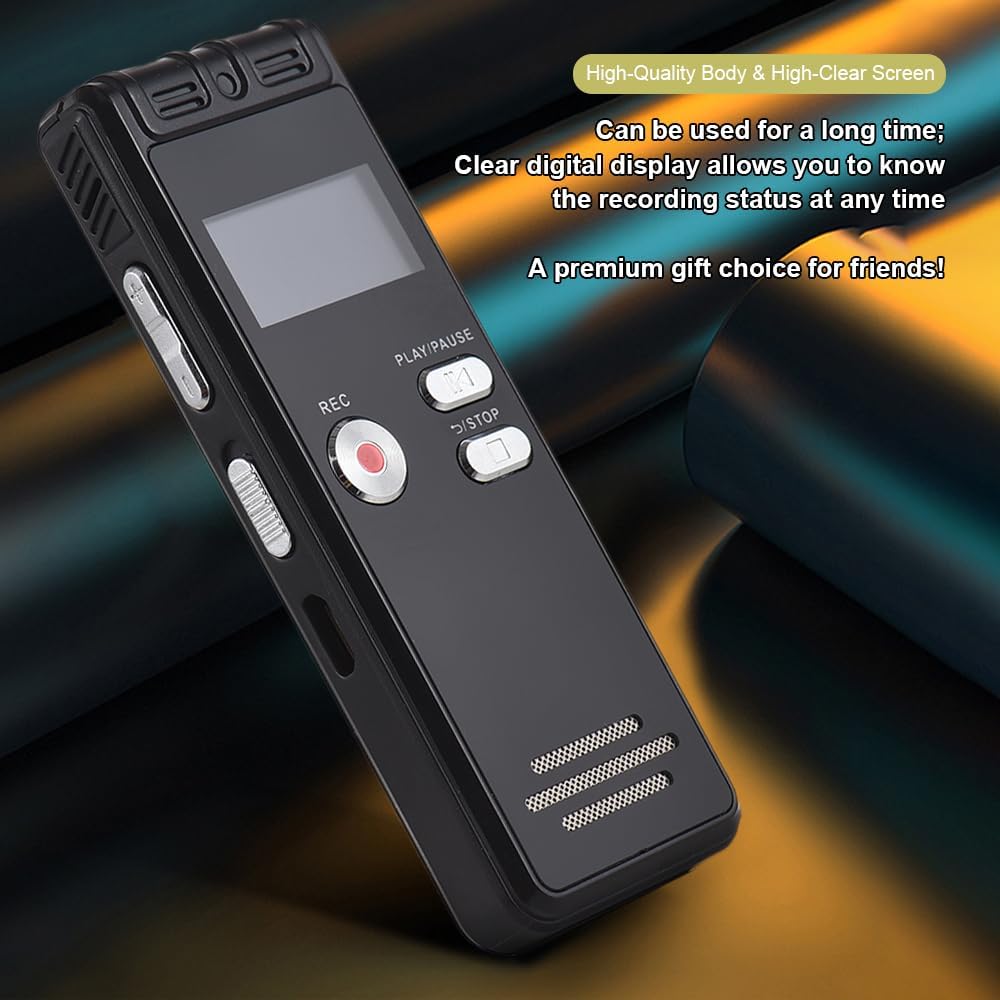
Figure 2.4: The durable construction and clear digital display of the recorder, providing real-time recording status.

Figure 2.5: The device features a built-in high-quality omnidirectional microphone for 360-degree panoramic sound capture.

Figure 2.6: The recorder's compact dimensions allow it to be easily carried in a pocket or bag.

Figure 2.7: The device supports one-click recording and saving, simplifying the recording process.

చిత్రం 2.8: ఉదాamples of various environments where the recorder can be effectively used, such as meetings, lectures, training sessions, and teaching.
3. ప్యాకేజీ విషయాలు
క్రింద జాబితా చేయబడిన అన్ని వస్తువులు మీ ప్యాకేజీలో చేర్చబడ్డాయని దయచేసి ధృవీకరించండి:
- 1x వాయిస్ రికార్డర్
- 1x USB కేబుల్
- 1x హెడ్ఫోన్
- 1x Adapters (likely phone line adapter)
- 1x Connect Cable (likely for phone recording)
- 1x మాన్యువల్ (ఈ పత్రం)

Figure 3.1: The Docooler Digital Voice Recorder shown with its complete set of accessories, including USB cable, headphones, and connection cables.
4. సెటప్
4.1 పరికరాన్ని ఛార్జ్ చేస్తోంది
- Connect the included USB cable to the recorder's USB port.
- Plug the other end of the USB cable into a computer's USB port or a compatible USB wall adapter (not included).
- The device's screen will indicate charging status. A full charge typically takes approximately 2-3 hours.
4.2 పవర్ చేయడం ఆన్/ఆఫ్
- To power on: Press and hold the Power button until the screen illuminates.
- To power off: Press and hold the Power button until the screen turns off.
4.3 హెడ్ఫోన్లను కనెక్ట్ చేస్తోంది
Insert the included headphones into the 3.5mm headphone jack on the device for private playback of recordings.
5. ఆపరేటింగ్ సూచనలు
5.1 ప్రాథమిక రికార్డింగ్
- పరికరం పవర్ ఆన్ చేయబడిందని నిర్ధారించుకోండి.
- నొక్కండి REC రికార్డింగ్ ప్రారంభించడానికి బటన్. రికార్డింగ్ సూచిక వెలుగుతుంది.
- రికార్డింగ్ను పాజ్ చేయడానికి, నొక్కండి ప్లే/పాజ్ చేయండి బటన్. పునఃప్రారంభించడానికి మళ్ళీ నొక్కండి.
- రికార్డింగ్ ఆపివేసి సేవ్ చేయడానికి file, నొక్కండి ఆపు బటన్. రికార్డింగ్ స్వయంచాలకంగా సేవ్ చేయబడుతుంది.
5.2 Voice-Activated Recording (VOR)
This feature allows the recorder to automatically start recording when sound is detected and pause when silence occurs, conserving memory and battery life.
- Navigate to the VOR settings in the device menu.
- Enable the VOR function and adjust the sensitivity level as needed.
- నొక్కండి REC button. The device will now record only when sound is present.
- నొక్కండి ఆపు button to end the voice-activated recording session.
5.3 ప్లేబ్యాక్
- From the main menu, select the 'Recordings' or 'Files' option.
- Use the navigation buttons to select the desired audio file.
- నొక్కండి ప్లే/పాజ్ చేయండి ప్లేబ్యాక్ ప్రారంభించడానికి బటన్.
- Use the volume controls on the side of the device to adjust the playback volume.
- నొక్కండి ఆపు ప్లేబ్యాక్ ముగించడానికి బటన్.
5.4 నాయిస్ తగ్గింపు
The device is equipped with an intelligent noise reduction feature. This function is typically active by default to enhance audio clarity. Refer to the device's settings menu for options to adjust or disable noise reduction if available.
6. నిర్వహణ
- పరికరాన్ని పొడిగా ఉంచండి. తేమ లేదా ద్రవాలకు గురికాకుండా ఉండండి.
- పరికరాన్ని మృదువైన, పొడి వస్త్రంతో శుభ్రం చేయండి. రాపిడి క్లీనర్లను లేదా ద్రావకాలను ఉపయోగించవద్దు.
- పరికరాన్ని వదలడం లేదా బలమైన ప్రభావాలకు గురిచేయడం మానుకోండి.
- పరికరాన్ని ప్రత్యక్ష సూర్యకాంతి మరియు తీవ్రమైన ఉష్ణోగ్రతలు లేకుండా చల్లని, పొడి ప్రదేశంలో నిల్వ చేయండి.
- Regularly back up important recordings to a computer to prevent data loss.
7. ట్రబుల్షూటింగ్
7.1 పరికరం పవర్ ఆన్ అవ్వదు
- Ensure the battery is charged. Connect the device to a power source using the USB cable and allow it to charge for at least 30 minutes.
- Press and hold the Power button for several seconds.
7.2 పేలవమైన రికార్డింగ్ నాణ్యత
- మైక్రోఫోన్ అడ్డుపడకుండా చూసుకోండి.
- Record in a quieter environment to minimize background noise.
- Check the microphone sensitivity settings in the device menu.
- Ensure the device is placed close enough to the sound source.
7.3 Cannot Play Back Recordings
- Verify that recordings exist in the device's memory.
- Check the volume level during playback.
- హెడ్ఫోన్లను ఉపయోగిస్తుంటే అవి సరిగ్గా కనెక్ట్ అయ్యాయని నిర్ధారించుకోండి.
7.4 కంప్యూటర్ ద్వారా పరికరం గుర్తించబడలేదు
- USB కేబుల్ పరికరం మరియు కంప్యూటర్ రెండింటికీ సురక్షితంగా కనెక్ట్ చేయబడిందని నిర్ధారించుకోండి.
- మీ కంప్యూటర్లో వేరే USB పోర్ట్కి కనెక్ట్ చేయడానికి ప్రయత్నించండి.
- మీ కంప్యూటర్ని పునఃప్రారంభించి, మళ్లీ ప్రయత్నించండి.
8. స్పెసిఫికేషన్లు
| బ్రాండ్ | డోకూలర్ |
| మోడల్ | డిజిటల్ వాయిస్ రికార్డర్ |
| సామర్థ్య ఎంపికలు | 8GB, 32GB |
| రంగు | నలుపు |
| మెటీరియల్ | ABS |
| బ్యాటరీ | 300mAh |
| వస్తువు బరువు | 2.38 ఔన్సులు (సుమారు 67.5గ్రా) |
| ప్యాకేజీ కొలతలు | 4.65 x 3.23 x 0.59 అంగుళాలు (11.8 x 8.2 x 1.5 సెం.మీ.) |
| తయారీదారు | డోకూలర్ |
| ASIN | B0D9WB349S (for 8GB variant) |
9. వారంటీ మరియు మద్దతు
For warranty information and customer support, please refer to the documentation provided at the time of purchase or contact your retailer. Keep your purchase receipt as proof of purchase for any warranty claims.