Ulefone TAB A11 Pro
Ulefone TAB A11 Pro Android 14 Tablet User Manual
Model: Ulefone TAB A11 Pro
1. పరిచయం
This manual provides essential instructions for setting up, operating, and maintaining your Ulefone TAB A11 Pro Android 14 Tablet. Please read this manual thoroughly before using your device to ensure proper function and longevity.
The Ulefone TAB A11 Pro is an 11-inch Android 14 tablet featuring a MediaTek Helio G99 Octa-Core processor, 16GB RAM, 256GB ROM, and an 8800mAh battery. It supports WiFi, Cellular (4G LTE), Bluetooth 5.2, GPS, NFC, and Widevine L1 for high-definition streaming.
2. ప్యాకేజీ విషయాలు
మీ ఉత్పత్తి ప్యాకేజీలో అన్ని అంశాలు ఉన్నాయని ధృవీకరించండి:
- Ulefone TAB A11 Pro Tablet
- USB టైప్-సి కేబుల్
- Power Adapter (33W fast charging compatible)
- SIM ఎజెక్టర్ సాధనం
- వినియోగదారు మాన్యువల్ (ఈ పత్రం)
- వారంటీ కార్డ్
- స్క్రీన్ ప్రొటెక్టర్ (ముందే వర్తింపజేయబడింది లేదా చేర్చబడింది)
- Protective Case (optional, may be included depending on package)

Image: Ulefone TAB A11 Pro Tablet and included accessories, showing the tablet, charging cable, power adapter, and documentation.
Video: Tablet Unboxing Demonstration. This video shows the unboxing process of a tablet, revealing the device and its accessories.
3. సెటప్
3.1. ప్రారంభ ఛార్జ్
Before first use, fully charge your Ulefone TAB A11 Pro. Connect the USB Type-C cable to the tablet's charging port and the power adapter to a wall outlet. The charging indicator will show the charging status.

Image: The Ulefone TAB A11 Pro tablet highlighting its 8800mAh large battery and charging capabilities.
3.2. సిమ్ కార్డ్ మరియు మైక్రో SD కార్డ్ చొప్పించడం
- టాబ్లెట్ వైపున SIM కార్డ్ ట్రేని గుర్తించండి.
- ట్రే పక్కన ఉన్న చిన్న రంధ్రంలోకి సిమ్ ఎజెక్టర్ సాధనాన్ని చొప్పించి, ట్రే బయటకు వచ్చే వరకు సున్నితంగా నొక్కండి.
- మీ నానో-సిమ్ కార్డ్(లు) మరియు/లేదా మైక్రో SD కార్డ్ను ట్రేలోని నిర్దేశించిన స్లాట్లలో ఉంచండి. బంగారు కాంటాక్ట్లు క్రిందికి ఉండేలా చూసుకోండి.
- ట్రే సరైన స్థానంలోకి వచ్చే వరకు జాగ్రత్తగా దాన్ని టాబ్లెట్లోకి నెట్టండి.

Image: Close-up of the Ulefone TAB A11 Pro's side, showing the SIM card tray and its slot.

Image: Diagram illustrating the Ulefone TAB A11 Pro's 256GB ROM and expandable storage up to 1TB via MicroSD card.
3.3. పవర్ ఆన్/ఆఫ్
- పవర్ ఆన్ చేయడానికి: Ulefone లోగో కనిపించే వరకు పవర్ బటన్ను నొక్కి పట్టుకోండి.
- పవర్ ఆఫ్ చేయడానికి: పవర్ బటన్ను నొక్కి పట్టుకోండి, ఆపై ఎంపికల నుండి "పవర్ ఆఫ్" ఎంచుకోండి.
3.4. ప్రారంభ సెటప్ విజార్డ్
మొదటిసారి పవర్-ఆన్ చేసిన తర్వాత, భాష ఎంపిక, Wi-Fi కనెక్షన్, Google ఖాతా లాగిన్ మరియు భద్రతా సెట్టింగ్లతో సహా ప్రారంభ సెటప్ను పూర్తి చేయడానికి స్క్రీన్పై ఉన్న సూచనలను అనుసరించండి.
4. మీ టాబ్లెట్ను ఆపరేట్ చేయడం
4.1. నావిగేషన్ మరియు సంజ్ఞలు
- నొక్కండి: ఒక అంశాన్ని ఎంచుకోండి లేదా ఒక ఫంక్షన్ను సక్రియం చేయండి.
- స్వైప్: Scroll through screens, lists, or content.
- పించ్-టు-జూమ్: స్క్రీన్పై కంటెంట్ను పెద్దదిగా చేయండి లేదా తగ్గించండి.
- లాంగ్ ప్రెస్: సందర్భోచిత మెనూలను యాక్సెస్ చేయండి లేదా చిహ్నాలను తరలించండి.
4.2. Connecting to Wi-Fi and Cellular Data
- వెళ్ళండి సెట్టింగ్లు > నెట్వర్క్ & ఇంటర్నెట్.
- For Wi-Fi: Turn on Wi-Fi, select your desired network, and enter the password if required.
- For Cellular Data: Ensure your SIM card is inserted correctly and enable "Mobile network" in settings.

Image: Illustration showing the Ulefone TAB A11 Pro's support for Dual 4G LTE network and Wi-Fi 6 connectivity.
4.3. కెమెరాలను ఉపయోగించడం
The tablet features a 16MP rear camera and an 8MP centered front camera.
- హోమ్ స్క్రీన్ లేదా యాప్ డ్రాయర్ నుండి కెమెరా యాప్ను తెరవండి.
- Tap the shutter button to take photos or switch to video mode to record.
- Use the front camera for video calls and selfies.
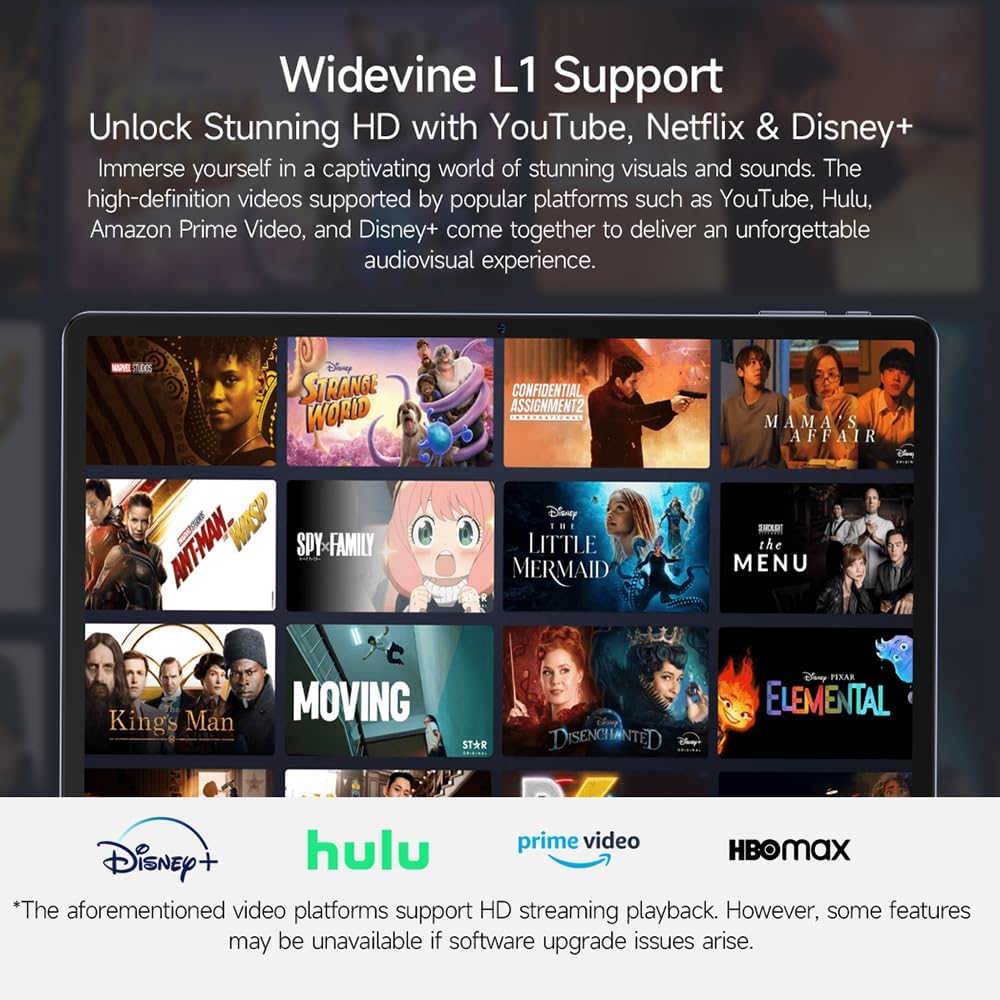
Image: The Ulefone TAB A11 Pro tablet showcasing its 16MP rear camera module.

Image: The Ulefone TAB A11 Pro tablet displaying its 8MP centered front camera, ideal for video calls.
4.4. స్ప్లిట్ స్క్రీన్ ఫంక్షనాలిటీ
The Ulefone TAB A11 Pro supports split-screen mode for multitasking.
- Open an app, then swipe up from the bottom of the screen and hold to access recent apps.
- యాప్ ప్రీ-స్క్రీన్ పైభాగంలో ఉన్న యాప్ చిహ్నాన్ని నొక్కండి.view and select "Split screen".
- Choose a second app from the recent apps list or app drawer to use in the other half of the screen.

Image: The Ulefone TAB A11 Pro tablet demonstrating its split-screen feature, allowing two applications to run simultaneously.
4.5. Widevine L1 Support
Enjoy high-definition streaming from platforms like YouTube, Netflix, Hulu, Amazon Prime Video, and Disney+ thanks to Widevine L1 support.

Image: The Ulefone TAB A11 Pro tablet displaying various streaming service logos, indicating Widevine L1 support for HD content.
Video: Ulefone TAB A11 Pro Unlocked. This video highlights the features and capabilities of the Ulefone TAB A11 Pro tablet.
5. నిర్వహణ
5.1. పరికరాన్ని శుభ్రపరచడం
టాబ్లెట్ స్క్రీన్ మరియు బాడీని శుభ్రం చేయడానికి మృదువైన, మెత్తటి బట్టను ఉపయోగించండి. ఉపరితలాన్ని దెబ్బతీసే కఠినమైన రసాయనాలు లేదా రాపిడి పదార్థాలను ఉపయోగించకుండా ఉండండి.
5.2. సాఫ్ట్వేర్ నవీకరణలు
సరైన పనితీరు, భద్రత మరియు కొత్త ఫీచర్లకు ప్రాప్యతను నిర్ధారించుకోవడానికి సాఫ్ట్వేర్ నవీకరణలను క్రమం తప్పకుండా తనిఖీ చేసి, ఇన్స్టాల్ చేయండి. వెళ్ళండి సెట్టింగ్లు > సిస్టమ్ > సిస్టమ్ అప్డేట్.

Image: Screenshots of the Ulefone TAB A11 Pro's Android 14 interface, highlighting its personalized and secure experience.
5.3. బ్యాటరీ సంరక్షణ
- టాబ్లెట్ను తీవ్రమైన ఉష్ణోగ్రతలకు గురిచేయకుండా ఉండండి.
- బ్యాటరీ తరచుగా పూర్తిగా ఖాళీ అవ్వనివ్వకండి.
- Use the original charger for optimal charging performance.
6. ట్రబుల్షూటింగ్
| సమస్య | పరిష్కారం |
|---|---|
| టాబ్లెట్ ఆన్ అవ్వడం లేదు | Ensure the battery is charged. Press and hold the Power button for 10-15 seconds to force a restart. |
| Wi-Fiకి కనెక్ట్ చేయడం సాధ్యపడదు | Check Wi-Fi settings, restart your router, or try connecting to a different network. |
| యాప్లు క్రాష్ అవుతున్నాయి లేదా స్తంభించిపోతున్నాయి | Clear the app's cache (Settings > Apps > [App Name] > Storage & cache > Clear cache) or reinstall the app. Ensure sufficient RAM is available. |
| నెమ్మదిగా పనితీరు | Close unnecessary background apps, clear cache, or free up storage space. Consider a factory reset as a last resort (backup data first). |
7. స్పెసిఫికేషన్లు
| ఫీచర్ | వివరాలు |
|---|---|
| మోడల్ | Ulefone TAB A11 Pro |
| ఆపరేటింగ్ సిస్టమ్ | ఆండ్రాయిడ్ 14 |
| ప్రాసెసర్ | MediaTek Helio G99 Octa-Core (2x A76 2.2GHz + 6x A55 2.0GHz) |
| RAM | 16GB (8GB physical + up to 8GB virtual expansion) |
| అంతర్గత నిల్వ (ROM) | 256GB UFS2.2 |
| విస్తరించదగిన నిల్వ | మైక్రో SD కార్డ్ ద్వారా 1TB వరకు |
| స్క్రీన్ పరిమాణం | 11 అంగుళాలు |
| స్క్రీన్ రిజల్యూషన్ | 1920x1200 (2K IPS), 90Hz Refresh Rate, 400 nits brightness |
| వెనుక కెమెరా | 16MP |
| ఫ్రంట్ కెమెరా | 8MP |
| బ్యాటరీ కెపాసిటీ | 8800mAh |
| ఛార్జింగ్ | 33W ఫాస్ట్ ఛార్జింగ్ (టైప్-సి) |
| కనెక్టివిటీ | 4G LTE (Dual SIM), Wi-Fi 6 (802.11ax), Bluetooth 5.2, GPS, NFC |
| కొలతలు | 10.1 x 6.6 x 0.3 inches (7.6mm thickness) |
| బరువు | 1.96 పౌండ్లు (సుమారు 500.5గ్రా) |
| ఆడియో | Quad Smart-PA Harman Speakers, Hi-Res Audio |
| వీడియో స్ట్రీమింగ్ | వైడ్వైన్ L1 సపోర్ట్ |

Image: Diagram illustrating the MediaTek Helio G99 Octa-Core processor, highlighting its 6nm architecture and performance metrics.

Image: The Ulefone TAB A11 Pro tablet showcasing its light (500.5g) and thin (7.6mm) design, emphasizing portability.

Image: The Ulefone TAB A11 Pro tablet highlighting its 11-inch FHD+ all-screen display with 90Hz refresh rate and 1920x1200 resolution.

Image: Diagram showing the placement of the Ulefone TAB A11 Pro's quad stereo speakers, emphasizing theater-level audio.
8. వారంటీ మరియు మద్దతు
Your Ulefone TAB A11 Pro comes with a 1-year warranty. For warranty claims, technical support, or service inquiries, please contact Ulefone customer service through their official webసైట్ లేదా మీ వారంటీ కార్డ్లో అందించిన సంప్రదింపు సమాచారం.
Please note that the 4G network functionality supports GSM WCDMA and LTE with most carriers like T-Mobile and Metro PCS. It does కాదు work with AT&T, Cricket Wireless, Sprint, or Boost.
మరింత సహాయం కోసం, సందర్శించండి అమెజాన్లో ఉలేఫోన్ స్టోర్.
Ask a question about this manual
Ask about setup, troubleshooting, compatibility, parts, safety, or missing instructions. Manuals+ will review the question and use this page’s manual context to help answer it.