
1. ఉత్పత్తి ముగిసిందిview
The Ovsuqu Raycus MOPA 60W Fiber Laser Engraver Machine, Model FL-60W, is a high-precision laser marking and engraving system designed for a wide range of materials. It features a powerful 60W Raycus laser source and is equipped with a red dot pointer for accurate positioning. This machine is suitable for detailed engraving on various metals and certain non-metal materials.
ముఖ్య లక్షణాలు:
- లేజర్ క్లాస్ 4: 60,000mW Output Power, FDA Accession Number: 2420799-000.
- Raycus Laser Source: RFL-P60MX, 60W rated output power, 1064 ± 5nm center wavelength.
- బహుముఖ అప్లికేషన్: Ideal for metal surface processing, peeling coating, aluminum black marking, semiconductor and electronics industry applications, large area engraving, and excellent marking on plastic or other sensitive materials. Capable of black and color marking on stainless steel.
- మెటీరియల్ అనుకూలత: Engraves on Gold, Silver, Aluminum, Stainless Steel, Brass, Copper, and non-metals such as nylon, light button, ABS, PVC, PES.
- EZCAD Lite Software: Compatible with Windows XP/Vista/7/8/10/11, supporting Coreldraw, AutoCAD, Photoshop, PLT, PCX, DXF, BMP, SHX, TTF fonts, and automatic encoding for serial numbers, batch numbers, production dates, barcodes, and QR codes.
2. సెటప్ సూచనలు
Follow these steps to set up your Ovsuqu Raycus MOPA 60W Fiber Laser Engraver Machine. Ensure all components are present and undamaged before proceeding.
2.1 అన్ప్యాకింగ్ మరియు కాంపోనెంట్ గుర్తింపు
Carefully unpack all items from the shipping crate. Identify the main unit, laser head, F-theta scan lens, power supply, and any included accessories.

చిత్రం: The main unit of the Ovsuqu Raycus MOPA 60W Fiber Laser Engraver Machine, showing the laser head and adjustable column.

చిత్రం: The BJJCZ main board, which comes with EZCAD Lite software, and a screenshot of the EZCAD software working page.
చిత్రం: Details of the F-theta Scan Lens (Mount: M85, Wavelength: 1064nm) and the Mean Well Power Supply, highlighting its high efficiency and stability.
2.2 అసెంబ్లీ
Assemble the laser engraver according to the following general steps. Refer to the setup video for a visual guide.
- Place the main base plate on a stable, level surface.
- Attach the vertical column to the base plate, ensuring it is securely fastened.
- Mount the laser head assembly onto the vertical column.
- Install the F-theta scan lens onto the laser head.
- Connect the necessary cables: power cord, USB cable to your computer, and the cable from the main unit to the laser head.
- If using a rotary axis, connect it to the designated port on the main unit.
వీడియో: A detailed guide on how to set up the OMTech fiber laser engraver, demonstrating the assembly process and initial connections.

చిత్రం: The Ovsuqu Raycus MOPA 60W Fiber Laser Engraver Machine shown with an optional rotary axis attached, ready for engraving cylindrical objects.
3. ఆపరేటింగ్ సూచనలు
This section outlines the basic steps for operating your fiber laser engraver. Always ensure proper safety precautions are followed, including wearing appropriate laser safety glasses.
3.1 సాఫ్ట్వేర్ ఇన్స్టాలేషన్ మరియు కాన్ఫిగరేషన్
Install the EZCAD Lite software on your Windows computer. Follow the on-screen instructions. Once installed, launch the software and configure the laser parameters according to your material and desired engraving effect.
చిత్రం: The EZCAD software working page, showing design area and marking parameters. This software is used to control the laser engraver.
3.2 చెక్కే ప్రక్రియ
- పవర్ ఆన్: Turn on the main power switch on the laser unit.
- మెటీరియల్ ప్లేస్మెంట్: Place the material to be engraved on the work platform. Use the red dot pointer to preview the engraving area and adjust the material position as needed.
- ఫోకస్ సర్దుబాటు: Adjust the height of the laser head until the red dot pointers converge into a single, sharp point on the material surface. This ensures optimal focus.
- Design Import: In EZCAD Lite, import or create your desired design.
- పారామీటర్ సెట్టింగ్: Set the appropriate laser parameters (power, speed, frequency, pulse width) based on the material type and desired engraving depth/effect. Refer to the software manual for detailed parameter guidance.
- చెక్కడం ప్రారంభించండి: Initiate the engraving process from the EZCAD Lite software. Monitor the process closely.
The MOPA laser source allows for various marking effects, including deep carving, black marking on aluminum, and color marking on stainless steel by adjusting pulse width and frequency.
3.3 Choosing the Right Lens and Laser Source
Selecting the correct lens and laser source is crucial for achieving desired results:
- లెన్స్ పరిమాణం: A larger lens provides a larger engraving area but may result in weaker light intensity. A smaller lens offers deeper engraving but with a smaller working area.
- లేజర్ మూలం: Raycus and MAX sources are effective for deep carving, hollow designs, and cutting. JPT sources are known for delicate touch carving. For metal cutting, a Raycus or MAX source with a smaller lens is recommended. For faster working or deeper results, consider higher power JPT 100W or 200W options.

చిత్రం: Informational graphic explaining how to choose the appropriate laser source (Raycus, MAX, JPT) and F-theta scan lens based on desired engraving depth and work area.
4. నిర్వహణ
క్రమం తప్పకుండా నిర్వహణ మీ లేజర్ చెక్కే వ్యక్తి యొక్క దీర్ఘాయువు మరియు సరైన పనితీరును నిర్ధారిస్తుంది.
- లెన్స్ క్లీనింగ్: Periodically clean the F-theta scan lens with a lens cleaning solution and a soft, lint-free cloth to maintain laser beam quality.
- Work Area Cleanliness: Keep the work platform and surrounding area free of debris and dust, which can interfere with engraving or damage components.
- కేబుల్ తనిఖీ: Regularly check all cables for signs of wear or damage. Ensure all connections are secure.
- వెంటిలేషన్: Ensure the machine's ventilation openings are clear and unobstructed to prevent overheating of internal components.
- సాఫ్ట్వేర్ అప్డేట్లు: Keep your EZCAD Lite software updated to the latest version for improved performance and features.
5. ట్రబుల్షూటింగ్
If you encounter issues with your laser engraver, refer to the following common troubleshooting steps:
- శక్తి లేదు: Check the power cord connection, ensure the main power switch is on, and verify the power outlet is functional.
- లేజర్ కాల్చడం లేదు: Confirm the laser is enabled in the software, check the emergency stop button is disengaged, and ensure all safety interlocks are correctly closed.
- పేలవమైన చెక్కడం నాణ్యత:
- Verify the laser focus is correctly set.
- Adjust laser parameters (power, speed, frequency) for the specific material.
- Clean the F-theta scan lens.
- పదార్థం చదునుగా మరియు సురక్షితంగా ఉంచబడిందని నిర్ధారించుకోండి.
- సాఫ్ట్వేర్ కనెక్షన్ సమస్యలు: Ensure the USB cable is securely connected to both the machine and the computer. Restart the software and the machine if necessary. Check device manager for proper driver installation.
If problems persist after attempting these steps, contact customer support for further assistance.
6. సాంకేతిక లక్షణాలు
| ఫీచర్ | స్పెసిఫికేషన్ |
|---|---|
| మోడల్ సంఖ్య | FL-60W |
| లేజర్ మూలం | Raycus RFL-P60MX |
| రేట్ అవుట్పుట్ పవర్ | 60W |
| మధ్య తరంగదైర్ఘ్యం | 1064 ± 5nm |
| Repetition Frequency Range | 1-2000kHz |
| అవుట్పుట్ పవర్ స్టెబిలిటీ | <5% |
| Output Spot Diameter | 7 ± 1మి.మీ |
| M² Factor | <1.6 |
| పల్స్ వెడల్పు | 10-350ns |
| Maximum Single Pulse Energy | 1.5mJ |
| లేజర్ క్లాస్ | 4 |
| FDA Accession Number | 2420799-000 |
| ఉత్పత్తి కొలతలు | 30.31 x 18.9 x 22.44 అంగుళాలు |
| Engraving Area (Standard) | 6.89x6.89 inches (175x175mm) |
| సాఫ్ట్వేర్ | EZCAD Lite |
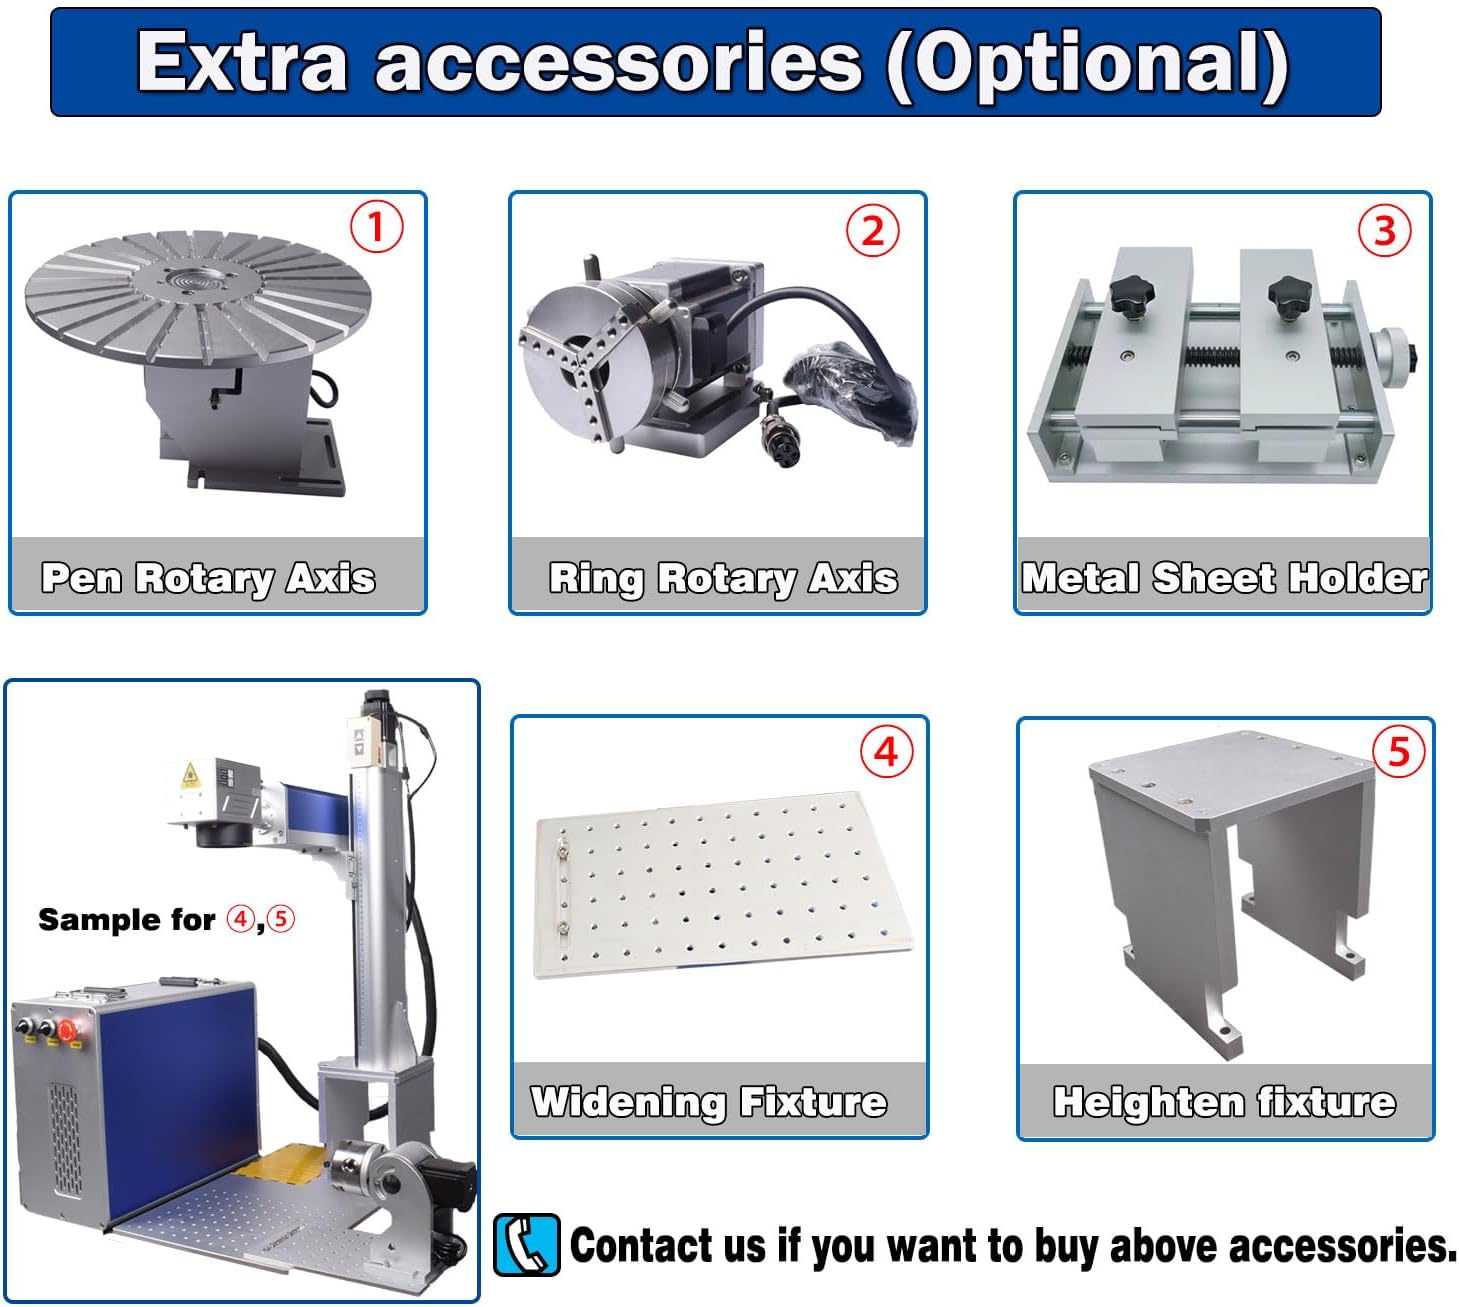
7. ఐచ్ఛిక ఉపకరణాలు
Enhance the functionality of your laser engraver with these optional accessories:

చిత్రం: A visual representation of various optional accessories: Pen Rotary Axis, Ring Rotary Axis, Metal Sheet Holder, Widening Fixture, and Heighten Fixture.
- Pen Rotary Axis: For engraving cylindrical objects like pens.
- Ring Rotary Axis: Specialized for engraving rings and other small circular items.
- Metal Sheet Holder: Provides secure clamping for flat metal sheets during engraving.
- Widening Fixture: Expands the work area for larger items.
- Heighten Fixture: Increases the working height for taller objects.
Contact your supplier if you wish to purchase any of these accessories.
8. వారంటీ మరియు మద్దతు
For any technical assistance, operational queries, or warranty-related concerns, please contact Ovsuqu customer support. The manufacturer, ChinaCNCzone, provides support for machine operation if needed.
నిర్దిష్ట వారంటీ నిబంధనలు మరియు సంప్రదింపు సమాచారం కోసం దయచేసి మీ కొనుగోలు డాక్యుమెంటేషన్ను చూడండి.