
1. ఉత్పత్తి ముగిసిందిview
The NJTY T21L is a high-precision digital multimeter designed for electricians, DIY enthusiasts, and anyone requiring accurate electrical measurements. This versatile tool offers a wide range of functions, including voltage, current, resistance, capacitance, inductance, frequency, temperature, diode, and continuity testing.
ముఖ్య లక్షణాలు ఉన్నాయి:
- పెద్ద HD డిస్ప్లే: A 6000-count display provides clear, easy-to-read measurements without parallax issues.
- Multifunctional Measurement: Capable of measuring DC/AC Voltage, DC/AC Current, Resistance, Capacitance, Inductance, Temperature, Diode, and Circuit Continuity.
- సంపర్కం కాని సంtage (NCV) గుర్తింపు: Safely detect AC voltage without direct contact, indicated by a light and buzzer alarm.
- Secure Test Lead Jacks: Designed for smooth and tight insertion of test leads, ensuring accurate and reliable connections.
- Backlight and Flashlight: Equipped with a display backlight and a built-in flashlight for convenient operation in low-light environments.

ముందు view of the NJTY T21L Digital Multimeter, showcasing its large display and rotary switch.
2. సెటప్ మరియు తయారీ
2.1 బ్యాటరీ ఇన్స్టాలేషన్
The NJTY T21L multimeter requires three (3) 1.5V AAA batteries (not included) for operation.
- మల్టీమీటర్ వెనుక భాగంలో బ్యాటరీ కంపార్ట్మెంట్ కవర్ను గుర్తించండి.
- బ్యాటరీ కంపార్ట్మెంట్ కవర్ను తెరవడానికి స్క్రూడ్రైవర్ని ఉపయోగించండి.
- Insert three 1.5V AAA batteries, ensuring correct polarity (+ and -).
- బ్యాటరీ కంపార్ట్మెంట్ కవర్ను మార్చండి మరియు దానిని స్క్రూతో భద్రపరచండి.
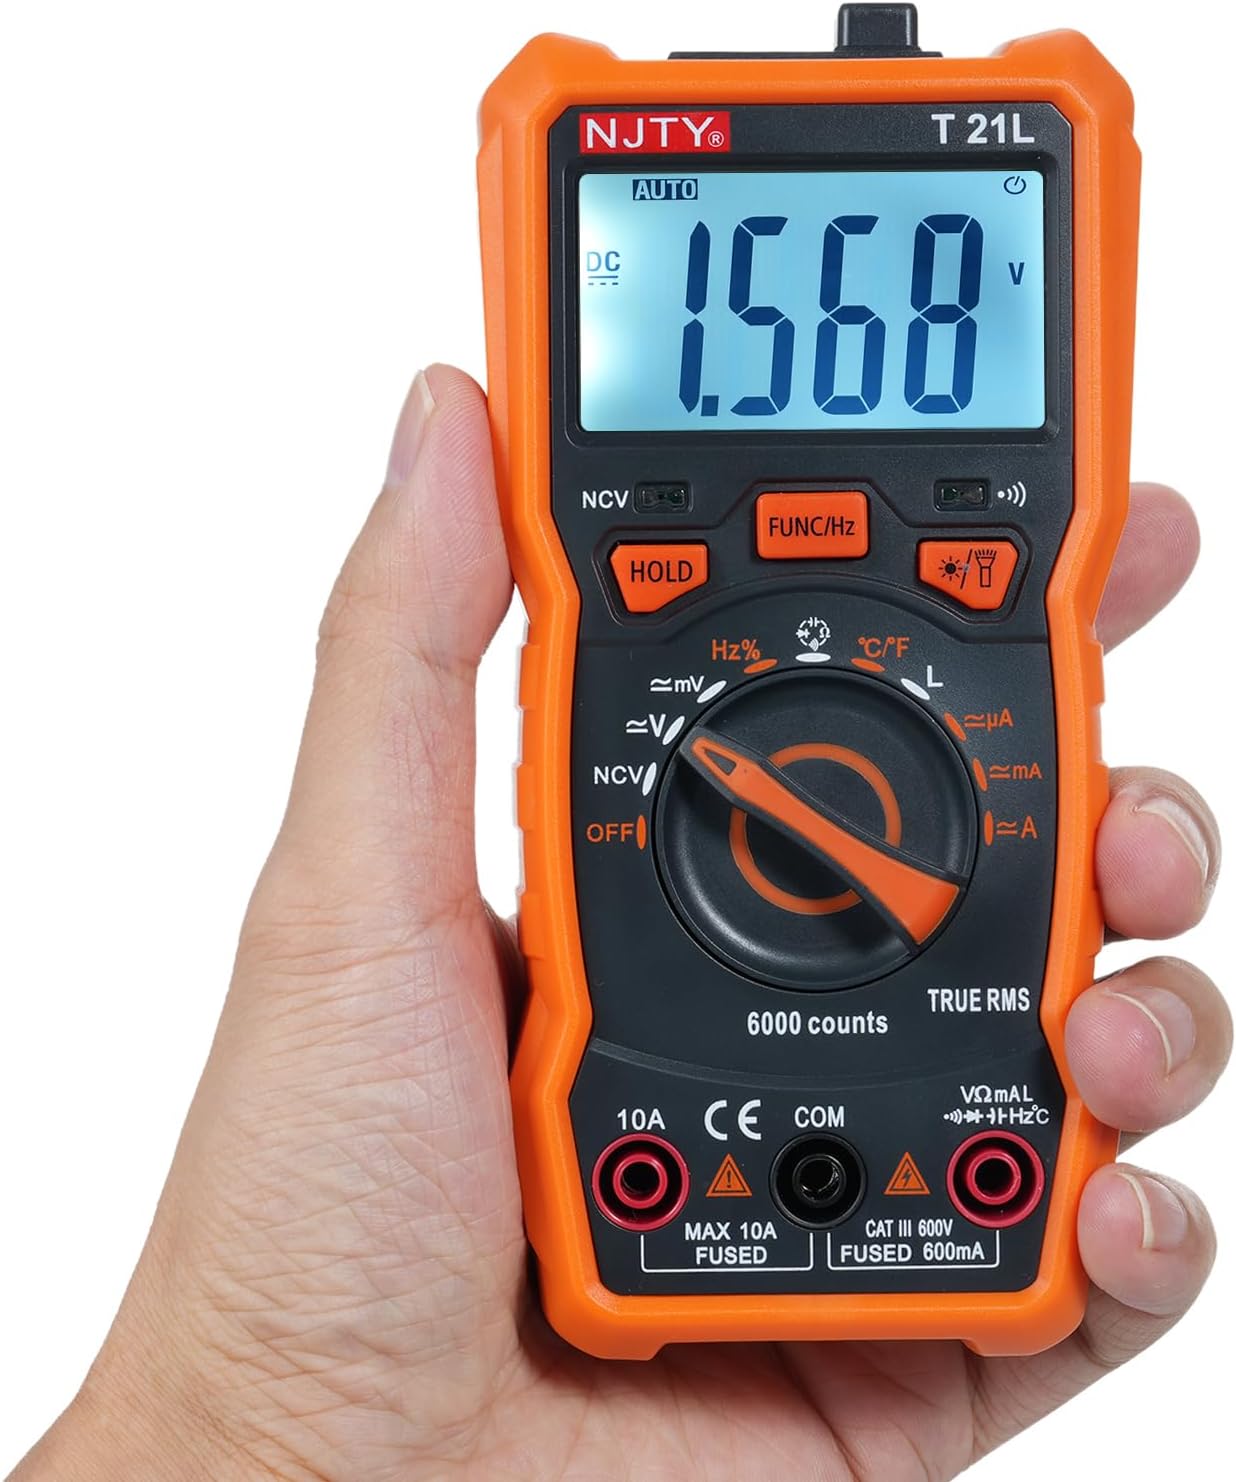
Image showing the open battery compartment for installing 3 AAA batteries.
2.2 టెస్ట్ లీడ్లను కనెక్ట్ చేయడం
Always ensure test leads are securely connected before taking measurements.
- చొప్పించు నలుపు పరీక్షలో లీడ్ COM (సాధారణ) ఇన్పుట్ టెర్మినల్.
- చాలా కొలతలకు (వాల్యూమ్tage, resistance, capacitance, frequency, temperature, diode, continuity, and current up to 600mA), insert the ఎరుపు పరీక్షలో లీడ్ VΩmA ఇన్పుట్ టెర్మినల్.
- For high current measurements (up to 10A), insert the ఎరుపు పరీక్షలో లీడ్ 10A ఇన్పుట్ టెర్మినల్.

The included red and black test leads used for making electrical measurements.

The multimeter with its test leads properly connected to the input terminals.
3. ఆపరేటింగ్ సూచనలు
3.1 Multimeter Components
Familiarize yourself with the various parts of the NJTY T21L multimeter:

This diagram identifies all key components and controls of the NJTY T21L digital multimeter.
- ఫ్లాష్లైట్: Located at the top, provides illumination for work areas.
- NCV సెన్సింగ్ ప్రాంతం: Top-front area for non-contact voltagఇ డిటెక్షన్.
- LED డిస్ప్లే: కొలత రీడింగ్లు మరియు సూచికలను చూపుతుంది.
- బజర్ సూచిక కాంతి: Illuminates and buzzes for NCV and continuity.
- ఫ్లాష్లైట్/బ్యాక్లైట్ బటన్: ఫ్లాష్లైట్ మరియు డిస్ప్లే బ్యాక్లైట్ను సక్రియం చేస్తుంది.
- గేర్ రోటరీ స్విచ్: Selects the primary measurement function.
- నిరోధకత/వాల్యూమ్tage ఇన్పుట్ టెర్మినల్ (VΩmA): వాల్యూమ్ కోసంtage, resistance, capacitance, frequency, temperature, diode, continuity, and low current measurements.
- కామన్ టెర్మినల్ (COM): For the black test lead.
- ప్రస్తుత ఇన్పుట్ టెర్మినల్ (10A): For high current measurements (up to 10A).
- డేటా హోల్డ్ బటన్ (హోల్డ్): డిస్ప్లేపై ప్రస్తుత రీడింగ్ను స్తంభింపజేస్తుంది.
- Function Switch/Frequency Button (FUNC/Hz): Toggles between sub-functions within a rotary switch setting (e.g., AC/DC voltage, diode/continuity) or activates frequency measurement.
- NCV సూచిక కాంతి: Illuminates during NCV detection.
3.2 ప్రాథమిక కొలత విధానాలు
Always ensure the multimeter is set to the correct function and range before connecting to a circuit. Start with a higher range if the expected value is unknown.
3.2.1 DC/AC వాల్యూమ్tage Measurement (V~, V=)
- రోటరీ స్విచ్ను సెట్ చేయండి V~ (AC వాల్యూమ్tagఇ) లేదా V= (DC వాల్యూమ్tagఇ) స్థానం.
- రెడ్ టెస్ట్ లీడ్ను దీనికి కనెక్ట్ చేయండి VΩmA టెర్మినల్ మరియు బ్లాక్ టెస్ట్ దారి తీస్తుంది COM టెర్మినల్.
- కొలవవలసిన భాగం లేదా సర్క్యూట్ అంతటా పరీక్ష ప్రోబ్లను సమాంతరంగా కనెక్ట్ చేయండి.
- సంపుటాన్ని చదవండిtagడిస్ప్లేలో ఇ విలువ.
3.2.2 రెసిస్టెన్స్ మెజర్మెంట్ (Ω)
- రోటరీ స్విచ్ను సెట్ చేయండి Ω (నిరోధకత) స్థానం.
- రెడ్ టెస్ట్ లీడ్ను దీనికి కనెక్ట్ చేయండి VΩmA టెర్మినల్ మరియు బ్లాక్ టెస్ట్ దారి తీస్తుంది COM టెర్మినల్.
- నిరోధకతను కొలిచే ముందు సర్క్యూట్ డీ-ఎనర్జైజ్ చేయబడిందని నిర్ధారించుకోండి.
- పరీక్ష ప్రోబ్లను కాంపోనెంట్ అంతటా కనెక్ట్ చేయండి.
- ప్రదర్శనలో నిరోధక విలువను చదవండి.
3.2.3 Continuity Test and Diode Test
- రోటరీ స్విచ్ను సెట్ చేయండి డయోడ్/కొనసాగింపు స్థానం.
- రెడ్ టెస్ట్ లీడ్ను దీనికి కనెక్ట్ చేయండి VΩmA టెర్మినల్ మరియు బ్లాక్ టెస్ట్ దారి తీస్తుంది COM టెర్మినల్.
- నొక్కండి FUNC/Hz button to toggle between Diode Test and Continuity Test.
- For Continuity: Touch the probes to the ends of the circuit. A continuous beep indicates continuity.
- For Diode: Connect the red probe to the anode and the black probe to the cathode. The display shows the forward voltage drop. Reverse the probes; an open circuit (OL) indicates a good diode.
3.2.4 కెపాసిటెన్స్ కొలత (F)
- రోటరీ స్విచ్ను సెట్ చేయండి కెపాసిటెన్స్ స్థానం.
- రెడ్ టెస్ట్ లీడ్ను దీనికి కనెక్ట్ చేయండి VΩmA టెర్మినల్ మరియు బ్లాక్ టెస్ట్ దారి తీస్తుంది COM టెర్మినల్.
- కొలతకు ముందు కెపాసిటర్ పూర్తిగా డిశ్చార్జ్ అయ్యిందని నిర్ధారించుకోండి.
- Connect the test probes across the capacitor terminals.
- డిస్ప్లేలో కెపాసిటెన్స్ విలువను చదవండి.
3.2.5 DC/AC Current Measurement (µA, mA, A)
జాగ్రత్త: Always connect the multimeter in series with the circuit. Never connect it in parallel across a voltage source when measuring current, as this can damage the meter and the circuit.
- Set the rotary switch to the appropriate current range (µA, mA, or A).
- 600mA వరకు విద్యుత్తు కోసం, ఎరుపు పరీక్ష లీడ్ను దీనికి కనెక్ట్ చేయండి VΩmA టెర్మినల్. 10A వరకు కరెంట్ల కోసం, ఎరుపు పరీక్ష లీడ్ను దీనికి కనెక్ట్ చేయండి 10A terminal. The black test lead always goes to COM.
- Open the circuit where current is to be measured and insert the multimeter in series.
- డిస్ప్లేలో ప్రస్తుత విలువను చదవండి.
3.2.6 నాన్-కాంటాక్ట్ వాల్యూమ్tagఇ (NCV) గుర్తింపు
- రోటరీ స్విచ్ను సెట్ చేయండి NCV స్థానం.
- Move the NCV sensing area (top of the meter) close to the AC voltagఇ మూలం.
- The NCV indicator light will illuminate, and the buzzer will sound, with increasing frequency as the meter gets closer to the voltagఇ మూలం.
3.2.7 Temperature Measurement (°C/°F)
- రోటరీ స్విచ్ను సెట్ చేయండి ° C / ° F. స్థానం.
- Connect the temperature probe (if included) to the VΩmA మరియు COM terminals, observing polarity.
- Place the tip of the temperature probe on the object or area whose temperature is to be measured.
- Read the temperature value on the display. Press FUNC/Hz సెల్సియస్ మరియు ఫారెన్హీట్ మధ్య మారడానికి.
3.3 ప్రత్యేక విధులు
- డేటా హోల్డ్: నొక్కండి పట్టుకోండి button to freeze the current reading on the display. Press it again to release.
- Backlight/Flashlight: నొక్కండి Flashlight/Backlight Button to turn on the display backlight. Press and hold to activate the top flashlight. Press again to turn off.
- ఆటోమేటిక్ షట్డౌన్: The multimeter will automatically power off after a period of inactivity to conserve battery life.
4. నిర్వహణ
4.1 శుభ్రపరచడం
మల్టీమీటర్ శుభ్రం చేయడానికి, కేసును ప్రకటనతో తుడవండి.amp వస్త్రం మరియు తేలికపాటి డిటర్జెంట్. అబ్రాసివ్లు లేదా ద్రావకాలను ఉపయోగించవద్దు. శుభ్రపరిచే ముందు పరికరం పవర్ ఆఫ్ చేయబడిందని మరియు ఏదైనా సర్క్యూట్ల నుండి డిస్కనెక్ట్ చేయబడిందని నిర్ధారించుకోండి.
4.2 బ్యాటరీ భర్తీ
When the low battery indicator appears on the display, replace the batteries promptly to ensure accurate readings. Follow the battery installation steps in Section 2.1.
4.3 భద్రతా జాగ్రత్తలు
- Always turn off the multimeter and disconnect test leads before opening the case for battery replacement or fuse inspection.
- Do not operate the meter if the battery cover is not properly closed.
- మీటర్ దెబ్బతిన్నట్లు కనిపిస్తే లేదా టెస్ట్ లీడ్స్పై ఇన్సులేషన్ దెబ్బతిన్నట్లయితే దాన్ని ఉపయోగించవద్దు.
5. ట్రబుల్షూటింగ్
- ప్రదర్శన లేదు: బ్యాటరీలు సరిగ్గా ఇన్స్టాల్ చేయబడ్డాయో లేదో మరియు తగినంత ఛార్జ్ ఉందో లేదో తనిఖీ చేయండి. అవసరమైతే మార్చండి.
- సరికాని రీడింగ్లు: Ensure the rotary switch is set to the correct function and range. Check test lead connections. Verify the circuit is properly connected.
- "OL" on Display: This usually indicates an over-range condition (measurement exceeds the selected range) or an open circuit (e.g., when measuring resistance of an open circuit).
- తక్కువ బ్యాటరీ సూచిక: Replace the batteries as soon as possible to maintain accuracy.
6. స్పెసిఫికేషన్లు
The following table details the technical specifications and measurement ranges for the NJTY T21L Digital Multimeter:

This table details the measurement ranges and accuracies for all functions of the NJTY T21L multimeter.
| పరామితి | స్పెసిఫికేషన్ |
|---|---|
| మోడల్ | T21L |
| DC సంtage | 60mV, 600mV, 6V, 60V, 600V; ±(0.5% reading + 5 digits) |
| AC వాల్యూమ్tage | 60mV, 600mV, 6V, 60V, 600V; ±(1% reading + 4 digits) |
| DC కరెంట్ | 600µA, 6000µA, 60mA, 600mA, 6A, 10A; ±(1.2% reading + 5 digits) for µA/mA, ±(3% reading + 5 digits) for A |
| ఎసి కరెంట్ | 600µA, 6100µA, 60mA, 600mA, 6A, 10A; ±(1.2% reading + 5 digits) for µA/mA, ±(3% reading + 5 digits) for A |
| ప్రతిఘటన | 600Ω, 6kΩ, 60kΩ, 600kΩ, 6MΩ, 60MΩ; ±(0.8% reading + 5 digits) |
| ఫ్రీక్వెన్సీ | 9.999Hz, 99.99Hz, 999.9Hz, 9.999KHz, 99.99KHz, 999.9KHz, 9.999MHz; ±(1.5% reading + 5 digits) |
| కెపాసిటెన్స్ | 6000pF, 60nF, 600nF, 6µF, 60µF, 600µF, 6mF, 60mF, 100mF; ±(4.0% reading + 5 digits) |
| ఉష్ణోగ్రత | -20℃ ~ 1000℃ / -4℉ ~ 1832℉ |
| ఇండక్టెన్స్ | 600µH, 6mH, 60mH, 600mH, 6H, 60H; ±(4.0% reading + 5 digits) |
| డయోడ్ టెస్ట్ | అవును |
| ON-OFF Buzzing (Continuity) | అవును |
| NCV (నాన్-కాంటాక్ట్ వాల్యూమ్tage) | అవును |
| డేటా నిలుపుదల | అవును |
| బ్యాక్లైట్ / ఫ్లాష్లైట్ | అవును |
| స్వయంచాలక షట్డౌన్ | అవును |
| తక్కువ వాల్యూమ్tagఇ సూచిక | అవును |
| ప్రదర్శించు | 6000 గణనలు |
| విద్యుత్ సరఫరా | 3 * 1.5V AAA batteries (Not included) |
| పరిమాణం | 147 * 71 * 45మి.మీ |
| తయారీదారు | ఇవిఎస్కాన్ |
| Manufacturer Reference Number | EVTSCANgfqdsmt5na |
7. వారంటీ మరియు మద్దతు
Specific warranty information for the NJTY T21L Digital Multimeter is not provided in the product details. For warranty claims, technical support, or service inquiries, please contact your retailer or the manufacturer, EVTSCAN, directly. Retain your proof of purchase for any warranty-related requests.