1. పరిచయం
ఈ మాన్యువల్ మీ Keeson CU380 JLDK.30.03.20 సర్దుబాటు చేయగల బెడ్ బేస్ రిమోట్ కంట్రోల్ యొక్క సరైన సెటప్, ఆపరేషన్ మరియు నిర్వహణ కోసం అవసరమైన సూచనలను అందిస్తుంది. సరైన కార్యాచరణను నిర్ధారించడానికి మరియు ఏవైనా సమస్యలను నివారించడానికి దయచేసి ఉపయోగించే ముందు ఈ మాన్యువల్ను పూర్తిగా చదవండి.
2. సెటప్ మరియు జత చేయడం
2.1 బ్యాటరీ ఇన్స్టాలేషన్
రిమోట్ కంట్రోల్కు 2 AAA బ్యాటరీలు అవసరం (చేర్చబడలేదు). ఇన్స్టాల్ చేయడానికి, రిమోట్ వెనుక భాగంలో ఉన్న బ్యాటరీ కంపార్ట్మెంట్ కవర్ను స్లయిడ్ చేయండి. బ్యాటరీలను చొప్పించండి, సరైన ధ్రువణతను (+/-) నిర్ధారించుకోండి. బ్యాటరీ కంపార్ట్మెంట్ కవర్ను సురక్షితంగా మూసివేయండి.
2.2 రిమోట్ జత చేసే విధానం
మీ రిమోట్ కంట్రోల్ ఇప్పటికే మీ సర్దుబాటు చేయగల బెడ్ బేస్తో జత చేయబడకపోతే, ఈ దశలను అనుసరించండి:
- దశ 1: మీ సర్దుబాటు చేయగల బెడ్ బేస్ యొక్క పవర్ కార్డ్ను ఎలక్ట్రికల్ అవుట్లెట్ నుండి డిస్కనెక్ట్ చేయండి. సుమారు 5 సెకన్లు వేచి ఉండి, ఆపై దాన్ని తిరిగి అవుట్లెట్లోకి ప్లగ్ చేయండి.
- దశ 2: పవర్ కార్డ్ను ప్లగ్ చేసిన 10 సెకన్లలోపు, రిమోట్ కంట్రోల్ వెనుక భాగంలో ఉన్న PAIR బటన్ను గుర్తించండి. ఈ PAIR బటన్ను నొక్కి పట్టుకోండి. బటన్ నీలం రంగులో వెలిగిపోతుంది మరియు ఫ్లాషింగ్ ప్రారంభమవుతుంది.
- దశ 3: పెయిర్ బటన్ ఫ్లాషింగ్ ఆగిపోయే వరకు మరియు మీ బెడ్ బేస్ కంట్రోల్ బాక్స్లోని LED లైట్ ఆరిపోయే వరకు దానిని పట్టుకోవడం కొనసాగించండి. పెయిర్ బటన్ను విడుదల చేయండి. రిమోట్ ఇప్పుడు సర్దుబాటు చేయగల బేస్తో జత చేయబడింది.
- దశ 4: విజయవంతమైన జతను నిర్ధారించడానికి అన్ని రిమోట్ ఫంక్షన్లను పరీక్షించండి.

చిత్రం: రిమోట్ కంట్రోల్ జత చేసే సూచనలు, రిమోట్ను బెడ్ బేస్కి కనెక్ట్ చేయడానికి దశలను వివరిస్తాయి.
3. రిమోట్ కంట్రోల్ని ఆపరేట్ చేయడం
రిమోట్ కంట్రోల్ మీ బెడ్ బేస్ను సర్దుబాటు చేయడానికి సహజమైన బటన్లను అందిస్తుంది. బటన్ లేఅవుట్ మరియు వాటి సంబంధిత ఫంక్షన్లతో మిమ్మల్ని మీరు పరిచయం చేసుకోండి:
- తల పైకి/క్రిందికి: మంచం యొక్క తల విభాగాన్ని సర్దుబాటు చేస్తుంది.
- కాలు పైకి/క్రిందికి: మంచం యొక్క పాదాల విభాగాన్ని సర్దుబాటు చేస్తుంది.
- ఫ్లాట్: మంచాన్ని చదునైన స్థానానికి తిరిగి ఇస్తుంది.
- జీరో జి: ఒత్తిడిని తగ్గించడానికి రూపొందించబడిన ముందుగా ప్రోగ్రామ్ చేయబడిన జీరో గ్రావిటీ స్థానాన్ని సక్రియం చేస్తుంది.
- మెమరీ ప్రీసెట్లు (అందుబాటులో ఉంటే): కొన్ని రిమోట్లలో మీకు ఇష్టమైన స్థానాలను సేవ్ చేయడానికి ప్రోగ్రామబుల్ మెమరీ బటన్లు ఉండవచ్చు. నిర్దిష్ట సూచనల కోసం మీ బెడ్ బేస్ మాన్యువల్ని సంప్రదించండి.

చిత్రం: ముందు భాగం view కీసన్ CU380 JLDK.30.03.20 రిమోట్ కంట్రోల్, తల/పాదం సర్దుబాటు, జీరో G మరియు ఇతర ఫంక్షన్ల కోసం బటన్లను ప్రదర్శిస్తుంది.
4. నిర్వహణ
4.1 బ్యాటరీ భర్తీ
రిమోట్ స్పందన మందగించినప్పుడు లేదా పనిచేయడం ఆగిపోయినప్పుడు బ్యాటరీలను మార్చండి. ఎల్లప్పుడూ కొత్త AAA బ్యాటరీలను వాడండి మరియు పాత బ్యాటరీలను బాధ్యతాయుతంగా పారవేయండి.
4.2 శుభ్రపరచడం
రిమోట్ కంట్రోల్ను శుభ్రం చేయడానికి, దానిని మృదువైన, పొడి గుడ్డతో సున్నితంగా తుడవండి. ద్రవ క్లీనర్లు లేదా రాపిడి పదార్థాలను ఉపయోగించడం మానుకోండి, ఎందుకంటే ఇవి రిమోట్ ఉపరితలం లేదా అంతర్గత భాగాలను దెబ్బతీస్తాయి.
5. ట్రబుల్షూటింగ్
5.1 రిమోట్ స్పందించడం లేదు
- బ్యాటరీలు సరిగ్గా ఇన్స్టాల్ చేయబడ్డాయని మరియు అవి అయిపోకుండా చూసుకోండి. అవసరమైతే భర్తీ చేయండి.
- సెక్షన్ 2.2 లోని జత చేసే విధానాన్ని అనుసరించడం ద్వారా రిమోట్ బెడ్ బేస్తో సరిగ్గా జత చేయబడిందో లేదో ధృవీకరించండి.
- బెడ్ బేస్ ఫంక్షనల్ పవర్ అవుట్లెట్కి ప్లగ్ చేయబడిందో లేదో తనిఖీ చేయండి.
5.2 అనుకూలత సమస్యలు
ఈ రిమోట్ కంట్రోల్ ప్రత్యేకంగా కీసన్ CU380 JLDK.30.03.20 సర్దుబాటు చేయగల బెడ్ బేస్ల కోసం రూపొందించబడింది. ఇది యూనివర్సల్ రిమోట్ కాదు. కొనుగోలు చేసే ముందుasing లేదా ఉపయోగించడానికి ప్రయత్నిస్తున్నప్పుడు, మీ బెడ్ బేస్ యొక్క కంట్రోల్ బాక్స్ మోడల్ నంబర్ CU380 JLDK.30.03.20 కి సరిపోలుతుందని నిర్ధారించుకోండి.
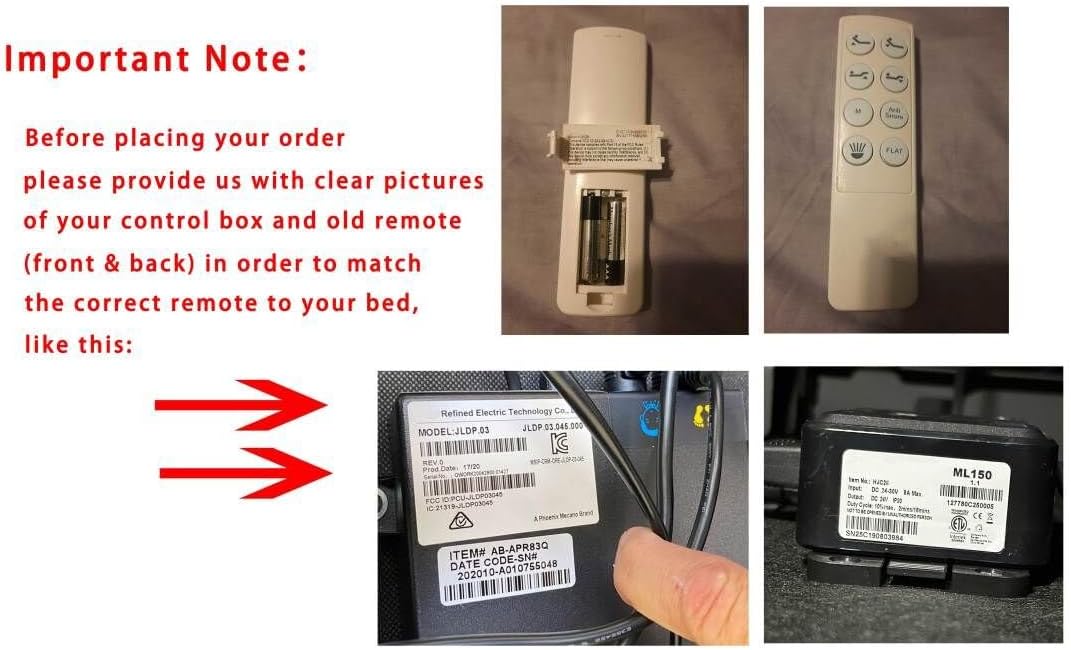
చిత్రం: కంట్రోల్ బాక్స్ మోడల్ నంబర్ను ధృవీకరించడం మరియు అనుకూలత కోసం పాత రిమోట్తో పోల్చడం యొక్క ప్రాముఖ్యతను నొక్కి చెప్పే విజువల్ గైడ్.
6. స్పెసిఫికేషన్లు
- మోడల్: CU380 JLDK.30.03.20 ద్వారా మరిన్ని
- అనుకూల పరికరాలు: సర్దుబాటు చేయగల బెడ్ బేస్ (కీసన్ CU380 JLDK.30.03.20)
- శక్తి మూలం: 2 AAA బ్యాటరీలు (చేర్చబడలేదు)
- రంగు: నలుపు
- ప్రత్యేక ఫీచర్: యూనివర్సల్ రిమోట్ కాదు
7. వారంటీ మరియు మద్దతు
7.1 వారంటీ సమాచారం
ఈ రిమోట్ కంట్రోల్ కోసం నిర్దిష్ట వారంటీ వివరాలు ఉత్పత్తి సమాచారంలో అందించబడలేదు. దయచేసి మీ సర్దుబాటు చేయగల బెడ్ బేస్తో వచ్చిన డాక్యుమెంటేషన్ను చూడండి లేదా వారంటీ విచారణల కోసం అసలు విక్రేతను సంప్రదించండి.
7.2 కస్టమర్ మద్దతు
ఈ మాన్యువల్లో పేర్కొనబడని సమస్యలను మీరు ఎదుర్కొంటే లేదా మరింత సహాయం అవసరమైతే, దయచేసి మీ సర్దుబాటు చేయగల బెడ్ బేస్ విక్రేత లేదా తయారీదారుని సంప్రదించండి. మద్దతును సంప్రదించేటప్పుడు, మీ బెడ్ బేస్, కంట్రోల్ బాక్స్ మరియు రిమోట్ కంట్రోల్ గురించి ఏవైనా సీరియల్ నంబర్లు లేదా మోడల్ ఐడెంటిఫైయర్లతో సహా వివరణాత్మక సమాచారాన్ని అందించండి.