
1. ఉత్పత్తి ముగిసిందిview
The GKG CT-120 Dieseless Lug Crimper Tool is a heavy-duty battery cable crimper designed for a wide range of electrical connections. Its dieseless design eliminates the need for interchangeable dies, accommodating various terminal sizes and types.
- Wide-Range Compatibility: This tool is compatible with AWG 8–4/0 and DIN 10–120mm² battery terminals. It also works with Anderson SB50/SB120/SB175/SB350 and PP75/PP120/PP180 terminals.
- Adjustable Indent Crimp: Features an adjustable single-indent design to suit various closed-barrel terminal types and sizes, ensuring a consistent crimp.
- మన్నికైన నిర్మాణం: Constructed from chrome-vanadium steel, designed to withstand over 10,000 crimp cycles.
- ఎర్గోనామిక్ డిజైన్: A 22.5-inch (57cm) extended lever is designed to reduce the physical effort required for crimping by approximately 30%.
The GKG CT-120 Dieseless Lug Crimper Tool, a heavy-duty tool designed for various electrical crimping tasks.
2. సెటప్ మరియు భాగాలు
Before operation, familiarize yourself with the tool's components and ensure it is clean and free from obstructions.
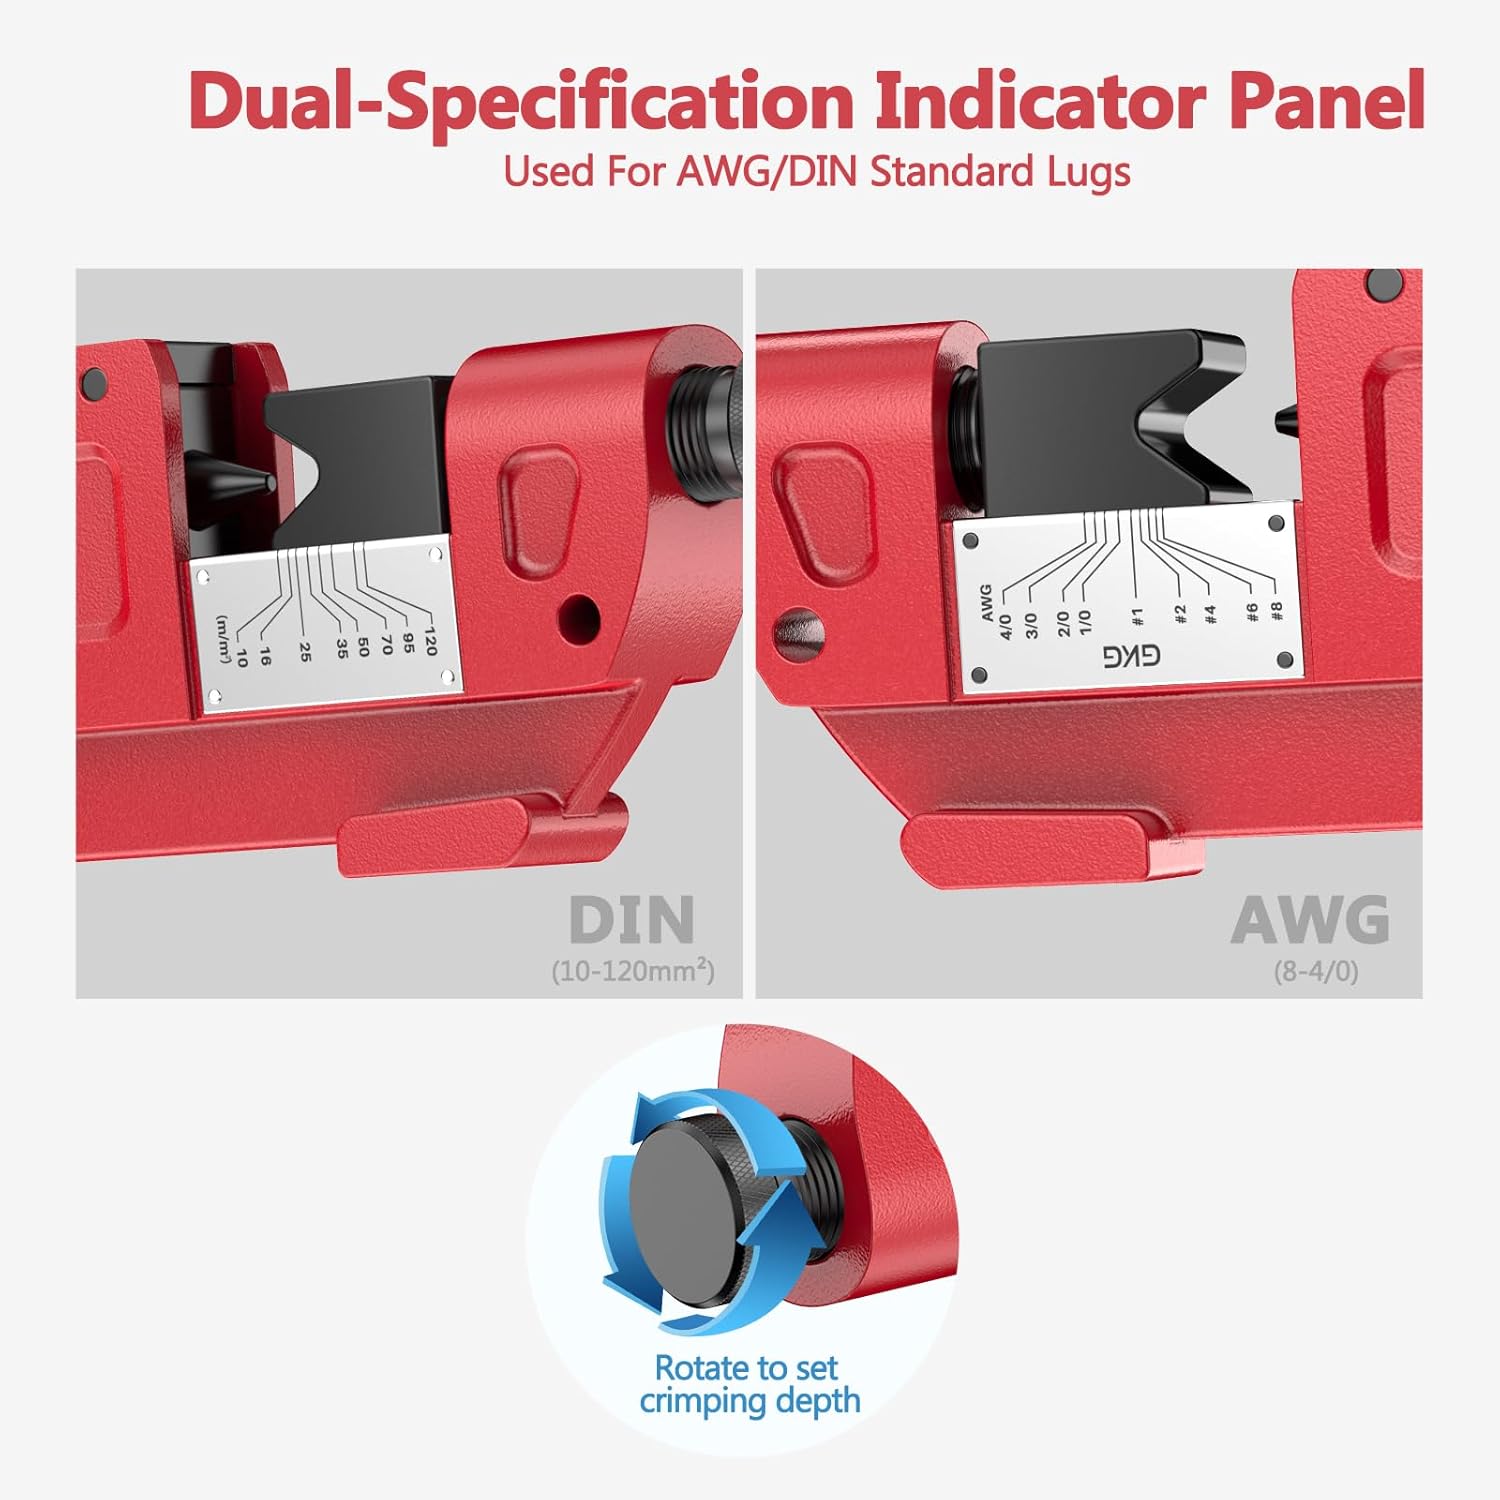
- Adjustable Crimp Screw: Located at the front, this knob allows for fine-tuning of the crimp depth.
- V-Jaw Crimp Dies: The primary crimping mechanism.
- Dual-Specification Indicator Panel: Provides markings for both AWG and DIN/mm² wire sizes to guide crimp depth adjustment.
- Long Lever Handle: Provides leverage for crimping.

క్లోజ్-అప్ view of the GKG CT-120 crimper's dual-specification indicator panel, showing markings for both DIN (10-120mm²) and AWG (8-4/0) standards, along with the rotating knob for setting crimping depth.

An annotated diagram highlighting key components of the GKG CT-120 crimper, including the adjustable crimp screw, V-jaw crimp dies, dual-specification indicator panel, long lever handle, and high-strength alloy steel construction.
3. ఆపరేటింగ్ సూచనలు
Follow these steps for proper crimping:
- Step 1: Set Size. Rotate the adjustable crimp screw to align the desired AWG (8-4/0) or DIN/mm² (10-120) size on the indicator panel. This sets the crimping depth.
- Step 2: Insert. Open the crimper jaws. Insert the terminal and the stripped wire into the V-grip of the dies. Ensure the wire is fully seated within the terminal.
- Step 3: Crimp. Squeeze the handles firmly until resistance is met and the connection feels secure. The dieseless design creates a cross-pattern indent crimp.
- దశ 4: పూర్తయింది! Release the handles and remove the crimped terminal. Inspect the crimp for a secure and proper connection. Note: Adjustment of crimp depth via the knob may be necessary outside of marked scales to achieve optimal wire-to-terminal fit and wall thickness.

A step-by-step visual guide on how to use the GKG CT-120 wire crimper, including setting the size, inserting the terminal and wire, crimping, and verifying the connection.

An illustration demonstrating the cross-pattern indent crimping method, which maximizes surface contact for secure and conductive electrical connections.
Official video demonstrating the use of the GKG CT-120 Battery Cable Lug Crimping Tool for creating secure electrical connections.
4. నిర్వహణ
Proper maintenance ensures the longevity and reliable performance of your GKG CT-120 crimper.
- శుభ్రపరచడం: After each use, wipe down the tool with a clean, dry cloth to remove any dirt, debris, or residue. For stubborn grime, a mild solvent can be used, ensuring to dry the tool thoroughly afterward.
- సరళత: Periodically apply a light machine oil to the pivot points and moving parts to ensure smooth operation and prevent rust.
- నిల్వ: Store the crimper in a dry environment to prevent corrosion. Keep the jaws closed to protect the crimping surfaces.
- తనిఖీ: Regularly inspect the crimping dies for wear or damage. Ensure the adjustment knob turns smoothly and the indicator panel is clear.
5. ట్రబుల్షూటింగ్
ఆపరేషన్ సమయంలో మీరు సమస్యలను ఎదుర్కొంటే, ఈ క్రింది సాధారణ సమస్యలు మరియు పరిష్కారాలను పరిగణించండి:
- Loose Crimp:
- Ensure the correct wire gauge and terminal size are selected.
- Adjust the crimp screw to a deeper setting (smaller number on AWG, larger number on DIN/mm²).
- Verify the wire is fully stripped and inserted into the terminal.
- Difficulty Squeezing Handles:
- The wire or terminal may be too large for the selected setting. Adjust the crimp screw to a shallower setting.
- Ensure the tool is clean and lubricated.
- Damaged Wire/Terminal After Crimping:
- The crimp setting may be too deep. Adjust the crimp screw to a shallower setting.
- Ensure the wire and terminal are correctly aligned in the V-jaw.
6. స్పెసిఫికేషన్లు
| ఫీచర్ | వివరాలు |
|---|---|
| క్రింపింగ్ రేంజ్ | AWG 8 to 4/0 & DIN 10 to 120mm² |
| మెటీరియల్ | క్రోమ్ వెనాడియం స్టీల్ (CR-V) |
| హ్యాండిల్ పొడవు | 22.5 అంగుళాలు (572 మిమీ) |
| సాధనం బరువు | 3.2కిలోలు (7 పౌండ్లు) |
| సర్దుబాటు రకం | Precision Screw Dial |
| మోడల్ సంఖ్య | CT-120 |
| UPC | 793269230027 |

A detailed table outlining the full specifications of the GKG CT-120 crimper, including crimping range, material, handle length, tool weight, and adjustment type.
7. వారంటీ మరియు మద్దతు
For any questions or assistance regarding the GKG CT-120 Dieseless Lug Crimper Tool, please contact GKG customer service. Refer to your purchase documentation for specific warranty details.