1. పరిచయం
Thank you for choosing the ANDELI OPTIM-600LB-NMB Auto-Darkening Welding Helmet. This manual provides essential information for the safe and effective use, setup, operation, and maintenance of your welding helmet. Please read it thoroughly before use and keep it for future reference.
2. భద్రతా సమాచారం
Welding and cutting processes can be hazardous. Always follow safety precautions to prevent personal injury. This welding helmet is designed to protect your eyes and face from sparks, spatter, and harmful ultraviolet (UV) and infrared (IR) radiation under normal welding conditions. It is crucial to understand that this helmet does not provide unlimited protection.
- Always wear appropriate eye protection (safety glasses) under the welding helmet.
- Ensure the helmet is correctly adjusted for your head size and viewing angle before starting any work.
- Do not use the helmet if any part is damaged or if the auto-darkening function is not working correctly.
- Avoid exposing the helmet to extreme temperatures or moisture.
- This helmet is not suitable for laser welding or overhead welding applications.
3. ఉత్పత్తి ముగిసిందిview మరియు ఫీచర్లు
The ANDELI OPTIM-600LB-NMB welding helmet offers advanced features for enhanced safety and comfort during various welding tasks.
3.1. Ultra-Wide Viewప్రాంతం
కేంద్ర viewing area measures 115mm x 82mm, providing a clear and expansive view of your work. Non-auto-darkening side areas further enhance peripheral vision. The lens boasts 1/1/1/2 optical clarity for true color recognition.
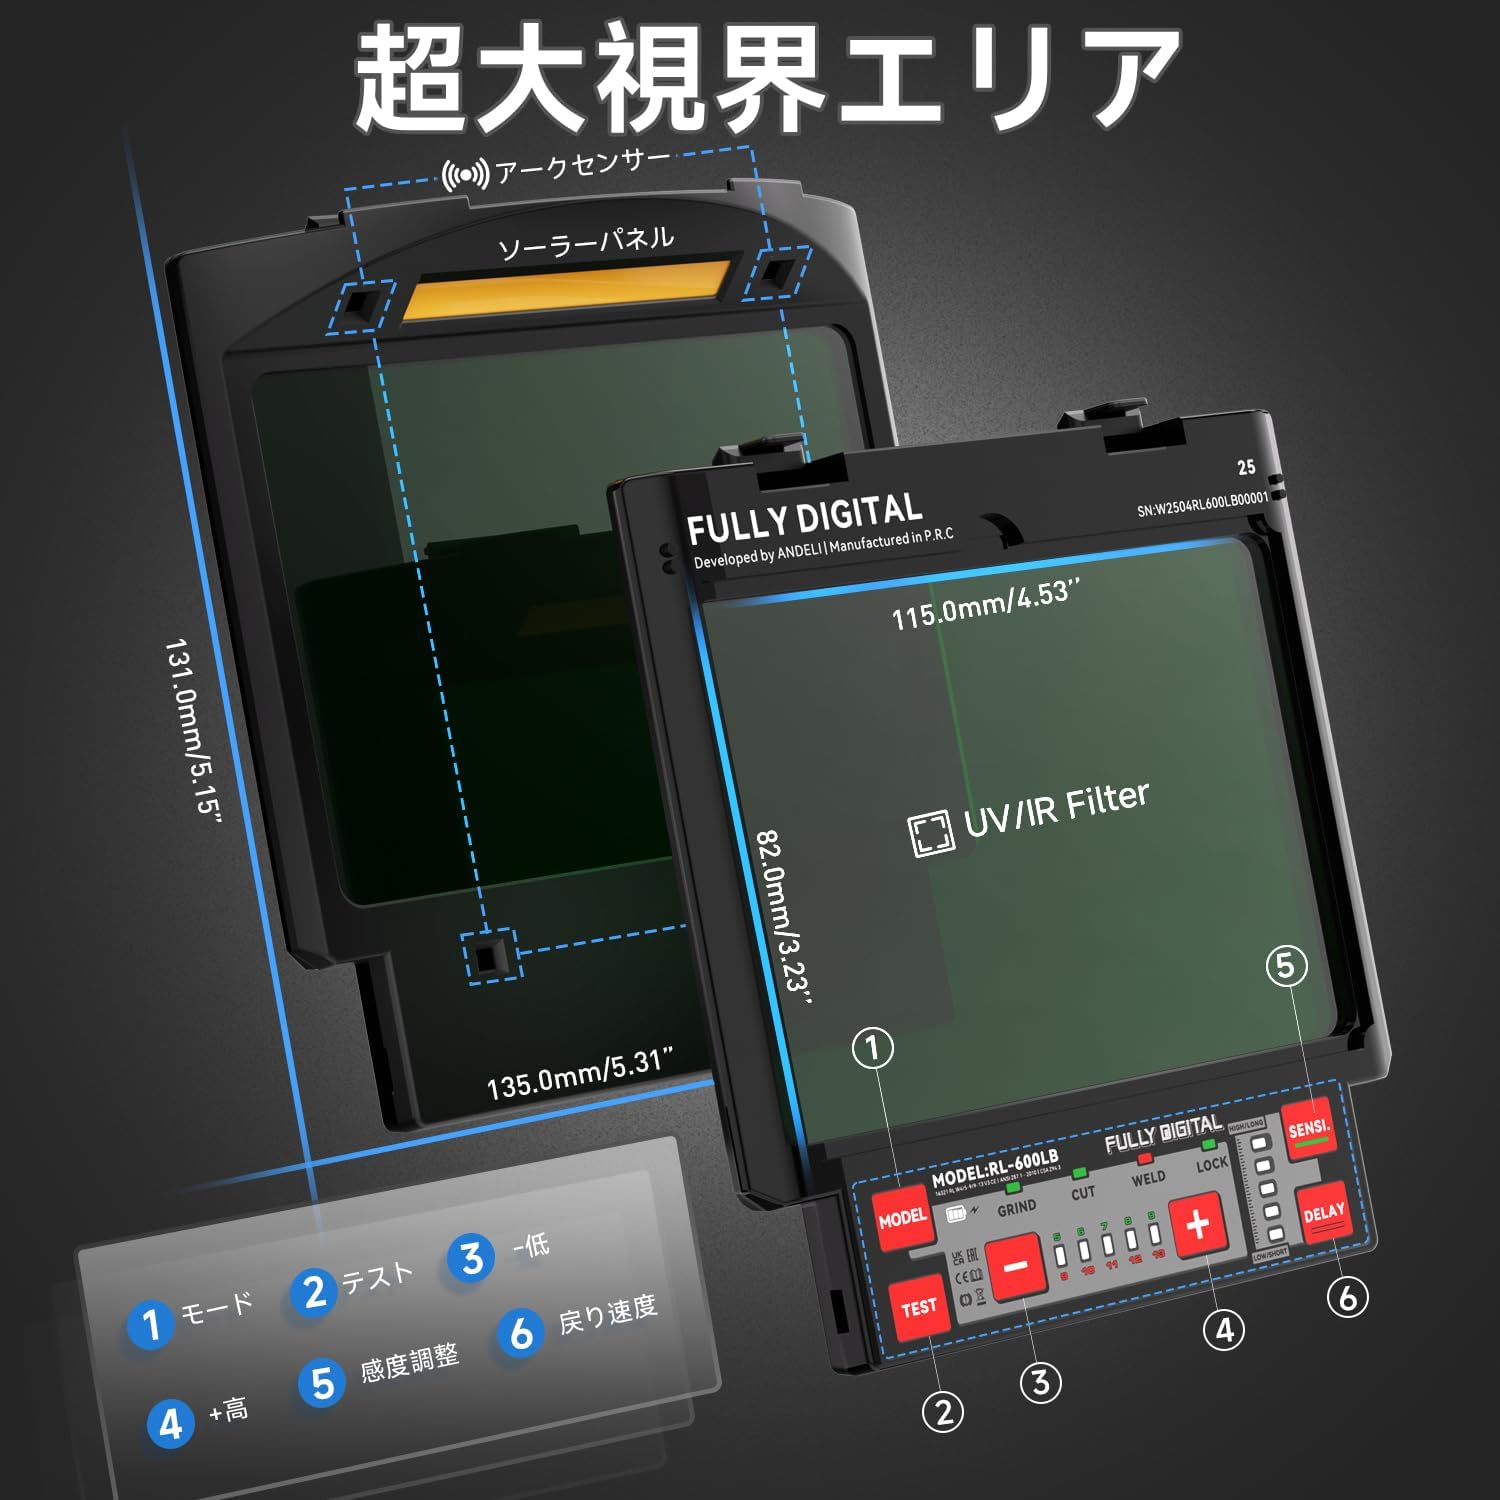
Figure 1: Ultra-Wide Viewప్రాంతం
3.2. Type-C Rechargeable Battery
Equipped with a high-quality 500mAh internal battery, rechargeable via a Type-C port. This provides approximately 2.5 times the operating time compared to CR2032 button cells, eliminating the need for frequent battery replacements and offering an economical solution.

Figure 2: Type-C Charging Feature
3.3. 4 Arc Sensors and Fast Response
The helmet features four high-quality arc sensors and solar panel technology, ensuring a shading speed of less than 1/30000 seconds. This high-sensitivity probe instantly darkens the screen upon arc ignition, providing immediate eye protection. The design is optimized for eye comfort.

Figure 3: 4 Arc Sensors and Rapid Shading
3.4. Lightweight and Comfortable Design
Weighing approximately 560g, the helmet utilizes upgraded lightweight PA material. Its 4-point headgear design with multiple support points and a pivot structure reduces fatigue during extended work periods, making it both lightweight and practical.

Figure 4: Lightweight Design
3.5. Multi-Layer Lens Structure
The helmet features a multi-layer protective lens structure that effectively shields your eyes from UV, IR, and arc light. This design ensures optimal protection and durability.
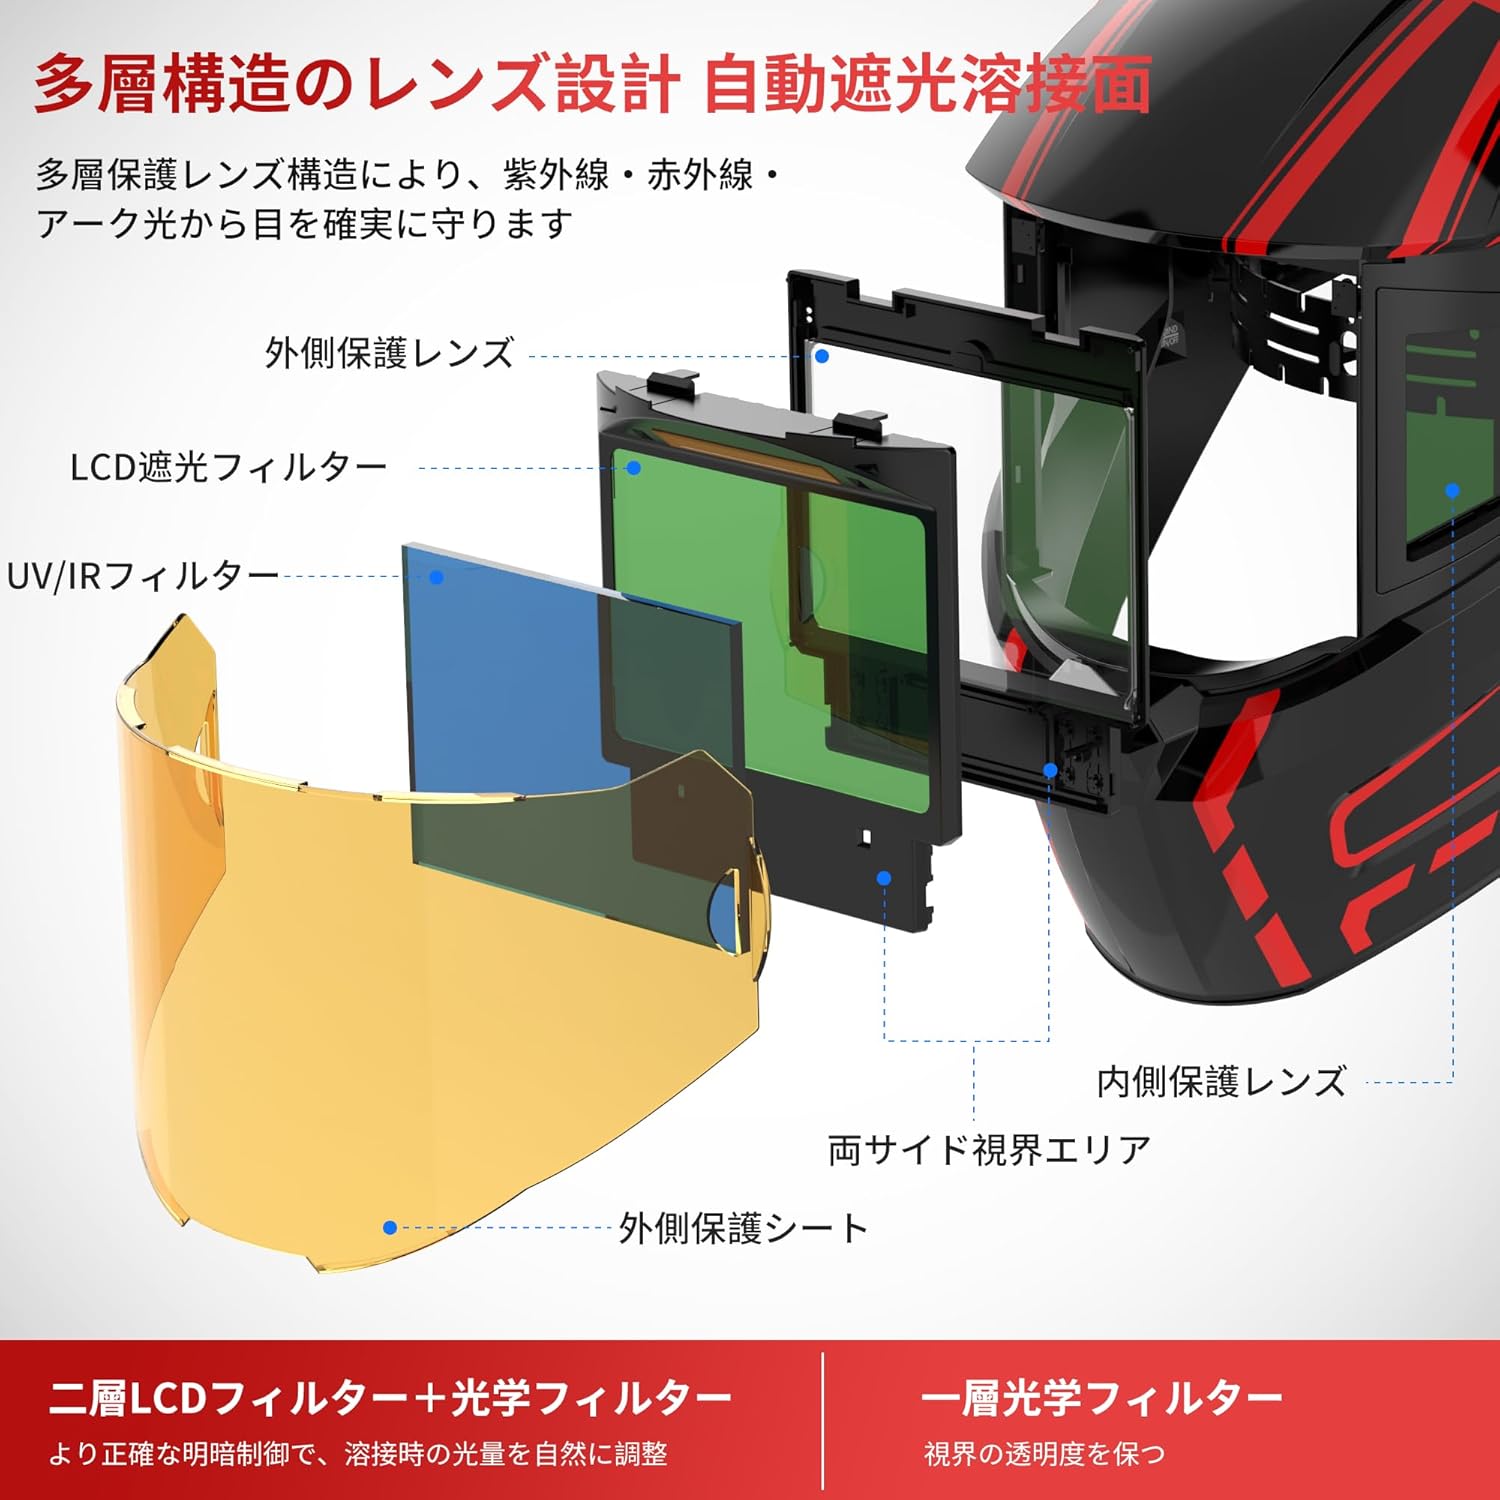
Figure 5: Multi-Layer Lens Design
4. సెటప్
4.1. హెడ్గేర్ సర్దుబాటు
Adjust the headgear to ensure a secure and comfortable fit. The 4-point headgear design allows for multiple points of adjustment to suit various head sizes and preferences.
- పరిమాణం సర్దుబాటు: Use the knob at the back of the headgear to adjust the circumference for a snug fit.
- కోణ సర్దుబాటు: Adjust the pivot points on the sides of the helmet to set the desired angle when the helmet is in the down position.
- దూరం సర్దుబాటు: Ensure the distance between your face and the auto-darkening filter is appropriate for clear vision and comfort.

Figure 6: Headgear Adjustment Points
4.2. ప్రారంభ ఛార్జింగ్
Before first use, fully charge the internal 500mAh battery using the provided Type-C charging cable. Connect the cable to the Type-C port on the helmet and a suitable USB power source. The helmet also features solar charging, which helps maintain the battery level during use.
5. ఆపరేటింగ్ సూచనలు
The OPTIM-600LB-NMB helmet is designed for ease of use with digital controls for various settings.
5.1. పవర్ ఆన్/ఆఫ్ మరియు మోడ్ ఎంపిక
The helmet typically powers on automatically when exposed to light or when an arc is detected. Use the mode selection buttons to choose the appropriate setting for your task:
- WELD Mode: For general welding applications. Adjustable shade levels from DIN 9 to DIN 13.
- CUT Mode: For plasma cutting. Adjustable shade levels from DIN 5 to DIN 8.
- GRIND Mode: For grinding operations. The auto-darkening function is deactivated, and the lens remains in the light state (DIN 3) for clear visibility.

Figure 7: Mode Selection and Shade Adjustment
5.2. Shade Level Adjustment
In WELD or CUT mode, use the digital adjustment buttons (often labeled '+' and '-') to select the desired shade level (DIN 5-8 or DIN 9-13). Refer to welding standards for appropriate shade levels based on your welding process and current.
5.3. సున్నితత్వం సర్దుబాటు
The sensitivity control (digital adjustment button) allows you to adjust how easily the sensors detect the welding arc. Increase sensitivity for low-amp TIG welding or when the arc is partially obscured. Decrease sensitivity to avoid false triggering from ambient light.
5.4. Delay Adjustment
The delay control (digital adjustment button) sets the time the lens remains dark after the welding arc stops. A shorter delay is suitable for tack welding, while a longer delay helps protect eyes from afterglow and reduces eye strain during continuous welding.
5.5. Test Function
Before each use, press the 'TEST' button to verify the auto-darkening function. The lens should momentarily darken and then return to the light state. If it does not function correctly, do not use the helmet for welding.
6. నిర్వహణ
6.1. శుభ్రపరచడం
- హెల్మెట్ షెల్ను తేలికపాటి సబ్బు మరియు నీటితో శుభ్రం చేయండి. కఠినమైన ద్రావకాలను నివారించండి.
- Wipe the auto-darkening filter and protective lenses with a soft, clean cloth. Do not use abrasive materials.
- సమర్థవంతమైన ఛార్జింగ్ని నిర్ధారించడానికి సోలార్ ప్యానెల్ను శుభ్రంగా ఉంచండి.
6.2. బ్యాటరీ సంరక్షణ
The internal 500mAh lithium polymer battery is designed for long life. Recharge it regularly, especially if the helmet has been stored for an extended period. A low battery indicator will alert you when charging is needed.
6.3. నిల్వ
Store the helmet in a dry, cool place, away from direct sunlight and extreme temperatures (-20°C to +70°C). Use the included cloth bag for protection against dust and scratches.
6.4. Replacing Protective Sheets
The outer and inner protective sheets are consumable parts. Replace them when they become scratched, pitted, or too dirty to ensure clear vision and proper function of the auto-darkening filter. Replacement is simple and does not require special tools.
7. ట్రబుల్షూటింగ్
మీ వెల్డింగ్ హెల్మెట్తో మీకు సమస్యలు ఎదురైతే, ఈ క్రింది సాధారణ సమస్యలు మరియు పరిష్కారాలను చూడండి:
- Lens not darkening: Ensure the battery is charged. Check if the arc sensors are clean and unobstructed. Verify the sensitivity setting is appropriate for your welding current.
- పేలవమైన దృశ్యమానత: Clean the protective lenses and the auto-darkening filter. Ensure the correct shade level is selected for your application. Replace scratched protective sheets.
- Inconsistent darkening: Check for proper sensitivity settings. Ensure the arc sensors are not blocked.
- Helmet feels uncomfortable: Re-adjust the headgear for a better fit, including circumference, angle, and distance from the lens.
ఈ పరిష్కారాలను ప్రయత్నించిన తర్వాత కూడా సమస్య కొనసాగితే, కస్టమర్ సపోర్ట్ను సంప్రదించండి.
8. స్పెసిఫికేషన్లు
| ఫీచర్ | స్పెసిఫికేషన్ |
|---|---|
| ఉత్పత్తి మోడల్ | OPTIM-600LB-NMB |
| Viewing Area (Central) | 115mm × 82mm |
| Protective Plate Size (Outer) | 131mm × 135mm × 10mm |
| ఆర్క్ సెన్సార్లు | 4 |
| UV/IR Protection Level | DIN 16 |
| Light State (Shade) | DIN 3 |
| Dark State (Shade) | DIN 5-8 / 9-13 |
| Shading Speed | 1/30000సె |
| ఆపరేటింగ్ ఉష్ణోగ్రత | -5°C నుండి +55°C |
| నిల్వ ఉష్ణోగ్రత | -20°C నుండి +70°C |
| Battery Capacity/Charging Port | 500mAh (టైప్-C) |
| శక్తి మూలం | Solar battery + Lithium polymer battery |
| కనిష్ట వెల్డింగ్ కరెంట్ | ఎసి / డిసి 5 ఎ |
| బరువు (సుమారు.) | 560గ్రా |
| ప్యాకేజీ పరిమాణం | 30 x 25 x 25 సెం.మీ |
| ఉపకరణాలు చేర్చబడ్డాయి | Cloth bag, Outer protective sheet, Inner protective sheet, Type-C charging cable |

చిత్రం 8: ఉత్పత్తి లక్షణాలు మరియు ఉపకరణాలు
9. వారంటీ మరియు మద్దతు
The ANDELI OPTIM-600LB-NMB welding helmet comes with a 1-year manufacturer's warranty from the date of purchase. This warranty covers defects in materials and workmanship under normal use. Please retain your proof of purchase for warranty claims.
For technical support, troubleshooting assistance, or warranty service, please contact the ANDELI Official Store JP customer service through the platform where you purchased the product. Provide your model number (OPTIM-600LB-NMB) and a detailed description of the issue to expedite service.