
1. పరిచయం
This manual provides essential information for the safe and efficient use of your Lenovo Tab K11 Gen 2 TB336ZA Tablet. Please read this manual thoroughly before using your device to ensure proper operation and to prevent damage. Keep this manual for future reference.
2. ఉత్పత్తి ముగిసిందిview
Familiarize yourself with the physical components of your Lenovo Tab K11 Gen 2 TB336ZA Tablet.
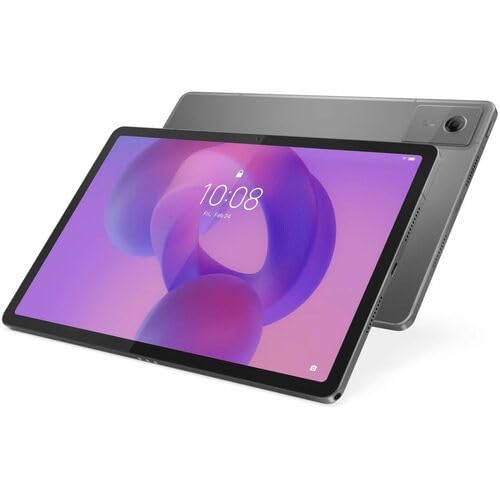
మూర్తి 2.1: ముందు view of the Lenovo Tab K11 Gen 2 TB336ZA Tablet, showing the 11-inch display and front camera.

మూర్తి 2.2: వైపు view of the tablet, highlighting the power button and volume control buttons.

మూర్తి 2.3: దిగువ వైపు view of the tablet, featuring the USB Type-C port for charging and data transfer, along with speaker grilles.

మూర్తి 2.4: పై వైపు view of the tablet, indicating the location of the SIM/microSD card tray.
2.1. భాగాలు మరియు నియంత్రణలు
- పవర్ బటన్: Located on the side, used to turn the tablet on/off or wake/sleep the screen.
- వాల్యూమ్ బటన్లు: ఆడియో వాల్యూమ్ను సర్దుబాటు చేయండి.
- USB టైప్-సి పోర్ట్: For charging the tablet and connecting to a computer for data transfer.
- ముందు కెమెరా: వీడియో కాల్స్ మరియు సెల్ఫీల కోసం 8 మెగాపిక్సెల్ కెమెరా.
- వెనుక కెమెరా: 13 Megapixel camera for photos and videos.
- MicroSD/SIM Card Tray: Insert a Nano SIM card for cellular connectivity and a microSD card for expandable storage.
- స్పీకర్లు: ఆడియో అవుట్పుట్ అందించండి.
- మైక్రోఫోన్లు: For voice input during calls or recordings.
3. సెటప్
3.1. టాబ్లెట్ను ఛార్జ్ చేయడం
Before first use, fully charge your tablet using the provided USB Type-C cable and power adapter. Connect the USB-C cable to the tablet's USB-C port and the adapter to a power outlet. The charging indicator will show the charging status.
3.2. పవర్ చేయడం ఆన్/ఆఫ్
- పవర్ ఆన్ చేయడానికి: Lenovo లోగో కనిపించే వరకు పవర్ బటన్ను నొక్కి పట్టుకోండి.
- పవర్ ఆఫ్ చేయడానికి: పవర్ ఆప్షన్స్ మెనూ కనిపించే వరకు పవర్ బటన్ను నొక్కి పట్టుకోండి, ఆపై "పవర్ ఆఫ్" ఎంచుకోండి.
- పునఃప్రారంభించడానికి: పవర్ ఆప్షన్స్ మెనూ కనిపించే వరకు పవర్ బటన్ను నొక్కి పట్టుకోండి, ఆపై "పునఃప్రారంభించు" ఎంచుకోండి.
3.3. ప్రారంభ ఆకృతీకరణ
Upon first power-on, the tablet will guide you through the initial setup process. This includes selecting your language, connecting to a Wi-Fi network, setting up your Google account, and configuring security options.
3.4. Installing SIM and MicroSD Cards
To install a Nano SIM card for 5G cellular connectivity or a microSD card for additional storage (up to 2 TB):
- టాబ్లెట్ వైపున SIM/మైక్రో SD కార్డ్ ట్రేని గుర్తించండి.
- Insert the SIM ejector tool (not included, typically a paperclip) into the small hole on the tray to eject it.
- Place the Nano SIM card and/or microSD card into the designated slots on the tray, ensuring correct orientation.
- ట్రే సరైన స్థానంలోకి వచ్చే వరకు జాగ్రత్తగా దాన్ని టాబ్లెట్లోకి నెట్టండి.
4. టాబ్లెట్ను ఆపరేట్ చేయడం
4.1. ప్రాథమిక నావిగేషన్
The Lenovo Tab K11 Gen 2 TB336ZA features an 11-inch touchscreen display. Navigate the Android 15 operating system using touch gestures:
- నొక్కండి: ఒక అంశాన్ని ఎంచుకోండి లేదా యాప్ను తెరవండి.
- స్వైప్: స్క్రీన్లు లేదా జాబితాల ద్వారా స్క్రోల్ చేయండి.
- చిటికెడు: చిత్రాలను జూమ్ ఇన్ లేదా అవుట్ చేయండి మరియు web పేజీలు.
- లాంగ్ ప్రెస్: సందర్భోచిత మెనూలను యాక్సెస్ చేయండి లేదా చిహ్నాలను తరలించండి.
4.2 కనెక్టివిటీ
- Wi-Fi: Connect to wireless networks via IEEE 802.11ac (Wi-Fi 5). Go to సెట్టింగ్లు > నెట్వర్క్ & ఇంటర్నెట్ > Wi-Fi కనెక్షన్లను నిర్వహించడానికి.
- బ్లూటూత్: Pair with Bluetooth 5.2 devices such as headphones or speakers. Go to సెట్టింగ్లు> కనెక్ట్ చేయబడిన పరికరాలు> కనెక్షన్ ప్రాధాన్యతలు> బ్లూటూత్.
- 5G సెల్యులార్: If a Nano SIM card is installed and activated, the tablet supports 5G, 4G, GPRS, and EDGE cellular data. Manage cellular settings in సెట్టింగ్లు > నెట్వర్క్ & ఇంటర్నెట్ > మొబైల్ నెట్వర్క్.
- GPS: The tablet includes GPS functionality for location services.
4.3. కెమెరా వినియోగం
The tablet is equipped with an 8 Megapixel front camera and a 13 Megapixel rear camera. Open the Camera app to capture photos and videos. The app provides various modes and settings for different shooting conditions.
4.4. ప్రదర్శన సెట్టింగ్లు
మీ అనుకూలీకరించండి viewఅనుభవం:
- ప్రకాశం: Adjust screen brightness in సెట్టింగ్లు > ప్రదర్శన or via the quick settings panel.
- రిఫ్రెష్ రేట్: The 90 Hz standard refresh rate provides smooth visuals.
- స్క్రీన్ రిజల్యూషన్: The 2.5K (2560 x 1600) IPS display offers crisp images.
5. నిర్వహణ
5.1. టాబ్లెట్ను శుభ్రపరచడం
టాబ్లెట్ స్క్రీన్ మరియు బాడీని శుభ్రం చేయడానికి మృదువైన, మెత్తటి బట్టను ఉపయోగించండి. మొండి మరకల కోసం, కొద్దిగా dampఎలక్ట్రానిక్స్ కోసం రూపొందించిన స్క్రీన్ క్లీనర్ లేదా నీటితో వస్త్రాన్ని శుభ్రం చేయండి. కఠినమైన రసాయనాలు లేదా రాపిడి పదార్థాలను నివారించండి.
5.2. సాఫ్ట్వేర్ నవీకరణలు
Keep your tablet's software up to date to ensure optimal performance and security. The tablet runs on Android 15. Check for updates in సెట్టింగ్లు > సిస్టమ్ > సిస్టమ్ అప్డేట్.
5.3. నిల్వ నిర్వహణ
Regularly manage your 128 GB internal storage. Delete unnecessary files, ఉపయోగించని యాప్లను అన్ఇన్స్టాల్ చేయండి లేదా పెద్దగా తరలించండి files to a microSD card to free up space. You can check storage usage in సెట్టింగ్లు > నిల్వ.
6. ట్రబుల్షూటింగ్
ఈ విభాగం మీ టాబ్లెట్తో మీరు ఎదుర్కొనే సాధారణ సమస్యలను పరిష్కరిస్తుంది.
6.1. Tablet Does Not Power On
- టాబ్లెట్ తగినంత ఛార్జ్ చేయబడిందని నిర్ధారించుకోండి. కనీసం 30 నిమిషాలు దానిని ఛార్జర్కు కనెక్ట్ చేయండి.
- బలవంతంగా రీస్టార్ట్ చేయడానికి పవర్ బటన్ను 10-15 సెకన్ల పాటు నొక్కి పట్టుకోండి.
6.2. Wi-Fi కనెక్టివిటీ సమస్యలు
- Toggle Wi-Fi off and on in సెట్టింగ్లు > నెట్వర్క్ & ఇంటర్నెట్ > Wi-Fi.
- మీ Wi-Fi రూటర్ను పునఃప్రారంభించండి.
- నెట్వర్క్ను మర్చిపోయి తిరిగి కనెక్ట్ చేయండి.
6.3. నెమ్మది పనితీరు
- నేపథ్యంలో నడుస్తున్న ఉపయోగించని అప్లికేషన్లను మూసివేయండి.
- యాప్ల కోసం కాష్ డేటాను క్లియర్ చేయండి.
- తగినంత ఉచిత నిల్వ స్థలం ఉండేలా చూసుకోండి.
- టాబ్లెట్ను పునఃప్రారంభించండి.
6.4. Apps Crashing
- యాప్ కాష్ మరియు డేటాను క్లియర్ చేయండి సెట్టింగ్లు > యాప్లు > [యాప్ పేరు] > నిల్వ & కాష్.
- Google Play Store నుండి యాప్ను దాని తాజా వెర్షన్కు అప్డేట్ చేయండి.
- యాప్ను అన్ఇన్స్టాల్ చేసి మళ్లీ ఇన్స్టాల్ చేయండి.
7. స్పెసిఫికేషన్లు
| ఫీచర్ | స్పెసిఫికేషన్ |
|---|---|
| బ్రాండ్ | లెనోవో |
| మోడల్ పేరు | ZAGX0007US |
| ఉత్పత్తి మోడల్ | TB336ZA |
| ఆపరేటింగ్ సిస్టమ్ | ఆండ్రాయిడ్ 15 |
| ప్రాసెసర్ | MediaTek Dimensity 6300 Octa-core (Cortex A76 Dual-core 2.40 GHz + Cortex A55 Hexa-core 2 GHz) |
| RAM | 8 జిబి LPDDR4X |
| అంతర్గత నిల్వ | 128 GB ఫ్లాష్ మెమరీ |
| విస్తరించదగిన నిల్వ | 2 TB వరకు మైక్రో SD |
| స్క్రీన్ పరిమాణం | 11 అంగుళాలు |
| ప్రదర్శన రకం | ఇన్-ప్లేన్ స్విచింగ్ (IPS) టెక్నాలజీ |
| స్క్రీన్ రిజల్యూషన్ | 2560 x 1600 (2.5K) |
| ప్రకాశం | 500 నిట్ |
| రిఫ్రెష్ రేట్ | 90 Hz |
| ఫ్రంట్ కెమెరా | 8 మెగాపిక్సెల్ |
| వెనుక కెమెరా | 13 మెగాపిక్సెల్ |
| వైర్లెస్ కనెక్టివిటీ | Wi-Fi 5 (IEEE 802.11ac), Bluetooth 5.2 |
| సెల్యులార్ కనెక్టివిటీ | 5G, 4G, GPRS, EDGE (Nano SIM supported) |
| ఓడరేవులు | 1 x USB-C (Hi-Speed USB / USB 2.0, with charging) |
| సెన్సార్లు | Accelerometer, Ambient Light Sensor, Hall Effect Sensor |
| బ్యాటరీ సగటు జీవితం | 8 గంటలు |
| రంగు | లూనా గ్రే |
| అంశం కొలతలు (L x W x మందం) | 10.7"లీ x 7.2"వా x 1.8"వ |
| వస్తువు బరువు | 4 పౌండ్లు |
8. వారంటీ మరియు మద్దతు
According to product information, this device comes with వారంటీ లేదు. For technical support, software updates, and additional resources, please visit the official Lenovo support website or contact Lenovo customer service. You can find more information and support at www.lenovo.com/support.