
1. పరిచయం
The Generic CM300 is a versatile 9-function digital multimeter designed for accurate electrical measurements in various environments. It features a 6000-count backlit LCD for clear readings, Non-Contact Voltage (NCV) detection for safety, and a CAT III 600V safety rating. This manual provides instructions for safe and effective use of your CM300 multimeter.
2. భద్రతా సమాచారం
హెచ్చరిక: Always adhere to safety precautions when using electrical testing equipment. Failure to do so may result in injury or damage to the meter.
- The CM300 is rated for CAT III 600V. Do not exceed these voltagఇ పరిమితులు.
- ఉపయోగించే ముందు ఎల్లప్పుడూ పరీక్ష లీడ్లను దెబ్బతింటుందో లేదో తనిఖీ చేయండి. ఇన్సులేషన్ దెబ్బతింటుంటే భర్తీ చేయండి.
- కొలత నిర్వహించబడటానికి ఫంక్షన్ స్విచ్ సరైన స్థితిలో ఉందని నిర్ధారించుకోండి.
- వాల్యూమ్ను కొలవడానికి ప్రయత్నించవద్దుtage or current on circuits exceeding the meter's maximum ratings.
- Use caution when working with live circuits. Avoid contact with bare wires or terminals.
- పరీక్ష ప్రోబ్స్పై వేళ్లను ఫింగర్ గార్డ్ల వెనుక ఉంచండి.
- ఖచ్చితమైన రీడింగ్లను నిర్ధారించడానికి తక్కువ బ్యాటరీ సూచిక కనిపించినప్పుడు వెంటనే బ్యాటరీలను మార్చండి.
3. ఉత్పత్తి ముగిసిందిview
The CM300 Digital Multimeter includes the main unit and two 42-inch test probes (one red, one black).

Figure 3.1: CM300 Multimeter Rotary Dial and Display
ఈ చిత్రం వివరణాత్మకమైనది చూపిస్తుంది view of the CM300 multimeter's central rotary dial, which is used to select different measurement functions. The backlit LCD display is visible above the dial, and various input jacks are located at the bottom of the device.
3.1 భాగాలు
- LCD డిస్ప్లే: 6000-count backlit display for clear readings.
- Function Rotary Switch: Selects measurement modes.
- ఇన్పుట్ జాక్స్: For connecting test probes (COM, VΩmA, 10A).
- పరీక్ష ప్రోబ్స్: Red (positive) and Black (common/negative).
- NCV సెన్సార్: Located at the top of the meter for non-contact voltagఇ డిటెక్షన్.
- బటన్లు: HOLD/SELECT, REL, BACKLIGHT.
4. సెటప్
4.1 బ్యాటరీ ఇన్స్టాలేషన్
- మల్టీమీటర్ ఆఫ్ చేయబడిందని నిర్ధారించుకోండి.
- మీటర్ వెనుక భాగంలో బ్యాటరీ కంపార్ట్మెంట్ను గుర్తించండి.
- బ్యాటరీ కంపార్ట్మెంట్ కవర్ను తెరవడానికి స్క్రూడ్రైవర్ని ఉపయోగించండి.
- సరైన ధ్రువణతను (+/-) గమనిస్తూ రెండు AAA బ్యాటరీలను చొప్పించండి.
- బ్యాటరీ కంపార్ట్మెంట్ కవర్ను మార్చండి మరియు దానిని స్క్రూతో భద్రపరచండి.
4.2 టెస్ట్ ప్రోబ్లను కనెక్ట్ చేయడం
- "COM" (కామన్) జాక్లోకి బ్లాక్ టెస్ట్ లీడ్ను చొప్పించండి.
- చాలా కొలతలకు (వాల్యూమ్tage, resistance, continuity, capacitance, diode, battery test), insert the red test lead into the "VΩmA" jack.
- For current measurements (up to 10A), insert the red test lead into the "10A" jack.
5. ఆపరేటింగ్ సూచనలు
Before each measurement, ensure the test leads are correctly connected and the function switch is set to the appropriate range.
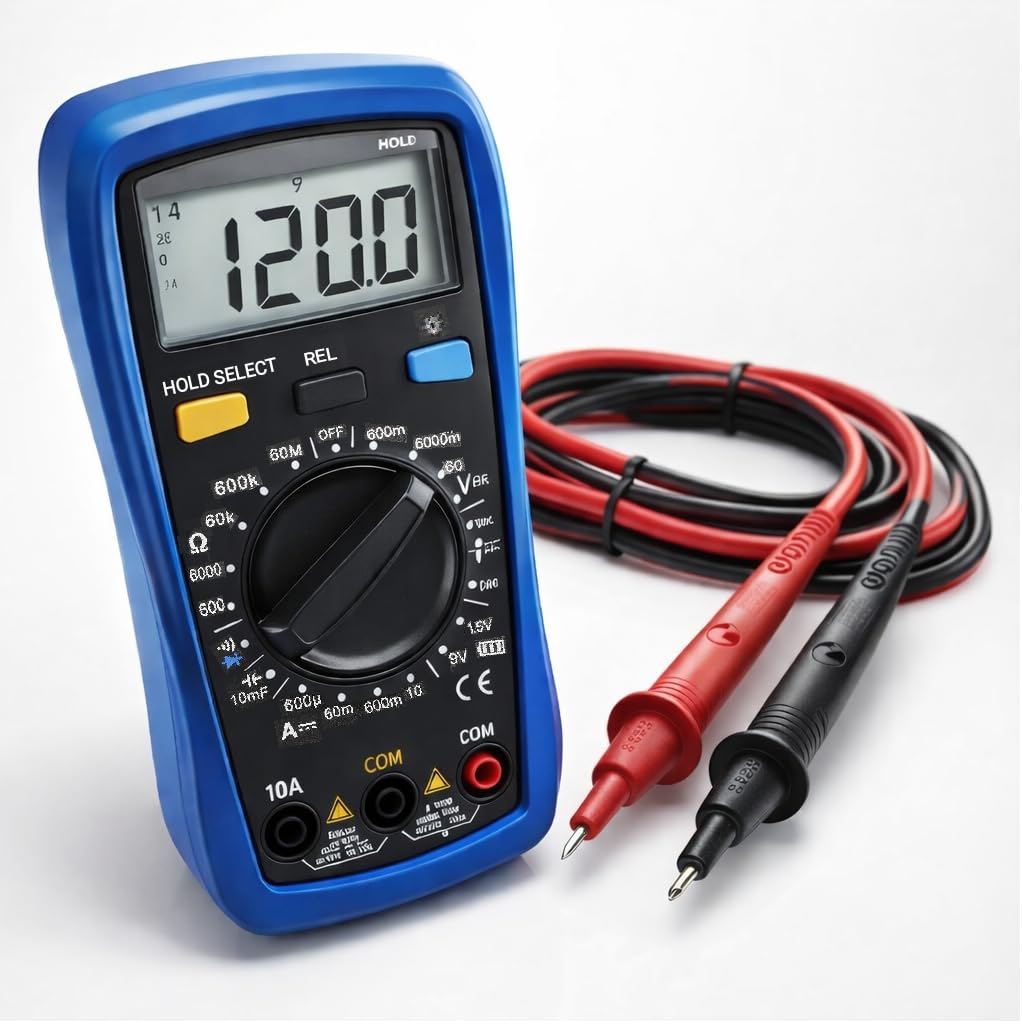
Figure 5.1: Measuring AC Voltage with CM300
This image illustrates the CM300 multimeter in use, displaying a voltage reading. A person is holding the blue multimeter while the red and black test probes are inserted into a standard wall outlet, demonstrating an AC voltagఇ కొలత.
5.1 పవర్ ఆన్/ఆఫ్
Rotate the function switch from "OFF" to any desired measurement function to power on the meter. Rotate it back to "OFF" to power off.
5.2 AC/DC వాల్యూమ్tage Measurement (V~ / V--)
- Set the function switch to the "V~" (AC Voltage) or "V--" (DC Voltagఇ) స్థానం.
- కొలవవలసిన సర్క్యూట్ లేదా కాంపోనెంట్కు సమాంతరంగా పరీక్ష ప్రోబ్లను కనెక్ట్ చేయండి.
- సంపుటాన్ని చదవండిtagఎల్సిడి డిస్ప్లేపై ఇ విలువ.
5.3 DC Current Measurement (A--)
- హెచ్చరిక: Ensure the red test lead is in the "10A" jack for current measurements up to 10A, or "VΩmA" for lower current ranges.
- Set the function switch to the "A--" position.
- కరెంట్ కొలవవలసిన సర్క్యూట్ను తెరిచి, మీటర్ను సిరీస్లో కనెక్ట్ చేయండి.
- LCD డిస్ప్లేలో ప్రస్తుత విలువను చదవండి.
5.4 రెసిస్టెన్స్ మెజర్మెంట్ (Ω)
- Set the function switch to the "Ω" position.
- నిరోధకతను కొలిచే ముందు సర్క్యూట్ డీ-ఎనర్జైజ్ చేయబడిందని నిర్ధారించుకోండి.
- కొలవవలసిన భాగం అంతటా పరీక్ష ప్రోబ్లను కనెక్ట్ చేయండి.
- LCD డిస్ప్లేలో నిరోధక విలువను చదవండి.
5.5 Diode Test (->|-)
- Set the function switch to the "->|-" (Diode) position.
- Connect the red probe to the anode and the black probe to the cathode of the diode.
- ఒక ముందు సంపుటిtage drop will be displayed. Reverse the probes; an open circuit (OL) should be displayed for a good diode.
5.6 Capacitance Measurement (10mF)
- Set the function switch to the "10mF" (Capacitance) position.
- హెచ్చరిక: Discharge capacitors before testing to prevent electric shock or damage to the meter.
- Connect the test probes across the capacitor terminals.
- LCD డిస్ప్లేలో కెపాసిటెన్స్ విలువను చదవండి.
5.7 Audible Continuity ()))
- Set the function switch to the ")))" (Continuity) position.
- సర్క్యూట్ డి-ఎనర్జైజ్ చేయబడిందని నిర్ధారించుకోండి.
- సర్క్యూట్ లేదా కాంపోనెంట్ అంతటా పరీక్ష ప్రోబ్లను కనెక్ట్ చేయండి.
- If resistance is below approximately 50Ω, the buzzer will sound, indicating continuity.
5.8 Battery Test (1.5V / 9V)
- Set the function switch to the "1.5V" or "9V" battery test position.
- Connect the red probe to the positive terminal and the black probe to the negative terminal of the battery.
- ప్రదర్శన బ్యాటరీ వాల్యూమ్ను చూపుతుందిtage.
5.9 నాన్-కాంటాక్ట్ వాల్యూమ్tagఇ (NCV)
- Set the function switch to the "NCV" position.
- Move the top of the meter near a live conductor.
- The meter will beep and the NCV indicator will light up when AC voltagఇ గుర్తించబడింది.
5.10 Data Hold (HOLD)
Press the "HOLD" button to freeze the current reading on the display. Press it again to release and resume live readings.
5.11 Relative Mode (REL)
Press the "REL" button to store the current reading as a reference value. Subsequent measurements will be displayed as the difference from this reference. Press again to exit relative mode.
5.12 బ్యాక్లైట్
Press the "BACKLIGHT" button to turn on the display backlight for better visibility in dim conditions. Press again to turn it off.
6. నిర్వహణ
6.1 శుభ్రపరచడం
Wipe the meter with a damp వస్త్రం మరియు తేలికపాటి డిటర్జెంట్. అబ్రాసివ్లు లేదా ద్రావకాలను ఉపయోగించవద్దు. ఉపయోగించే ముందు మీటర్ పొడిగా ఉందని నిర్ధారించుకోండి.
6.2 బ్యాటరీ భర్తీ
Refer to Section 4.1 for battery installation instructions. Replace batteries when the low battery indicator appears on the display.
6.3 ఫ్యూజ్ రీప్లేస్మెంట్
If the current measurement function stops working, the fuse may need replacement. This procedure should only be performed by qualified personnel. Contact support for assistance.
7. ట్రబుల్షూటింగ్
| సమస్య | సాధ్యమైన కారణం | పరిష్కారం |
|---|---|---|
| మీటర్ పవర్ ఆన్ అవ్వదు. | డెడ్ లేదా తప్పుగా ఇన్స్టాల్ చేయబడిన బ్యాటరీలు. | బ్యాటరీ ధ్రువణతను తనిఖీ చేయండి; బ్యాటరీలను భర్తీ చేయండి. |
| "OL" (ఓవర్లోడ్) ప్రదర్శించబడింది. | Input value exceeds selected range or meter's maximum. | Select a higher range or ensure input is within meter's limits. |
| సరికాని రీడింగ్లు. | Low battery, incorrect function selected, or damaged test leads. | Replace batteries, verify function switch, inspect and replace test leads if damaged. |
| కంటిన్యుటీ బీప్ లేదు. | Circuit resistance too high, or open circuit. | Check the circuit for breaks; ensure resistance is below 50Ω. |
8. స్పెసిఫికేషన్లు
| ఫీచర్ | స్పెసిఫికేషన్ |
|---|---|
| మోడల్ | CM300 |
| ప్రదర్శించు | 6000-Count Backlit LCD |
| AC/DC వాల్యూమ్tagఇ పరిధి | 1 ఎంవి - 600 వి |
| DC ప్రస్తుత పరిధి | 10A వరకు |
| ప్రతిఘటన పరిధి | 60MΩ వరకు |
| కెపాసిటెన్స్ పరిధి | 10,000 µF వరకు |
| భద్రతా రేటింగ్ | CAT III 600V, ETL Certified |
| శక్తి మూలం | 2 x AAA బ్యాటరీలు |
| చేర్చబడిన భాగాలు | CM300 Digital Multimeter, two 42 in. test probes |
| కొలతలు | 8 x 4 x 2.5 అంగుళాలు |
| బరువు | 4 పౌండ్లు |
| ప్రత్యేక లక్షణాలు | NCV, Data Hold, Relative Mode, Backlight, Audible Continuity, Diode Test, Battery Test |
9. వారంటీ మరియు మద్దతు
The Generic CM300 Digital Multimeter comes with a 30-day return policy. For technical support or warranty inquiries, please contact your retailer or the manufacturer.