
1. పరిచయం
This manual provides detailed instructions for the installation, maintenance, and troubleshooting of your new Generic replacement laptop bottom case for HP 17-CP series laptops. This product is designed to replace a damaged or worn original bottom enclosure, restoring the structural integrity and appearance of your device.
అనుకూల నమూనాలు:
- HP 17-CP2034NO
- HP 17-CP2035NM
- HP 17-CP2036NM
- HP 17-CP2036NO
- HP 17-CP2037NF
- HP 17-CP2038NB
- HP 17-CP2039NB
- HP 17-CP2039NF
- HP 17-CP2040NB
Please verify your laptop model number before proceeding with installation to ensure compatibility.
2. భద్రతా సమాచారం
ఎలక్ట్రానిక్ భాగాలతో పనిచేయడంలో జాగ్రత్త అవసరం. దయచేసి ఈ క్రింది భద్రతా మార్గదర్శకాలను గమనించండి:
- పవర్ డిస్కనెక్ట్ చేయండి: Always ensure your laptop is powered off and disconnected from the AC adapter before beginning any disassembly or installation. Remove the battery if it is externally accessible.
- స్టాటిక్ ఎలక్ట్రిసిటీ: Static discharge can damage sensitive electronic components. Use an anti-static wrist strap or frequently touch a grounded metal object to discharge static electricity.
- సరైన ఉపకరణాలు: Use appropriate tools for laptop disassembly to prevent damage to screws or plastic components.
- వృత్తిపరమైన సహాయం: If you are unsure about any step or uncomfortable performing the installation yourself, seek assistance from a qualified technician.
3. ప్యాకేజీ విషయాలు
ప్యాకేజీని తెరిచినప్పుడు అన్ని వస్తువులు ఉన్నాయని మరియు దెబ్బతినకుండా ఉన్నాయని ధృవీకరించండి:
- 1x Generic Laptop Bottom Case (Silver)
Note: Screws and other internal components are not included and should be reused from your original laptop.
4. సెటప్ మరియు ఇన్స్టాలేషన్
This section outlines the general procedure for replacing the laptop bottom case. Specific steps may vary slightly depending on your exact laptop model.
4.1. ప్రీ-ఇన్స్టాలేషన్ తనిఖీలు
- మీ ల్యాప్టాప్ పవర్ ఆఫ్ చేయబడిందని మరియు అన్ప్లగ్ చేయబడిందని నిర్ధారించుకోండి.
- Gather necessary tools: small Phillips head screwdriver, plastic prying tool (spudger).
- శుభ్రంగా, బాగా వెలిగే, మరియు స్థిరత్వం లేని కార్యస్థలాన్ని సిద్ధం చేయండి.
4.2. Disassembly of Old Bottom Case
- Turn the laptop upside down on a soft, clean surface.
- Locate and remove all visible screws securing the bottom case. Pay attention to screw lengths and locations, as they may vary. It is recommended to organize them.
- Carefully use a plastic prying tool to gently separate the old bottom case from the main chassis. Start from a corner or edge and work your way around, releasing any plastic clips. Avoid excessive force to prevent damage.
- Once all clips are released, carefully lift and remove the old bottom case.
4.3. Installation of New Bottom Case
- Align the new bottom case with the laptop chassis. Ensure all internal components (such as speakers, cables, or ports) are clear and not obstructed.
- Gently press down around the edges of the new bottom case until you hear or feel the plastic clips snap into place.
- Reinsert all screws that were removed in step 4.2.2. Tighten them securely but do not overtighten, as this can strip the screw threads or crack the plastic.
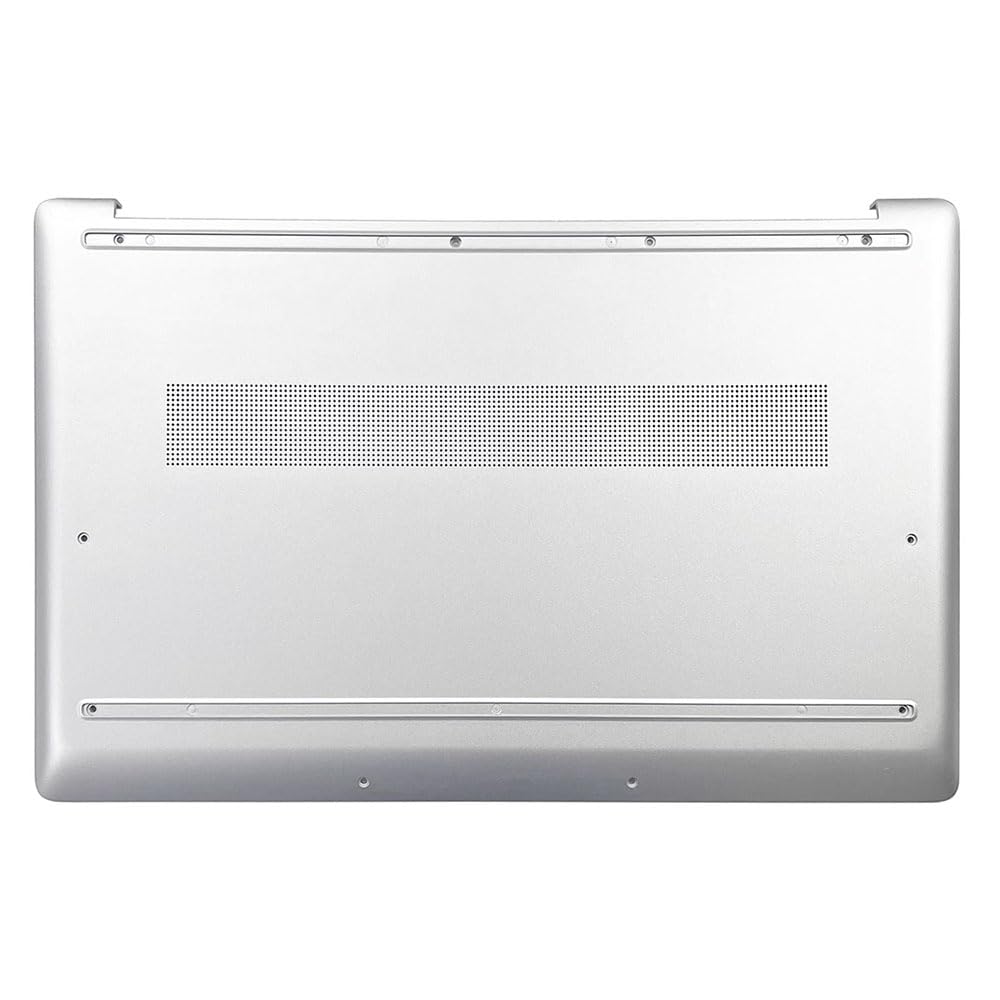
మూర్తి 1: ఇంటీరియర్ view of the replacement laptop bottom case. It features multiple screw mounting points around the perimeter and a large ventilation grille in the center, designed for optimal airflow and secure attachment to the laptop chassis.
4.4. Post-installation Checks
- Ensure the bottom case is flush with the rest of the laptop chassis and there are no gaps.
- Gently try to flex the case to confirm it is securely attached.
- Reconnect the AC adapter and power on the laptop to ensure normal operation.
5. ఆపరేటింగ్
Once the bottom case is installed, your laptop should operate as normal. The new bottom case provides structural support and protection for internal components. Ensure that the laptop is always placed on a stable, flat surface to prevent undue stress on the chassis.
6. నిర్వహణ
To ensure the longevity and appearance of your laptop bottom case:
- శుభ్రపరచడం: ఉపరితలాన్ని మృదువైన, డితో తుడవండిamp వస్త్రం. కఠినమైన రసాయనాలు లేదా రాపిడి క్లీనర్లను నివారించండి.
- వెంటిలేషన్: Keep the ventilation grille clear of dust and debris to ensure proper airflow and prevent overheating. Periodically clean the grille with compressed air.
- నిర్వహణ: Avoid dropping the laptop or subjecting it to impacts, which can damage the bottom case and internal components.
7. ట్రబుల్షూటింగ్
If you encounter issues after installing the new bottom case, consider the following:
- Case Not Fitting Flush: Double-check that all internal components are correctly seated and not obstructing the case. Ensure all clips are engaged and screws are tightened.
- వదులుగా ఉండే మరలు: If the case feels loose, re-examine all screw points. Ensure you are using the correct screws for each location and they are tightened appropriately.
- ల్యాప్టాప్ ఆన్ కావడం లేదు: This is unlikely to be directly caused by the bottom case itself. Recheck all internal connections if you opened the laptop beyond just replacing the bottom case. Ensure the battery and power cable are properly connected.
8. స్పెసిఫికేషన్లు
| ఫీచర్ | వివరాలు |
|---|---|
| ఉత్పత్తి రకం | Laptop Bottom Case / Base Enclosure |
| అనుకూలత | HP 17-CP Series Laptops (e.g., 17-CP2034NO, 17-CP2035NM, etc.) |
| రంగు | వెండి |
| మెటీరియల్ | Plastic (typical for laptop chassis) |
| ఉత్పత్తి కొలతలు | 16.93 x 7.09 x 2.76 అంగుళాలు |
| వస్తువు బరువు | 2.64 పౌండ్లు |
| తయారీదారు | సాధారణమైనది |
| ASIN | B0GJSSQ5CG |
9. వారంటీ
ఈ ఉత్పత్తి a తో వస్తుంది 90-రోజుల వారంటీ from the date of purchase. This warranty covers manufacturing defects. It does not cover damage resulting from improper installation, accidental damage, misuse, or unauthorized modifications. Please retain your proof of purchase for warranty claims.
10. మద్దతు
For further assistance, technical support, or warranty inquiries, please contact the seller or manufacturer through the platform where the product was purchased. When contacting support, please provide your order number and a detailed description of the issue.
ముఖ్యమైన: Before contacting support, please ensure you have carefully reviewed this manual and followed all installation steps.