ఉత్పత్తి ముగిసిందిview
The Moog K9127 Control Arm and Ball Joint Assembly is engineered to restore like-new steering and handling performance in your vehicle. This assembly is a critical component in your vehicle's suspension system, connecting the steering knuckle to the vehicle frame and allowing for vertical movement of the wheel while maintaining proper alignment.
Moog Problem Solver products incorporate proven design and engineering features to ensure durability and optimal performance. This assembly is designed for easy installation and is preferred by professional technicians for its reliability and precision.
ముఖ్య లక్షణాలు:
- ఇన్స్టాల్ చేయడం సులభం: Designed for straightforward replacement.
- Restores like-new steering and handling: Improves vehicle control and ride comfort.
- Moog engineering-validated construction and design: Ensures high quality and performance.
- Addresses premature tire wear: Helps prevent issues caused by loose or worn chassis parts.
- Problem Solver technology: Incorporates advanced design and engineering for enhanced durability.
సెటప్ మరియు ఇన్స్టాలేషన్
Installation of the Moog K9127 Control Arm and Ball Joint Assembly requires mechanical knowledge and appropriate tools. It is recommended that installation be performed by a certified automotive technician to ensure proper fitment and safety.
సాధారణ ఇన్స్టాలేషన్ మార్గదర్శకాలు:
- మొదటి భద్రత: Always use appropriate safety gear, including eye protection and gloves. Ensure the vehicle is securely supported on jack stands or a lift.
- వాహన తయారీ: Lift the vehicle and remove the wheel. Locate the existing control arm and ball joint assembly.
- కాంపోనెంట్ తొలగింపు: Carefully disconnect the ball joint from the steering knuckle and unbolt the control arm from the vehicle frame. Note the orientation of all components.
- New Assembly Installation: Position the new Moog K9127 assembly. Securely bolt the control arm to the frame and connect the ball joint to the steering knuckle. Ensure all fasteners are torqued to the manufacturer's specifications.
- చివరి తనిఖీలు: Reinstall the wheel and lower the vehicle. It is highly recommended to perform a wheel alignment after replacing suspension components to ensure proper vehicle handling and tire longevity.
Refer to your vehicle's specific service manual for detailed, step-by-step installation instructions and torque specifications.
ఆపరేటింగ్ ప్రిన్సిపల్స్
The Moog K9127 Control Arm and Ball Joint Assembly functions as a critical link in your vehicle's independent suspension system. It allows the wheel to move vertically in response to road imperfections while maintaining the correct wheel alignment and geometry for optimal steering and handling.
The ball joint component facilitates pivotal movement, allowing the steering knuckle to turn and pivot as the suspension moves. The control arm itself provides structural support and defines the arc of the wheel's movement. Proper functioning of this assembly is essential for safe and stable vehicle operation, precise steering response, and even tire wear.
నిర్వహణ
The Moog K9127 Control Arm and Ball Joint Assembly is designed for long-lasting performance with minimal maintenance. However, regular inspection of your vehicle's suspension components is crucial for identifying potential issues early.
తనిఖీ మార్గదర్శకాలు:
- దృశ్య తనిఖీ: During routine vehicle service (e.g., oil changes, tire rotations), visually inspect the control arm and ball joint for any signs of damage, corrosion, or worn rubber bushings.
- బూట్ సమగ్రత: Check the rubber boot covering the ball joint. If it is torn, cracked, or missing, contaminants can enter the joint, leading to premature wear.
- Play Check: With the vehicle lifted and supported, check for excessive play in the ball joint by attempting to move the wheel vertically and horizontally while observing the joint. Any noticeable looseness indicates wear.
- నాయిస్ డిటెక్షన్: Listen for unusual noises (e.g., clunking, squeaking) coming from the suspension, especially when going over bumps or turning. These can be indicators of worn suspension components.
If any signs of wear or damage are detected, it is recommended to have the component inspected and replaced by a qualified technician to maintain vehicle safety and performance.
సాధారణ సమస్యలను పరిష్కరించడం
Issues related to control arms and ball joints often manifest as changes in vehicle handling or audible noises. Addressing these symptoms promptly can prevent further damage and ensure driving safety.
| లక్షణం | సాధ్యమైన కారణం | పరిష్కారం |
|---|---|---|
| Clunking or popping noise over bumps | Worn ball joint or control arm bushings | Inspect and replace the control arm and ball joint assembly. |
| Excessive play in steering wheel | Worn ball joint or other steering/suspension components | Have a professional inspect the entire steering and suspension system. |
| Uneven tire wear (e.g., feathering, cupping) | Misalignment due to worn suspension parts, including control arm | Replace worn components and perform a wheel alignment. |
| Vehicle pulling to one side | Worn control arm, ball joint, or alignment issues | Inspect suspension components and perform a wheel alignment. |
If you experience any of these symptoms, it is crucial to have your vehicle inspected by a qualified technician immediately to diagnose and rectify the issue.
స్పెసిఫికేషన్లు
| గుణం | వివరాలు |
|---|---|
| బ్రాండ్ | మూగ్ |
| మోడల్ సంఖ్య | K9127 |
| సరిపోయే రకం | వాహనం నిర్దిష్ట ఫిట్ |
| మెటీరియల్ | Rubber Bushings |
| వస్తువు బరువు | 3.8 పౌండ్లు |
| ఉత్పత్తి కొలతలు | 16.5 x 3.5 x 3.5 అంగుళాలు |
| తయారీదారు | Federal Mogul |
| UPC | 080066140360 |
| ASIN | B000C5A0VC |
| మొదటి తేదీ అందుబాటులో ఉంది | డిసెంబర్ 2, 2005 |
ఉత్పత్తి చిత్రాలు

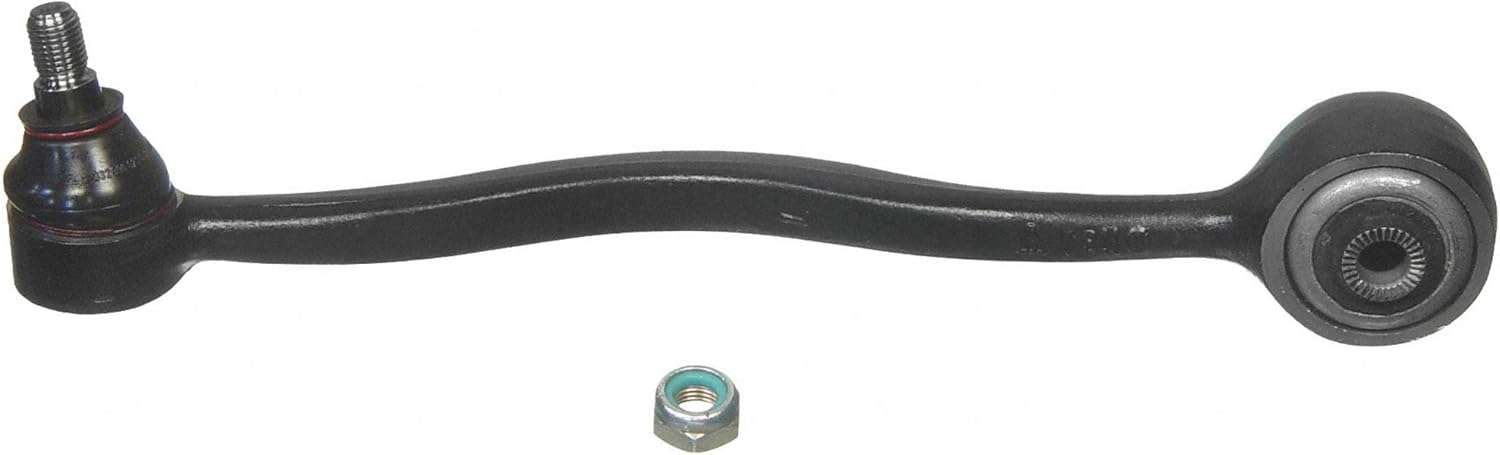
చిత్రం 1: The Moog K9127 Control Arm and Ball Joint Assembly, showcasing the main component with its integrated ball joint and the included protective boot and nut. This view highlights the overall shape and design of the assembly.
చిత్రం 2: ఒక వైపు view of the Moog K9127 Control Arm and Ball Joint Assembly, providing a clearer perspective of the ball joint stud and the arm's curvature. The included nut is also visible.
అదనపు సమాచారం మరియు మద్దతు
For further technical assistance, detailed installation guides, or warranty information, please refer to the official MOOG website or contact their customer support. Always ensure you are using genuine MOOG parts for optimal performance and safety.
You can visit the official MOOG store on Amazon for more products and information: MOOG Store


