1. పరిచయం
This manual provides detailed instructions for the setup, operation, and maintenance of your Vibe Axcess 5-in-1 Universal Remote. Please read this manual thoroughly before using the remote control to ensure proper functionality and to maximize your user experience. This remote is designed to control up to five different audio/video devices.
2. ఉత్పత్తి ముగిసిందిview
The Vibe Axcess 5-in-1 Universal Remote is designed to consolidate control of multiple home entertainment devices into a single unit. It features dedicated buttons for various functions and device types.
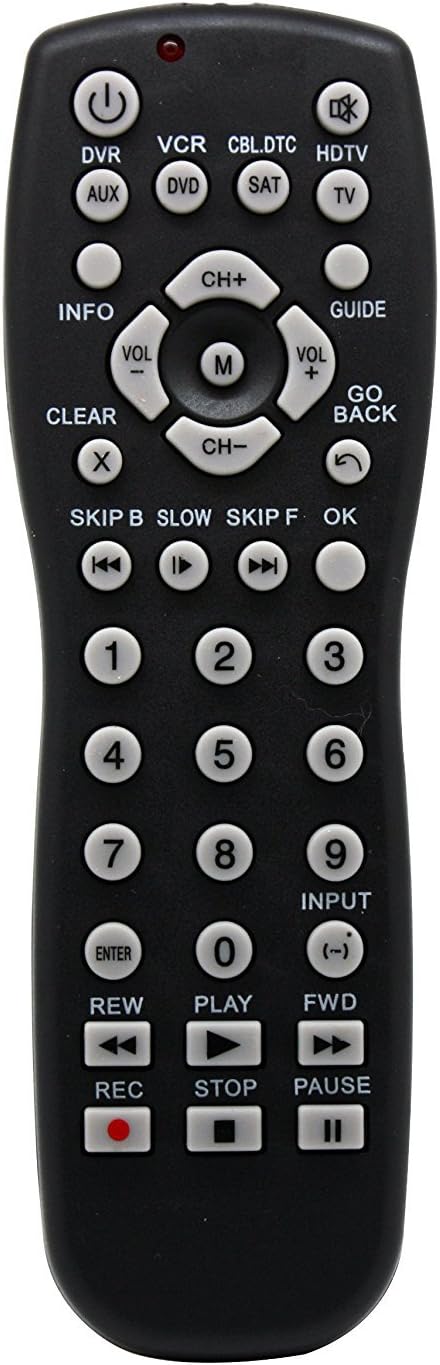
మూర్తి 1: ముందు view of the Vibe Axcess 5-in-1 Universal Remote. This image displays the remote's layout, including device selection buttons (DVR, VCR, CBL.DTC, HDTV, AUX, DVD, SAT, TV), navigation pad, number keys, and media control buttons (REW, PLAY, FWD, REC, STOP, PAUSE).

మూర్తి 2: Packaging of the Vibe Axcess 5-in-1 Universal Remote. The packaging highlights the remote's 5-in-1 capability and compatibility with various device types such as DVD/VCR, HDTV, DVD, AUX, and CBL/SAT/CABLE.
3. సెటప్
3.1 బ్యాటరీ ఇన్స్టాలేషన్
- రిమోట్ కంట్రోల్ వెనుక బ్యాటరీ కంపార్ట్మెంట్ కవర్ను గుర్తించండి.
- కవర్ను క్రిందికి జారండి లేదా తెరవడానికి గడియ మరియు లిఫ్ట్ను నొక్కండి.
- రెండు (2) AAA బ్యాటరీలను చొప్పించండి, పాజిటివ్ (+) మరియు నెగటివ్ (-) టెర్మినల్స్ కంపార్ట్మెంట్ లోపల ఉన్న రేఖాచిత్రాలకు సరిపోలుతున్నాయని నిర్ధారించుకోండి.
- బ్యాటరీ కంపార్ట్మెంట్ కవర్ను మార్చండి, అది సురక్షితంగా క్లిక్ అయ్యే వరకు దాన్ని తిరిగి స్థానంలోకి జారండి.
గమనిక: Always use fresh batteries and replace both batteries at the same time. Do not mix old and new batteries or different types of batteries.
3.2 రిమోట్ను ప్రోగ్రామింగ్ చేయడం
To control your devices, the universal remote must be programmed with the correct codes for each device. There are typically two methods for programming:
3.2.1 డైరెక్ట్ కోడ్ ఎంట్రీ
This method involves entering a specific code from a code list (usually provided with the remote or available online) for your device's brand.
- మీరు నియంత్రించాలనుకుంటున్న పరికరాన్ని ఆన్ చేయండి (ఉదా. టీవీ, DVD ప్లేయర్).
- Press and hold the desired device button on the remote (e.g., TV, DVD) for approximately 3 seconds until the indicator light (usually red) illuminates and stays on.
- While the indicator light is on, enter the 3-digit or 4-digit code for your device's brand using the number keys.
- If the code is valid, the indicator light will turn off. If the light flashes and remains on, the code was invalid; re-enter the code.
- నొక్కడం ద్వారా రిమోట్ను పరీక్షించండి శక్తి button. If the device turns off, the code is correct. If not, try the next code listed for your brand.
3.2.2 ఆటో కోడ్ శోధన
If you cannot find a code or direct code entry fails, use the auto code search method.
- మీరు నియంత్రించదలిచిన పరికరాన్ని ఆన్ చేయండి.
- కావలసిన పరికర బటన్ను నొక్కి పట్టుకోండి (ఉదా., TV) for approximately 3 seconds until the indicator light illuminates and stays on.
- While holding the device button, press the శక్తి button once. The indicator light will start flashing, indicating it is searching for a code.
- Point the remote at the device and wait for the device to turn off. This may take several minutes as the remote cycles through codes.
- పరికరం ఆపివేయబడిన తర్వాత, వెంటనే నొక్కండి నమోదు చేయండి కోడ్ను సేవ్ చేయడానికి బటన్ను నొక్కండి. సూచిక లైట్ ఆగిపోతుంది.
- Test the remote's functions. If some functions do not work, repeat the auto search process to find a more compatible code.
4. ఆపరేటింగ్ సూచనలు
Once programmed, operating your Vibe Axcess 5-in-1 Universal Remote is straightforward.
- పరికరాన్ని ఎంచుకోండి: సంబంధిత పరికర బటన్ను నొక్కండి (ఉదా., TV, DVD, CBL.DTC) for the device you wish to control. The indicator light will briefly illuminate to confirm selection.
- పవర్ ఆన్/ఆఫ్: నొక్కండి శక్తి ఎంచుకున్న పరికరాన్ని ఆన్ లేదా ఆఫ్ చేయడానికి బటన్.
- వాల్యూమ్ నియంత్రణ: ఉపయోగించండి VOL+ మరియు VOL- వాల్యూమ్ సర్దుబాటు చేయడానికి బటన్లు.
- ఛానెల్ నియంత్రణ: ఉపయోగించండి CH+ మరియు CH- ఛానెల్లను మార్చడానికి బటన్లు.
- సంఖ్య కీలు: Use the number keys (0-9) to directly enter channel numbers or other numerical inputs.
- నావిగేషన్: Use the directional pad (up, down, left, right) and OK button for menu navigation.
- మీడియా నియంత్రణలు: ఉపయోగించండి ఆడండి, పాజ్ చేయండి, ఆపు, REW, FWD, మరియు REC for controlling media playback on compatible devices.
5. నిర్వహణ
5.1 శుభ్రపరచడం
To clean your remote, gently wipe it with a soft, dry cloth. Do not use abrasive cleaners, solvents, or harsh chemicals, as these can damage the remote's finish or internal components.
5.2 బ్యాటరీ భర్తీ
When the remote's performance degrades or the indicator light fails to illuminate, it is time to replace the batteries. Follow the battery installation steps in Section 3.1. Dispose of used batteries responsibly according to local regulations.
6. ట్రబుల్షూటింగ్
- రిమోట్ పనిచేయడం లేదు:
- బ్యాటరీలు సరిగ్గా చొప్పించబడ్డాయో లేదో మరియు అవి ఖాళీగా లేవో తనిఖీ చేయండి. అవసరమైతే భర్తీ చేయండి.
- Ensure you have selected the correct device button (e.g., TV for your television).
- Verify that the remote is programmed with the correct code for your device. Re-program if unsure.
- రిమోట్ మరియు పరికరం యొక్క ఇన్ఫ్రారెడ్ సెన్సార్ మధ్య ఎటువంటి అడ్డంకులు లేవని నిర్ధారించుకోండి.
- కొన్ని విధులు పనిచేయడం లేదు:
- Some universal remote codes may not support all original remote functions. Try another code for your device brand using the programming steps.
- Ensure the device you are trying to control supports the specific function (e.g., not all TVs have a dedicated 'INFO' button function).
- Indicator light not illuminating:
- బ్యాటరీలను తనిఖీ చేయండి మరియు భర్తీ చేయండి.
- బ్యాటరీని మార్చిన తర్వాత కూడా సమస్య కొనసాగితే, రిమోట్ లోపభూయిష్టంగా ఉండవచ్చు.
7. స్పెసిఫికేషన్లు
- మోడల్: OT795-KO
- బ్రాండ్: వైబ్
- ఉత్పత్తి కొలతలు: 10.7 x 4 x 0.8 అంగుళాలు
- వస్తువు బరువు: 4 ఔన్సులు
- బ్యాటరీలు: 2 AAA బ్యాటరీలు అవసరం (చేర్చబడలేదు)
- మద్దతు ఉన్న పరికరాల గరిష్ట సంఖ్య: 5
- కనెక్టివిటీ టెక్నాలజీ: ఇన్ఫ్రారెడ్
- ప్రత్యేక ఫీచర్: యూనివర్సల్
8. వారంటీ మరియు మద్దతు
For information regarding warranty coverage or technical support, please refer to the documentation included with your purchase or contact the retailer where the product was acquired. Specific warranty terms may vary.


