1. పరిచయం
LAUNCH X431 PRO3 (V+) V5.0 అనేది సమగ్ర వాహన విశ్లేషణ కోసం రూపొందించబడిన అధునాతన ఆల్-ఇన్-వన్ ద్వి దిశాత్మక డయాగ్నస్టిక్ స్కాన్ సాధనం. ఈ పరికరం 10.1-అంగుళాల టచ్ స్క్రీన్ను కలిగి ఉంది మరియు ఆండ్రాయిడ్ 10.0పై నడుస్తుంది, ఇది ఆటోమోటివ్ టెక్నీషియన్లకు స్థిరమైన మరియు సమర్థవంతమైన ప్లాట్ఫామ్ను అందిస్తుంది. ఇది టోపోలాజీ మ్యాపింగ్, ECU కోడింగ్, యాక్టివ్ పరీక్షలు మరియు 200 కంటే ఎక్కువ వాహన బ్రాండ్లను కవర్ చేసే 55 కంటే ఎక్కువ ప్రత్యేక సేవా విధులతో సహా విస్తృత శ్రేణి డయాగ్నస్టిక్ ఫంక్షన్లకు మద్దతు ఇస్తుంది.
ఈ మాన్యువల్ మీ LAUNCH X431 PRO3 (V+) V5.0 స్కానర్ను సమర్థవంతంగా ఉపయోగించడంలో మీకు సహాయపడటానికి వివరణాత్మక సూచనలను అందిస్తుంది, ఖచ్చితమైన డయాగ్నస్టిక్స్ మరియు సమర్థవంతమైన వాహన నిర్వహణను నిర్ధారిస్తుంది.
2. పెట్టెలో ఏముంది
LAUNCH X431 PRO3 (V+) V5.0 కంప్లీట్ కిట్ కింది భాగాలను కలిగి ఉంది:
- X431 PRO3 (V+) V5.0 డిస్ప్లే టాబ్లెట్ను ప్రారంభించండి
- DBSCAR VII డయాగ్నస్టిక్ కనెక్టర్
- డబుల్ clamp విద్యుత్ లైన్
- సిగరెట్ లైటర్ లైన్
- బ్రిటిష్ ప్రామాణిక మార్పిడి హెడ్
- యూరోపియన్ గేజ్ కన్వర్షన్ హెడ్
- పవర్ అడాప్టర్, 5V/5A, వైర్ పొడవు 1.2మీ, అమెరికన్ స్టాండర్డ్ కన్వర్షన్ హెడ్తో
- HD15F నుండి OBDII 16 పురుష ఇంటిగ్రేటెడ్ టెస్ట్ కనెక్టర్
- HDB15F నుండి HDB15F పరీక్ష ప్రధాన లైన్ (DC తో)
- యూనివర్సల్ పిన్ ఎన్వలప్
- వినియోగదారు మాన్యువల్
- త్వరిత ప్రారంభ గైడ్
- క్లౌడ్ క్లినిక్ కార్ కస్టమ్ టైప్ A నుండి టైప్ C USB డేటా కేబుల్
- క్లిప్పర్ ఫ్యూజ్ 5*20mm (4pcs)
- తేలికైన ఫ్యూజ్ 630mm (2pcs)
- పాస్వర్డ్ ఎన్వలప్
చిత్రం: LAUNCH X431 PRO3 (V+) V5.0 కంప్లీట్ కిట్లో చేర్చబడిన అన్ని భాగాలు, దాని క్యారీయింగ్ కేసులో చక్కగా నిర్వహించబడ్డాయి.
3. సెటప్
3.1 ప్రారంభ పవర్ ఆన్
పరికరాన్ని ఆన్ చేయడానికి, స్క్రీన్పై LAUNCH లోగో కనిపించే వరకు టాబ్లెట్ వైపు ఉన్న పవర్ బటన్ను నొక్కి పట్టుకోండి. పరికరం Android ఆపరేటింగ్ సిస్టమ్లో నడుస్తుంది మరియు హోమ్ స్క్రీన్కు బూట్ అవుతుంది.
3.2 Wi-Fiకి కనెక్ట్ చేస్తోంది
సాఫ్ట్వేర్ అప్డేట్లు మరియు ఆన్లైన్ ఫంక్షన్ల కోసం, మీ పరికరాన్ని Wi-Fi నెట్వర్క్కి కనెక్ట్ చేయండి:
- హోమ్ స్క్రీన్ నుండి, 'సెట్టింగ్లు' చిహ్నాన్ని నొక్కండి.
- 'WLAN' (వైర్లెస్ లోకల్ ఏరియా నెట్వర్క్) లేదా 'Wi-Fi' ఎంచుకోండి.
- Wi-Fi ని ఆన్ చేసి, జాబితా నుండి మీకు కావలసిన నెట్వర్క్ను ఎంచుకోండి.
- ప్రాంప్ట్ చేయబడితే పాస్వర్డ్ను నమోదు చేసి, 'కనెక్ట్' నొక్కండి.
3.3 సాఫ్ట్వేర్ నవీకరణ
రెగ్యులర్ సాఫ్ట్వేర్ అప్డేట్లు తాజా వాహన నమూనాలు మరియు డయాగ్నస్టిక్ ప్రోటోకాల్లతో అనుకూలతను నిర్ధారిస్తాయి. Wi-Fiకి కనెక్ట్ చేసిన తర్వాత:
- హోమ్ స్క్రీన్లో లాంచ్ అప్లికేషన్ చిహ్నాన్ని నొక్కండి.
- అప్లికేషన్లోని 'అప్డేట్' విభాగానికి నావిగేట్ చేయండి.
- మీ రిజిస్టర్డ్ సీరియల్ నంబర్ మరియు పాస్వర్డ్ని ఉపయోగించి లాగిన్ అవ్వండి.
- అందుబాటులో ఉన్న నవీకరణలను ఎంచుకుని, డౌన్లోడ్ మరియు ఇన్స్టాలేషన్ ప్రక్రియను ప్రారంభించండి. అన్ని నవీకరణలను ఇన్స్టాల్ చేయడానికి దీనికి అనేక పరుగులు అవసరం కావచ్చు.
3.4 VCI యాక్టివేషన్
మీ VCI (వెహికల్ కమ్యూనికేషన్ ఇంటర్ఫేస్) పరికరాన్ని యాక్టివేట్ చేయడానికి:
- మీ కిట్లో అందించబడిన 12-అంకెల సీరియల్ నంబర్ మరియు 8-అంకెల యాక్టివేషన్ కోడ్తో కాగితాన్ని గుర్తించండి.
- LAUNCH అప్లికేషన్లోని నియమించబడిన ఫీల్డ్లలో సీరియల్ నంబర్ మరియు యాక్టివేషన్ కోడ్ను నమోదు చేయండి.
- VCI యాక్టివేషన్ను పూర్తి చేయడానికి 'యాక్టివేట్' నొక్కండి.
3.5 SD కార్డ్ ఇన్స్టాలేషన్ (మెమరీ అప్గ్రేడ్)
పరికరం యొక్క నిల్వ సామర్థ్యాన్ని విస్తరించడానికి, మీరు మైక్రో SD కార్డ్ను ఇన్స్టాల్ చేసుకోవచ్చు (128GB వరకు మద్దతు ఉంది). పరికరం యొక్క అంతర్గత నిల్వ సుమారు 16GB, గణనీయమైన భాగాన్ని Android OS ఉపయోగిస్తుంది.
- టాబ్లెట్ను పూర్తిగా ఆఫ్ చేయండి.
- రబ్బరు రక్షణ సి ని జాగ్రత్తగా తొలగించండిasinటాబ్లెట్ నుండి గ్రా. ఈ సిasing చిన్న కీల ద్వారా స్థానంలో ఉంచబడుతుంది మరియు ఒక మూల నుండి ప్రారంభించి, సున్నితంగా చీల్చవచ్చు.
- ఒకసారి రబ్బరు సిasing తొలగించబడిన తర్వాత, టాబ్లెట్ వెనుక భాగంలో ఉన్న చిన్న స్క్రూలను గుర్తించండి. అన్ని స్క్రూలను తీసివేయడానికి ఫిలిప్స్ హెడ్ స్క్రూడ్రైవర్ను ఉపయోగించండి.
- టాబ్లెట్ నుండి గట్టి ప్లాస్టిక్ వెనుక కవర్ను సున్నితంగా వేరు చేయండి.
- టాబ్లెట్ వైపు మైక్రో SD కార్డ్ స్లాట్ను గుర్తించండి.
- మైక్రో SD కార్డ్ స్లాట్లోకి క్లిక్ అయ్యే వరకు దాన్ని చొప్పించండి.
- వెనుక కవర్ మరియు రబ్బరు సిని తిరిగి అటాచ్ చేయడం ద్వారా టాబ్లెట్ను తిరిగి అమర్చండి.asing.
- టాబ్లెట్ను ఆన్ చేయండి. కొత్త SD కార్డ్ గుర్తించబడిందని మీకు నోటిఫికేషన్ వస్తుంది.
- మీరు యాప్లు మరియు ఫోటోలను నేరుగా కార్డ్లో నిల్వ చేయాలనుకుంటే నోటిఫికేషన్ను నొక్కి, 'అంతర్గత నిల్వగా ఉపయోగించు' లేదా తరలించడానికి 'పోర్టబుల్ నిల్వగా ఉపయోగించు' ఎంచుకోండి. fileపరికరాల మధ్య లు. గమనిక: అంతర్గత నిల్వగా ఉపయోగించడానికి కార్డ్ను ఫార్మాట్ చేయాలి, ఇది రీఫార్మాట్ చేయకుండా ఇతర పరికరాలతో పనిచేయకుండా నిరోధిస్తుంది.
వీడియో: మైక్రో SD కార్డ్ని ఇన్స్టాల్ చేయడం ద్వారా LAUNCH X431 V+ యొక్క అంతర్గత మెమరీని ఎలా అప్గ్రేడ్ చేయాలో దశల వారీ గైడ్.
4. ఆపరేటింగ్ సూచనలు
4.1 ఇంటెలిజెంట్ డయాగ్నస్టిక్స్ వర్క్ఫ్లో
LAUNCH X431 PRO3 (V+) V5.0 క్రమబద్ధీకరించబడిన 4-దశల డయాగ్నస్టిక్ ప్రక్రియను అందిస్తుంది:
- యాక్సెస్ (ఆటోవిన్ ఇన్స్టంట్ ఐడి): స్కానర్ను OBD పోర్ట్లోకి ప్లగ్ చేయండి. పరికరం స్వయంచాలకంగా VINని చదువుతుంది, వాహన మోడల్, సంవత్సరం, ఇన్స్టాల్ చేయబడిన ECUలు, పవర్ట్రెయిన్ రకం మరియు బస్ ప్రోటోకాల్ (CAN, CAN-FD, లేదా DoIP)ని గుర్తిస్తుంది.
- గుర్తించండి (వన్-టచ్ ఫుల్ సిస్టమ్ స్కాన్ + టోపోలాజీ మ్యాప్): అందుబాటులో ఉన్న అన్ని ECUలను (ఉదా. CEM, ECM, TCM, SRS, ABS, TPMS) సమాంతరంగా స్కాన్ చేయడానికి 'స్కాన్' నొక్కండి. పైభాగంలో కీలకమైన అంశాలతో రంగు-కోడెడ్ తప్పు జాబితా కనిపిస్తుంది. 'టోపోలాజీ మ్యాప్' ECU కనెక్షన్లు మరియు కమ్యూనికేషన్ మార్గాలను చూపించే ప్రత్యక్ష నెట్వర్క్ రేఖాచిత్రాన్ని అందిస్తుంది, ఇది నిర్దిష్ట భాగాలకు లోపాలను గుర్తించడంలో సహాయపడుతుంది.
- విశ్లేషించండి (ఫ్రేమ్ + లైవ్ డేటా + యాక్టివ్ పరీక్షలు ఫ్రీజ్ చేయండి):
- ఫ్రీజ్-ఫ్రేమ్ స్నాప్షాట్లు: ఇంజిన్ వేగం, బ్యాటరీ వాల్యూమ్ను సంగ్రహిస్తుందిtagDTC సెట్ చేయబడిన సమయంలో e, కూలెంట్ ఉష్ణోగ్రత మరియు ఇతర విలువలు.
- ప్రత్యక్ష డేటా స్ట్రీమ్లు: గ్రాఫ్లు మరియు వినియోగదారు నిర్వచించిన అలారాలతో నిజ సమయంలో 500 కంటే ఎక్కువ పారామితులను పర్యవేక్షిస్తుంది.
- క్రియాశీల పరీక్షలు: యాంత్రిక ప్రతిస్పందనను ధృవీకరించడానికి యాక్యుయేటర్లను (ఉదా., ఇంజెక్టర్లు, ABS పంపులు) ఆదేశిస్తుంది.
- నివేదించు & పరిష్కరించు (ఆటోమేటిక్ రిపోర్ట్ + క్లియర్ DTCలు): డయాగ్నస్టిక్ PDF నివేదిక స్వయంచాలకంగా ఉత్పత్తి అవుతుంది, DTCలు, ఫ్రీజ్-ఫ్రేమ్ వివరాలు మరియు సిఫార్సు చేయబడిన భాగాలు/కార్మిక చిట్కాలను సంగ్రహిస్తుంది. మరమ్మతుల తర్వాత, ఒకే ట్యాప్తో కోడ్లను క్లియర్ చేయండి మరియు పారామితులు పరిధిలో ఉన్నాయని నిర్ధారించడానికి మరియు హెచ్చరిక లైట్లను ఆఫ్ చేయడానికి తిరిగి స్కాన్ చేయండి.

చిత్రం: ఆటోవిన్, టోపోలాజీ మ్యాపింగ్, డిటిసి రీడింగ్ మరియు మరమ్మత్తు/క్లియర్ లోపాలతో సహా 4-దశల ఇంటెలిజెంట్ డయాగ్నస్టిక్స్ వర్క్ఫ్లో యొక్క దృశ్య ప్రాతినిధ్యం.
4.2 టోపోలాజీ మ్యాపింగ్
టోపోలాజీ మ్యాపింగ్ వాహనం యొక్క ఎలక్ట్రానిక్ నియంత్రణ వ్యవస్థ యొక్క దృశ్యమాన ప్రాతినిధ్యాన్ని అందిస్తుంది, ఇది ECUలు ఎలా అనుసంధానించబడి ఉన్నాయో మరియు వాటి మధ్య డేటా ఎలా ప్రవహిస్తుందో అర్థం చేసుకోవడానికి మిమ్మల్ని అనుమతిస్తుంది. ఈ లక్షణం వేగవంతమైన తప్పు ఐసోలేషన్లో సహాయపడుతుంది:
- పిన్పాయింట్ సమస్యలు: ECU సరిగ్గా కమ్యూనికేట్ చేయనప్పుడు దెబ్బతిన్న వైర్లు లేదా సెన్సార్ గ్లిచ్లు వంటి ఖచ్చితమైన ప్రదేశాలకు లోపాలను దృశ్యమానంగా గుర్తిస్తుంది.
- సాధారణ ట్రబుల్షూటింగ్: కమ్యూనికేషన్ నెట్వర్క్ యొక్క స్పష్టమైన చిత్రాన్ని అందిస్తుంది, నిమిషాల్లో 30 కి పైగా సిస్టమ్లను స్వయంచాలకంగా తనిఖీ చేస్తుంది.
- రంగు-కోడెడ్ లేబుల్లు: లైన్లు యాక్టివ్ (ఆకుపచ్చ), లోపభూయిష్ట (ఎరుపు) లేదా బలహీనమైన (డాష్డ్) కనెక్షన్లను సూచిస్తాయి, సమస్యలను సులభంగా గుర్తించగలవు.

చిత్రం: టోపోలాజీ మ్యాపింగ్ స్క్రీన్ వాహన మాడ్యూల్స్ మరియు వాటి కనెక్షన్ల రేఖాచిత్ర వృక్షాన్ని చూపిస్తుంది, రంగు-కోడెడ్ తప్పు సూచికలతో.
4.3 ECU కోడింగ్
ECU కోడింగ్ అనేది వాహనం యొక్క ఎలక్ట్రానిక్ కంట్రోల్ యూనిట్ (ECU)లోని సాఫ్ట్వేర్ పారామితులను మార్చడం ద్వారా వాహన ప్రవర్తనను హార్డ్వేర్ మార్పులు లేకుండా అనుకూలీకరించడం. LAUNCH X431 PRO3 (V+) V5.0 ఆన్లైన్ మరియు ఆఫ్లైన్ కోడింగ్ రెండింటికీ మద్దతు ఇస్తుంది:
- అనుకూలత చేసుకోండి: బహుళ వాహన కాన్ఫిగరేషన్లకు మద్దతు ఇవ్వడానికి సింగిల్ హార్డ్వేర్ మాడ్యూల్లను ప్రారంభిస్తుంది (ఉదా., హెడ్లైట్ లాజిక్ను సర్దుబాటు చేయడం).
- దాచిన ఫంక్షన్లను బ్రష్ చేయండి: తయారీదారు దాచిన ప్రీసెట్ ఫంక్షన్లను వెలికితీస్తుంది (ఉదా., సీట్బెల్ట్ హెచ్చరికలను నిలిపివేయడం, డాష్బోర్డ్ ప్రకాశాన్ని మార్చడం).
- రెగ్యులేటరీ సమ్మతి: ఉద్గార ప్రమాణాలను పెంచుతుంది లేదా ప్రాంత-నిర్దిష్ట లక్షణాలను ప్రారంభిస్తుంది.
- ECU తప్పు పరిష్కారం: పార్ట్ రీప్లేస్మెంట్ల ద్వారా ప్రేరేపించబడిన ఎర్రర్ కోడ్లను రీసెట్ చేస్తుంది (ఉదా., SAS రీకాలిబ్రేషన్).
ఆన్లైన్ & ఆఫ్లైన్ ECU కోడింగ్:
- ఆన్లైన్ కోడింగ్: క్లౌడ్ సర్వర్ డేటాను సేవ్ చేస్తుంది, ఆటోమేటిక్ సూచనలను పంపుతుంది మరియు సరళమైన 'అవును'/'కాదు' ఎంపికలను అవసరం.
- ఆఫ్లైన్ కోడింగ్ (వేరియంట్ కోడింగ్): మరింత అనుకూలీకరణ మరియు వివరణాత్మక ప్రక్రియ నియంత్రణ కోసం మాన్యువల్ కోడింగ్ దశలను అనుమతిస్తుంది.
ECU కోడింగ్ బ్యాకప్/రికవరీ: మీరు కంట్రోల్ మాడ్యూల్ నుండి ఇప్పటికే ఉన్న కోడ్లను కాపీ చేయవచ్చు, వాటిని ఇలా సేవ్ చేయవచ్చు file, మరియు అవసరమైతే వాటిని పునరుద్ధరించండి.
ప్రోగ్రామబుల్ మాడ్యూల్ ఇన్స్టాలేషన్ (PMI): ఈ దినచర్య పాత మాడ్యూల్ యొక్క 'వ్యక్తిత్వాన్ని' కొత్తదానికి కాపీ చేయడానికి మిమ్మల్ని అనుమతిస్తుంది, డేటాను చదివే ప్రక్రియను ఆటోమేట్ చేస్తుంది, క్రమాంకనం డౌన్లోడ్ చేస్తుంది. fileలు, ఫ్లాషింగ్ మరియు స్వీయ-పరీక్షలను అమలు చేయడం.

చిత్రం: ECU కోడింగ్ ఇంటర్ఫేస్ ఆన్లైన్ మరియు ఆఫ్లైన్ కోడింగ్ కోసం ఎంపికలను చూపిస్తుంది, ex తో పాటుampఆటోమేటిక్ మిర్రర్ క్లోజింగ్ మరియు సీట్బెల్ట్ వార్నింగ్ డీయాక్టివేషన్ వంటి అనేక అనుకూలీకరించదగిన ఫీచర్లు.
4.4 క్రియాశీల పరీక్షలు (ద్వి దిశాత్మక నియంత్రణ)
యాక్టివ్ టెస్ట్లు వాహన వ్యవస్థలు మరియు భాగాల ఇన్పుట్ మరియు అవుట్పుట్ను తనిఖీ చేయడానికి ఆదేశాలను పంపడం ద్వారా వాటిని పూర్తిగా నియంత్రించడానికి మిమ్మల్ని అనుమతిస్తాయి. ఇది లోపాలను త్వరగా గుర్తించడంలో సహాయపడుతుంది:
- ఆపరేషన్: సిస్టమ్ డయాగ్నస్టిక్స్ ఇంటర్ఫేస్లో, 'యాక్షన్ టెస్ట్' ఎంచుకుని, కావలసిన పరీక్షను ఎంచుకుని, ప్రాంప్ట్లను అనుసరించండి. స్కానర్ యాక్యుయేటర్లను ఆపరేట్ చేయడానికి ECUకి ఆదేశాలను పంపుతుంది మరియు ఫలితాలను ప్రదర్శిస్తుంది.
- కవరేజ్: ఫ్యాన్లు, లైట్లు, హార్న్, తలుపులు, కిటికీలు, బ్రేక్లు, థ్రోటిల్, A/C, క్లచ్లు, అద్దాలు, కెమెరాలు, పంపులు మరియు వాల్వ్లతో సహా చాలా సిస్టమ్-సంబంధిత యాక్యుయేటర్లను కవర్ చేస్తుంది.
- ప్రయోజనాలు: ప్రత్యక్ష భాగాల పరీక్షను అనుమతించడం ద్వారా రోగ నిర్ధారణ సమయాన్ని 50% తగ్గిస్తుంది మరియు తప్పు నిర్ధారణ రేట్లను 10% తగ్గిస్తుంది.
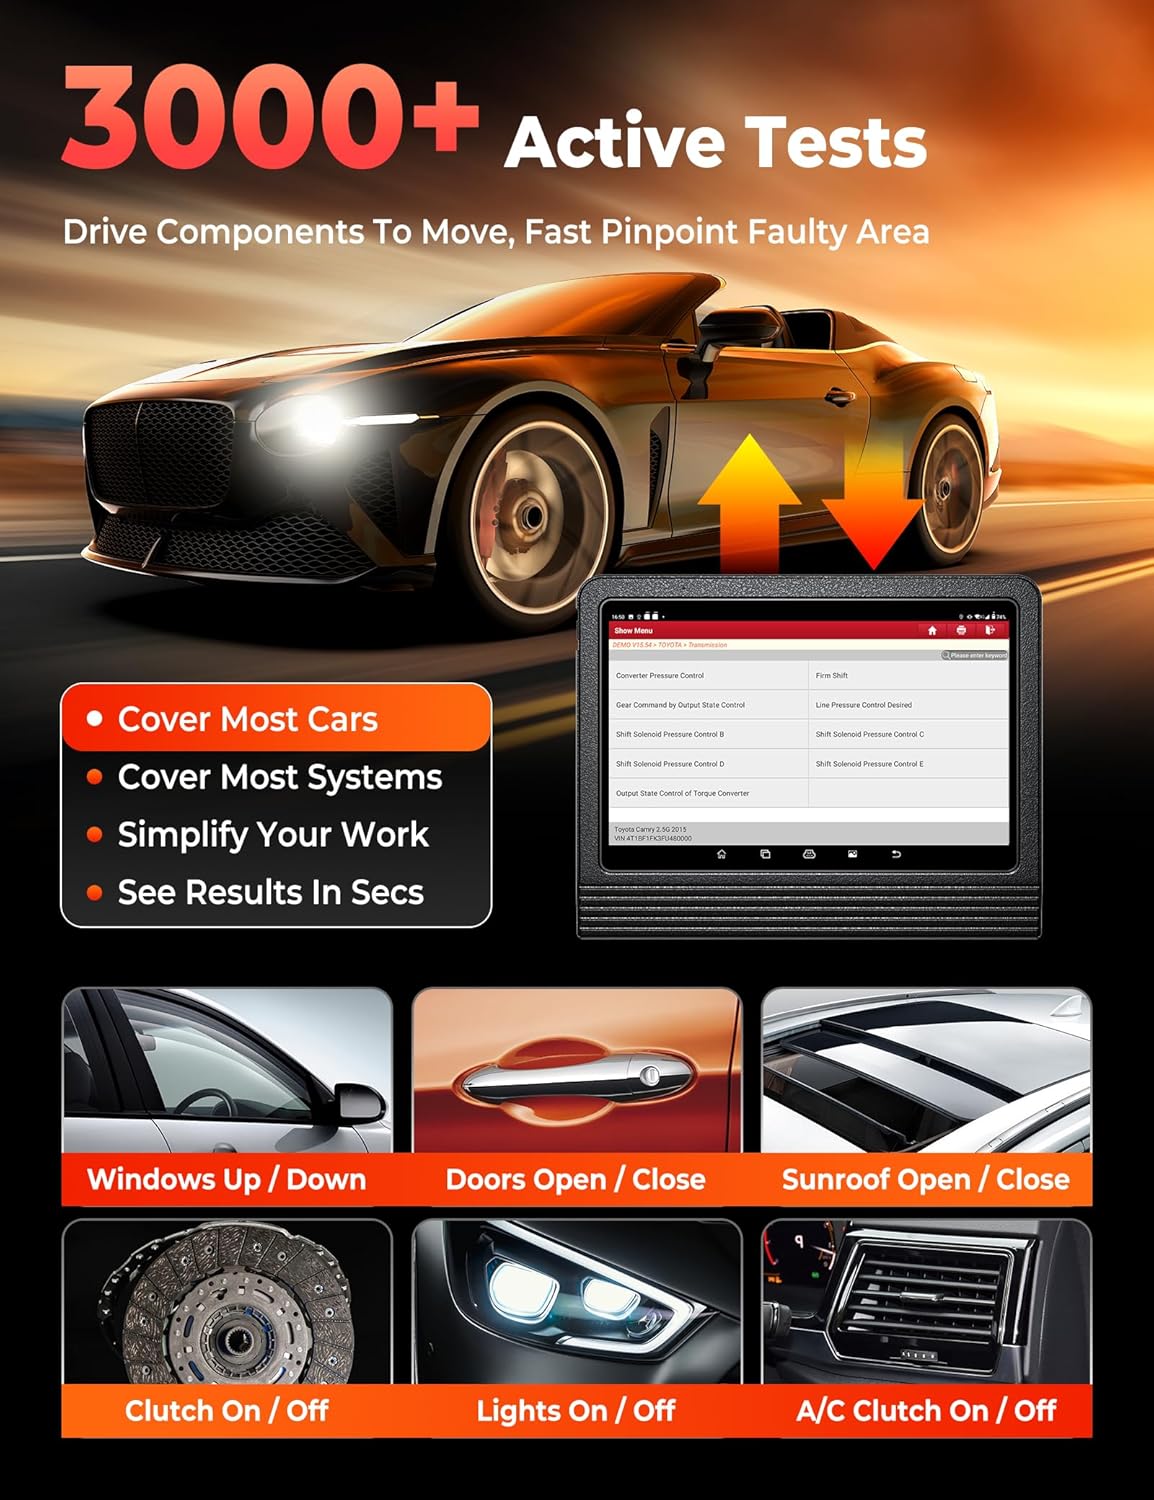
చిత్రం: యాక్టివేషన్ స్థితిపై దృశ్యమాన అభిప్రాయంతో, కిటికీలు, తలుపులు మరియు లైట్లు వంటి భాగాలను యాక్టివేట్ చేయడానికి ECUకి ఆదేశాలు ఎలా పంపబడతాయో ప్రదర్శించే యాక్టివ్ టెస్ట్ ఇంటర్ఫేస్.
4.5 ప్రత్యేక విధులు (55+ రీసెట్ సేవలు)
ఈ స్కానర్ తరచుగా ఉపయోగించే 55 కి పైగా రీసెట్ సేవలను అందిస్తుంది, వీటిని స్వతంత్ర 'స్పెషల్ ఫంక్షన్ మాడ్యూల్' ద్వారా యాక్సెస్ చేయవచ్చు. ఇది దినచర్య పనులను క్రమబద్ధీకరిస్తుంది మరియు సామర్థ్యాన్ని మెరుగుపరుస్తుంది:
- Exampతక్కువ: ఆయిల్ రీసెట్, BMS, ABS బ్లీడ్, TPMS (పరోక్ష), ఎయిర్బ్యాగ్ రీసెట్, ఇంజెక్టర్ కోడింగ్, SAS కాలిబ్రేషన్, సస్పెన్షన్ కాలిబ్రేషన్, థ్రోటిల్ అడాప్టేషన్, సన్రూఫ్ ఇనిషియలైజేషన్, సీట్ల కాలిబ్రేషన్, లాంగ్వేజ్ చేంజ్, హెడ్లైట్ మ్యాచింగ్, A/F సెట్టింగ్, WIN DR రూఫ్, CHG టైర్ సైజు, సిలిండర్, టర్బోచార్జింగ్, లిమిట్, ట్రాన్స్ అడాప్టేషన్, న్యూట్రల్ గేర్ పొజిషన్ లెర్నింగ్, టార్క్ సెన్సార్ అడ్జస్ట్మెంట్, సిగ్నల్ చెక్, యా రేట్ సెన్సార్ (YRS) లెర్న్, క్లచ్ పెడల్ పొజిషన్ లెర్న్, సిలిండర్ పవర్ బ్యాలెన్స్, కాంపోనెంట్ మ్యాచింగ్, స్టాప్/స్టార్ట్ రీసెట్, ట్రాన్స్పోర్ట్ మోడ్, ఆటో-డోర్ లాక్.
- మరిన్ని సేవలను పొందడం: ప్రారంభ 55+ హాట్ సేవలకు మించి, మీరు మీ వాహనం యొక్క డయాగ్నస్టిక్ సాఫ్ట్వేర్ను ఎంచుకోవడం, సిస్టమ్ ద్వారా నావిగేట్ చేయడం మరియు మాడ్యూల్ యొక్క సర్వీస్ ఫంక్షన్ మెనుపై నొక్కడం ద్వారా 100 కంటే ఎక్కువ అదనపు సేవలను యాక్సెస్ చేయవచ్చు.

చిత్రం: ఆయిల్ రీసెట్, ABS బ్లీడ్, EPB, SAS, SRS, TPMS, క్లచ్, కూలెంట్, సీట్లు మరియు హెడ్ల్తో సహా వివిధ 'హాట్ మెయింటెనెన్స్ సర్వీస్' చిహ్నాల ప్రదర్శన.amp, 100 కి పైగా అదనపు ఫంక్షన్లను సూచిస్తుంది.
4.6 VAG గైడెడ్ ఫంక్షన్
వోక్స్వ్యాగన్, ఆడి, స్కోడా మరియు సీట్ వాహనాల కోసం ప్రత్యేకంగా రూపొందించబడిన ఈ ఫీచర్, సాధారణ-ఇంగ్లీష్ చిట్కాలను అందించడం ద్వారా మరియు విధానాల ద్వారా మీకు మార్గనిర్దేశం చేయడం ద్వారా కీలకమైన డయాగ్నస్టిక్లను ఆటోమేట్ చేస్తుంది, ఛానల్-ఐడిలు మరియు లాగిన్ కోడ్లను మాన్యువల్గా ఇన్పుట్ చేయవలసిన అవసరాన్ని తొలగిస్తుంది.
4.7 రిమోట్ నిపుణుడు
రిమోట్ ఎక్స్పర్ట్ ఫీచర్ సంక్లిష్ట వాహన సమస్యలతో తక్షణ మార్గదర్శకత్వం మరియు సహాయం కోసం రిమోట్గా ప్రొఫెషనల్ టెక్నీషియన్లతో కనెక్ట్ అవ్వడానికి మిమ్మల్ని అనుమతిస్తుంది, అంచనా మరియు శిక్షణ అవసరాలను తగ్గిస్తుంది.
4.8 ఆన్లైన్లో డేటాను రిపేర్ చేయండి
రోగ నిర్ధారణ సామర్థ్యాన్ని మెరుగుపరచడానికి ఆపరేటింగ్ నైపుణ్యాలు, DTC సహాయం, ఆటోమోటివ్ టెక్నాలజీ హ్యాండ్బుక్లు, మరమ్మతు కేసులు మరియు నిర్వహణ చిట్కాలతో సహా మరమ్మతు సమాచారం యొక్క సమగ్ర ఆన్లైన్ డేటాబేస్ను యాక్సెస్ చేయండి. సందర్శించండి. రిపేర్డేటా.x431.com.
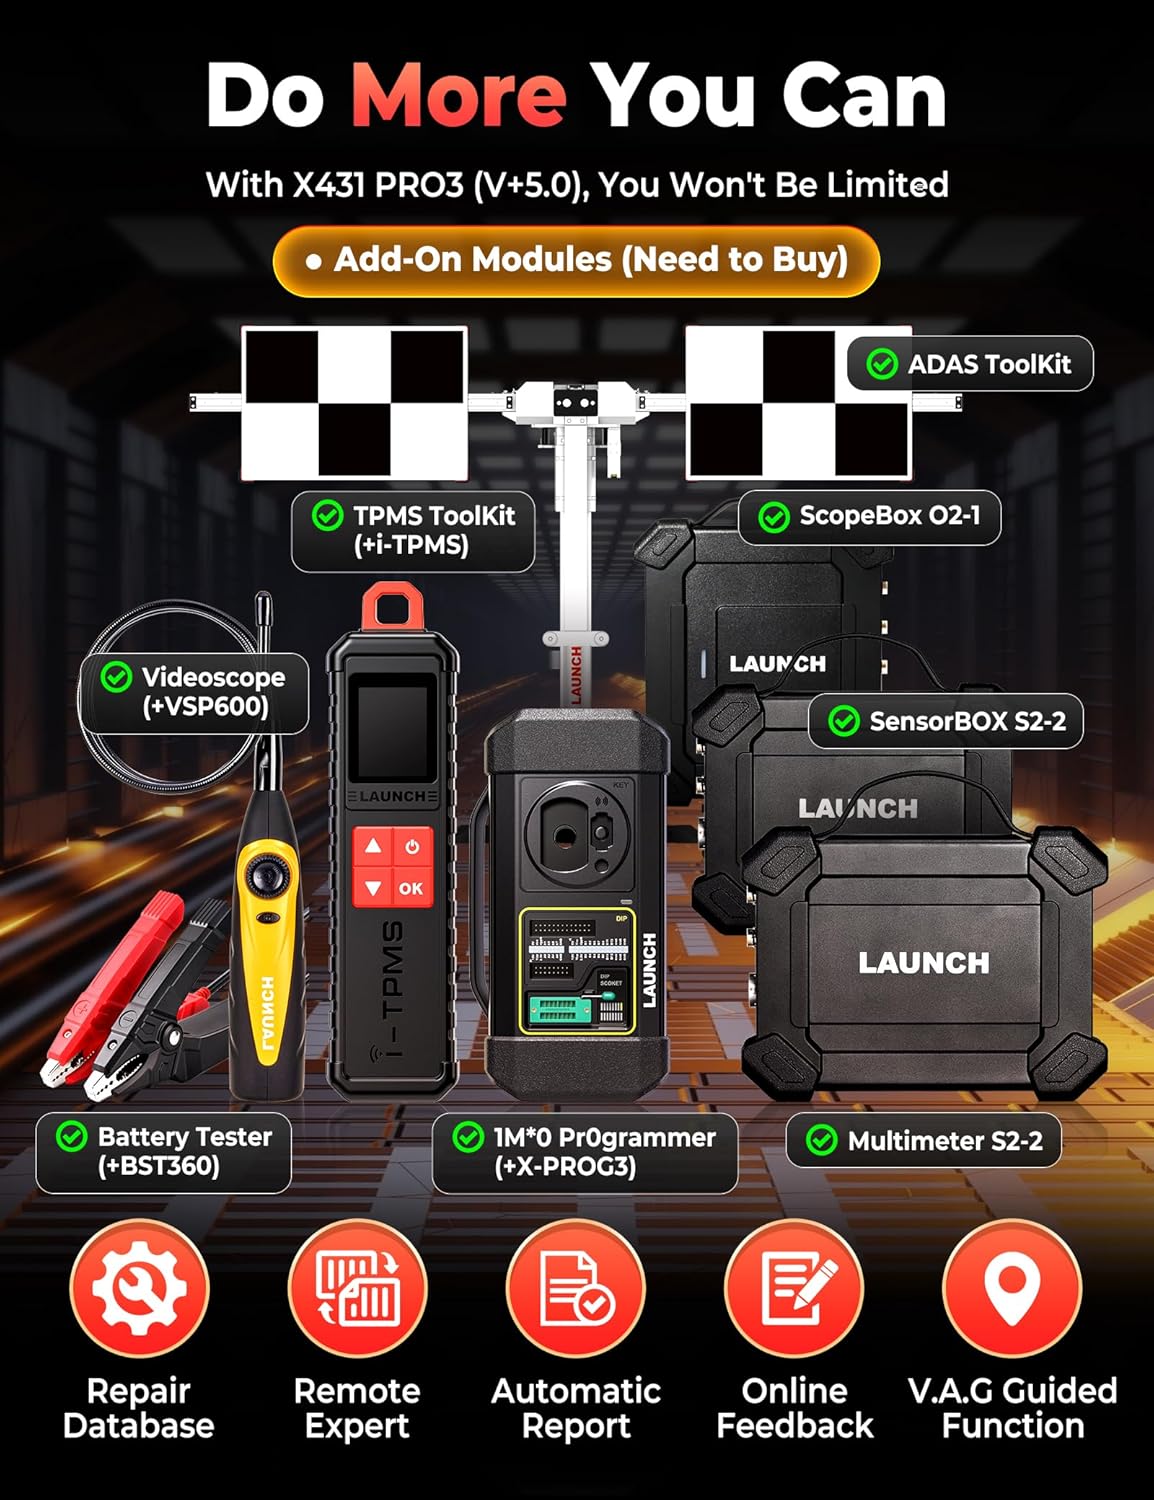
4.9 ఎక్స్టెన్షన్ మాడ్యూల్స్
LAUNCH X431 PRO3 (V+) V5.0 దాని సేవా సామర్థ్యాలను విస్తరించడానికి వివిధ X431 ఎక్స్టెన్షన్ మాడ్యూల్లతో జత చేయవచ్చు:
- బ్యాటరీ టెస్టర్ BST360: 12V బ్యాటరీ SOC/SOH/ఆరోగ్య స్థితిని పరీక్షిస్తుంది.
- i-TPMS సాధనం: టైర్ సెన్సార్లను సక్రియం చేస్తుంది, తిరిగి నేర్చుకుంటుంది మరియు ప్రోగ్రామ్ చేస్తుంది.
- ఎండోస్కోప్ VSP600: ఇంజిన్, అండర్ క్యారేజ్, ఎలక్ట్రికల్ మరియు ఇంటీరియర్ ప్రాంతాలలో లోతైన తనిఖీ కోసం.
- స్కోప్బాక్స్ O2-1: సర్క్యూట్ సిగ్నల్లను వేగంగా సంగ్రహిస్తుంది.
- సెన్సార్బాక్స్ S2-2: వాహన సెన్సార్ పనిచేయకపోవడాన్ని అనుకరిస్తుంది.
- మల్టీమీటర్ S2-2: కొలతలు వాల్యూమ్tagఇ, కరెంట్ మరియు రెసిస్టెన్స్.
- ADAS ప్రో/మొబైల్: డ్రైవర్ సహాయ వ్యవస్థలను సర్దుబాటు చేస్తుంది.
4.10 FCA SGW డయాగ్నస్టిక్ యాక్సెస్
FCA SGW (సెక్యూరిటీ గేట్వే) వాహనాలను నిర్ధారించడానికి, మీరు 'ఆటోఆథ్' సేవ కోసం నమోదు చేసుకోవాలి లేదా యాప్లో కొనుగోలు చేయాలి. ఇది అనుకూలమైన 2018+ క్రిస్లర్, డాడ్జ్, జీప్, ఆల్ఫా రోమియో మరియు ఫియట్ మోడళ్ల కోసం డయాగ్నస్టిక్ ఫంక్షన్లకు యాక్సెస్ను అందిస్తుంది. మీకు చెల్లుబాటు అయ్యే సాఫ్ట్వేర్ సబ్స్క్రిప్షన్ మరియు తాజా క్రిస్లర్ సాఫ్ట్వేర్ ఇన్స్టాల్ చేయబడిందని మరియు మీ స్కాన్ సాధనం ఇంటర్నెట్కు కనెక్ట్ చేయబడిందని నిర్ధారించుకోండి.
వీడియో: LAUNCH X431 PRO3 (V+) V5.0 తో FCA వాహనాలను నిర్ధారించడానికి AutoAuth ఖాతాను ఎలా నమోదు చేయాలో సూచనలు.
4.11 CAN-FD & DoIP వర్తింపు
ఈ LAUNCH స్కానర్ ఆధునిక వాహనాలను నిర్ధారించడానికి CAN-FD మరియు DoIP ప్రోటోకాల్లకు మద్దతు ఇస్తుంది. అనుకూల GM మోడళ్లలో బ్లేజర్ (2024), CT4 (2023-2024), CT5 (2023-2025), CT6 (2023-2024), కాన్యన్ (2024) మరియు ఇతరాలు ఉన్నాయి. అనుకూల జీప్ మోడళ్లలో గ్రాండ్ చెరోకీ (WL) (2021-2024) మరియు గ్రాండ్ వాగోనీర్ (WS) (2022-2024) ఉన్నాయి.
5. నిర్వహణ
- సాఫ్ట్వేర్ అప్డేట్లు: కొత్త వాహన మోడళ్లతో సరైన పనితీరు మరియు అనుకూలతను నిర్ధారించడానికి సాఫ్ట్వేర్ను క్రమం తప్పకుండా నవీకరించండి.
- పరికరాన్ని శుభ్రపరచడం: టాబ్లెట్ మరియు VCI కనెక్టర్ను శుభ్రంగా మరియు దుమ్ము మరియు చెత్త లేకుండా ఉంచండి. శుభ్రం చేయడానికి మృదువైన, పొడి వస్త్రాన్ని ఉపయోగించండి.
- బ్యాటరీ సంరక్షణ: బ్యాటరీ ఆరోగ్యాన్ని కాపాడుకోవడానికి పరికరాన్ని క్రమం తప్పకుండా ఛార్జ్ చేయండి. తీవ్రమైన ఉష్ణోగ్రతలను నివారించండి.
- నిల్వ: ఉపయోగంలో లేనప్పుడు పరికరాన్ని దాని రక్షణ కేసులో నిల్వ చేయండి, తద్వారా నష్టం జరగదు.
6. ట్రబుల్షూటింగ్
- కమ్యూనికేషన్ లోపాలు: VCI కనెక్టర్ వాహనం యొక్క OBD పోర్ట్ మరియు టాబ్లెట్కి సురక్షితంగా ప్లగ్ చేయబడిందని నిర్ధారించుకోండి. వాహనం యొక్క ఇగ్నిషన్ ఆన్లో ఉందో లేదో ధృవీకరించండి.
- సాఫ్ట్వేర్ సమస్యలు: క్రాష్లు లేదా గ్లిచ్లను ఎదుర్కొంటుంటే, Android OS తాజాగా ఉందని మరియు అన్ని డయాగ్నస్టిక్ సాఫ్ట్వేర్లు నవీకరించబడ్డాయని నిర్ధారించుకోండి.
- నెమ్మదిగా పనితీరు: అందుబాటులో ఉన్న అంతర్గత నిల్వను తనిఖీ చేసి, SD కార్డ్ను ఇన్స్టాల్ చేయడం లేదా అనవసరమైన వాటిని తొలగించడం గురించి ఆలోచించండి. files.
- బ్యాటరీ త్వరగా ఆరిపోతుంది: స్క్రీన్ ప్రకాశాన్ని తగ్గించండి, ఉపయోగించని అప్లికేషన్లను మూసివేయండి మరియు ఉపయోగించే ముందు పరికరం పూర్తిగా ఛార్జ్ చేయబడిందని నిర్ధారించుకోండి.
- శక్తి లేదు: ఛార్జింగ్ కేబుల్ మరియు అడాప్టర్ను తనిఖీ చేయండి. పరికరం యొక్క బ్యాటరీ పూర్తిగా ఖాళీ కాలేదని నిర్ధారించుకోండి.
7. స్పెసిఫికేషన్లు
- బ్రాండ్: ప్రారంభించు
- మోడల్: X431 V+ లాంచ్
- ఆపరేటింగ్ సిస్టమ్: ఆండ్రాయిడ్ 10.0
- ప్రాసెసర్: 4-కోర్
- RAM / ROM: 4GB RAM / 64GB ROM
- స్క్రీన్ పరిమాణం: 10.1 అంగుళాలు
- స్క్రీన్ రిజల్యూషన్: 1280*800 LCD
- బ్యాటరీ: 6300mAh లిథియం పాలిమర్ (చేర్చబడింది)
- కెమెరా: 8MP వెనుక కెమెరా
- కనెక్టివిటీ: డ్యూయల్-బ్యాండ్ Wi-Fi (2.4/5GHz), బ్లూటూత్ వైర్లెస్
- ఉత్పత్తి కొలతలు: 16.9"లీ x 6.3"వా x 14.5"హ
- వస్తువు బరువు: 17.82 పౌండ్లు
- మద్దతు ఉన్న భాషలు: ఇంగ్లీష్, ఫ్రెంచ్, జర్మన్, ఇటాలియన్, స్పానిష్ (మరియు 20+ ఇతర భాషలు)
8. వారంటీ మరియు మద్దతు
LAUNCH X431 PRO3 (V+) V5.0 తాజా కార్ మోడల్లు మరియు డయాగ్నస్టిక్ ప్రోటోకాల్లకు అనుకూలతను నిర్ధారించడానికి 2 సంవత్సరాల ఉచిత నవీకరణలతో వస్తుంది. జీవితకాల సాంకేతిక మద్దతు కూడా అందించబడుతుంది.
మీ LAUNCH X431 PRO3 (V+) V5.0 గురించి ఏవైనా ప్రశ్నలు లేదా సహాయం కోసం, దయచేసి నిపుణులైన సాంకేతిక సిబ్బందిని సంప్రదించండి:
- ఫోన్: 1-888-756-2936 (సోమ-శుక్ర 9:00 AM–6:00 PM EST)
- ఇమెయిల్: launch-aftersales@outlook.com
మీరు స్కాన్ సాధనంతో సంతృప్తి చెందకపోతే మరియు దానిని తిరిగి ఇవ్వాలనుకుంటే, దానిని ఇతర కస్టమర్లకు ఉపయోగించిన వస్తువుగా పంపకుండా నిరోధించడానికి దయచేసి దానిని [అమ్మలేనిది] గా గుర్తించండి.


