1. పరిచయం
This manual provides comprehensive instructions for the setup, operation, and maintenance of your Humax FVP-4000T Freeview Play HD TV Recorder. Please read this manual carefully before using the product to ensure proper functionality and to avoid damage.
The Humax FVP-4000T is a Freeview Play HD TV Recorder designed to enhance your television viewing experience. It features multiple HD tuners, allowing you to record several programmes simultaneously while watching another. With its integrated hard drive, you can store a significant amount of recorded content. The device also offers Wi-Fi connectivity for access to catch-up services and other online features.
2. బాక్స్ విషయాలు
ప్యాకేజింగ్ తెరిచినప్పుడు, దయచేసి కింది అంశాలన్నీ చేర్చబడ్డాయో లేదో నిర్ధారించుకోండి:
- Humax FVP-4000T/1TB Set-top Box
- రిమోట్ కంట్రోల్
- HDMI కేబుల్
- Power adapter (not explicitly listed but implied for operation)
- వినియోగదారు మాన్యువల్ (ఈ పత్రం)

మూర్తి 2.1: ముందు view of the Humax FVP-4000T recorder. This image shows the main unit in a cappuccino colour with a textured top surface and the Humax logo on the front left. A small red light is visible on the front right, indicating power status.
3. సెటప్ గైడ్
3.1. Connecting Your FVP-4000T
Follow these steps to connect your Humax FVP-4000T to your television and antenna.
- యాంటెన్నాను కనెక్ట్ చేయండి: Connect your TV aerial cable to the "RF IN" port on the back of the FVP-4000T. If you wish to loop the signal through to your TV's internal tuner, connect a second aerial cable from the "RF OUT" port on the FVP-4000T to the aerial input on your TV.
- టీవీకి కనెక్ట్ చేయండి (HDMI): Use the supplied HDMI cable to connect the "HDMI" port on the FVP-4000T to an available HDMI input on your television. Note the HDMI input number (e.g., HDMI 1, HDMI 2) for later selection on your TV.
- Connect to Network (Optional - Ethernet): For wired internet access, connect an Ethernet cable from the "ETHERNET" port on the FVP-4000T to your home router. The device also supports Wi-Fi for wireless connectivity.
- పవర్ కనెక్ట్ చేయండి: Connect the power adapter to the "POWER" input on the FVP-4000T, then plug the adapter into a wall socket.

మూర్తి 3.1: Rear panel connections of the Humax FVP-4000T. This image displays the various input and output ports including RF IN/OUT, Audio/Video (RCA), SPDIF (optical), HDMI, Ethernet, USB, and Power input.
మూర్తి 3.2: Illustration indicating the requirement for a TV antenna. The image shows an antenna icon with an arrow pointing down to the Humax FVP-4000T unit, emphasizing that an external antenna is needed for Freeview రిసెప్షన్.
3.2. ప్రారంభ సెటప్ విజార్డ్
Upon first power-on, the FVP-4000T will guide you through an initial setup wizard. This process includes:
- భాష ఎంపిక: మీకు ఇష్టమైన భాషను ఎంచుకోండి.
- Region Selection: మీ దేశం/ప్రాంతాన్ని ఎంచుకోండి.
- ఛానల్ స్కాన్: The device will automatically scan for available Freeview channels. This may take several minutes.
- నెట్వర్క్ సెటప్: Configure your internet connection. If using Wi-Fi, you will be prompted to select your network and enter the password.
- Time Zone and Parental Control: Set your local time zone and configure any desired parental control settings.
Ensure your TV is set to the correct HDMI input to view సెటప్ విజార్డ్.
4. ఆపరేటింగ్ సూచనలు
4.1. రిమోట్ కంట్రోల్ ఓవర్view
The supplied remote control provides full functionality for navigating the FVP-4000T. Familiarize yourself with its layout:

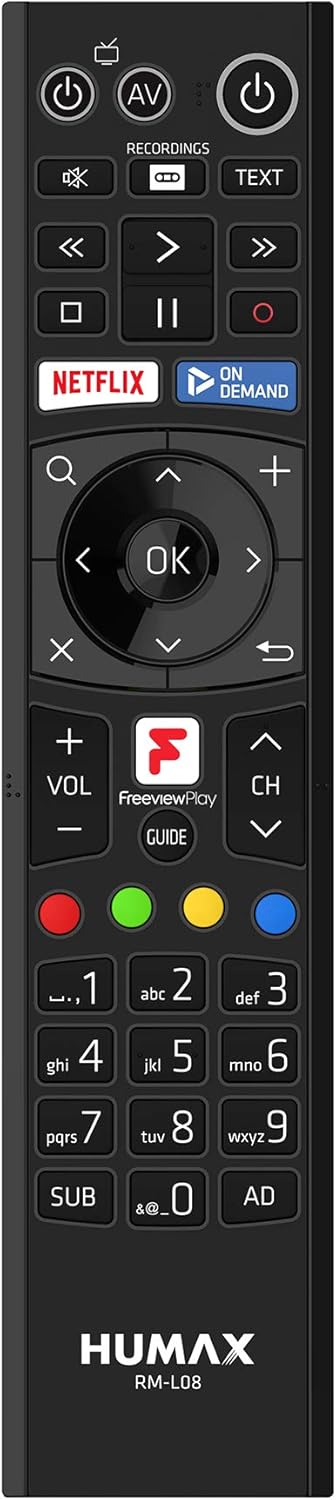
మూర్తి 4.1: Humax RM-L08 Remote Control. This image displays the full layout of the remote control, including power buttons, navigation keys, playback controls, numerical keypad, and dedicated buttons for Netflix, On Demand, and Freeview Play Guide.
- పవర్ బటన్: యూనిట్ని ఆన్ లేదా ఆఫ్ చేస్తుంది.
- Navigation Pad (OK, Up, Down, Left, Right): మెనూలను నావిగేట్ చేయడానికి మరియు ఎంపికలను ఎంచుకోవడానికి ఉపయోగించబడుతుంది.
- ఛానల్ పైకి/క్రిందికి: టీవీ ఛానెల్ని మారుస్తుంది.
- వాల్యూమ్ అప్/డౌన్: వాల్యూమ్ను సర్దుబాటు చేస్తుంది.
- రికార్డ్ (రెడ్ సర్కిల్): Initiates recording of the current programme.
- ప్లేబ్యాక్ నియంత్రణలు (ప్లే, పాజ్, స్టాప్, ఫాస్ట్ ఫార్వర్డ్, రివైండ్): మీడియా ప్లేబ్యాక్ను నియంత్రిస్తుంది.
- గైడ్: Opens the Electronic Programme Guide (EPG).
- Netflix / On Demand: Dedicated buttons for quick access to these services.
4.2. లైవ్ టీవీ చూడటం
After setup, you can start watching live Freeview ఛానెల్లు:
- Ensure the FVP-4000T is powered on.
- Select the correct HDMI input on your television.
- ఉపయోగించండి ఛానల్ అప్/డౌన్ buttons or the numerical keypad on the remote to change channels.
4.3. Recording Programmes
The FVP-4000T allows you to record up to three programmes simultaneously while watching a fourth live, thanks to its triple tuners.
- Instant Record: While watching a programme, press the రికార్డ్ చేయండి button (red circle) on the remote control. The programme will begin recording immediately.
- Scheduled Record (EPG): నొక్కండి గైడ్ button to open the Electronic Programme Guide. Navigate to the desired programme and press the రికార్డ్ చేయండి button. You can set single recordings or series recordings.
- Managing Recordings: Access your recorded programmes by pressing the రికార్డింగ్లు button on the remote. From here, you can play, delete, or manage your stored content.
4.4. ఉచితంview Play and Catch-up Services
ఉచితview Play integrates live TV with catch-up and on-demand services from BBC iPlayer, ITV Hub, All 4, My5, and UKTV Play.
- క్యాచ్-అప్ టీవీ: Scroll back through the EPG (Electronic Programme Guide) to find programmes you've missed from the last seven days. Select a programme and press OK to launch the relevant catch-up app.
- On-Demand Apps: Access dedicated apps like Netflix, BBC iPlayer, ITV Hub, All 4, and My5 directly from the main menu or via dedicated remote buttons.

మూర్తి 4.2: Humax FVP-4000T showcasing integrated Freeview Play and streaming services. This image features the Humax unit in the foreground with a collage of logos for various streaming and catch-up services such as BBC One, BBC iPlayer, ITV, All 4, Netflix, and YouTube, illustrating the device's capabilities.
4.5. Wi-Fi కనెక్టివిటీ
The FVP-4000T features built-in Wi-Fi for convenient wireless connection to your home network. This enables access to Freeview Play services, software updates, and media sharing.
- నావిగేట్ చేయండి Settings > Network > Wi-Fi Setup.
- జాబితా నుండి మీ ఇంటి Wi-Fi నెట్వర్క్ను ఎంచుకోండి.
- ఆన్-స్క్రీన్ కీబోర్డ్ ఉపయోగించి మీ Wi-Fi పాస్వర్డ్ను నమోదు చేయండి.
- కనెక్షన్ని నిర్ధారించండి.
5. నిర్వహణ
5.1. శుభ్రపరచడం
To maintain the appearance and functionality of your FVP-4000T:
- శుభ్రపరిచే ముందు ఎల్లప్పుడూ పవర్ కేబుల్ను డిస్కనెక్ట్ చేయండి.
- యూనిట్ వెలుపలి భాగాన్ని తుడవడానికి మృదువైన, పొడి వస్త్రాన్ని ఉపయోగించండి.
- మొండి గుర్తుల కోసం, కొద్దిగా dampen గుడ్డను నీటితో తడిపివేయండి. రాపిడి క్లీనర్లు, ద్రావకాలు లేదా రసాయన స్ప్రేలను ఉపయోగించవద్దు.
- వెంటిలేషన్ ఓపెనింగ్లను దుమ్ము మరియు చెత్త లేకుండా శుభ్రంగా ఉంచండి.
5.2. సాఫ్ట్వేర్ నవీకరణలు
Humax periodically releases software updates to improve performance, add features, or fix bugs. Ensure your FVP-4000T is connected to the internet to receive these updates.
- Updates are typically downloaded and installed automatically in standby mode.
- మీరు దీని ద్వారా నవీకరణల కోసం మాన్యువల్గా తనిఖీ చేయవచ్చు సెట్టింగ్లు > సిస్టమ్ > సాఫ్ట్వేర్ అప్డేట్.
6. ట్రబుల్షూటింగ్
This section addresses common issues you might encounter with your Humax FVP-4000T.
| సమస్య | సాధ్యమైన కారణం | పరిష్కారం |
|---|---|---|
| చిత్రం లేదా ధ్వని లేదు | Incorrect HDMI input selected on TV; Loose cable connections; Unit not powered on. | Ensure TV is on the correct HDMI input. Check all cable connections (HDMI, power, antenna). Press the power button on the remote or unit. |
| No channels found during scan | Antenna not connected or faulty; Weak signal. | Check antenna connection to "RF IN". Ensure your antenna is properly aligned and functioning. Try a manual scan in settings. |
| రిమోట్ కంట్రోల్ స్పందించడం లేదు | Batteries are flat or inserted incorrectly; Obstruction between remote and unit. | Replace batteries. Ensure line of sight to the FVP-4000T. |
| Wi-Fiకి కనెక్ట్ చేయడం సాధ్యపడదు | తప్పు పాస్వర్డ్; రూటర్ సమస్యలు; సిగ్నల్ జోక్యం. | Double-check Wi-Fi password. Restart your router. Ensure the unit is within range of your Wi-Fi router. |
| Recordings failing or poor quality | Insufficient hard drive space; Signal issues; Recording conflicts. | Delete old recordings to free up space. Check signal strength. Adjust recording padding in settings to avoid conflicts. |
If the problem persists after trying these solutions, please contact Humax customer support.
7. స్పెసిఫికేషన్లు
| ఫీచర్ | వివరాలు |
|---|---|
| మోడల్ సంఖ్య | FVP-4000T 1TB Cappuccino |
| నిల్వ సామర్థ్యం | 1 TB (టెరాబైట్) |
| ట్యూనర్లు | 3 x Freeview HD Tuners |
| రికార్డింగ్ సామర్థ్యం | Up to 600 hours (SD) |
| కనెక్టివిటీ | HDMI, Ethernet, USB, Wi-Fi (Built-in) |
| కొలతలు (సుమారుగా) | 2 x 2 x 2 సెం.మీ (ఉత్పత్తి కొలతలు) |
| బరువు (సుమారు.) | 360 గ్రా |
| రంగు | కాపుచినో |
| చేర్చబడిన భాగాలు | Receiver box, Remote control, HDMI cable |
| అనుకూల పరికరాలు | టెలివిజన్ |
8. వారంటీ మరియు మద్దతు
8.1. వారంటీ సమాచారం
Your Humax FVP-4000T comes with a standard manufacturer's warranty. Please refer to the warranty card included in your product packaging for specific terms and conditions, including the warranty period and coverage details. Keep your proof of purchase for warranty claims.
8.2. కస్టమర్ మద్దతు
For technical assistance, troubleshooting beyond this manual, or warranty inquiries, please contact Humax customer support:
- Webసైట్: Visit the official Humax UK webతరచుగా అడిగే ప్రశ్నలు, సాఫ్ట్వేర్ డౌన్లోడ్లు మరియు మద్దతు సంప్రదింపు సమాచారం కోసం సైట్.
- ఫోన్: Refer to the contact details provided in your product documentation or on the Humax UK webసైట్.
When contacting support, please have your product model number (FVP-4000T) and serial number ready.