1. పరిచయం
The ATEN CE820 USB HDMI HDBaseT 2.0 KVM Extender is designed to extend HDMI video, stereo audio, USB, Ethernet, and RS-232 signals over a single Cat6 or 2L-2910 Cat 6 cable. Utilizing HDBaseT 2.0 technology, it provides reliable transmission for distances up to 100 meters for 4K resolution and up to 150 meters for 1080P resolution in Long-Reach mode. This extender is suitable for applications requiring remote access, such as control centers, medical facilities, and industrial environments.
2. ప్యాకేజీ విషయాలు
Verify that all components are present and in good condition. If any items are missing or damaged, contact your dealer.
- 1x CE820L USB HDMI HDBaseT 2.0 KVM Extender (Local Unit)
- 1x CE820R USB HDMI HDBaseT 2.0 KVM Extender (Remote Unit)
- 1x HDMI KVM Cable Set (HDMI, USB, Audio; 1.8m/6ft)
- 2x పవర్ ఎడాప్టర్లు
- 2x Mounting Kits
- 1x User Instructions (this document)
3. హార్డ్వేర్ ఓవర్view
The ATEN CE820 KVM Extender consists of a Local Unit (CE820L) and a Remote Unit (CE820R). Below is an image illustrating the ports and indicators on the units.
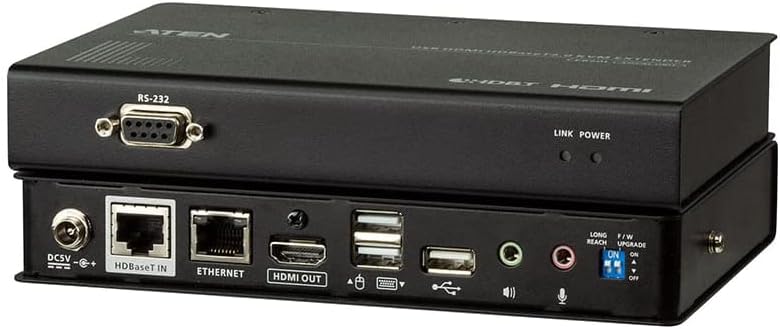
చిత్రం 3.1: వెనుక view of the ATEN CE820 KVM Extender units, showing various ports including DC power, HDBaseT In/Out, Ethernet, HDMI, USB, audio jacks, RS-232, and DIP switches for mode selection.
Local Unit (CE820L) Ports:
- DC5V పవర్ ఇన్పుట్: చేర్చబడిన పవర్ అడాప్టర్కు కనెక్ట్ అవుతుంది.
- HDBaseT అవుట్: Connects to the Remote Unit via Cat6/6a cable.
- ఈథర్నెట్: RJ-45 port for network connection.
- HDMI ఇన్: Connects to the video source (e.g., computer).
- USB టైప్ B: Connects to the computer's USB port for KVM functionality.
- ఆడియో ఇన్/అవుట్: 3.5mm jacks for audio input and output.
- RS-232: Serial port for control.
Remote Unit (CE820R) Ports:
- DC5V పవర్ ఇన్పుట్: చేర్చబడిన పవర్ అడాప్టర్కు కనెక్ట్ అవుతుంది.
- HDBaseT లో: Connects to the Local Unit via Cat6/6a cable.
- ఈథర్నెట్: RJ-45 port for network connection.
- HDMI అవుట్: Connects to the display device (e.g., monitor).
- USB Type A (x2): Connects to USB peripherals (e.g., keyboard, mouse).
- ఆడియో ఇన్/అవుట్: 3.5mm jacks for audio input and output.
- RS-232: Serial port for control.
- DIP స్విచ్లు: For selecting operating modes (e.g., Long-Reach mode).
4. సెటప్ మరియు ఇన్స్టాలేషన్
Follow these steps to set up your ATEN CE820 KVM Extender system:
- పవర్ ఆఫ్ పరికరాలు: Ensure all devices, including the computer, monitor, and KVM extender units, are powered off and unplugged.
- Connect Local Unit (CE820L):
- Connect the HDMI KVM cable set's HDMI connector to the HDMI ఇన్ port on the CE820L and to the HDMI output of your computer.
- Connect the USB connector from the KVM cable set to the USB టైప్ B port on the CE820L and to a USB port on your computer.
- (Optional) Connect the audio jacks from the KVM cable set to the ఆడియో ఇన్/అవుట్ ports on the CE820L and to your computer's audio ports.
- (Optional) Connect an Ethernet cable from your network router/switch to the ఈథర్నెట్ port on the CE820L.
- (Optional) Connect an RS-232 cable for serial control.
- Connect Remote Unit (CE820R):
- నుండి HDMI కేబుల్ను కనెక్ట్ చేయండి HDMI అవుట్ port on the CE820R to the HDMI input of your display device (monitor).
- మీ USB కీబోర్డ్ మరియు మౌస్ని దీనికి కనెక్ట్ చేయండి USB రకం A ports on the CE820R.
- (Optional) Connect speakers/microphone to the ఆడియో ఇన్/అవుట్ ports on the CE820R.
- (Optional) Connect an Ethernet cable from your network device to the ఈథర్నెట్ port on the CE820R.
- (Optional) Connect an RS-232 cable for serial control.
- Connect Extender Units: Connect a single Cat6 or 2L-2910 Cat 6 cable from the HDBaseT అవుట్ port on the CE820L to the HDBaseT ఇన్ port on the CE820R. Ensure the cable is properly terminated and meets HDBaseT specifications for optimal performance.
- శక్తిని వర్తింపజేయండి: Connect the two included power adapters to the DC5V పవర్ ఇన్పుట్ ports on both the CE820L and CE820R units, then plug them into power outlets.
- పవర్ ఆన్ పరికరాల: Power on your display device, then your computer. The KVM extender system should now be operational.
DIP Switch Configuration (Remote Unit)
The Remote Unit (CE820R) features DIP switches for selecting operating modes. Refer to the labels on the unit for specific switch functions. For example, to enable Long-Reach mode (1080P up to 150m), you may need to set a specific DIP switch to the 'ON' position. Ensure both units are powered off before changing DIP switch settings.
5. ఆపరేషన్
Once properly set up, the ATEN CE820 operates automatically. The KVM extender transparently passes video, audio, USB, Ethernet, and RS-232 signals between the local and remote units.
వీడియో ప్రసారం
- ప్రామాణిక మోడ్: Supports resolutions up to 4K (3840 x 2160) at 30Hz over 100 meters.
- Long-Reach Mode: Supports resolutions up to 1080P (1920 x 1080) over 150 meters. This mode is typically enabled via DIP switches on the remote unit.
- The extender is HDCP 2.2 compliant.
USB కార్యాచరణ
The USB 2.0 full-speed ports allow for the connection of a keyboard, mouse, and other USB peripherals at the remote location, providing seamless control of the computer connected to the local unit.
Audio and RS-232
The extender supports 2-channel stereo audio transmission and RS-232 serial communication for device control.
6. నిర్వహణ
To ensure the longevity and optimal performance of your ATEN CE820 KVM Extender, follow these maintenance guidelines:
- శుభ్రపరచడం: Use a soft, dry cloth to clean the exterior of the units. Do not use liquid or aerosol cleaners.
- వెంటిలేషన్: Ensure the units are placed in a well-ventilated area to prevent overheating. Do not block ventilation openings.
- కేబుల్ నిర్వహణ: Keep cables neatly organized and avoid sharp bends or excessive tension, which can damage cables and connectors.
- విద్యుత్ సరఫరా: Use only the power adapters provided with the unit.
7. ట్రబుల్షూటింగ్
If you encounter issues with your ATEN CE820 KVM Extender, refer to the following common troubleshooting steps:
- వీడియో డిస్ప్లే లేదు:
- Check all HDMI cable connections between the source, local unit, remote unit, and display.
- Ensure both local and remote units are powered on.
- Verify the Cat6/6a cable connection between the local and remote units is secure and undamaged.
- Confirm the display is set to the correct input source.
- If using Long-Reach mode, ensure the DIP switch on the remote unit is correctly set.
- Try a different HDMI cable or display to rule out faulty components.
- No USB Functionality (Keyboard/Mouse):
- Ensure the USB cable from the computer to the local unit is securely connected.
- Verify the USB peripherals are correctly plugged into the USB Type A ports on the remote unit.
- Test the USB peripherals directly with the computer to confirm they are functional.
- ఆడియో లేదు:
- Check all 3.5mm audio cable connections.
- Ensure the computer's audio output and the display's audio input are correctly configured.
- అడపాదడపా సిగ్నల్:
- Inspect the Cat6/6a cable for damage or poor termination. A high-quality, certified Cat6/6a cable is crucial for stable HDBaseT transmission.
- Ensure the cable length does not exceed the specified maximum for the resolution being used (100m for 4K, 150m for 1080P).
- Minimize electromagnetic interference by keeping the Cat6/6a cable away from power lines or other sources of interference.
8. స్పెసిఫికేషన్లు
| ఫీచర్ | వివరణ |
|---|---|
| మోడల్ సంఖ్య | CE820 |
| కనెక్టివిటీ ప్రోటోకాల్ | Ethernet, HDBaseT 2.0 |
| వీడియో ఇన్పుట్ | 1x HDMI Female (Local Unit) |
| వీడియో అవుట్పుట్ | 1x HDMI Female (Remote Unit) |
| USB పోర్ట్లు | 1x USB Type B Female (Local Unit), 2x USB Type A Female (Remote Unit) |
| ఆడియో పోర్ట్లు | 2x Mini Stereo Jack (Local Unit), 2x Mini Stereo Jack (Remote Unit) |
| ఈథర్నెట్ పోర్ట్స్ | 1x RJ-45 Female (Local Unit), 1x RJ-45 Female (Remote Unit) |
| సీరియల్ పోర్ట్ | 1x RS-232 Female (Local Unit), 1x RS-232 Female (Remote Unit) |
| Max. Resolution / Distance (Standard Mode) | 4K (3840 x 2160) @ 30Hz up to 100m (Cat6/6a/2L-2910) |
| Max. Resolution / Distance (Long-Reach Mode) | 1080P (1920 x 1080) up to 150m |
| HDCP వర్తింపు | HDCP 2.2 అనుకూలమైనది |
| విద్యుత్ వినియోగం | 87 watts (total for both units, typical) |
| కొలతలు (L x W x H) | 8 x 4 x 2 inches (per unit, approximate) |
| వస్తువు బరువు | 1.39 పౌండ్లు (యూనిట్కు, సుమారుగా) |
| అంతర్జాతీయ రక్షణ రేటింగ్ | IP54 |
9. వారంటీ మరియు మద్దతు
ATEN is committed to providing high-quality products and customer support.
వారంటీ సమాచారం
This product comes with a standard manufacturer's warranty. Extended warranty services and variable value-added service packages may be available. Please refer to the official ATEN website or contact your local dealer for detailed warranty terms and conditions.
సాంకేతిక మద్దతు
ATEN offers free technical support for its products. For assistance, you can typically expect a response within 4 hours. Support services include localized repair centers for RMA (Return Merchandise Authorization) service.

చిత్రం 9.1: Illustration of ATEN's support services, including localized repair centers, extended warranty options, and free technical support with a 4-hour response time.
For further support, please visit the official ATEN webసైట్: www.aten.com


