1. పరిచయం మరియు ఓవర్view
The ARGO Milo Plus is a versatile portable air conditioner designed to provide optimal climate control for your indoor spaces. Featuring both cooling and heating capabilities, along with ventilation and dehumidification modes, it ensures comfort throughout the year. Its compact design, multi-directional wheels, and integrated Wi-Fi connectivity make it a convenient and efficient solution for various environments. This manual provides essential information for safe operation, installation, maintenance, and troubleshooting.
2. భద్రతా సమాచారం
Before operating the ARGO Milo Plus, carefully read all safety instructions to prevent injury or damage. Keep this manual for future reference.
- యూనిట్ స్థిరమైన, స్థాయి ఉపరితలంపై ఉంచబడిందని నిర్ధారించుకోండి.
- Do not block air inlets or outlets. Maintain at least 30 cm of clear space around the unit.
- Always unplug the unit from the power outlet before cleaning, maintenance, or moving.
- దెబ్బతిన్న త్రాడు లేదా ప్లగ్తో యూనిట్ను ఆపరేట్ చేయవద్దు. మరమ్మతుల కోసం అర్హత కలిగిన సేవా సిబ్బందిని సంప్రదించండి.
- పిల్లలు మరియు పెంపుడు జంతువులకు దూరంగా ఉంచండి. పర్యవేక్షణలో తప్ప, ఈ ఉపకరణం శారీరక, ఇంద్రియ లేదా మానసిక సామర్థ్యాలు తగ్గిన వ్యక్తులు ఉపయోగించడానికి ఉద్దేశించబడలేదు.
- పేర్కొన్న వాల్యూమ్తో మాత్రమే ఉపయోగించండిtagఇ (230 వి).
- గాలి వెంట్లలో వస్తువులను చొప్పించవద్దు.
- తడి వాతావరణంలో లేదా నీటి దగ్గర యూనిట్ను ఉపయోగించవద్దు.
- The unit contains R290 refrigerant. Do not attempt to service the refrigerant circuit yourself.
3. ఉత్పత్తి భాగాలు
The ARGO Milo Plus package includes the following components:
- ARGO Milo Plus Main Unit
- ఫ్లెక్సిబుల్ ఎగ్జాస్ట్ హోస్
- విండో అడాప్టర్
- ఫిక్స్డ్ గ్లాస్ ఇన్స్టాలేషన్ కోసం కిట్
- Multifunction Remote Control with LED Display
- వినియోగదారు మాన్యువల్ (ఈ పత్రం)

మూర్తి 3.1: ముందు view of the ARGO Milo Plus portable air conditioner.

Figure 3.2: ARGO Milo Plus highlighting key features such as Wi-Fi connectivity, memory function, sleep mode, timer, remote control, energy efficiency, and cooling/heating capacity.

మూర్తి 3.3: వైపు view of the unit, illustrating the air intake and exhaust grilles.

Figure 3.4: Close-up of the digital control panel on the top of the unit.

Figure 3.5: Included accessories: exhaust hose, window kit components, and remote control.
4. సెటప్ మరియు ఇన్స్టాలేషన్
Proper setup is crucial for the efficient operation of your ARGO Milo Plus.
4.1 అన్ప్యాకింగ్ మరియు ప్లేస్మెంట్
- ప్యాకేజింగ్ నుండి యూనిట్ మరియు అన్ని ఉపకరణాలను జాగ్రత్తగా తొలగించండి.
- Position the air conditioner on a flat, stable surface, ensuring at least 30 cm of clear space around the unit for proper airflow. The unit is equipped with multi-directional wheels for easy movement.
4.2 ఎగ్జాస్ట్ హోస్ ఇన్స్టాలేషన్
The exhaust hose expels hot air (during cooling) or cold air (during heating) from the room. Proper installation is essential for efficiency.
- Connect one end of the flexible exhaust hose to the air outlet on the rear of the main unit. Twist clockwise until secure.
- Attach the window adapter or the fixed installation kit components to the other end of the exhaust hose.
- Extend the hose to the nearest window or pre-installed vent. Use the provided window adapter or fixed installation kit to seal the opening and prevent hot air (or cold air in heating mode) from re-entering the room.
- Ensure the hose is as straight and short as possible to maximize efficiency. Avoid sharp bends or kinks, as this can reduce performance and potentially damage the unit.

చిత్రం 4.1: ఉదాample placement of the ARGO Milo Plus in a room.

Figure 4.2: Dimensional diagram of the unit.

Figure 4.3: Unit dimensions in centimeters.
5. ఆపరేటింగ్ సూచనలు
Your ARGO Milo Plus can be operated via the control panel on the unit, the remote control, or through the dedicated Wi-Fi app.
5.1 కంట్రోల్ ప్యానెల్ మరియు రిమోట్ కంట్రోల్
The control panel on the top of the unit and the remote control share similar functions.
- ఆన్/ఆఫ్ బటన్: యూనిట్ని ఆన్ లేదా ఆఫ్ చేయడానికి నొక్కండి.
- మోడ్ బటన్: Cycle through operating modes: Cooling (Cool), Heating (Heat), Fan (Ventilation), Dehumidification (Dry), and Auto.
- ఉష్ణోగ్రత సర్దుబాటు (+/-): కావలసిన ఉష్ణోగ్రత సెట్టింగ్ను సర్దుబాటు చేయండి.
- ఫ్యాన్ స్పీడ్ బటన్: Select fan speed (Low, Medium, High, Auto).
- స్వింగ్ బటన్: Activates or deactivates the automatic oscillation of the upper air flap.
- టైమర్ బటన్: Set a 24-hour timer for automatic power on or off.
- నిద్ర ఫంక్షన్: Optimizes operation for quiet night-time use.
- మెమరీ ఫంక్షన్: Recalls previous settings after power interruption.
- X-Fan Function: Continues fan operation after shutdown to dry internal components and prevent mold.
- Intelligent Pre-heating: In heating mode, the unit pre-heats before blowing air to prevent cold drafts.
5.2 Wi-Fi కనెక్టివిటీ మరియు యాప్ నియంత్రణ
The ARGO Milo Plus features integrated Wi-Fi for remote control via a smartphone app.
- Download the official ARGO app from your smartphone's app store.
- Follow the in-app instructions to pair your device with the air conditioner. This typically involves putting the unit into pairing mode (often by pressing the Wi-Fi button on the control panel) and connecting to your home Wi-Fi network.
- Once connected, you can control all functions of the unit remotely, including mode selection, temperature, fan speed, and timer settings.
6. నిర్వహణ మరియు శుభ్రపరచడం
క్రమం తప్పకుండా నిర్వహణ సరైన పనితీరును నిర్ధారిస్తుంది మరియు మీ యూనిట్ యొక్క జీవితకాలం పొడిగిస్తుంది.
6.1 ఎయిర్ ఫిల్టర్ క్లీనింగ్
The air filter should be cleaned regularly, ideally every two weeks or more frequently depending on usage and air quality.
- పవర్ అవుట్లెట్ నుండి యూనిట్ను అన్ప్లగ్ చేయండి.
- యూనిట్ వెనుక నుండి ఎయిర్ ఫిల్టర్ను గుర్తించి తీసివేయండి.
- ఫిల్టర్ను గోరువెచ్చని నీరు మరియు తేలికపాటి డిటర్జెంట్తో కడగాలి. బాగా కడగాలి.
- Allow the filter to dry completely in a shaded area before reinserting it into the unit. Do not expose to direct sunlight.
6.2 నీటి పారుదల
In dehumidification mode or during heating, the internal water tank may accumulate condensate. When full, the unit will stop operating and indicate a full tank.
- మాన్యువల్ డ్రైనేజ్: Place a shallow pan or container under the drainage port located at the bottom rear of the unit. Remove the drainage plug to allow water to flow out. Replace the plug securely once drained.
- Continuous Drainage (Dehumidification Mode): For continuous dehumidification, connect a drainage hose (not always included, check accessories) to the continuous drainage outlet. Ensure the hose is sloped downwards to allow gravity drainage.
6.3 సాధారణ శుభ్రపరచడం
యూనిట్ యొక్క బాహ్య భాగాన్ని మృదువైన, డితో తుడవండిamp కఠినమైన రసాయనాలు, అబ్రాసివ్లు లేదా ద్రావకాలను ఉపయోగించవద్దు, ఎందుకంటే ఇవి ఉపరితలాన్ని దెబ్బతీస్తాయి.
7. ట్రబుల్షూటింగ్
కస్టమర్ సపోర్ట్ను సంప్రదించే ముందు, సాధారణ సమస్యల కోసం దయచేసి కింది ట్రబుల్షూటింగ్ గైడ్ను చూడండి.
| సమస్య | సాధ్యమైన కారణం | పరిష్కారం |
|---|---|---|
| యూనిట్ ఆన్ చేయబడలేదు | No power supply; Timer function active; Power cord not fully inserted. | Check power connection and wall outlet; Deactivate timer; Ensure plug is securely inserted. |
| తగినంత శీతలీకరణ/వేడి లేకపోవడం | Windows/doors open; Exhaust hose improperly installed/sealed; Dirty air filter; Room size too large. | Close all windows and doors; Ensure exhaust hose is short, straight, and sealed; Clean air filter; Consider unit capacity for room size. |
| విపరీతమైన శబ్దం | Unit not on a flat surface; Obstructions in air vents. | Place unit on a stable, level surface; Check and remove any obstructions from vents. |
| నీటి లీకేజీ | Drainage plug not securely closed; Drainage hose kinked/blocked (if used). | Ensure drainage plug is tightly closed; Check drainage hose for kinks or blockages. |
| Wi-Fi కనెక్షన్ సమస్యలు | Incorrect Wi-Fi password; Unit too far from router; Router issues. | Verify Wi-Fi password; Move unit closer to router; Restart router and unit. |
8. స్పెసిఫికేషన్లు
Key technical specifications for the ARGO Milo Plus portable air conditioner:
- మోడల్: MILO PLUS
- శీతలీకరణ సామర్థ్యం: 13000 BTU/H
- తాపన సామర్థ్యం: 13000 BTU/H (with heat pump)
- విద్యుత్ సరఫరా: 230 వి
- వాట్tage (Cooling): 1083 W
- కొలతలు (W x D x H): 40.5 x 38.5 x 83.5 సెం.మీ
- బరువు: 36 కిలోలు
- శబ్దం స్థాయి: 65 డిబి
- ఎనర్జీ ఎఫిషియెన్సీ క్లాస్ (శీతలీకరణ): A
- Energy Efficiency Class (Heating): A++
- రిఫ్రిజెరాంట్: R290
For detailed energy information and product fiche, please refer to the EPREL database:
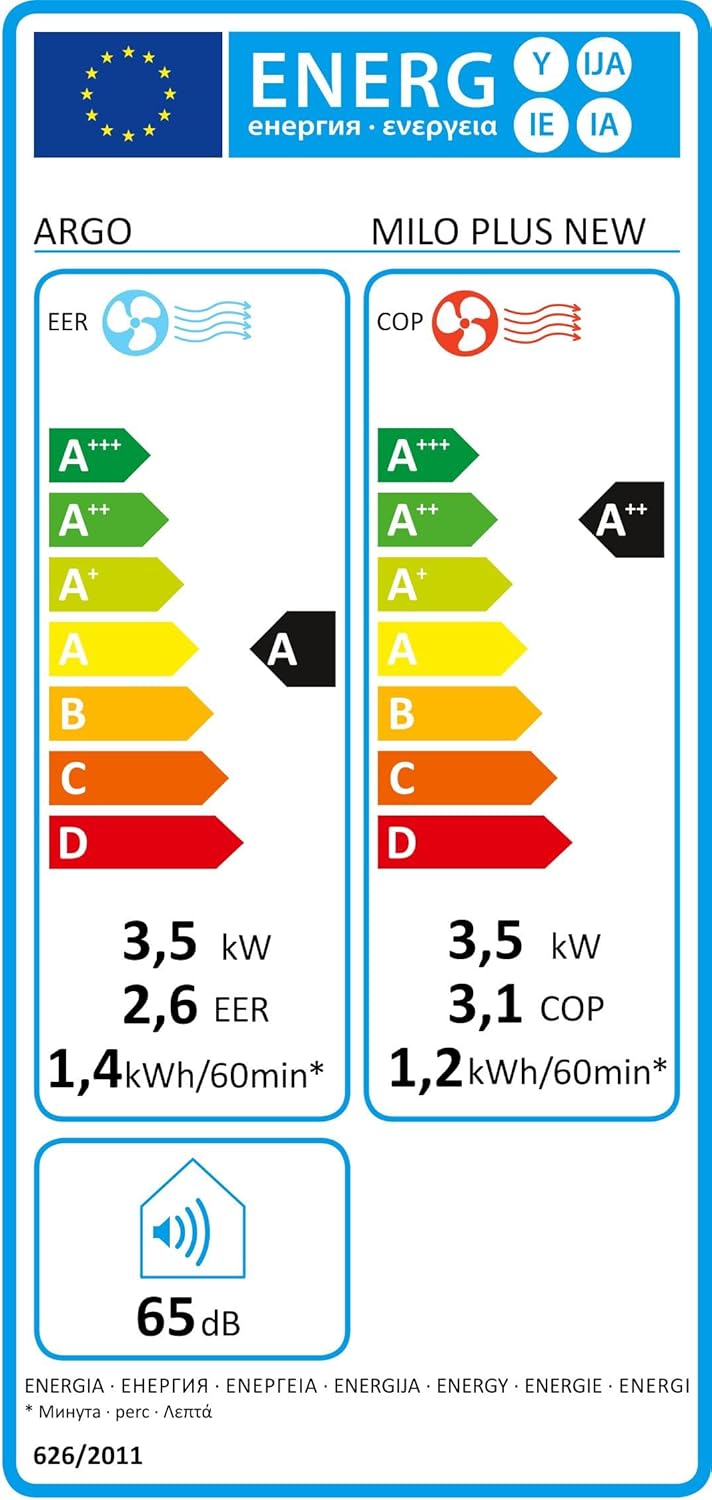
Figure 8.1: Energy Label (Cooling).

Figure 8.2: Energy Label (Heating).
9. వారంటీ మరియు మద్దతు
This product comes with a standard manufacturer's warranty. Please refer to the warranty card included in the packaging for specific terms and conditions, including the warranty period and coverage details.
For technical assistance, spare parts, or warranty claims, please contact your local authorized service center or the retailer where the product was purchased. Always keep your purchase receipt as proof of purchase.


