
1. పరిచయం
The ID-COOLING FROSTFLOW 120 is an All-In-One (AIO) liquid cooling solution designed for Graphics Processing Units (GPUs). This cooler features a 120mm radiator and is engineered to provide efficient thermal management for compatible VGA cards, ensuring stable performance during demanding operations. This manual provides essential information for the proper installation, operation, and maintenance of your FROSTFLOW 120 liquid cooler.
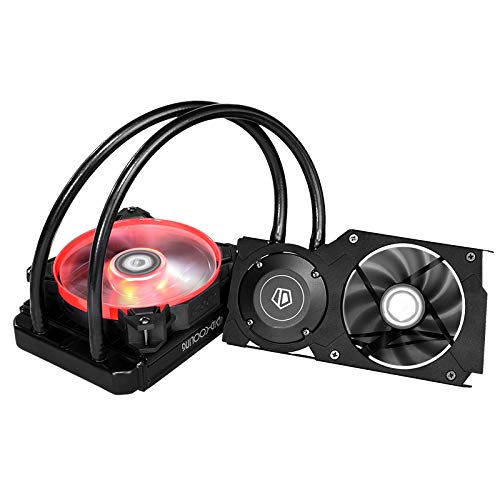
చిత్రం 1.1: ముగిసిందిview of the ID-COOLING FROSTFLOW 120 VGA Liquid Cooler components, including the pump/cold plate assembly, radiator, and fan.
2. అనుకూలత
The FROSTFLOW 120 is designed for a range of NVIDIA and AMD graphics cards. Please verify your GPU's mounting hole dimensions and PCB layout against the cooler's specifications before installation.
అనుకూల సిరీస్:
- NVIDIA GeForce RTX 2070, RTX 2080, RTX 2080Ti Series
- AMD Radeon RX 5700, RX 5700XT Series
- NVIDIA GeForce GTX 1070, GTX 1080 Series
For specific models within these series, it is recommended to consult the ID-COOLING official website or product documentation for detailed compatibility lists and mounting hole patterns.
3. ప్యాకేజీ విషయాలు
Before proceeding with installation, ensure all components listed below are present and undamaged. If any parts are missing or damaged, contact customer support.
- FROSTFLOW 120 Pump/Cold Plate Assembly with Tubing
- 120 మిమీ రేడియేటర్
- 120mm కూలింగ్ ఫ్యాన్
- Mounting Brackets for various GPU models
- స్క్రూలు మరియు ఫాస్టెనర్లు
- థర్మల్ పేస్ట్ (ముందుగా అప్లై చేయబడినది లేదా ట్యూబ్లో)
- VRAM/MOSFET Heatsinks
- వినియోగదారు మాన్యువల్ (ఈ పత్రం)
4. సెటప్ మరియు ఇన్స్టాలేషన్
ముఖ్యమైన: Before beginning installation, power off your computer and disconnect it from the power source. Handle all components with care to avoid damage from static electricity. It is recommended to wear an anti-static wrist strap.
4.1 Preparing Your Graphics Card
- Remove Existing Cooler: Carefully remove the stock cooler from your graphics card. This typically involves unscrewing the mounting screws around the GPU core and disconnecting any fan or RGB cables.
- Clean GPU Die: Gently clean any residual thermal paste from the GPU die using isopropyl alcohol and a lint-free cloth.
- Install VRAM/MOSFET Heatsinks: Apply the provided VRAM and MOSFET heatsinks to the appropriate components on your graphics card's PCB. Ensure good contact and adhesion.
4.2 Mounting the Pump/Cold Plate
- Select Brackets: Choose the correct mounting brackets for your specific GPU model. Refer to the included installation guide for bracket identification.
- Attach Brackets to Pump: Secure the selected brackets to the pump base using the designated screws.
- థర్మల్ పేస్ట్ వర్తించు: If not pre-applied, apply a small amount of high-quality thermal paste to the center of the GPU die.
- Mount Pump: Carefully align the pump/cold plate assembly with the GPU die and the mounting holes on the PCB. Gently lower the pump onto the GPU.
- సురక్షిత పంపు: From the back of the VGA card, secure the pump using the spring-loaded screws. Tighten screws in a diagonal pattern until snug, but do not overtighten.

చిత్రం 4.1: క్లోజప్ view of the ID-COOLING FROSTFLOW 120 pump/cold plate assembly correctly installed on a graphics card, showing the secure mounting.
4.3 రేడియేటర్ మరియు ఫ్యాన్ ఇన్స్టాలేషన్
- Attach Fan to Radiator: Mount the 120mm cooling fan to the radiator using the provided fan screws. Ensure the fan is oriented to push or pull air in the desired direction (typically pushing air through the radiator and out of the case).
- మౌంట్ రేడియేటర్: Install the radiator assembly into an available 120mm fan mount in your PC case. Common locations include the rear exhaust, top, or front of the case. Secure with appropriate screws.

Image 4.2: The ID-COOLING FROSTFLOW 120 radiator and fan assembly mounted as a rear exhaust in a PC case, demonstrating proper placement.
4.4 కేబుల్ కనెక్షన్లు
- పంప్ పవర్: Connect the pump's 3-pin power cable to an available 3-pin fan header on your motherboard or a dedicated pump header.
- ఫ్యాన్ పవర్: Connect the 120mm radiator fan's 3-pin power cable to an available 3-pin fan header on your motherboard.
- VRAM Fan Power (if applicable): If your GPU cooler includes a separate fan for VRAM cooling, connect its 3-pin power cable to an appropriate header.
Note: The pump and fan are typically 3-pin and will run at full speed. If PWM control is desired, a separate adapter or fan controller may be required.
5. ఆపరేటింగ్ సూచనలు
Once installed, the FROSTFLOW 120 operates automatically to cool your GPU. Upon system startup, the pump and fans will begin operating. Monitor your GPU temperatures using system monitoring software to ensure optimal cooling performance.
- ప్రారంభ ప్రారంభం: After installation, power on your system and check for any unusual noises or leaks. Verify that the pump and fan are spinning.
- ఉష్ణోగ్రత పర్యవేక్షణ: Use GPU monitoring software (e.g., MSI Afterburner, HWMonitor) to observe GPU core temperatures under idle and load conditions. Typical idle temperatures should be significantly lower than with air cooling, and load temperatures should remain within safe operating limits.
- ఫ్యాన్ నియంత్రణ: While the included fans are 3-pin, some motherboards or software may offer voltage-based fan control. Adjust fan curves as desired for a balance of cooling performance and noise levels.
6. నిర్వహణ
Regular maintenance helps ensure the longevity and optimal performance of your FROSTFLOW 120 liquid cooler.
- దుమ్ము శుభ్రపరచడం: Periodically clean dust from the radiator fins and fan blades using compressed air or a soft brush. Excessive dust buildup can impede airflow and reduce cooling efficiency.
- గొట్టాల తనిఖీ: Inspect the tubing for any signs of kinks, cracks, or leaks. Ensure connections remain secure.
- Pump Check: Listen for any unusual noises from the pump, which could indicate an issue.
- థర్మల్ పేస్ట్: While not frequently required, if you notice a significant increase in GPU temperatures over time, reapplying thermal paste to the GPU die may be beneficial.
7. ట్రబుల్షూటింగ్
| సమస్య | సాధ్యమైన కారణం | పరిష్కారం |
|---|---|---|
| High GPU Temperatures |
|
|
| Pump or Fan Not Spinning |
|
|
| అసాధారణ శబ్దాలు |
|
|
8. స్పెసిఫికేషన్లు
| ఫీచర్ | వివరాలు |
|---|---|
| బ్రాండ్ | ID-శీతలీకరణ |
| మోడల్ | FROSTFLOW 120 |
| శీతలీకరణ పద్ధతి | లిక్విడ్ |
| రేడియేటర్ పరిమాణం | 120మి.మీ |
| మెటీరియల్ | అల్యూమినియం, రాగి |
| పవర్ కనెక్టర్ రకం | 3-Pin (for Pump and Fan) |
| వాల్యూమ్tage | 12 వోల్ట్లు |
| వాట్tage | 2.4 వాట్స్ |
| శబ్దం స్థాయి | 26.4 డెసిబెల్స్ |
| గరిష్ట భ్రమణ వేగం | 1500 RPM |
| అనుకూల పరికరాలు | Desktop (GPU Cooler) |
| వస్తువు బరువు | 2.91 పౌండ్లు |
| ప్యాకేజీ కొలతలు | 11.3 x 7.9 x 5.8 అంగుళాలు |
9. వారంటీ మరియు మద్దతు
For warranty information, technical support, or to report missing/damaged parts, please contact ID-COOLING customer service. Refer to the product packaging or the official ID-COOLING webసంప్రదింపు వివరాల కోసం సైట్.
ID-COOLING Official Webసైట్: www.idcooling.com