1. పరిచయం
ఆర్టిలరీ హార్నెట్ 3D ప్రింటర్ యూజర్ మాన్యువల్కు స్వాగతం. ఈ గైడ్ మీ కొత్త 3D ప్రింటర్ను సెటప్ చేయడం, ఆపరేట్ చేయడం, నిర్వహించడం మరియు ట్రబుల్షూటింగ్ కోసం సమగ్ర సూచనలను అందిస్తుంది. ఆర్టిలరీ హార్నెట్ వాడుకలో సౌలభ్యం మరియు అధిక-నాణ్యత ముద్రణ కోసం రూపొందించబడింది, ఇది అత్యంత ముందస్తుగా అమర్చబడిన నిర్మాణం మరియు నమ్మకమైన పనితీరు కోసం అధునాతన భాగాలను కలిగి ఉంటుంది.
2. భద్రతా సమాచారం
- ప్రింటర్ను ఎల్లప్పుడూ బాగా వెంటిలేషన్ ఉన్న ప్రదేశంలో ఆపరేట్ చేయండి.
- ఆపరేషన్ సమయంలో కదిలే భాగాల నుండి చేతులు దూరంగా ఉంచండి.
- ప్రింటింగ్ సమయంలో లేదా తర్వాత వెంటనే హాట్ఎండ్ లేదా వేడిచేసిన బెడ్ను తాకవద్దు, ఎందుకంటే అవి అధిక ఉష్ణోగ్రతలకు చేరుకుంటాయి.
- విద్యుత్ సరఫరా సరిగ్గా కనెక్ట్ చేయబడిందని మరియు గ్రౌండింగ్ చేయబడిందని నిర్ధారించుకోండి.
- ఏదైనా నిర్వహణ లేదా శుభ్రపరిచే ముందు ప్రింటర్ను పవర్ సోర్స్ నుండి అన్ప్లగ్ చేయండి.
- ప్రింటర్ను మండే పదార్థాలు మరియు ప్రత్యక్ష సూర్యకాంతి నుండి దూరంగా ఉంచండి.
- ప్రింటర్ పనిచేస్తున్నప్పుడు పిల్లలు మరియు పెంపుడు జంతువులను పర్యవేక్షించండి.
3. ప్యాకేజీ విషయాలు
అన్బాక్సింగ్ తర్వాత, దయచేసి అన్ని భాగాలు ఉన్నాయని ధృవీకరించండి:
- ఆర్టిలరీ హార్నెట్ 3D ప్రింటర్ (95% ముందే అసెంబుల్ చేయబడింది)
- ఫిలమెంట్ స్పూల్ హోల్డర్
- పవర్ కేబుల్
- USB కేబుల్
- టూల్ కిట్ (రెంచెస్, స్క్రూడ్రైవర్లు, మొదలైనవి)
- పరీక్షతో SD కార్డ్ Fileలు మరియు సాఫ్ట్వేర్
- వినియోగదారు మాన్యువల్ (ఈ పత్రం)
- Sampలే ఫిలమెంట్
4. ఉత్పత్తి ముగిసిందిview
ఆర్టిలరీ హార్నెట్ దృఢమైన లోహ ఇంటిగ్రేటెడ్ నిర్మాణం మరియు సొగసైన డిజైన్ను కలిగి ఉంది. కీలక భాగాలు:

మూర్తి 4.1: మొత్తం view ఆర్టిలరీ హార్నెట్ 3D ప్రింటర్.
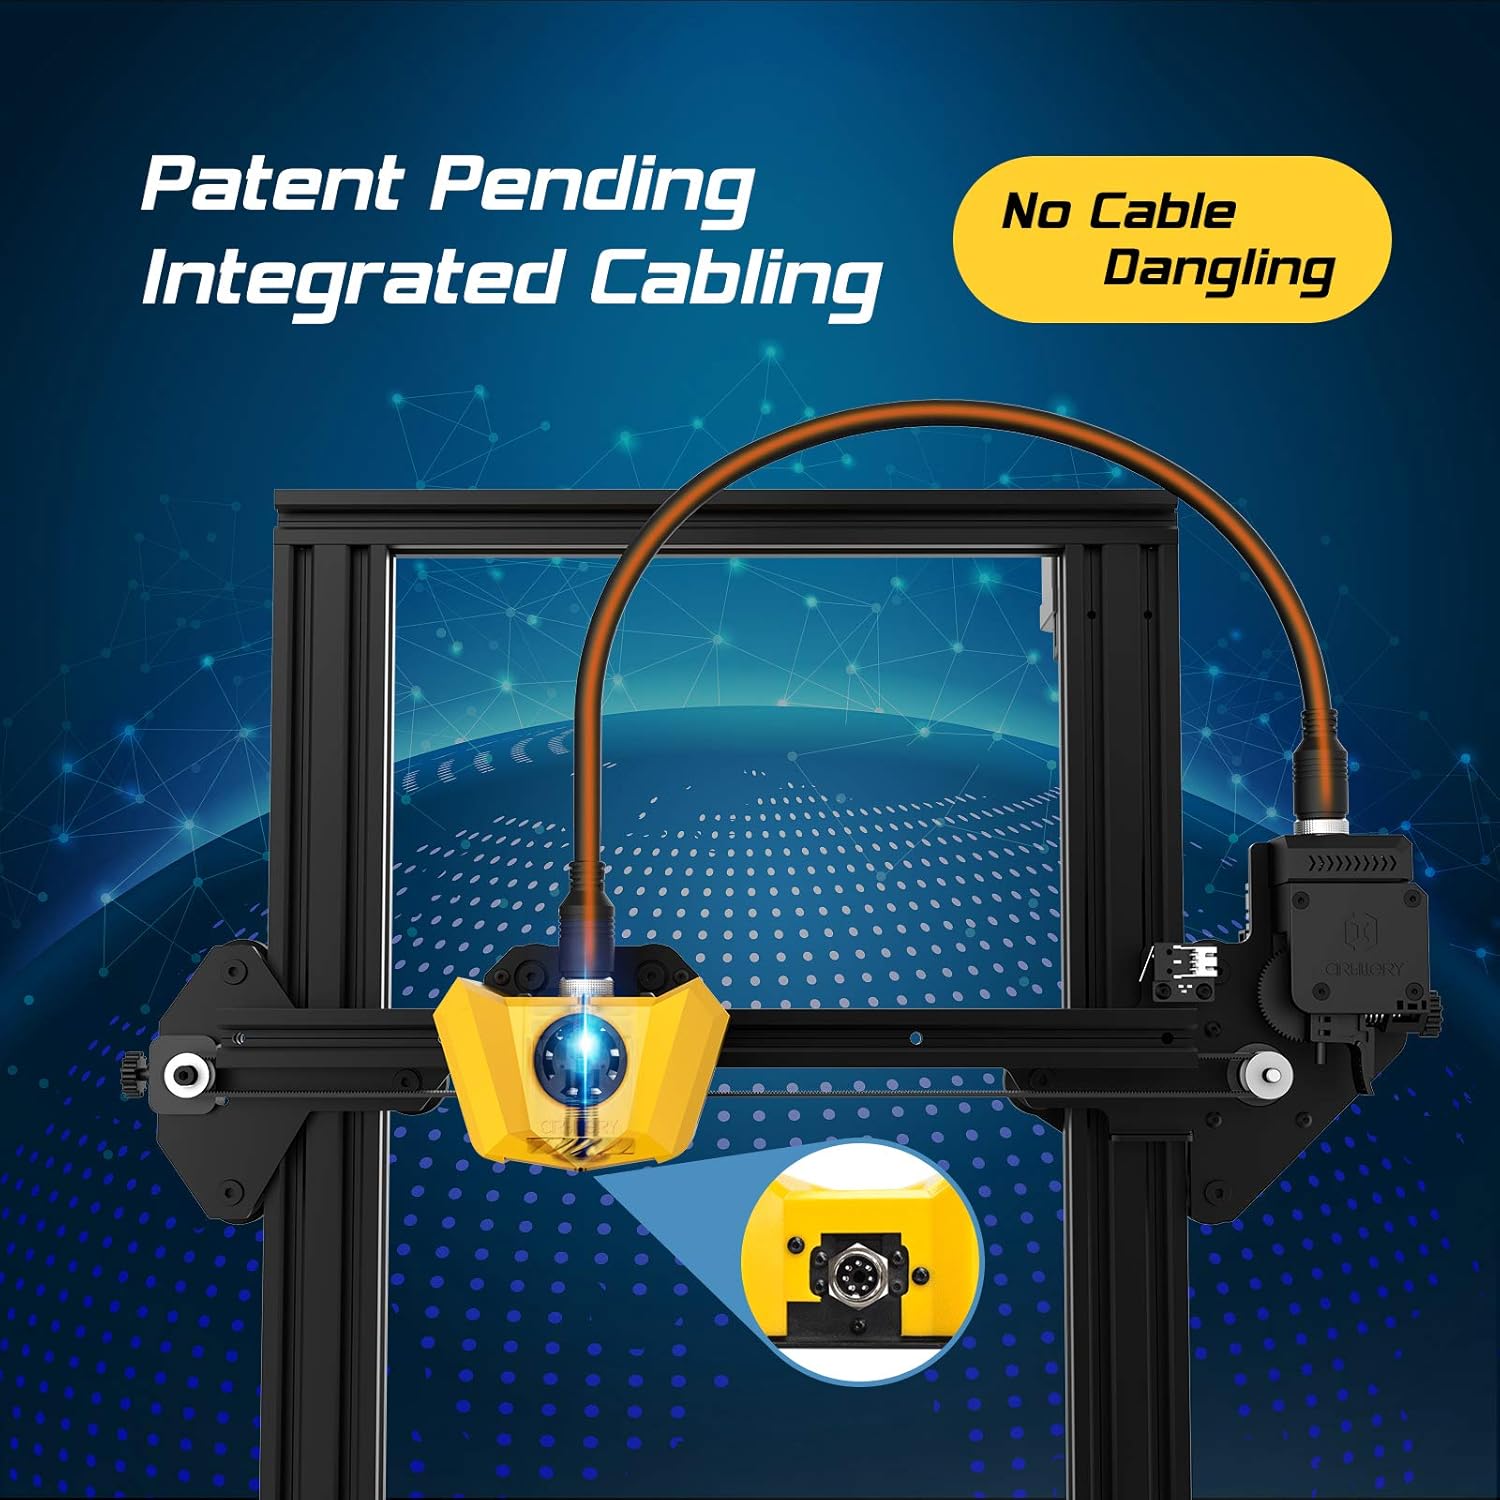
చిత్రం 4.2: కేబుల్ వేలాడకుండా నిరోధించడానికి మరియు చక్కని సెటప్ను నిర్ధారించడానికి రూపొందించబడిన వినూత్న ఇంటిగ్రేటెడ్ కేబులింగ్ వ్యవస్థ యొక్క క్లోజప్.

చిత్రం 4.3: స్థిరమైన మరియు ఖచ్చితమైన ఫిలమెంట్ ఫీడింగ్ మరియు ద్రవీభవనానికి కీలకమైన కొత్త టైటాన్ ఎక్స్ట్రూడర్ మరియు మాడ్యులర్ హోటెండ్ వివరాలు.

చిత్రం 4.4: మార్చగల డ్రైవర్లతో స్వీయ-అభివృద్ధి చేయబడిన 32-బిట్ మదర్బోర్డ్, అల్ట్రా-సైలెంట్ ప్రింటింగ్ మరియు మెరుగైన పనితీరును అనుమతిస్తుంది.

చిత్రం 4.5: సులభమైన ఆపరేషన్ కోసం వినియోగదారు-స్నేహపూర్వక వన్-కీ నాబ్ ఇంటిగ్రేటెడ్ స్విచ్ మరియు తక్కువ గురుత్వాకర్షణ కేంద్రాన్ని నిర్వహించడానికి రూపొందించబడిన సర్దుబాటు చేయగల ఫిలమెంట్ హోల్డర్.
5. సెటప్ గైడ్
ఆర్టిలరీ హార్నెట్ 95% ముందే అమర్చబడి, త్వరగా మరియు సులభంగా అమర్చడానికి రూపొందించబడింది. సెటప్ను పూర్తి చేయడానికి ఈ దశలను అనుసరించండి:

చిత్రం 5.1: ప్రింటర్ 95% ముందే అసెంబుల్ చేయబడి వస్తుంది, తుది సెటప్ కోసం కొన్ని నిమిషాలు మాత్రమే పడుతుంది.
- అన్ప్యాకింగ్: ప్యాకేజింగ్ నుండి అన్ని భాగాలను జాగ్రత్తగా తొలగించండి.
- గాంట్రీని అటాచ్ చేయండి: అందించిన స్క్రూలను ఉపయోగించి ముందుగా అమర్చిన గ్యాంట్రీని బేస్ యూనిట్కు భద్రపరచండి. ఇంటిగ్రేటెడ్ కేబులింగ్ ఈ కనెక్షన్ను సులభతరం చేస్తుంది.
- ఫిలమెంట్ హోల్డర్ను ఇన్స్టాల్ చేయండి: సర్దుబాటు చేయగల ఫిలమెంట్ హోల్డర్ను ప్రింటర్ వైపున ఉన్న నియమించబడిన స్లాట్కు మౌంట్ చేయండి.
- పవర్ కనెక్ట్ చేయండి: పవర్ కేబుల్ను ప్రింటర్లోకి ప్లగ్ చేసి, ఆపై గ్రౌండెడ్ ఎలక్ట్రికల్ అవుట్లెట్లోకి ప్లగ్ చేయండి.
- పవర్ ఆన్: బేస్ యూనిట్ వెనుక భాగంలో ఉన్న పవర్ స్విచ్ను తిప్పండి.
- బెడ్ లెవలింగ్: ప్రింటర్ డిస్ప్లేలో లేదా చేర్చబడిన SD కార్డ్లోని వివరణాత్మక గైడ్లో సూచించిన విధంగా మాన్యువల్ బెడ్ లెవలింగ్ను నిర్వహించండి. విజయవంతమైన ప్రింట్లకు సరైన బెడ్ లెవలింగ్ చాలా కీలకం.
6. ఆపరేటింగ్ సూచనలు
ఆర్టిలరీ హార్నెట్ను ఆపరేట్ చేయడం చాలా సులభం, దాని వన్-కీ నాబ్ ఇంటిగ్రేటెడ్ స్విచ్ మరియు సమర్థవంతమైన డిజైన్కు ధన్యవాదాలు.
6.1. ఫిలమెంట్ లోడింగ్
- మీ ఫిలమెంట్ స్పూల్ను సర్దుబాటు చేయగల ఫిలమెంట్ హోల్డర్పై ఉంచండి.
- ఫిలమెంట్ సెన్సార్ ద్వారా మరియు టైటాన్ ఎక్స్ట్రూడర్లోకి ఫిలమెంట్ను ఫీడ్ చేయండి.
- మీ ఫిలమెంట్ రకానికి తగిన ఉష్ణోగ్రతకు (ఉదా. PLA కోసం 200°C) హోటెండ్ను వేడి చేయండి.
- 'లోడ్ ఫిలమెంట్' ఎంపికను ఎంచుకోవడానికి వన్-కీ నాబ్ను ఉపయోగించండి. ఎక్స్ట్రూడర్ ఫిలమెంట్ను సజావుగా బయటకు వచ్చే వరకు హోటెండ్ ద్వారా స్వయంచాలకంగా లాగుతుంది.
6.2. ప్రింట్ ప్రారంభించడం
- స్లైసింగ్ సాఫ్ట్వేర్ (ఉదా. క్యూరా, ప్రూసా స్లైసర్) ఉపయోగించి మీ 3D మోడల్ను సిద్ధం చేసి, దానిని G-కోడ్గా సేవ్ చేయండి. file SD కార్డ్కి.
- ప్రింటర్ యొక్క SD కార్డ్ స్లాట్లో SD కార్డ్ను చొప్పించండి.
- 'SD నుండి ప్రింట్' చేయడానికి వన్-కీ నాబ్ని ఉపయోగించి మెనూను నావిగేట్ చేయండి మరియు మీకు కావలసిన G-కోడ్ను ఎంచుకోండి. file.
- ప్రింటర్ స్వయంచాలకంగా బెడ్ మరియు హోటెండ్ను వేడి చేస్తుంది, తర్వాత ప్రింటింగ్ ప్రారంభిస్తుంది. స్వీయ-అభివృద్ధి చేసిన 32-బిట్ మదర్బోర్డ్ ప్రింటింగ్ సమయంలో అల్ట్రా-సైలెంట్ ఆపరేషన్ను నిర్ధారిస్తుంది.
వీడియో 6.1: ఒక అధికారిview ఆర్టిలరీ హార్నెట్ 3D ప్రింటర్, షోక్asing దాని లక్షణాలు మరియు ముద్రణ సామర్థ్యాలు.
7. నిర్వహణ
క్రమం తప్పకుండా నిర్వహణ మీ ఆర్టిలరీ హార్నెట్ 3D ప్రింటర్ యొక్క ఉత్తమ పనితీరు మరియు దీర్ఘాయువును నిర్ధారిస్తుంది.
- ప్రింట్ బెడ్ శుభ్రం చేయండి: ప్రతి ప్రింట్ తర్వాత, భవిష్యత్ ప్రింట్లకు మంచి అతుక్కొని ఉండేలా ప్రింట్ బెడ్ను ఐసోప్రొపైల్ ఆల్కహాల్తో శుభ్రం చేయండి.
- నాజిల్ క్లీనింగ్: నాజిల్ మూసుకుపోకుండా ఉండటానికి కాలానుగుణంగా శుభ్రం చేయండి. ఏదైనా అవశేషాలను తొలగించడానికి ఇత్తడి బ్రష్ లేదా సూదిని ఉపయోగించండి.
- లూబ్రికేట్ Z-యాక్సిస్ రాడ్: మృదువైన నిలువు కదలికను నిర్ధారించడానికి ప్రతి కొన్ని నెలలకు ఒకసారి Z-యాక్సిస్ లెడ్ స్క్రూకు కొద్ది మొత్తంలో లిథియం గ్రీజు లేదా అలాంటి లూబ్రికెంట్ను పూయండి.
- చెక్ బెల్టులు: X మరియు Y యాక్సిస్ బెల్ట్లు సరైన టెన్షన్ మరియు ధరించడం కోసం తనిఖీ చేయండి. చాలా వదులుగా ఉంటే సర్దుబాటు చేయండి లేదా దెబ్బతిన్నట్లయితే భర్తీ చేయండి.
- ఫ్యాన్ క్లీనింగ్: వేడెక్కకుండా నిరోధించడానికి కూలింగ్ ఫ్యాన్లు (హాటెండ్, పార్ట్ కూలింగ్ మరియు విద్యుత్ సరఫరా కోసం) దుమ్ము మరియు శిధిలాలు లేకుండా ఉండేలా చూసుకోండి.
8. ట్రబుల్షూటింగ్
ఇక్కడ కొన్ని సాధారణ సమస్యలు మరియు వాటి సంభావ్య పరిష్కారాలు ఉన్నాయి:
| సమస్య | సాధ్యమైన కారణం | పరిష్కారం |
|---|---|---|
| ఫిలమెంట్ తినకపోవడం | నాజిల్ మూసుకుపోవడం, చిక్కుబడ్డ ఫిలమెంట్, తప్పుగా లోడ్ అవడం. | నాజిల్ను క్లియర్ చేయండి, ఫిలమెంట్ను విప్పండి, ఫిలమెంట్ను తిరిగి లోడ్ చేయండి, అది బౌడెన్ ట్యూబ్లోకి సరిగ్గా ప్రవేశిస్తుందని జాగ్రత్తగా చూసుకోండి. |
| ప్రింట్ అతుక్కోవడం లేదు / ప్రింట్లను ఎత్తడం | సమతలం లేని మంచం, మురికి ముద్రణ ఉపరితలం, తప్పు బెడ్ ఉష్ణోగ్రత. | ప్రింట్ బెడ్ను తిరిగి లెవెల్ చేయండి, ఐసోప్రొపైల్ ఆల్కహాల్తో ప్రింట్ ఉపరితలాన్ని శుభ్రం చేయండి, స్లైసింగ్ సాఫ్ట్వేర్లో బెడ్ ఉష్ణోగ్రతను సర్దుబాటు చేయండి. |
| పొరలు వేయడంలో సమస్యలు / ముద్రణ నాణ్యత సరిగా లేదు | వదులైన బెల్టులు, Z-అక్షం తడబాటు, తప్పు ముద్రణ సెట్టింగ్లు. | X/Y బెల్ట్లను తనిఖీ చేసి బిగించండి, Z-కప్లర్ సురక్షితంగా ఉందని నిర్ధారించుకోండి, ప్రింట్ వేగం మరియు ఉష్ణోగ్రత సెట్టింగ్లను సర్దుబాటు చేయండి. |
| ప్రింటర్ శబ్దం చేస్తోంది | వదులుగా ఉన్న భాగాలు, అరిగిపోయిన బేరింగ్లు. | అన్ని స్క్రూలు మరియు కనెక్షన్లను తనిఖీ చేయండి. 32-బిట్ మదర్బోర్డ్ నిశ్శబ్ద ఆపరేషన్ కోసం రూపొందించబడింది, కానీ బాహ్య కారకాలు శబ్దానికి కారణమవుతాయి. |
| వేడెక్కడం సమస్యలు | కూలింగ్ ఫ్యాన్లు బ్లాక్ అయ్యాయి. | అన్ని కూలింగ్ ఫ్యాన్లు అడ్డంకులు లేకుండా మరియు సరిగ్గా పనిచేస్తున్నాయని నిర్ధారించుకోండి. |
9. స్పెసిఫికేషన్లు
| ఫీచర్ | స్పెసిఫికేషన్ |
|---|---|
| బిల్డ్ వాల్యూమ్ | 220 x 220 x 250 మిమీ |
| ప్రింటర్ కొలతలు | 17.1"డి x 16.1"వా x 18.5"హ |
| వస్తువు బరువు | 17.6 పౌండ్లు (8 కిలోగ్రాములు) |
| మెటీరియల్ | అల్యూమినియం |
| రంగు | పసుపు |
| ఎక్స్ట్రూడర్ రకం | కొత్త టైటాన్ ఎక్స్ట్రూడర్ |
| హోటెండ్ రకం | మాడ్యులర్ హోటెండ్ |
| మదర్బోర్డు | మార్చగల డ్రైవర్లతో 32-బిట్ |
| అసెంబ్లీ | 95% ముందే అసెంబుల్ చేయబడింది |

చిత్రం 9.1: ఆర్టిలరీ హార్నెట్ 3D ప్రింటర్ యొక్క కొలతలు.
10. వారంటీ మరియు మద్దతు
వారంటీ సమాచారం మరియు సాంకేతిక మద్దతు కోసం, దయచేసి మీ ఉత్పత్తితో చేర్చబడిన డాక్యుమెంటేషన్ను చూడండి లేదా అధికారిక ఆర్టిలరీని సందర్శించండి. webసైట్. ఏవైనా వారంటీ క్లెయిమ్లకు కొనుగోలు రుజువుగా మీ కొనుగోలు రసీదును ఉంచండి.


