1. పరిచయం
The BlackVue DR900X-2CH is a high-performance 4K UHD cloud dashcam system designed to provide comprehensive vehicle surveillance. It features a front 4K UHD camera and a Full HD rear camera, built-in Wi-Fi, GPS, and advanced parking mode capabilities. This manual provides detailed instructions for installation, operation, and maintenance, ensuring you get the most out of your BlackVue dashcam.
2. ప్యాకేజీ విషయాలు
ఇన్స్టాలేషన్ ప్రారంభించే ముందు, దయచేసి మీ ప్యాకేజీలో అన్ని భాగాలు ఉన్నాయని ధృవీకరించండి:
- BlackVue DR900X-2CH Front Camera Unit
- BlackVue Rear Camera
- Rear Camera Connection Cable (Coaxial)
- Power Cord (Cigarette Lighter Plug)
- Hardwiring Power Cable
- మైక్రో SD కార్డ్ (32GB చేర్చబడింది)
- మైక్రో SD కార్డ్ రీడర్
- Cable Clips (8ea)
- ప్రై టూల్
- Spare Mounting Tape
- త్వరిత ప్రారంభ గైడ్

3. ఉత్పత్తి ముగిసిందిview
Familiarize yourself with the main components and their functions.
3.1 Front Camera Unit

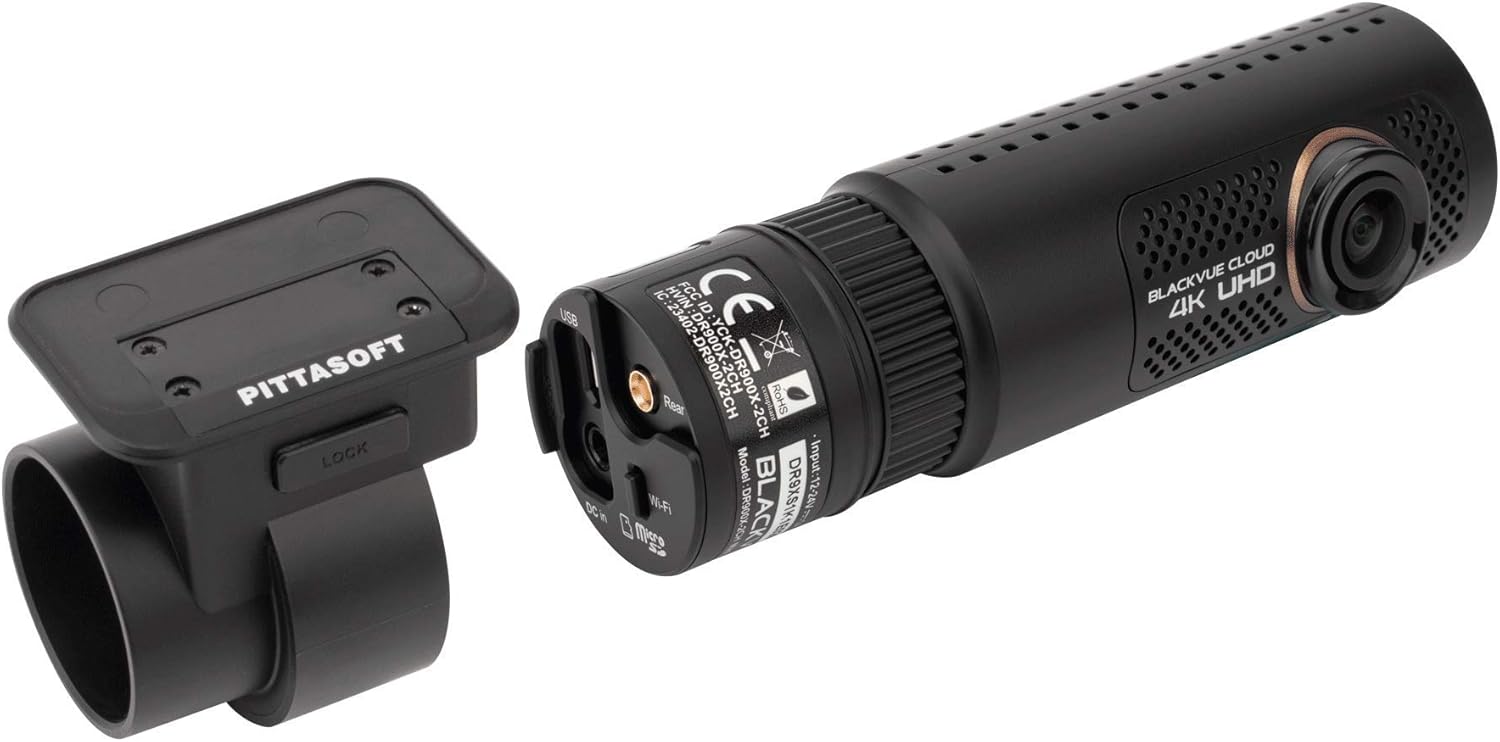
The front camera unit houses the main processor, 4K UHD lens, Wi-Fi module, GPS, and various ports for power, the rear camera, and the optional LTE module.

- Front Lens: 4K UHD వీడియోను సంగ్రహిస్తుంది.
- Wi-Fi బటన్: Activates/deactivates Wi-Fi.
- మైక్రో SD కార్డ్ స్లాట్: మెమరీ కార్డ్ చొప్పించడం కోసం.
- DC లో: పవర్ ఇన్పుట్ పోర్ట్.
- వెనుక కెమెరా పోర్ట్: Connects the rear camera via coaxial cable.
- USB పోర్ట్: For connecting the optional CM100 LTE module.
- స్పీకర్: For voice prompts.
- LED సూచికలు: Indicate recording status, GPS, Wi-Fi, and LTE connectivity.
3.2 Rear Camera Unit
The rear camera unit captures Full HD video and connects to the front unit via the provided coaxial cable.
4. సెటప్ మరియు ఇన్స్టాలేషన్
Proper installation is crucial for optimal performance and video quality.
4.1 మైక్రో SD కార్డ్ చొప్పించడం
- డాష్క్యామ్ పవర్ ఆఫ్ చేయబడిందని నిర్ధారించుకోండి.
- Open the microSD card cover on the side of the front camera unit.
- Insert the microSD card into the slot with the gold contacts facing away from the lens until it clicks into place.
- కవర్ను సురక్షితంగా మూసివేయండి.
4.2 డాష్క్యామ్ను మౌంట్ చేయడం
- మీరు డాష్క్యామ్ను అమర్చాలనుకుంటున్న విండ్షీల్డ్ ప్రాంతాన్ని శుభ్రం చేయండి. దుమ్ము మరియు గ్రీజు లేకుండా చూసుకోండి.
- Attach the front camera unit to its mounting bracket.
- Peel off the protective film from the mounting tape on the bracket.
- Mount the front camera on the center of your windshield, ideally behind the rearview అద్దం, అది మీకు ఆటంకం కలిగించకుండా చూసుకోవాలి view. Press firmly for 30 seconds.
- Mount the rear camera on the rear windshield, ensuring the lens has a clear view.

4.3 Wiring the Dashcam
There are two primary wiring options:
- సిగరెట్ లైటర్ పవర్ కేబుల్: For basic operation, plug the power cable into your vehicle's cigarette lighter socket. The dashcam will power on/off with the vehicle's ignition.
- Hardwiring Power Cable: For advanced parking mode functionality, connect the hardwiring cable to your vehicle's fuse box. This allows the dashcam to continue recording when the vehicle is parked. Refer to your vehicle's manual for fuse box location and proper connection points (ACC, BATT+, GND). It is recommended to have this installed by a professional if you are unsure.
- Connect the power cable to the DC In port on the front camera unit.
- Route the power cable along the edge of the windshield and down to the power source, using the provided cable clips and pry tool to tuck the cable neatly.
- Connect the rear camera cable to the Rear Camera port on the front unit.
- Route the rear camera cable to the rear of the vehicle, ensuring it does not interfere with airbags or other vehicle components.
4.4 Initial Setup with BlackVue App
- Download the BlackVue App from your smartphone's app store (iOS/Android).
- డాష్క్యామ్పై పవర్.
- On your smartphone, go to Wi-Fi settings and connect to the BlackVue dashcam's Wi-Fi network (SSID: DR900X-2CH-XXXXXX, Password: blackvue).
- Open the BlackVue App. The app will automatically connect to the dashcam.
- Follow the on-screen prompts to set up basic settings like time zone, recording quality, and parking mode options.
5. Operating the Dashcam
Understand the various recording modes and features of your BlackVue dashcam.
5.1 రికార్డింగ్ మోడ్లు
- సాధారణ రికార్డింగ్: Continuous recording while driving. Files are saved in segments and overwritten oldest first when the microSD card is full.
- ఈవెంట్ రికార్డింగ్: Triggered by impacts detected by the G-sensor or manual events (e.g., pressing the touch sensor on the dashcam). These fileలు తిరిగి వ్రాయబడకుండా రక్షించబడతాయి.
- Parking Mode Recording: Activated when the vehicle's ignition is turned off (requires hardwiring). Records only when motion or impact is detected, conserving power and storage.
5.2 LED Indicators and Voice Prompts
The dashcam provides visual and audible cues for its status:
- REC LED: Indicates recording status (e.g., solid for normal, blinking for event).
- GPS LED: Solid when GPS signal is acquired.
- Wi-Fi LED: Solid when Wi-Fi is active, blinking during connection.
- LTE LED: (If CM100 LTE module is connected) Indicates LTE connectivity.
- వాయిస్ ప్రాంప్ట్లు: The dashcam will announce status changes, such as
సంబంధిత పత్రాలు - DR900X-2CH

BlackVue SIM Activation Guide for Cloud Connectivity
A comprehensive guide to activating your SIM card and connecting your BlackVue dashcam to the BlackVue Cloud service. This guide covers finding connectivity details, creating an account, registering your dashcam, and the SIM activation process for enhanced features.
BlackVue DR970X Box-2CH Plus Series Installation and User Guide
A comprehensive guide to installing and using the BlackVue DR970X Box-2CH Plus Series dashcam, including rear camera setup, GNSS module installation, connectivity module installation, power cable options, and app usage.
BlackVue DR900X Plus Quick Start Guide
Comprehensive quick start guide for the BlackVue DR900X Plus dashcam, covering installation, setup, playback, cloud connectivity, product specifications, and warranty information.
BlackVue DR650S-2CH IR User Guide: Infrared Interior Camera
User guide for the BlackVue DR650S-2CH IR dashcam, detailing its features, specifications, and installation instructions for the infrared interior camera.
BlackVue DR770X-2CH IR LTE Dashcam: Component Overview
పైగా వివరంగాview of the components and features of the BlackVue DR770X-2CH IR LTE dual-channel dashcam, including front, rear, and internal camera parts, LEDs, ports, and mounting instructions.
BlackVue Wi-Fi 2CH DR550GW-2CH User Manual
User manual for the BlackVue Wi-Fi 2CH DR550GW-2CH car dashcam by PittaSoft Co., Ltd., detailing installation, operation, features, and troubleshooting for enhanced driving safety.