పరిచయం
ధన్యవాదాలు, ధన్యవాదాలు.asing the Edillas Digital Alarm Clock. This manual provides detailed instructions for setting up, operating, and maintaining your new alarm clock. Please read this manual thoroughly before use to ensure proper function and to maximize your product experience. Keep this manual for future reference.

మూర్తి 1: Edillas Digital Alarm Clock. This image shows the front view of the alarm clock with its large green LED display, reflecting a room in its mirror surface.
ప్యాకేజీ విషయాలు
అన్బాక్సింగ్ సమయంలో అన్ని వస్తువులు ఉన్నాయని నిర్ధారించుకోవడానికి దయచేసి ప్యాకేజీ కంటెంట్లను తనిఖీ చేయండి:
- 1 x Edillas Digital Alarm Clock
- 1 x USB కేబుల్ (పవర్ కోసం)
- 1 x యూజర్ మాన్యువల్ (ఈ పత్రం)
- 1 x Backup Battery (for time memory)
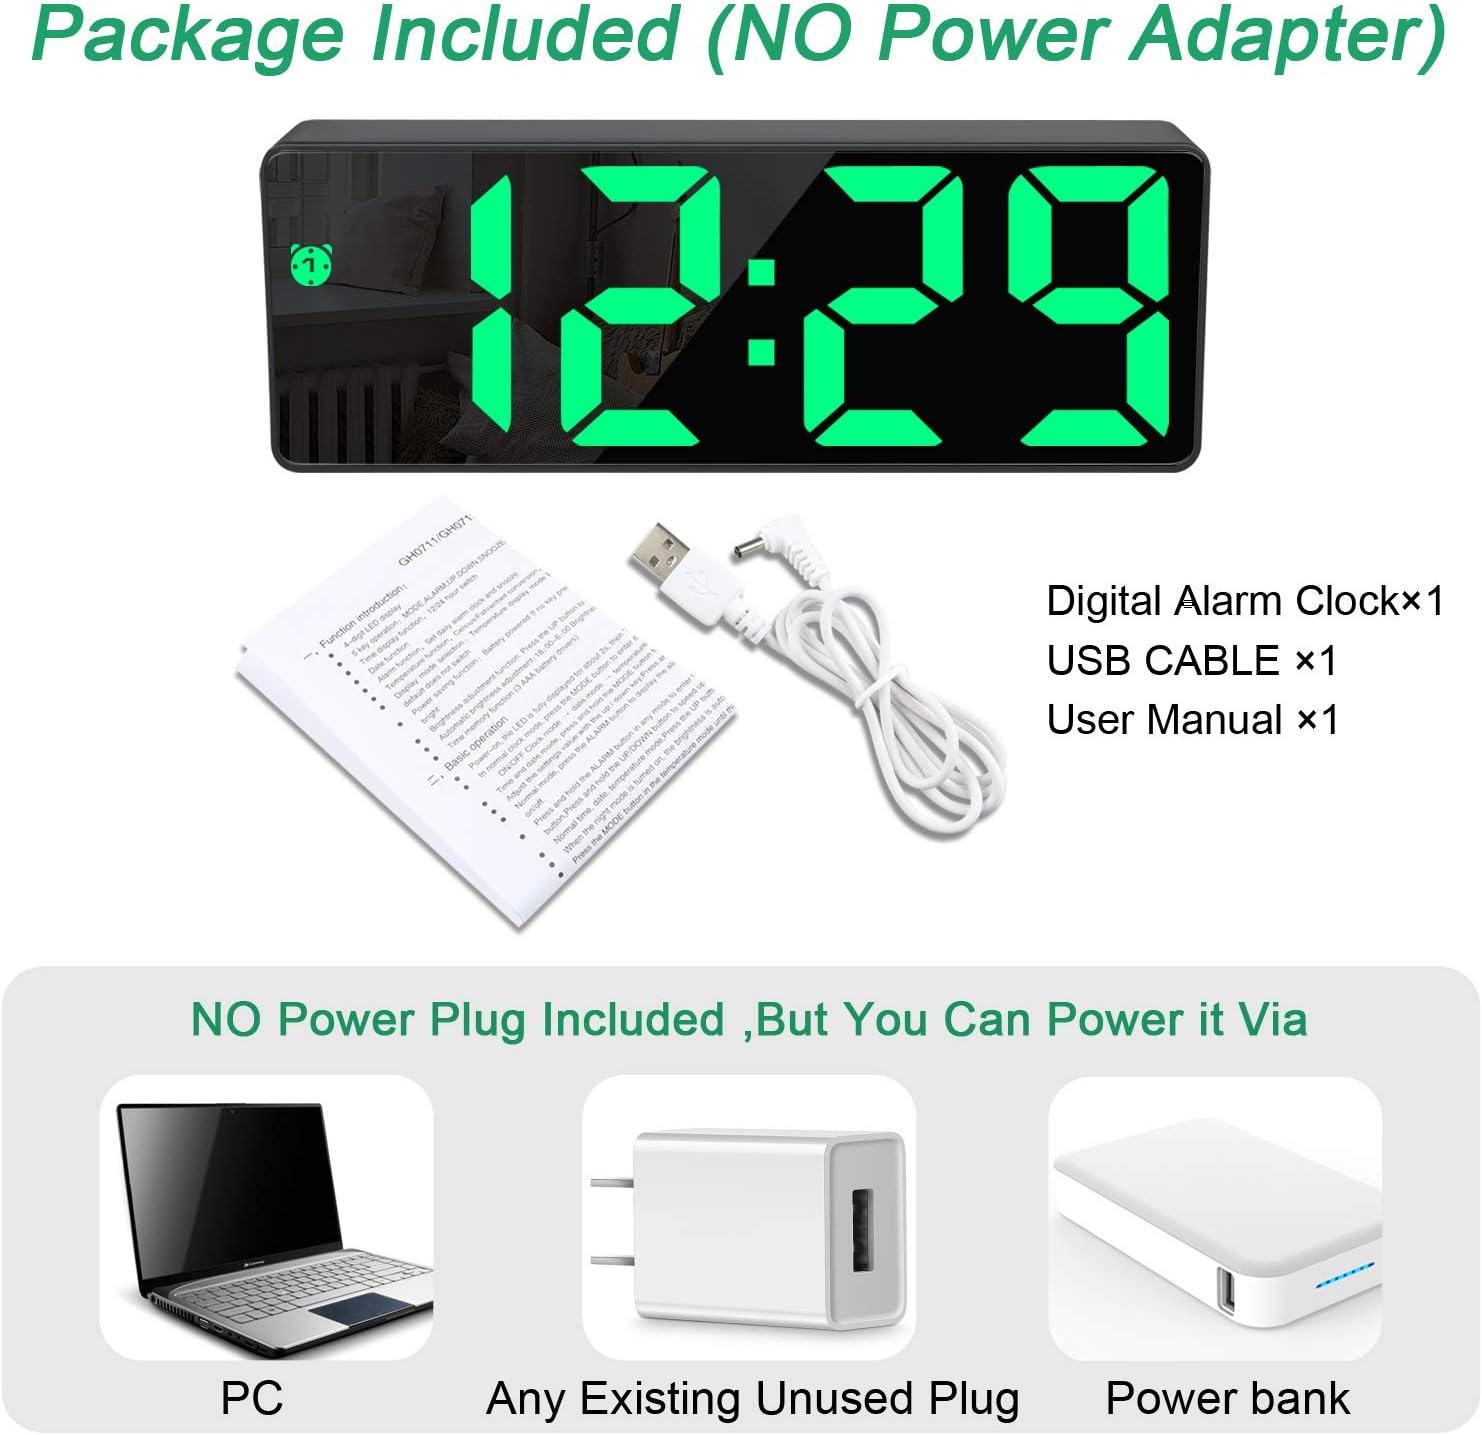
మూర్తి 2: Package Contents. This image displays the Edillas Digital Alarm Clock along with its included USB cable, user manual, and a backup battery, indicating that a power adapter is not included.
ఉత్పత్తి లక్షణాలు
The Edillas Digital Alarm Clock offers several key features designed for convenience and functionality:
- పెద్ద LED డిస్ప్లే: Clear and easy-to-read time display.
- అద్దం ఉపరితలం: Functions as a mirror when not actively displaying time.
- సర్దుబాటు ప్రకాశం: Three levels of brightness can be set manually or automatically.
- ద్వంద్వ అలారాలు: రెండు స్వతంత్ర అలారాలను సెట్ చేయండి.
- తాత్కాలికంగా ఆపివేయి ఫంక్షన్: Provides an additional 5 minutes of sleep.
- External Storage Battery: Built-in battery retains time settings during power outages.
- USB ఛార్జింగ్ కనెక్షన్: Powers the clock via a standard USB port.

మూర్తి 3: Rear Panel and Features. This image shows the back of the alarm clock with labeled buttons for SNOOZE/LIGHT, UP, DOWN, MODE, and ALARM, along with the DC 5V power input. Icons below illustrate features like alarm, power saving, memory, adjustable brightness, time display, night display, temperature display, date display, and snooze function.
సెటప్
1. పవర్ కనెక్షన్
- Connect the provided USB cable to the DC 5V port on the back of the alarm clock.
- Plug the other end of the USB cable into a compatible USB power source (e.g., a computer, a USB wall adapter, or a power bank). గమనిక: A power adapter is not included.
- గడియారం ఆన్ చేయబడిందని సూచిస్తూ డిస్ప్లే వెలిగిపోతుంది.
మూర్తి 4: Powering the Device. This image illustrates different ways to power the alarm clock using the USB cable, including connecting to a PC, a standard USB wall plug, or a portable power bank.
2. Initial Setup (Backup Battery)
The clock includes a backup battery to maintain time settings during power interruptions. Ensure it is properly installed or activated if required. The built-in storage battery ensures that you do not need to reset the time when the main power is disconnected.
ఆపరేటింగ్ సూచనలు
1. Time Setting (12/24 Hour Format)
- నొక్కండి మరియు పట్టుకోండి మోడ్ సమయ సెట్టింగ్ మోడ్లోకి ప్రవేశించడానికి 3 సెకన్ల పాటు బటన్ను నొక్కండి. గంట అంకెలు ఫ్లాష్ అవుతాయి.
- ఉపయోగించండి UP or డౌన్ గంటను సర్దుబాటు చేయడానికి బటన్లు.
- నొక్కండి మోడ్ నిమిషం సెట్టింగ్కి మారడానికి మళ్ళీ బటన్ నొక్కండి. నిమిషం అంకెలు ఫ్లాష్ అవుతాయి.
- ఉపయోగించండి UP or డౌన్ నిమిషం సర్దుబాటు చేయడానికి బటన్లు.
- నొక్కండి మోడ్ button a third time to select 12-hour or 24-hour format. Use UP or డౌన్ టోగుల్ చేయడానికి.
- నొక్కండి మోడ్ button once more to confirm and exit time setting.
2. Alarm Setting (Dual Alarms)
This clock supports setting two independent alarms (AL1 and AL2).
- నొక్కండి అలారం button once to display AL1.
- నొక్కండి మరియు పట్టుకోండి అలారం button for 3 seconds to enter AL1 setting mode. The hour digits will flash.
- ఉపయోగించండి UP or డౌన్ అలారం గంటను సర్దుబాటు చేయడానికి బటన్లు.
- నొక్కండి అలారం నిమిషం సెట్టింగ్కి మారడానికి మళ్ళీ బటన్ నొక్కండి. నిమిషం అంకెలు ఫ్లాష్ అవుతాయి.
- ఉపయోగించండి UP or డౌన్ అలారం నిమిషం సర్దుబాటు చేయడానికి బటన్లు.
- నొక్కండి అలారం button once more to confirm AL1 setting.
- To set AL2, repeat steps 1-6, pressing అలారం twice initially to display AL2 before holding it.
- అలారంను యాక్టివేట్/డియాక్టివేట్ చేయడానికి, అలారం button repeatedly until the desired alarm icon (AL1 or AL2) appears or disappears on the display.
3. స్నూజ్ ఫంక్షన్
When an alarm sounds:
- నొక్కండి SNOOZE / LIGHT button to activate the snooze function. The alarm will pause for 5 minutes and then sound again.
- To stop the alarm completely, press any other button on the back of the clock.
- The snooze duration can be adjusted from 5 to 60 minutes (refer to advanced settings if available, otherwise assume default 5 minutes as per product description).

మూర్తి 5: Snooze Mode. This image shows the alarm clock displaying time with a 'Zz' icon, indicating snooze mode is active, with a hand reaching towards the top button.
4. ప్రకాశం సర్దుబాటు
The display brightness can be adjusted manually or automatically.
- మాన్యువల్ సర్దుబాటు: నొక్కండి SNOOZE / LIGHT button (when not in alarm mode) to cycle through 3 brightness levels (High, Medium, Low).
- ఆటోమేటిక్ డిమ్మింగ్: The clock can automatically dim the LED light during night hours to protect your eyes and save energy. Refer to the full user manual for specific instructions on activating or adjusting automatic dimming if this feature is not immediately apparent.

మూర్తి 6: Brightness Levels. This image shows two identical alarm clocks side-by-side, demonstrating the difference between a brighter and a dimmer display setting, illustrating the adjustable brightness feature.
5. Mirror Surface Function
The front surface of the alarm clock is designed with a mirror finish. When the display is off or at its lowest brightness, it can function as a reflective mirror.

మూర్తి 7: Mirror Functionality. This image highlights the mirror surface of the alarm clock, showing a reflection and various makeup items placed in front of it, demonstrating its dual use.
నిర్వహణ
- శుభ్రపరచడం: Use a soft, dry cloth to clean the mirror surface and body of the clock. Avoid abrasive cleaners or solvents.
- శక్తి: Always use the provided USB cable for power. Ensure the power source is 5V DC.
- పర్యావరణం: Keep the clock away from direct sunlight, high temperatures, and high humidity.
- బ్యాకప్ బ్యాటరీ: The internal backup battery is designed for memory retention. If the clock frequently loses time settings after power disconnection, the backup battery may need replacement (consult customer support if this occurs).
ట్రబుల్షూటింగ్
| సమస్య | సాధ్యమైన కారణం | పరిష్కారం |
|---|---|---|
| గడియార ప్రదర్శన ఆఫ్లో ఉంది. | విద్యుత్ సరఫరా లేదా వదులుగా కనెక్షన్ లేదు. | Ensure USB cable is securely connected to both the clock and a working power source. |
| అలారం మోగడం లేదు. | అలారం యాక్టివేట్ కాలేదు లేదా తప్పుగా సెట్ చేయబడలేదు. | Verify alarm time and ensure the alarm icon (AL1/AL2) is displayed. |
| Time settings are lost after power disconnection. | Backup battery issue. | Ensure the backup battery is correctly installed. If issues persist, the backup battery may need replacement. |
| డిస్ప్లే చాలా మసకగా/ప్రకాశవంతంగా ఉంది. | ప్రకాశం స్థాయిని సర్దుబాటు చేయాలి. | నొక్కండి SNOOZE / LIGHT బ్రైట్నెస్ స్థాయిల ద్వారా సైకిల్ చేయడానికి బటన్. |
స్పెసిఫికేషన్లు
| ఫీచర్ | వివరాలు |
|---|---|
| బ్రాండ్ | ఎడిల్లాస్ |
| మోడల్ | B08F9WMNDH |
| ప్రదర్శన రకం | డిజిటల్ LED |
| మెటీరియల్ | పాలీ వినైల్ క్లోరైడ్ (PVC) |
| ఉత్పత్తి కొలతలు | 16 x 2.5 x 6 సెం.మీ |
| వస్తువు బరువు | 160 గ్రా |
| శక్తి మూలం | USB (DC 5V), Battery Powered (for memory) |
| ప్రత్యేక లక్షణాలు | Adjustable Brightness, Dual Alarms, Large Display, Snooze Function, Mirror Surface |
| సమయ ఆకృతి | 12/24 గంట |
| స్నూజ్ వ్యవధి | 5-60 minutes (default 5 minutes) |
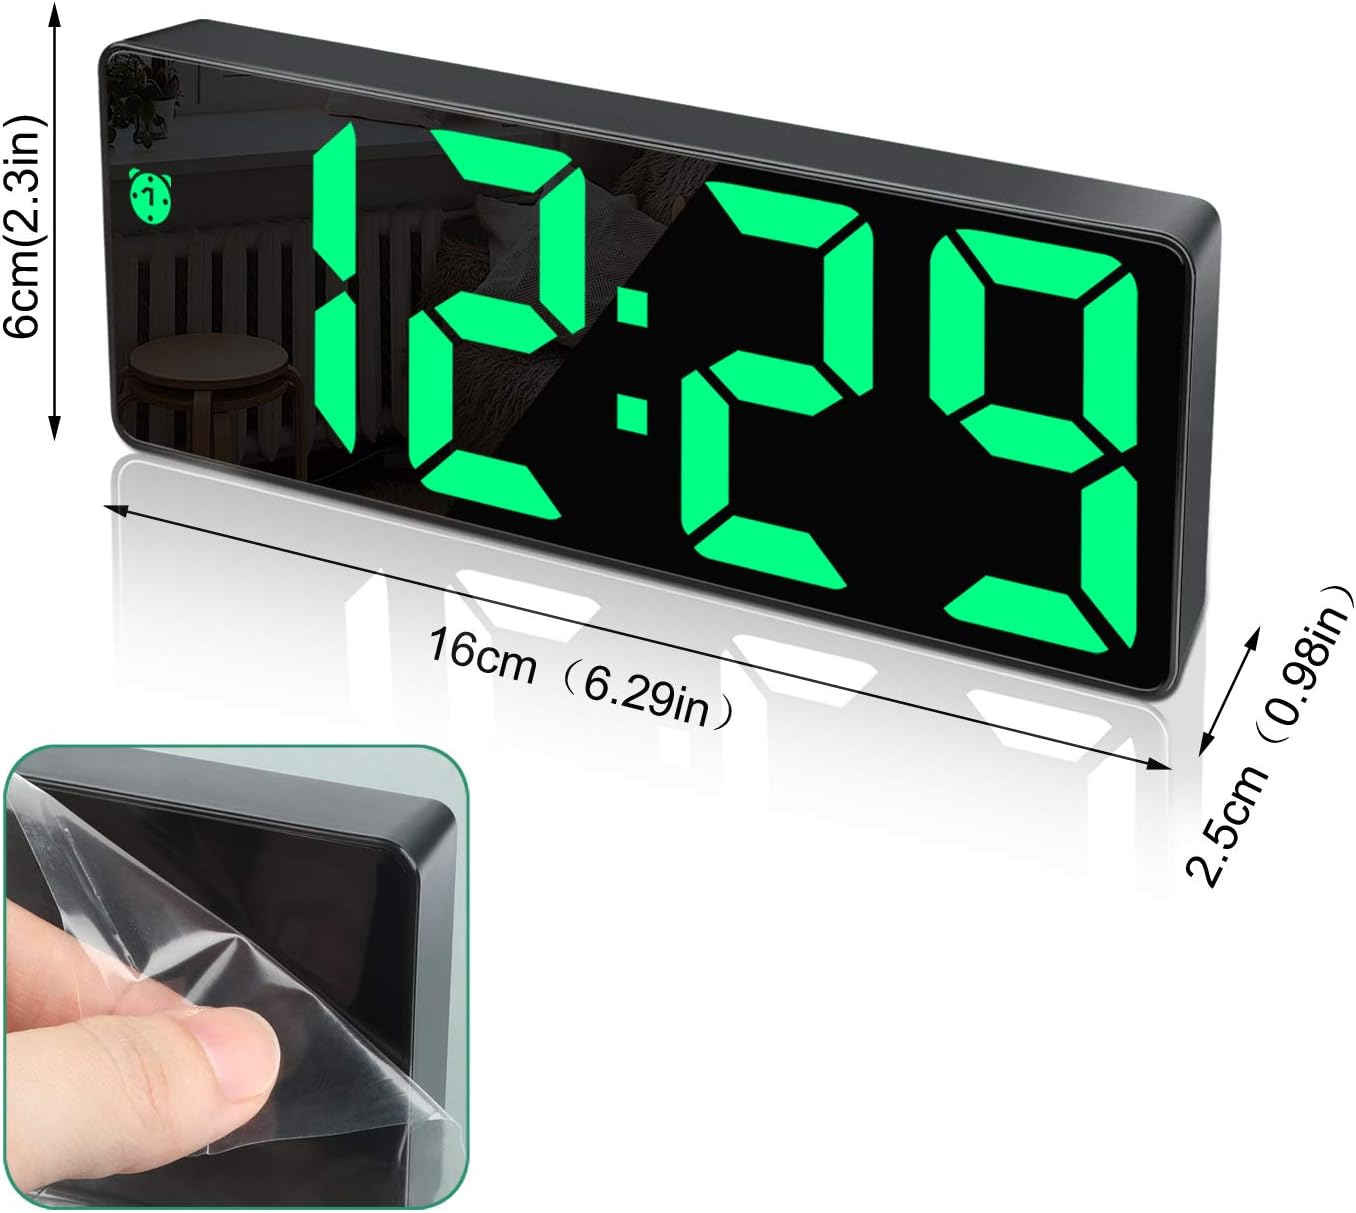
మూర్తి 8: Product Dimensions. This image provides a visual representation of the alarm clock's dimensions, showing its length (16cm / 6.29in), height (6cm / 2.3in), and depth (2.5cm / 0.98in).
వారంటీ మరియు మద్దతు
For warranty information or technical support, please refer to the contact details provided with your purchase documentation or visit the official Edillas webసైట్. ఏవైనా వారంటీ క్లెయిమ్ల కోసం దయచేసి మీ కొనుగోలు రుజువును ఉంచుకోండి.
