1. పరిచయం
This manual provides detailed instructions for the safe and efficient operation of your Airiton UV-S9 Plus 8W Dual Band Ham Radio. Please read this manual thoroughly before using the device to ensure proper functionality and to prevent damage.
2. ఉత్పత్తి ముగిసిందిview మరియు భాగాలు
The Airiton UV-S9 Plus is a high-power, dual-band handheld two-way radio designed for reliable communication. Familiarize yourself with the radio's components and included accessories.

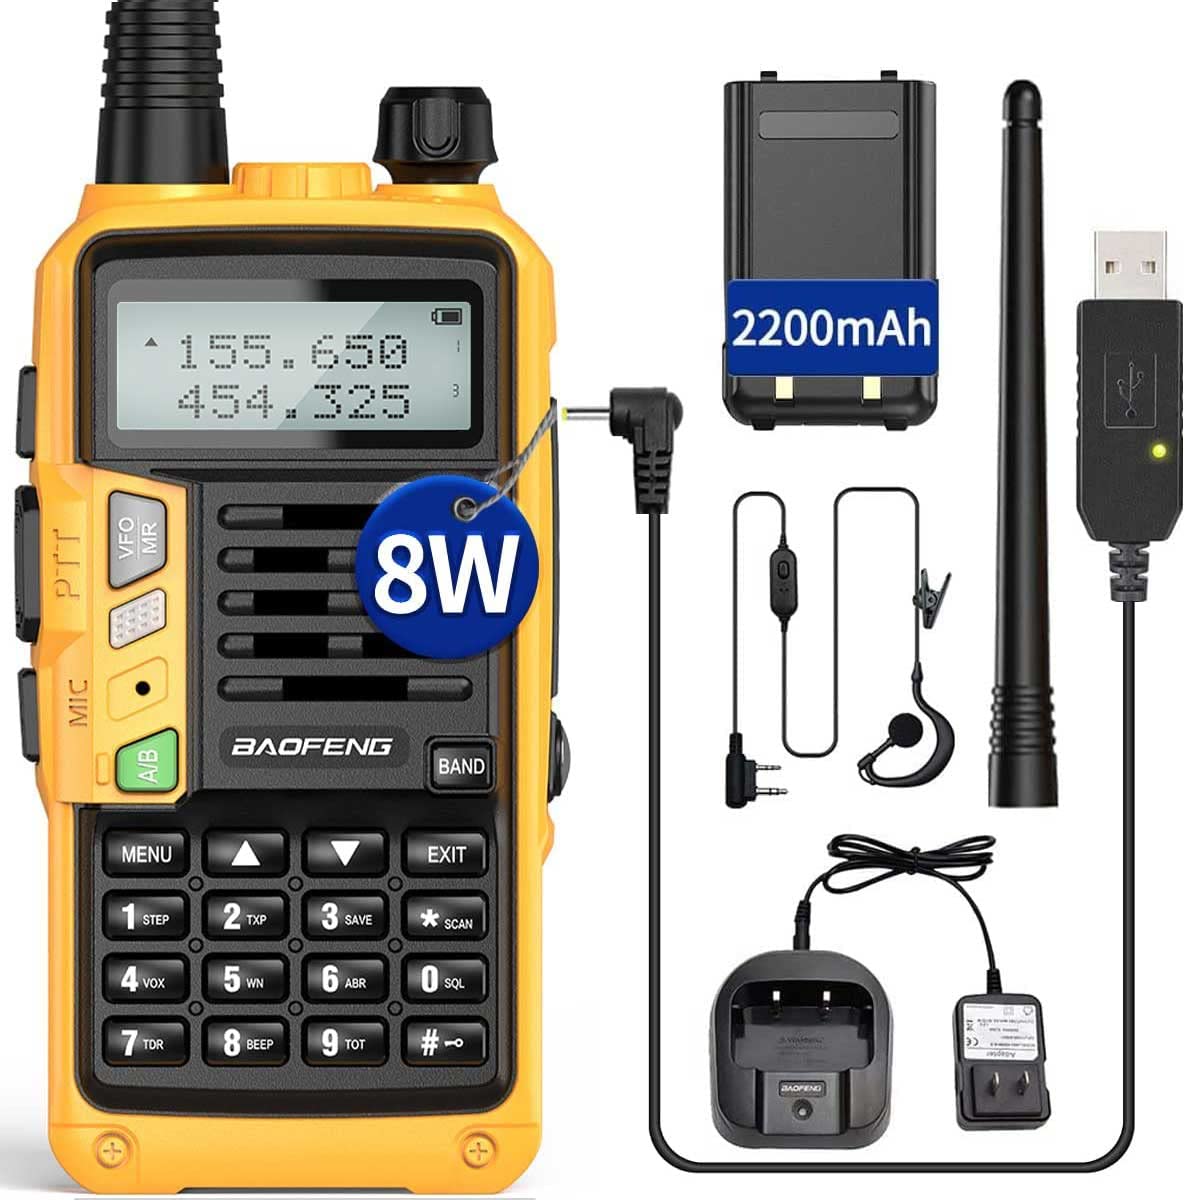
మూర్తి 2.1: Airiton UV-S9 Plus radio, antenna, battery, belt clip, charging adapter, USB charging cable, user manual, and earpiece.
మూర్తి 2.2: Key features of the Airiton UV-S9 Plus, including the USB Charge Port, Call Key, Accessory Jack, and MONI Key.

మూర్తి 2.3: వివరంగా views highlighting the radio's top controls (volume/power knob, flashlight), side buttons (PTT, Call, MONI), and accessory ports.
3. సెటప్
3.1 బ్యాటరీ ఇన్స్టాలేషన్
- రేడియో పవర్ ఆఫ్ చేయబడిందని నిర్ధారించుకోండి.
- రేడియో వెనుక భాగంలో ఉన్న పొడవైన కమ్మీలతో బ్యాటరీ ప్యాక్ను సమలేఖనం చేయండి.
- బ్యాటరీ ప్యాక్ దాని స్థానంలో క్లిక్ అయ్యే వరకు పైకి స్లైడ్ చేయండి.
- To remove, press the release latch (if present) and slide the battery downwards.
3.2 యాంటెన్నా అటాచ్మెంట్
- రేడియో పైభాగంలో ఉన్న కనెక్టర్లోకి యాంటెన్నాను సవ్యదిశలో స్క్రూ చేయండి, అది వేలితో బిగుతుగా ఉండే వరకు. అతిగా బిగించవద్దు.
3.3 బ్యాటరీని ఛార్జ్ చేయడం
The UV-S9 Plus supports both cradle charging and direct USB charging.
మూర్తి 3.1: The radio connected to the USB charging cable for convenient power replenishment.
- ఛార్జింగ్ rad యల ఉపయోగించి: Place the radio with the battery installed into the charging cradle. Ensure the charging contacts align. The indicator light on the cradle will show charging status.
- Using the USB Charging Cable: Connect the USB charging cable to the radio's USB charge port and to a compatible USB power source (e.g., computer, USB wall adapter). The radio's display or an indicator light will show charging status.
పూర్తిగా ఛార్జ్ చేయడానికి సాధారణంగా చాలా గంటలు పడుతుంది. బ్యాటరీని ఎక్కువగా ఛార్జ్ చేయవద్దు.
4. ఆపరేటింగ్ సూచనలు
4.1 పవర్ ఆన్/ఆఫ్ మరియు వాల్యూమ్ నియంత్రణ
- పవర్ ఆన్: Rotate the volume/power knob (top of the radio) clockwise until you hear a click and the display illuminates.
- పవర్ ఆఫ్: Rotate the volume/power knob counter-clockwise until you hear a click and the display turns off.
- వాల్యూమ్ సర్దుబాటు: Rotate the volume/power knob to adjust the audio output level.
4.2 Channel Selection (VFO/MR Mode)
The radio operates in two main modes: VFO (Variable Frequency Oscillator) for direct frequency input and MR (Memory Recall) for stored channels.
- నొక్కండి VFO/MR button to switch between VFO and MR modes.
- In VFO mode, use the keypad to enter frequencies directly or the UP/DOWN arrow keys to scan.
- In MR mode, use the UP/DOWN arrow keys to select a stored channel.
4.3 ప్రసారం మరియు స్వీకరించడం
- స్వీకరిస్తోంది: When the radio is on and tuned to an active frequency, it will automatically receive incoming transmissions.
- ప్రసారం: నొక్కండి మరియు పట్టుకోండి PTT (పుష్-టు-టాక్) button on the side of the radio. Speak clearly into the microphone. Release the PTT button to stop transmitting and return to receive mode.
4.4 కీప్యాడ్ విధులు
- మెను: Enters the menu system for advanced settings.
- పైకి/క్రిందికి బాణాలు: Navigate menu options, change frequencies/channels.
- బయటకి దారి: ప్రస్తుత మెను లేదా ఫంక్షన్ నుండి నిష్క్రమిస్తుంది.
- Numbers (0-9): Used for direct frequency input or selecting menu options.
- #: Activates/deactivates keypad lock (long press).
- *: Activates/deactivates the FM radio (long press).
4.5 Programming the Radio
The Airiton UV-S9 Plus can be programmed using dedicated software and a programming cable. This allows for customization of channels, frequencies, and other advanced settings.
వీడియో 4.1: This video demonstrates the process of connecting the Airiton UV-S9 Plus to a computer using a programming cable, installing the necessary software, reading data from the radio, editing frequencies, and writing the updated frequencies back to the radio. It provides a visual guide for channel programming.
సాధారణ ప్రోగ్రామింగ్ దశలు:
- Obtain the correct 2-pin programming cable for the UV-S9 Plus.
- Download and install the UV-S9 Plus programming software on your computer. It is recommended to temporarily disable antivirus software during installation to prevent interference.
- Connect the programming cable to the radio's accessory jack and to a USB port on your computer.
- Open the programming software and identify the correct COM port for the cable.
- Read the current configuration from the radio.
- Edit frequencies, channel names, and other parameters as needed within the software.
- Write the new configuration to the radio.
5. నిర్వహణ
5.1 శుభ్రపరచడం
రేడియో ఉపరితలాన్ని మృదువైన, d తో తుడవండి.amp cloth. Do not use harsh chemicals or abrasive cleaners. Ensure all ports are dry before use.
5.2 బ్యాటరీ సంరక్షణ
బ్యాటరీ జీవితకాలాన్ని పొడిగించడానికి, బ్యాటరీని తరచుగా పూర్తిగా డిశ్చార్జ్ చేయకుండా ఉండండి. రేడియో మరియు బ్యాటరీని ఎక్కువసేపు ఉపయోగించనప్పుడు చల్లని, పొడి ప్రదేశంలో నిల్వ చేయండి. బ్యాటరీని తీవ్రమైన ఉష్ణోగ్రతలకు గురిచేయవద్దు.
5.3 నిల్వ
When storing the radio for a long time, remove the battery. Store the radio in a dry, dust-free environment away from direct sunlight and extreme temperatures.
6. ట్రబుల్షూటింగ్
- Radio not powering on: Check if the battery is properly installed and charged. Ensure the volume/power knob is turned clockwise.
- Cannot transmit or receive: Verify the antenna is securely attached. Check the selected frequency or channel. Ensure the battery has sufficient charge.
- పేలవమైన ఆడియో నాణ్యత: Adjust the volume. Check the antenna connection. Ensure you are within range of other radios or repeaters.
- ప్రోగ్రామింగ్ సమస్యలు: Confirm the programming cable is correctly connected and the drivers are installed. Ensure the correct COM port is selected in the software. Temporarily disable antivirus software if it interferes with the programming process.
7. స్పెసిఫికేషన్లు
| ఫీచర్ | స్పెసిఫికేషన్ |
|---|---|
| బ్రాండ్ | Airiton |
| మోడల్ | UV-S9 Plus |
| వస్తువు బరువు | 15.8 ఔన్సులు |
| ప్యాకేజీ కొలతలు | 7.24 x 4.37 x 4.09 అంగుళాలు |
| వాల్యూమ్tage | 7.4 వోల్ట్లు |
| కనెక్టివిటీ టెక్నాలజీ | USB |
| ట్యూనర్ టెక్నాలజీ | UHF, VHF |
| శక్తి మూలం | బ్యాటరీ ఆధారితమైనది |
| రేడియో బ్యాండ్లకు మద్దతు ఉంది | 2-బ్యాండ్ |
| తయారీదారు | Airiton |
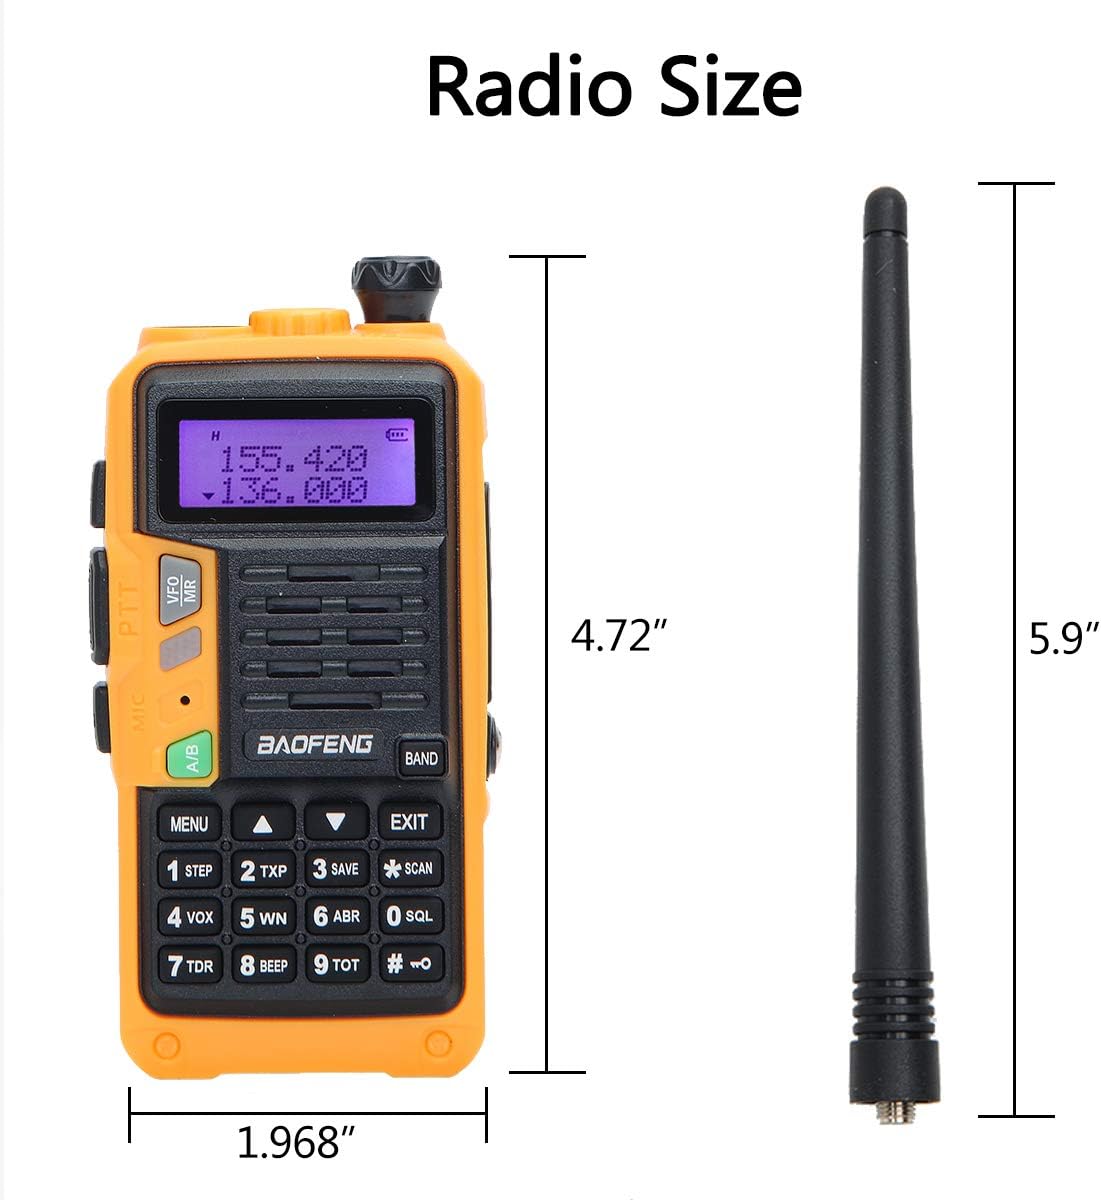
మూర్తి 7.1: Physical dimensions of the Airiton UV-S9 Plus radio and its antenna.
8. వారంటీ మరియు మద్దతు
వారంటీ సమాచారం మరియు సాంకేతిక మద్దతు కోసం, దయచేసి మీ కొనుగోలుతో చేర్చబడిన డాక్యుమెంటేషన్ను చూడండి లేదా తయారీదారుని నేరుగా సంప్రదించండి. వారంటీ క్లెయిమ్ల కోసం మీ కొనుగోలు రుజువును ఉంచండి.


